
Looking for a yarn?


Comments / Questions (5)
![]() Chau wrote:
Chau wrote:
Kan I lave en video af denne opskrift? HØJRE ARM: Armen hækles rundt og startes med en lm-række øverste på armen. Hækl 5 lm (4 lm + 1 lm at vende med ) med cerise. Vend arb og hækl tilbage således: 1.OMG: Hækl 1 fm i hver lm fra 2.lm fra nålen = 4 fm. Fortsæt at hækle 3 fm på den anden side af lm-rækken = 7 fm totalt. Derefter hækles der rundt med 1 fm i hver fm totalt 28 fm. OBS: Du behøver ikke bruge mærketråd her.
11.02.2020 - 20:16DROPS Design answered:
Hej Chau, Det skriver vi på ønskelisten :)
18.02.2020 - 09:01
![]() Chau wrote:
Chau wrote:
Jeg har så svært ved at forstå opskriften på armene som "vend arb og hækl tilbage således: 1.OMG: Hækl 1 fm i hver lm fra 2.lm fra nålen = 4 fm. Fortsæt at hækle 3 fm på den anden side af lm-rækken = 7 fm totalt." Jeg ved ikke, hvad jeg skal gøre. Kan I forklare, hvad I mener med "Vend arb og hækl tilbage" efter man har lavet 5 lm (4 lm + 1 lm til at vende med)?
15.06.2019 - 11:28DROPS Design answered:
Hej, du hækler på begge sider af den lille luftmaskerække, altså først den ene vej, så den anden vej i samme luftmaskerække. Nu kan du hækle rundt (ovalt) i alle masker. God fornøjelse!
09.07.2019 - 12:03
![]() Lorna Gerhardt wrote:
Lorna Gerhardt wrote:
Do you ship to the United States? And I think the little pink and red cat should be called "Lucky Cat" with the waving paw and red color (s)he is very good luck.
13.01.2019 - 12:26DROPS Design answered:
Dear Lorna. Here's a list of active DROPS stores in your country: https://www.garnstudio.com/findastore.php?id=17&cid=17
13.01.2019 - 18:12
![]() DROPS Design wrote:
DROPS Design wrote:
Det var en feil i den svenske oppskriften. Det er nå rettet på.
14.09.2011 - 07:59
![]() Emmy wrote:
Emmy wrote:
Kropp: VARV 3: *1 fm i nästa fm, 2 fm i nästa fm*. Upprepa *-* v runt = 24 fm. VARV 4: *1 fm i de nästföljande 12 fm, 2 fm i nästa fm*. Upprepa *-* v runt = 32 fm. Det är väl ganska omöjligt att få 32 fm där? Man kan bara göra den kombinationen 1 gång för sen har man bara 11 fm kvar från föregående varv kvar, och då har man bara plussat på 1 fm. Hjärnbry, snälla förklara! MVH Emmy
13.09.2011 - 22:43
|
|
DROPS Extra 0-756 |
|
|
|
|
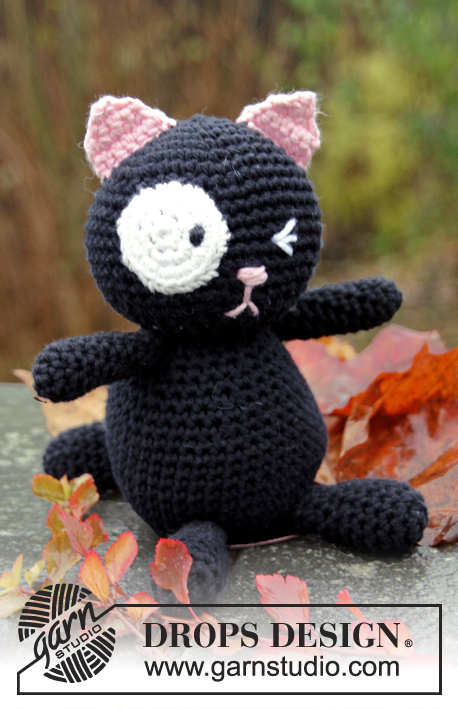
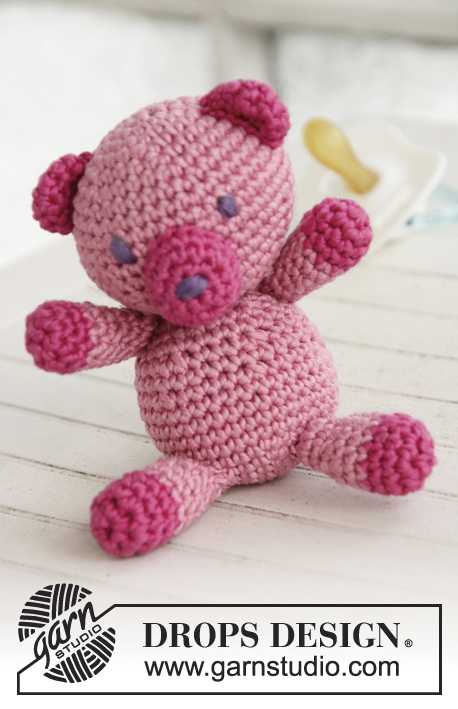
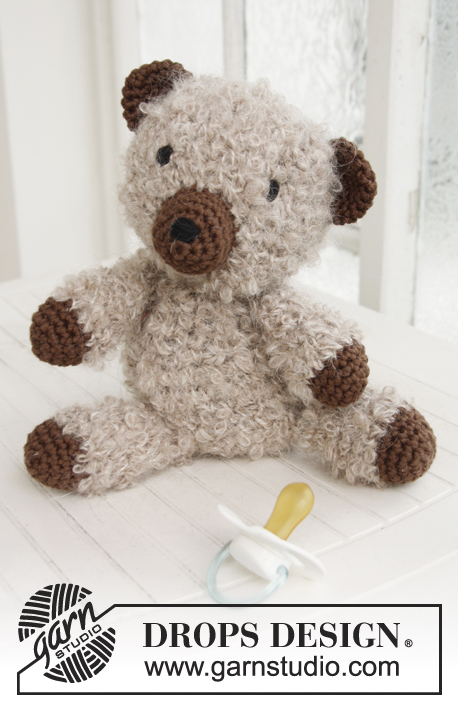
Crochet DROPS cat in "BabyMerino".
DROPS Extra 0-756 |
|
|
CROCHET INFO: MAGIC CIRCLE: When piece is worked in the round, start with this technique to avoid a hole in the middle (instead of a chain ring): Hold the yarn end and wind the yarn one time around the index finger to make a loop. Hold the loop with left thumb and middle finger, place the thread over left index finger. Insert hook through the loop, make a YO and pull thread through loop, ch 1, then work sc around the loop. When the desired no of sc have been reached, pull the yarn end to tighten the loop. Fasten the yarn end on the back side. Continue to work in the round in a circle. WORK IN THE ROUND IN A CIRCLE: After last sc on the round, continue to next round with 1 sc in next sc (= first sc on next round). NOTE: Insert a marker between last sc and first sc on the round, move the marker upwards. WORKING 2 SC TOG: * Insert hook in next st, get thread *, repeat from *-* one more time, make a YO and pull thread through all 3 sts on hook. COLOR CHANGE: To get a nice color change work last sc on round as follows: Insert hook in last st, get thread, make a YO with the new color and pull it through all sts on hook. Continue on to next round. -------------------------------------------------------- HEAD: Start at the top of the head by making a Magic circle - READ EXPLANATION ABOVE - with Baby Merino cerise. ROUND 1: Work 6 sc in the magic circle. READ WORK IN THE ROUND IN A CIRCLE. ROUND 2: Work 2 sc in every sc = 12 sc. ROUND 3: * 1 sc in next sc, 2 sc in next sc *, repeat from *-* the rest of the round = 18 sc. ROUND 4: * 1 sc in the next 2 sc, 2 sc in next sc *, repeat from *-* the rest of the round = 24 sc. ROUND 5: * 1 sc in the next 3 sc, 2 sc in next sc *, repeat from *-* the rest of the round = 30 sc. ROUND 6: * 1 sc in the next 4 sc, 2 sc in next sc *, repeat from *-* the rest of the round = 36 sc. ROUND 7-10: Work 1 sc in every sc = 36 sc on the round. ROUND 11: * 1 sc in the next 4 sc, then crochet the next 2 sc tog * - See explanation above, repeat from *-* the rest of the round = 30 sc. ROUND 12: * 1 sc in the next 3 sc, then crochet the next 2 sc tog *, repeat from *-* the rest of the round = 24 sc. ROUND 13: * 1 sc in the next 2 sc, then crochet the next 2 sc tog *, repeat from *-* the rest of the round = 18 sc. ROUND 14: * 1 sc in the next 4 sc, then crochet the next 2 sc tog *, repeat from *-* the rest of the round = 15 sc. Fasten off. Fill the head with some poly stuffing. BODY: Start at the bottom of body by making a magic circle in cerise. ROUND 1: Work 8 sc in the magic circle. ROUND 2: Work 2 sc in every sc = 16 sc. ROUND 3: * 1 sc in next sc, 2 sc in next sc *, repeat from *-* the rest of the round = 24 sc. ROUND 4: * 1 sc in the next 2 sc, 2 sc in next sc *, repeat from *-* the rest of the round = 32 sc. ROUND 5: * 1 sc in the next 3 sc, 2 sc in next sc *, repeat from *-* the rest of the round = 40 sc. ROUND 6-9: Work 1 sc in every sc = 40 sc on the round. ROUND 10: * 1 sc in the next 2 sc, then crochet the next 2 sc tog *, repeat from *-* the rest of the round = 30 sc. ROUND 11: Work 1 sc in every sc = 30 sc. ROUND 12: * 1 sc in next sc, then crochet the next 2 sc tog *, repeat from *-* the rest of the round = 20 sc. ROUND 13: Work 1 sc in every sc = 20 sc. Cut the thread and keep 30 cm / 12" for assembly. Fill the body with some poly stuffing. LEG: Start by making a magic circle in red. ROUND 1: Work 8 sc in the magic circle. ROUND 2: * 1 sc in the next 3 sc, 2 sc in next sc *, repeat from *-* one more time = 10 sc. ROUND 3-4: Work 1 sc in every sc = 10 sc on the round. Switch to cerise in last sc on round 4 - READ COLOR CHANGE. ROUND 5: Work 1 sc in every sc = 10 sc. ROUND 6: * 1 sc in the next 3 sc, then crochet the next 2 sc tog *, repeat from *-* one more time = 8 sc. ROUND 7-9: Work 1 sc in every sc = 8 sc on the round. Cut the thread and keep 20 cm / 8" for assembly. Work another leg the same way. Fill the legs with some poly stuffing. RIGHT ARM: Worked in the round. Start with a ch row at the top of arm. Ch 5 (= 4 ch + 1 ch to turn with) with cerise. Turn piece and work back as follows: ROUND 1: Work 1 sc in every ch starting in 2nd ch on hook = 4 sc. Continue to work 3 sc on the other side of ch row = a total of 7 sc. Then work in the round with 1 sc in every sc = a total of 28 sc. NOTE: There is no need for a marker here. Cut the thread and keep 20 cm / 8" for assembly (do not fill with poly stuffing). LEFT ARM: Work as right arm but work a total of 35 sc after 1st round (left arm is longer than right arm). Cut the thread and keep 20 cm / 8" for assembly (do not fill with poly stuffing). EAR: Start by making a magic circle in red. ROUND 1: Work 3 sc in the magic circle. ROUND 2: Work 2 sc in every sc = 6 sc. ROUND 3: * 1 sc in next sc, 2 sc in next sc *, repeat from *-* the rest of the round = 9 sc. ROUND 4: Work 1 sc in every sc = 9 sc. Cut the thread and keep 20 cm / 8" for assembly. Work another ear the same way (do not fill with poly stuffing). TAIL: Start by making a magic circle in red. ROUND 1: Work 4 sc in the magic circle. ROUND 2: Work 2 sc in every sc = 8 sc. ROUND 3-4: Work 1 sc in every sc = 8 sc on the round. Cut the thread and keep 20 cm / 8" for assembly (do not fill with poly stuffing). ASSEMBLY: Work a ch row of approx. 10 cm / 4" with 1 strand Baby Merino red and 1 thread Glitter red. Fold the ch row double and fasten the ends in mid at the top of the head. Sew the ears flat on the head. Sew eyes with some left-over black yarn and sew nose and mouth with Baby Merino red. Sew the head on to body with neat little stitches. Sew 2 stitches at the tip of the arms with red (= paws). Sew the arms and legs on to body with neat little stitches. Sew the tail to the back of body. Sew a pattern on the stomach - see picture for suggestion. Work another ch row of approx. 20 cm / 8" with 1 strand Baby Merino red and 1 thread Glitter red. Tie it around the neck with a bow in the back. |
|
Have you finished this pattern?Tag your pictures with #dropspattern or submit them to the #dropsfan gallery. Do you need help with this pattern?You'll find 7 tutorial videos, a Comments/Questions area and more by visiting the pattern on garnstudio.com. © 1982-2025 DROPS Design A/S. We reserve all rights. This document, including all its sub-sections, has copyrights. Read more about what you can do with our patterns at the bottom of each pattern on our site. |


With over 40 years in knitting and crochet design, DROPS Design offers one of the most extensive collections of free patterns on the internet - translated to 17 languages. As of today we count 314 catalogs and 11822 patterns - 11812 of which are translated into English (US/in).
We work hard to bring you the best knitting and crochet have to offer, inspiration and advice as well as great quality yarns at incredible prices! Would you like to use our patterns for other than personal use? You can read what you are allowed to do in the Copyright text at the bottom of all our patterns. Happy crafting!
Post a comment to pattern DROPS Extra 0-756
We would love to hear what you have to say about this pattern!
If you want to leave a question, please make sure you select the correct category in the form below, to speed up the answering process. Required fields are marked *.