
Looking for a yarn?


Comments / Questions (53)
![]() Suzanne wrote:
Suzanne wrote:
For the sleeve, if I cast on 46 sts then increase and decrease, will I end up with 36 sts to cast off?
01.02.2025 - 18:55DROPS Design answered:
Dear Suzanne, first you increase 20 stitches to 66, then you cast off 6 stitches and 8 stitches and then 1 stitch in each side approx. (depending on your gauge; that's why we don't indicate a specific number) 8 times (so 16 in total). In this case you would have 36 stitches left. Then cast off 8 stitches and 6 stitches once again. So you have 22 stitches left to cast off. Happy knitting!
02.02.2025 - 21:10
![]() Jocelyne HERY wrote:
Jocelyne HERY wrote:
Quand vous indiquez taille M (moyen) à quoi cela correspond t-il en taille française 38 ou 40 par exemple modèle femme . Merci de votre réponse. Cordialement.
15.01.2025 - 13:41
![]() Paula Shorten wrote:
Paula Shorten wrote:
Is there any one thicker yarn you can use to knit this instead of using several different yarns at once?
11.09.2024 - 22:27DROPS Design answered:
Dear Paula, yes, of course, you can knit this with one thicker yarn (insted of the several thinner starnds held together). If you look through our Yarngroup C, you can find some that has similar knitting gauge that is given for this piece. Please, always do a gauge swatch, wash and block it, and then recalculate stitchnumbers if necessary. Happy Knitting!
12.09.2024 - 03:00
![]() Paula Shorten wrote:
Paula Shorten wrote:
Is there any one thicker yarn you can use to knit this instead of using several different yarns at once?
11.09.2024 - 12:59
![]() Kirsti wrote:
Kirsti wrote:
Strikker denne boleroen til bryllup. Stemmer det at det skal felles så få masker til armhull? Eller er det noe feil i oppskriften?
22.02.2024 - 09:59DROPS Design answered:
Hej Kirsti, ja det stemmer, da vil du få de mål du kan se i måleskitsen nederst i opskriften :)
23.02.2024 - 10:37
![]() Jan Daly wrote:
Jan Daly wrote:
What sewing technique would you recommend for assembling the Simply Red bolero? This is the first garment I have made in moss stitch. Thank you
23.01.2024 - 11:19DROPS Design answered:
Dear Mrs Daly, you can use either this technique or this one both would work. Happy assembly!
24.01.2024 - 07:52
![]() Evemarie wrote:
Evemarie wrote:
Wieviel cm-Breite hat das Vorderteil unten und dann oben an der Schulter? Wird in einer Grossrunde vom Vorderteil über Rücken zu Vorderteil gestrickt oder alle Teile einzeln und dann zusammengenäht? Möchte gerne in 1 Grossteil stricken und benötige deshalb die cm -Maße vom Vorderteil. Danke für Ihre liebe Rückmeldung. LG Evemarie.
01.05.2023 - 15:53DROPS Design answered:
Liebe Evemarie, mit 17 Maschen = 10 cm sind die 20 Maschen (in S) für Vorderteile am Anfang ca 12 cm (vor den Zunahmen), und die 19 übrigen Maschen für den Schulter messen dann ca 11 cm. Viel Spaß beim stricken!
02.05.2023 - 09:38
![]() Monique Biron wrote:
Monique Biron wrote:
Pour le modèle Drops design Z-576 (Drops 131-51), je voudrais utiliser de la laine mérino (1 fil ou 2 fils identiques). Le coloris doit être NOIR. Quel produit me conseillez-vous?
11.04.2022 - 15:42DROPS Design answered:
Bonjour Mme Biron, vous pouvez utiliser 2 fils Baby Merino ou 1 fil Big Merino pour avoir la même tension (17 mailles x 22 rangs jersey), vérifiez avec votre échantillon que la texture vous convient bien, elle sera probablement un peu plus souple que dans le modèle (où on tricote 1 fil du groupe A + 1 fil Brushed Alpaca Silk - le fil Glitter ne modifie pas la tension). Bon tricot!
19.04.2022 - 08:09
![]() Alexandra wrote:
Alexandra wrote:
Ich verstehe die Anleitung für das Abketten für den Armausschnitt am Rückenteil nicht. Wenn ich den Text "0-1-1-2-3-4 Mal 3 M" so verstehe, dass ich in R1 0 M abkette, R2 1X3 M, R3 1X3 M auf jeder Seite, dann komme ich auf rechts 79 M abketten und links auch 79 M abketten. Da aber die Arbeit nur 110 M hat, ist das ja nicht möglich. Mit ist klar, dass ich den Text nicht richtig interpretiere, aber wie ist er richtig zu interpretieren? Könnt ihr mir da bitte weiter helfen?
01.11.2019 - 18:09DROPS Design answered:
Liebe Alexandra, in der 1. Größe ketten Sie bei der 1. Reihe 2 Maschen ab, dh direkt mit den 1. Abkette anfangen. Viel Spaß beim stricken!
04.11.2019 - 16:02
![]() Anne Christine Bang wrote:
Anne Christine Bang wrote:
Hei. Jeg har begynt å strikke denne jakken. På bildet ser det ut som det er en felling på forstykket opp mot halsdelen. Jeg finner ikke dette igjen på mønsteret. Heller ikke på diagrammet/ det tegnete mønsteret. Jeg vil gjerne ha jakken slik som den er vist på bildet. Er det noe jeg har oversett på mønsteret. Hvis ikke kan dere fortelle meg hvordan/ hvor ofte jeg skal felle av på forstykket slik at jeg får genseren slik som avbildet.
01.04.2019 - 20:26DROPS Design answered:
Hei Anne Christine. jakken på bildet er strikket etter oppsrkiften: Det er ingen annen felling enn den mot ermhullet. Kanskje den virker smalere øverst fordi modellen er bredere over skuldrene enn rundt livet og at jakken derfor ser ut som den smalner oppover mot skulderne. Men den gjør altså ikke det. God fornøyeløse
08.04.2019 - 13:40
|
|
Simply Red#simplyredbolero |
|
|
|
|
Knitted DROPS bolero with ¾ sleeves in Alpaca, Vivaldi and Glitter or Alpaca, Brushed Alpaca Silk and Glitter Size: S - XXXL.
DROPS 131-51 |
|
|
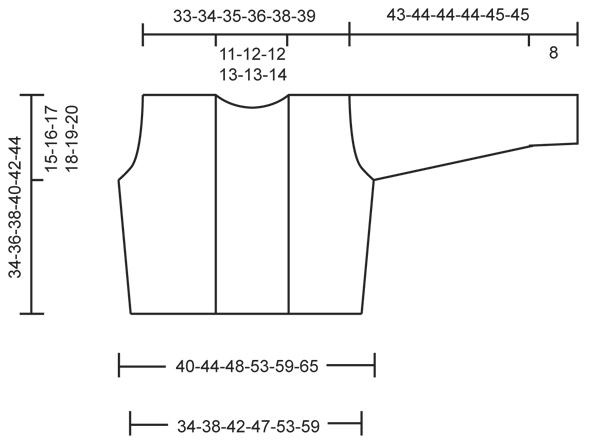
SEED ST: 1st row: * K 1, P 1 *, repeat from *-*. 2nd row: K over P and P over K. Repeat 2nd row. INCREASE TIP 1 (applies to body): Inc 1 st on each side of markers as follows: Work 2 sts in 1 st on each side of marker. INCREASE TIP 2 (applies to sleeve): Inc 1 st by making 1 YO, on next row work YO twisted (i.e. K or P in the back loop of st instead front) to avoid holes. NOTE: Work the new sts in seed st. -------------------------------------------------------- BODY: Worked back and forth on needle. Cast on 98-108-124-138-158-176 sts on circular needle size 5 mm / US 8 with 1 strand Alpaca, 1 thread Alpaca, 1 thread Vivaldi/1 thread Brushed Alpaca Silk and 1 thread Glitter. Work in seed st - see explanation above (1st row = RS). REMEMBER THE GAUGE! When piece measures 5-5-6-6-7-7 cm / 2"-2"-2⅜"-2⅜"-2¾"-2¾", insert 2 markers in the piece; 20-22-26-29-34-38 sts (= front piece) in from each side (back piece = 58-64-72-80-90-100 sts). Move the markers upwards when working. On next row, inc 1 st on each side of each markers - Read INCREASE TIP 1 above = 4 new sts. Repeat inc every 3 cm / 1⅛" a total of 5 times in all sizes = 118-128-144-158-178-196 sts. Continue until piece measures 19-20-21-22-23-24 cm / 7½"-8"-8¼"-8¾"-9"-9½", divide the piece at the markers and finish each part separately. BACK PIECE: = 68-74-82-90-100-110 sts. Now bind off for armholes in beg of every row each side as follows: 3 sts 0-1-1-2-3-4 times, 2 sts 2-1-2-2-4-4 times and 1 st 2-3-4-4-1-2 times = 56-58-60-62-64-66 sts. Continue to work until piece measures 32-34-36-38-40-42 cm / 12½"-13⅜"-14¼"-15"-15¾"-16½". Now bind off for shoulder and neck as follows: bind off the first 6 sts on row, work 14-14-15-15-16-16 sts, bind off the next (= middle) 16-18-18-20-20-22 sts for neck, work the rest of row. Now finish each shoulder separately. Bind off the first 6 sts on next row from WS = 14-14-15-15-16-16 sts remain. On next row from RS (i.e from neck) bind off 1 st. Bind off the first 6 sts on next row from WS = 7-7-8-8-9-9 sts remain. Loosely bind off all sts on next row from RS, piece now measures approx. 34-36-38-40-42-44 cm / 13⅜"-14¼"-15"-15¾"-16½"-17 ¼". Work the other shoulder the same way but reversed. RIGHT FRONT PIECE: = 25-27-31-34-39-43 sts. Bind off for armhole in the side as on back piece = 19-19-20-20-21-21 sts remain for shoulder. Continue until piece measures 32-34-36-38-40-42 cm / 12½"-13⅜"-14¼"-15"-15¾"-16½", bind off for shoulder as follows: bind off on every row from shoulder 6 sts 2 times, bind off the remaining 7-7-8-8-9-9 sts on next row. LEFT FRONT PIECE: Work as right front piece but reversed. SLEEVE: Worked back and forth with 1 thread Alpaca, 1 thread Vivaldi/1 thread Brushed Alpaca Silk and 1 thread Glitter on circular needle size 5 mm / US 8. Cast on 36-38-40-42-44-46 sts (includes 2 edge sts), and work in seed st with 1 edge st in garter st in each side. When piece measures 8 cm / 3⅛", inc 1 st inside 1 edge st in each side - Read INCREASE TIP 2 = 2 new sts on needle. Repeat inc every 3½-3½-3-2½-2-2 cm / 1¼"-1¼"-1⅛"-⅞"-¾"-¾" a total of 7-7-8-9-10-10 times = 50-52-56-60-64-66 sts. When piece measures 32-33-32-32-32-32 cm / 12½"-13"-12½"-12½"-12½"-12½", bind off for sleeve cap in beg of every row each side as follows: 3 sts 1 time, 2 sts 1-1-1-1-2-2 times, and 1 st in each side until piece measures 40-41-41-41-42-42 cm / 15¾"-16⅛"-16⅛"-16⅛"-16½"-16½". Now bind off in beg of every row each side: 2 sts 2 times and 3 sts 1 time. Loosely bind off all sts on next row from RS (piece now measures approx. 43-44-44-44-45-45 cm / 17"-17¼"-17¼"-17¼"-17¾"-17¾"). Work another sleeve. ASSEMBLY: Sew the shoulder seams tog. Sew sleeves tog inside 1 edge st and sew in sleeves. |
|
|
|
Have you finished this pattern?Tag your pictures with #dropspattern #simplyredbolero or submit them to the #dropsfan gallery. Do you need help with this pattern?You'll find 14 tutorial videos, a Comments/Questions area and more by visiting the pattern on garnstudio.com. © 1982-2025 DROPS Design A/S. We reserve all rights. This document, including all its sub-sections, has copyrights. Read more about what you can do with our patterns at the bottom of each pattern on our site. |


With over 40 years in knitting and crochet design, DROPS Design offers one of the most extensive collections of free patterns on the internet - translated to 17 languages. As of today we count 314 catalogs and 11822 patterns - 11812 of which are translated into English (US/in).
We work hard to bring you the best knitting and crochet have to offer, inspiration and advice as well as great quality yarns at incredible prices! Would you like to use our patterns for other than personal use? You can read what you are allowed to do in the Copyright text at the bottom of all our patterns. Happy crafting!
Post a comment to pattern DROPS 131-51
We would love to hear what you have to say about this pattern!
If you want to leave a question, please make sure you select the correct category in the form below, to speed up the answering process. Required fields are marked *.