
Looking for a yarn?


Comments / Questions (17)
![]() Fayard wrote:
Fayard wrote:
Sur quel motif on démarre le pouce ! Vous dites le motif mais ce n’est pas logique . Voudriez-Vous me l’expliquer ? Merci
02.04.2025 - 09:43DROPS Design answered:
Bonjour Mme Fayard, les augmentations du pouce se font de part et d'autre du 1er motif M.1 au début du tour, autrement dit, vous allez augmenter le nombre de mailles envers avant et après le 1er M.1 = la 1ère torsade vous aurez ainsi 6-7 augmentations (cf taille) +4 mailles envers = 10-11 mailles envers avant le 1er M.1 et après le 1er M.1 - les mailles du pouce = les 15-17 m soit les 3 m de M.1 + 6-7 m de chaque côté. Il reste ainsi 4 m envers avant les mailles en attente, vous montez 3 m pour le reste de la main au-dessus de l'ouverture du pouce pour continuer M.1 et vous avez 4 m envers après ce 1er M.1 du tour. En espérant que mes explications vous aident. Bon tricot!
02.04.2025 - 13:53
![]() Fayard wrote:
Fayard wrote:
Pour le pouce on commence de chaque côté d’un motif ? Sur la photo on ne voit pas cela ! Merci pour votre réponse . En attendant je commence la 2ème . Bonne soirée
01.04.2025 - 21:01DROPS Design answered:
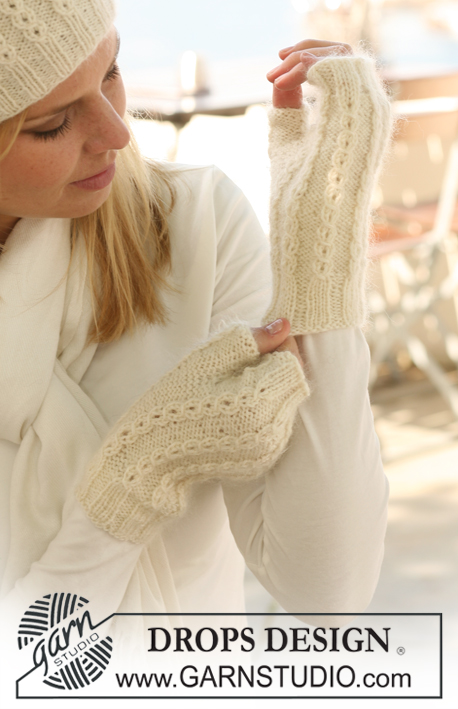
Bonjour Mme Fayard, effectivement, lors de la prise de photo, le pouce n'a pas été mis en avant, toutefois, si vous regardez bien le côté gauche du pouce de la main droite sur la 1ère photo, vous verrez un petit relief le long du pouce = il correspond au motif qui va se trouver au milieu du pouce, on voit bien le nombre de mailles envers qui a augmenté après le motif précédent (et de l'autre côté, on ne le voit pas sur les photos, mais le nombre de mailles envers va aussi augmenter pour former le gousset du pouce). Bon tricot!
02.04.2025 - 08:35
![]() Andrea wrote:
Andrea wrote:
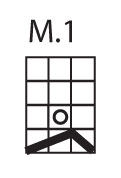
Beim Diagramm; Die leeren Kästchen sind doch keine rechten Maschen? Das Muster zwischen den kleinen "Zöpfchen ist doch glatt links?!!
07.12.2024 - 15:56DROPS Design answered:
Liebe Andrea, also man wird M.1 mit jeweils 4 linken Maschen dazwischen stricken; wenn das Bündchen fertig ist, sind es 3 rechte Maschen/4 linke Maschen; dann stricken Sie (M.1, 4 linke Maschen) die ganze Runde. Viel Spaß beim Stricken!
09.12.2024 - 08:30
![]() Joe wrote:
Joe wrote:
Vraiment un très beau modèle et très confortable. Merci à toute l'équipe
28.03.2020 - 16:36
![]() Germana wrote:
Germana wrote:
Sera una info nel motivo M1 quando dice 2 m dir, intende insieme? Grazie
04.01.2020 - 20:36DROPS Design answered:
Buongiorno Germana, no, deve lavorare 2 maglie a diritto. Buon lavoro!
05.01.2020 - 14:29
![]() Sabina wrote:
Sabina wrote:
Hej! För vanter nr 2 står det bara: sticka en vante till. Blir det inte två vantar för samma hand då? Kanske en idiotfråga, men när jag har stickat vantar tidigare så har man gjort olika för höger och vänster. Tacksam för svar Sabina
03.10.2017 - 10:25DROPS Design answered:
Hejsan, eftersom dessa vantar har likadant mönster över hela arb kan samma vante användas såväl på vänster som på höger hand. Båda stickas alltså lika.
03.10.2017 - 13:33
![]() Jiřina wrote:
Jiřina wrote:
Do popisu copánkového vzoru se vloudila chybička. Správně má být: 1 oko sejmeme hladce, 2 oka upleteme (místo spleteme) hladce a sejmuté přes ně přetáhneme.
13.09.2017 - 20:24DROPS Design answered:
Milá jiřino, díky za upozornění - opraveno.
20.09.2017 - 00:21
![]() Patricia Johnsson wrote:
Patricia Johnsson wrote:
På mönstret står det att man ska öka 6-7 ggr till tummen och då ska det bli 15-17 tum m. Man har då 63 maskor och ökar man 7 ggr , 2 m per ggr blir det 14 m plus de 8 maskor det var innan på stickan då blir det 22 maskor . Inte 17 som det skulle vara. Förstår inte det?
27.06.2016 - 21:16DROPS Design answered:
Hej. Tum-maskorna är endast den första m i M.1 och ökningarna som görs runt den. Dvs i storlek L/XL ökar du först 1 m på varje sida om den första m i M.1 och sedan gör du ökningen 7 gånger till. Detta ger totalt 17 m, tum-maskorna. Lycka till!
28.06.2016 - 08:38
![]() Annick Etcheberry wrote:
Annick Etcheberry wrote:
Qu'appelez-vous : section ?
05.02.2014 - 18:58DROPS Design answered:
Bonjour Mme Etcheberry, 1 section envers = les m env des côtes - 1 section end = les m end des côtes. Ainsi, au début, on augmente 2 m env dans toutes les sections envers des côtes pour avoir des côtes 3 m end/4 m env (au lieu de 3 m end/2 m env). Bon tricot!
06.02.2014 - 09:02Anne wrote:
Lorsque l'on fait le jeté au 3ème rang du motif, on obtient 4 mailles. Au tour suivant, on glisse la première, on tricote les 2 autres, on glisse la première, puis on tricote la maille endroit qui reste ? Est-ce bien ça ? Je n'arrive pas à faire exactement comme sur la photo.
13.11.2013 - 14:59DROPS Design answered:
Bonjour Anne, au 1er rang, on ne diminue qu'une seule maille: on glisse 1 m à l'end, puis on tricote 2 m end et on passe la m glissée par-dessus les 2 m tricotées (il reste 2 m seulement), au tour suivant, on tricote 1 m end, 1 jeté et 1 m end. Au 3ème tour, tricotez le jeté normalement à l'endroit. Bon tricot!
13.11.2013 - 15:39
|
||||||||||
Nieves Mittens#nievesmittens |
||||||||||
 |
 |
|||||||||
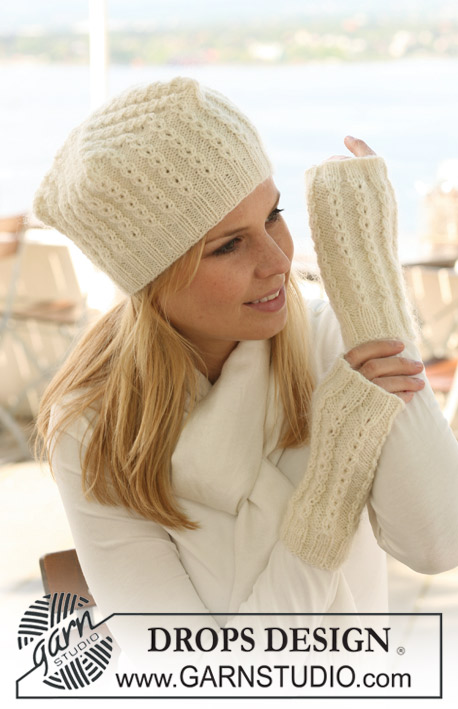
Knitted DROPS wrist warmers in ”Alpaca” and ”Kid-Silk”.
DROPS 122-13 |
||||||||||
|
PATTERN: See diagram M.1. Diagram shows the pattern from RS. -------------------------------------------------------- WRIST WARMER: Worked in the round. Cast on 40-45 sts on double pointed needles size 3 mm / US 2or3 with 1 strand of each quality (= 2 strands). K 1 round and continue in rib as follows: P1, * K3, P2 *, repeat from *-* and finish with K3 and P1. When piece measures approx 3 cm / 1⅛" inc 2 sts in each P-section by making 1 YO each side of the P2 = 56-63 sts. Change to double pointed needles size 3.5 mm / US 4 and work 1 round with K over K and P over P (P YO into back of loop). Continue in M.1 on all K3 and P4 between each M.1 repeat. When piece measures approx 8 cm / 3⅛" inc 1 st each side of the first M.1 at beg of round for thumb. Inc 1 st by making 1 YO, on next round P YO into back of loop – continue to P inc sts. Repeat the inc each side of M.1 on every other round a total of 6-7 times = 15-17 thumb sts. When piece measures 13-14 cm / 5⅛"-5½" slip the 15-17 thumb sts on a stitch holder. On next round cast on 3 new sts behind thumb sts = 56-63 sts. Continue in pattern as before. When piece measures 17-18 cm / 6¾"-7" work 1 round with K over K and P over P, AT THE SAME TIME dec 2 sts in each P-section by P tog the first 2 sts and P tog the 2 last sts = 40-45 sts. Change to double pointed needles size 3 mm / US 2or3 and continue with K over K and P over P (= P2/K3). When rib measures approx 3-4 cm / 1⅛"-1½" bind off with K over K and P over P. Piece measures approx 20-22 cm / 8"-8¾". THUMB: Slip the 15-17 thumb sts on double pointed needles size 3 mm / US 2or3 and pick up 3 sts in the edge behind these = 18-20 sts. Continue in M.1 and P remaining sts for approx 2-3 cm / ¾"-1⅛". P 1 round, AT THE SAME TIME K tog the first 2 sts in M.1. On next round bind off with K sts. Make 1 more |
||||||||||
Diagram explanations |
||||||||||
|
||||||||||
|
||||||||||
Have you finished this pattern?Tag your pictures with #dropspattern #nievesmittens or submit them to the #dropsfan gallery. Do you need help with this pattern?You'll find 13 tutorial videos, a Comments/Questions area and more by visiting the pattern on garnstudio.com. © 1982-2025 DROPS Design A/S. We reserve all rights. This document, including all its sub-sections, has copyrights. Read more about what you can do with our patterns at the bottom of each pattern on our site. |
||||||||||


With over 40 years in knitting and crochet design, DROPS Design offers one of the most extensive collections of free patterns on the internet - translated to 17 languages. As of today we count 314 catalogs and 11822 patterns - 11812 of which are translated into English (US/in).
We work hard to bring you the best knitting and crochet have to offer, inspiration and advice as well as great quality yarns at incredible prices! Would you like to use our patterns for other than personal use? You can read what you are allowed to do in the Copyright text at the bottom of all our patterns. Happy crafting!
Post a comment to pattern DROPS 122-13
We would love to hear what you have to say about this pattern!
If you want to leave a question, please make sure you select the correct category in the form below, to speed up the answering process. Required fields are marked *.