DROPS Merino Extra Fine
100% Wool
from 4.55 $ /50g
Get the yarn to make this pattern from 22.75$.

The yarn cost is calculated from the pattern’s smallest size and the yarn’s cheapest product type. Looking for an even better price? You might find it on the DROPS Deals!

DROPS Super Sale

Head Over Heels For You

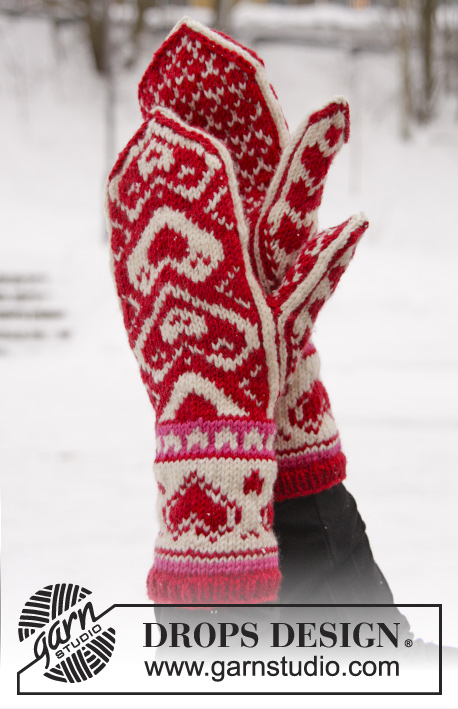
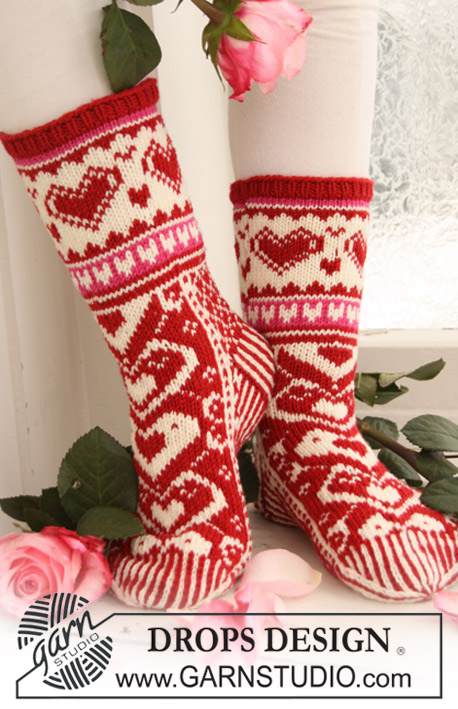
Knitted socks in DROPS Merino Extra Fine. Socks are worked with Nordic pattern with heart. Size 5 - 10½. Theme: Christmas

DROPS Extra 0-611
DROPS design: Pattern no me-028a
Yarn group B
---------------------------------------------------------
Size:
5/6½ - 7½/9 – 9½/10½ (US sizes)
35/37 - 38/40 – 41/43 (EU sizes)
3/4 – 5/6½ – 7/8 (Uk sizes)
Foot length: 22-24-27 cm / 8¾”-9½”-10 5/8”
Materials: DROPS MERINO EXTRA FINE
100 g for all sizes color no 11, red
100 g for all sizes color no 01, off-white
50 g for all sizes color no 17, cerise

DROPS DOUBLE POINTED NEEDLES
size 3.5 mm / US 4 - or size needed to get 22 sts x 30 rows in stockinette st = 10 x 10 cm / 4'' x 4''.
DROPS DOUBLE POINTED NEEDLES
size 3 mm / US 2½ – for rib

-------------------------------------------------------

Alternative Yarn – See how to change yarns here
Yarn Groups A to F – Use the same pattern and change the yarn here
Yarn usage using an alternative yarn – Use our yarn converter here

-------------------------------------------------------

DROPS Merino Extra Fine
100% Wool
from 4.55 $ /50g
Get the yarn to make this pattern from 22.75$.

The yarn cost is calculated from the pattern’s smallest size and the yarn’s cheapest product type. Looking for an even better price? You might find it on the DROPS Deals!

DROPS Super Sale

SAVE 30% on 6 cotton favorites!
Valid until 04.12.2024

Pattern instructions

NOTE: This pattern is written in American English. All measurements in charts are in cm. For conversion from inches to cm - click here. There are different terms for crocheting in American and British English. If this pattern includes crochet, click for "crochet terms" here. For this pattern in British English, please click here.
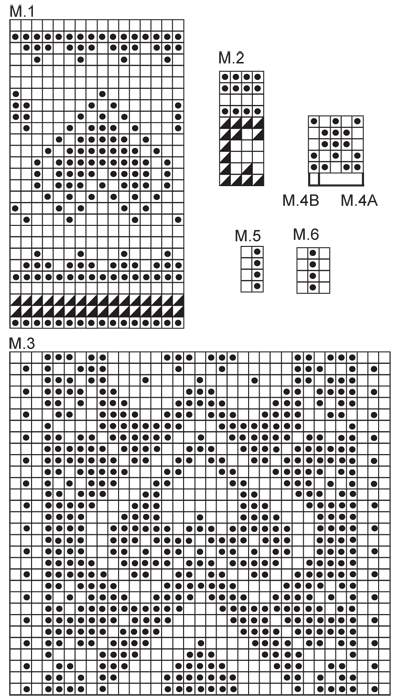
PATTERN: Diagram M.1 to M.6. Diagram shows the pattern from RS. The entire pattern is worked in stockinette st.
HEEL DECREASES:
Row 1 (= RS): Work row until 7-8-8 sts remain, slip next st as if to K, K1, psso, turn piece.
Row 2 (= WS): Work row until 7-8-8 sts remain, slip next st as if to P, P1, psso, turn piece.
Row 3 (= RS): Work row until 6-7-7 sts remain, slip next st as if to K, K1, psso, turn piece.
Row 4 (= WS): Work row until 6-7-7 sts remain, slip next st as if to P, P1, psso, turn piece.
Continue dec like this with 1 less st before each dec until there are 9-11-11 sts on needle.
--------------------------------------------------------
--------------------------------------------------------

SOCK:
Worked in the round on double pointed needles. Cast on 64-64-64 sts on double pointed needles size 3 mm / US 2½ with red. K 1 round and work 4 rounds rib K1/P1. Change to double pointed needles size 3.5 mm / US 4 and continue in M.1 (= 16 sts) on all sts, AT THE SAME TIME on last row of M.1 dec 4-0-0 sts evenly = 60-64-64 sts. Continue in M.2 (= 4 sts) on all sts, AT THE SAME TIME on last row of M.2 dec 4-4-4 sts evenly = 56-60-60 sts. K 1 round with off-white, and continue as follows: M.3 (= 35 sts), M.4A (= 4 sts) on the next 20-24-24 sts, finish with M.4B (= 1 st). Work a total of 4 vertical repeats of M.4 and now slip sts on M.3 (= 35 sts) on a stitch holder = 21-25-25 sts left for heel. Work M.5 on these sts for 5-5.5-6 cm / 2''-2¼''-2 3/8'', and insert a marker in piece. Now work HEEL DECREASES – see above. After heel dec pick up 12-14-14 sts each side of heel and slip the 35 sts from stitch holder back on needle = 68-74-74 sts. Continue in M.3 on the 35 sts on upper foot and M.5 on the remaining sts under foot, AT THE SAME TIME dec each side of sts on upper foot as follows: K tog the 2 sts before M.3 and K tog into back of loop the 2 sts after M.3. Repeat the dec on every other row a total of 5 times = 58-64-64 sts. Continue in M.3 and M.5. After 2 vertical repeats of M.3 continue as follows: M.6 (= 3 sts), M.5 on the next 29 sts, M.6, M.5 on the next 23-29-29 sts. Continue like this until piece measures 17-18-21 cm / 6 3/4"-7"-8 1/4" from marker on heel (= 5-6-6 cm / 2"-2 3/8"-2 3/8" remain). Now dec for toes each side of the middle st in M.6 each side. Dec as follows before the middle st: K2 tog with off-white. Dec as follows after the middle st: slip first st as if to K, K1, psso. Dec on every round a total of 9-10-10 times = 22-24-24 sts left. K2 tog all the way round, cut the thread, pull it through remaining sts and fasten.

Diagram

All measurements in charts are in cm.

symbols = off-white
symbols = red
symbols = cerise
diagram
Do you have a question? See a list of frequently asked questions (FAQ)

Knitting tension is what determines the final measurements of your work, and is usually measured per 10 x 10 cm. It is provided like so: number of stitches in width x number of rows in height - eg: 19 stitches x 26 rows = 10 x 10 cm.

The knitting tension is very individual; some people knit/crochet loosely while others work tightly. You adjust the knitting tension with the needle size, which is why the suggested needle size only serve as a guide! You need to adjust this (up or down) to ensure that YOUR knitting tension matches the knitting tension provided in the pattern. If you work with a different knitting tension than provided you will have a different yarn consumption, and your work will have different measurements than what the pattern suggests.

The knitting tension also determines which yarns can replace each other. As long as you achieve the same knitting tension you can replace one yarn with another.

See DROPS lesson: How to measure your tension/gauge

See DROPS video: How to make a gauge tension swatch

The required amount of yarn is provided in grams, eg: 450 g. To calculate how many balls you’ll need you first need to know how many grams are in 1 ball (25g, 50g or 100g). This information is available if you click on the individual yarn quality on our pages. Divide the amount required with the amount of each ball. For example, if each ball is 50g (the most common amount), the calculation will be as follows: 450 / 50 = 9 balls.

The important thing when changing from one yarn to another is that the knitting/crochet tension remains the same. This is so that the measurements of the finished piece will be the same as on the sketch provided. It is easier to achieve the same knitting tension using yarns from the same yarn group. It is also possible to work with multiple strands of a thinner yarn to achieve the knitting tension of a thicker one. Please try our yarn converter. We recommend you to always work a test swatch.

Please NOTE: when changing yarn the garment might have a different look and feel to the garment in the photo, due to individual properties and qualities of each yarn.

See DROPS lesson: Can I use a different yarn than the one mentioned in the pattern?

All our yarns are categorised into yarn groups (from A to F) according to thickness and knitting tension – group A contains the thinnest yarns and group F the thickest. This makes it easier for you to find alternative yarns to our patterns, should you wish to switch yarn. All yarns within the same group have a similar knitting tension and can easily replace each other. However, different yarn qualities have different structures and properties which will give the finished work a unique look and feel.

Click here for an overview of the yarns in each yarn group

At the top of all our patterns you’ll find a link to our yarn converter, which is a helpful tool should you wish to use a different yarn than suggested. By filling in the yarn quality you wish to replace, the amount (in your size) and number of strands, the converter will present good alternative yarns with the same knitting tension. Additionally it will tell you how much you’ll require in the new qualities and whether you’ll need to work with multiple strands. Most skeins are 50g (some are 25g or 100g).

If the pattern is worked with multiple colours, every colour will have to be converted separately. Similarly, if the pattern is worked with several strands of different yarns (for example 1 strand Alpaca and 1 strand Kid-Silk) you will have to find alternatives for each, individually.

Click here to see our yarn converter

Since different yarns have different qualities and textures we have chosen to keep the original yarn in our patterns. However, you can easily find options among our available qualities by using our yarn converter, or simply pick a yarn from the same yarn group.

It is possible that some retailers still have discontinued yarns in stock, or that someone has a few skeins at home that they would like to find patterns for.

The yarn converter will provide both alternative yarn as well as required amount in the new quality.

If you think it's hard to decide what size to make, it can be a good idea to measure a garment you own already and like the size of. Then you can pick the size by comparing those measures with the ones available in the pattern's size chart.

You'll find the size chart at the bottom of the pattern.

See DROPS lesson: How to read size chart

The needle size provided in the pattern serves only as a guide, the important thing is to follow the knitting tension. And since knitting tension is very individual, you will have to adjust the needle size to ensure that YOUR tension is the same as in the pattern – maybe you’ll have to adjust 1, or even 2 needle sizes, up or down to achieve the correct tension. For this, we recommend that you work test swatches.

Should you work with a different knitting tension than the one provided, the measurements of the finished garment might deviate from the measurement sketch.

See DROPS lesson: How to measure your tension/gauge

See DROPS video: How to make a gauge tension swatch

Working a garment top-down provides more flexibility and room for personal adjustment. For example it is easier to try the garment on while working, as well as making adjustments to length of yoke and shoulder caps.

The instructions are carefully explaining every step, in the correct order. Diagrams are adjusted to the knitting direction and are worked as usual.

The diagram depicts all rows/rounds, and every stitch seen from the right side. It is read from bottom to top, from right to left. 1 square = 1 stitch.

When working back and forth, every other row is worked from the right side and every other row is worked from the wrong side. When working from the wrong side, the diagram will have to be worked reversed: from left to right, knit stitches are purled, purl stitches are knit etc.

When working in the round every round is worked from the right side and the diagram are worked from right to left on all rounds.

See DROPS lesson: How to read knitting diagrams

The diagram depicts all rows/rounds, and every stitch seen from the right side. It is worked from bottom to top, from right to left.

When working back and forth every other row is worked from the right side: from right to left and every other row is worked from the wrong side: from left to right.

When working in the round, every row in the diagram are worked from the right side, from right to left.

When working a circular diagram you start in the middle and work your way outwards, counter clockwise, row by row.

The rows usually start with a given number of chain stitches (equivalent to the height of the following stitch), this will either be depicted in the diagram or explained in the pattern.

See DROPS lesson: How to read crochet diagrams

Instructions for working several diagrams after each other on the same row/round, will often be written like so: “work A.1, A.2, A.3 a total of 0-0-2-3-4 times". This means you work A.1 once, then A.2 is worked once, and A.3 is repeated (in width) the number of times provided for your size – in this case like so: S = 0 times, M = 0 times, L=2 times, XL= 3 times and XXL = 4 times.

The diagrams are worked as usual: begin with the first row in A.1, then work the first row in A.2 etc.

See DROPS lesson: How to read knitting diagrams

See DROPS lesson: How to read crochet diagrams

The total width of the garment (from wrist-to-wrist) will be larger in the larger sizes, despite the actual sleeves being shorter. The larger sizes have longer sleeve caps and wider shoulders, so there will be a good fit in all sizes.

The measurement sketch/schematic drawing provides information regarding the full length of the garment. If it’s a jumper or a jacket the length is measured from the highest point on the shoulder (usually closest to the neckline), and straight down to the bottom of the garment. It is NOT measured from the tip of shoulder. Similarly, the length of yoke is measured from the highest point on the shoulder and down to where yoke is split into body and sleeves.

See DROPS lesson: How to read a schematic drawing

Diagrams are often repeated on the round or in height. 1 repeat is the diagram the way it appears in the pattern. If it says to work 5 repeats of A.1 in the round, then you work A.1 a total of 5 times after/next to each other in the round. If it says to work 2 repeats of A.1 vertically/in height you work the entire diagram once, then begin again at the start and work the entire diagram one more time.

Chain stitches are slightly narrower than other stitches and to avoid working the cast-on edge too tight, we simply chain more stitches to begin with. The stitch count will be adjusted on the following row to fit the pattern and measurement sketch.

The rib edge is more elastic and will contract slightly compared to, for example, stocking stitch. By increasing before the rib edge, you avoid a visible difference in width between the rib edge and the rest of the body.

It’s very easy to cast off too tightly, and by making yarn overs while casting off (and simultaneously casting these off) you avoid a too tight cast off edge.

See DROPS video: How to bind off with yarn overs (yo)

To achieve an even increase (or decrease) you can increase on, for example: every 3rd and 4th row alternately, like so: work 2 rows and increase on the 3rd row, work 3 rows and increase on the 4th. Repeat this until the increase is complete.

See DROPS lesson: Increase or decrease 1 st on every 3rd and 4th row alternately

Should you prefer to work in the round instead of back and forth, you may of course adjust the pattern. You’ll need to add steeks mid-front (usually 5 stitches), and follow the instructions. When you would normally turn and work from the wrong side, simply work across the steek and continue in the round. At the end you’ll cut the piece open, pick up stitches to work bands, and cover the cut edges.

See DROPS video: How to knit steeks and cut open

Should you prefer to work back and forth instead of in the round, you may of course adjust the pattern so you work the pieces separately and then assemble them at the end. Divide the stitches for the body in 2, add 1 edge stitch in each side (for sewing) and work the front and back pieces separately.

See DROPS lesson: Can I adapt a pattern for circular needles into straight needles?

Pattern repeats can vary slightly in the different sizes, in order to get the correct proportions. If you’re not working the exact same size as the garment in the photo, yours might deviate slightly. This has been carefully developed and adjusted so that the complete impression of the garment is the same in all sizes.

Make sure to follow instructions and diagrams for your size!

If you have found a pattern you like which is available in women’s size it’s not very difficult to convert it to men’s size. The biggest difference will be the length of sleeves and body. Start working on the women size that you think would fit across the chest. The additional length will be worked right before you cast off for the armhole/sleeve cap. If the pattern is worked top-down you can add the length right after the armhole or before the first decrease on sleeve.

Regarding additional yarn amount, this will depend on how much length you add, but it is better with a skein too many than too few.

All yarns will have excess fibres (from production) that might come off as lint or shedding. Brushed yarns (ie hairier yarns) have more of these loose, excess fibres, causing more shedding.

Shedding also depends on what is worn under or over the garment, and whether this pulls at the yarn fibres. It’s therefore not possible to guarantee that there will be no shedding

Below are some tips on how to get the best result when working with hairier yarns:

1. When the garment is finished (before you wash it) shake it vigorously so the looser hairs come off. NOTE: do NOT use a lint roller, brush or any method that pulls at the yarn.

2. Place the garment in a plastic bag and put it in your freezer - the temperature will cause the fibres to become less attached to each other, and excess fibres will come off easier.

3. Leave in the freezer for a few hours before taking it out and shaking it again.

4. Wash the garment according to the instructions on the yarn label.

Pilling is a natural process that happens to even the most exclusive of fibers. It's a natural sign of wear and tear that is hard to avoid, and that is most visible in high friction areas of your garment like a sweater's arms and cuffs.

You can make your garment look as new by removing the pilling, using a fabric comb or a pill/lint remover.

Still can't find the answer you need? Then scroll down and leave your question so one of our experts can try to help you. This will be done normally within 5 to 10 working days.
In the meantime, you can read the questions and answers that others have left to this pattern or join the DROPS Workshop on Facebook to get help from fellow knitters/crocheters!

You might also like...

Post a comment to pattern DROPS Extra 0-611

We would love to hear what you have to say about this pattern!

If you want to leave a question, please make sure you select the correct category in the form below, to speed up the answering process. Required fields are marked *.

Comments / Questions (10)

country flag Dominique CASTAGNO wrote:

Modèle chaussettes ME-028. Je suis arrivée aux 9 mailles après les diminutions du talon. Je bloque...Que faire de ces 9 mailles ? Dois-je les arrêter ? A partir de quel endroit, je dois relever les 12 mailles de chaque côté ? Je ne trouve pas le moyen de vous envoyer une photo de mon avancée. Merci pour votre aide

07.10.2022 - 15:45

DROPS Design answered:

Bonjour Mme Castagno, lorsqu'il vous reste 9 m à la fin des diminutions du talon, tricotez ces 9 m sur l'endroit, relevez 12 m le long du côté gauche du talon, tricotez les 35 m en attente (continuez M.3) et relevez 12 m du côté droit du talon. cette vidéo montre (sur un modèle uni) comment tricoter ce premier tour, en espérant qu'elle puisse vous aider. Bon tricot!

07.10.2022 - 16:11

country flag Nini Nielsen wrote:

Der mangler diagrammer i mange opskrifter. hvorfor?

05.10.2021 - 14:57

country flag Ingunn Dahle Haukeberg wrote:

Har problem med å få det til å stemme med hælfellinga, og få fine striper.Hva gjør jeg galt ?

11.01.2016 - 20:20

DROPS Design answered:

Hej, det er svært at svare på hvad der går galt når man ikke har set det. Prøv og tag strikketøjet med og spørg i butikken hvor du har købt dit garn. Held og lykke!

26.01.2016 - 15:08

country flag Lena wrote:

Drops extra 0-1011

01.05.2014 - 20:08

country flag Margareta Johansson wrote:

Finns vantar i samma mönster?

01.05.2014 - 11:59

country flag Jaana Myllynen wrote:

Yritin laittaa kysymyksen:Aina ilmoittaa että kysymys on liian pitkä tai lyhyt tai siinä on sopimaton sana Jaana Myllynen

05.10.2013 - 13:50

Nathalie wrote:

Il ce pourrais t'il que le patron des coeurs soit à l'envers qui faut tournée les diagrames (je commence a tricoter je veut seulement etre sur merci)parce qu'il me semble.....

03.03.2013 - 04:04

DROPS Design answered:

Bonjour Nathalie, les chaussettes se tricotent de haut en bas (=du haut de la chaussette vers la pointe), et les diagrammes se lisent en commençant en bas à droite vers la gauche tous les tours, ainsi les coeurs seront à l'endroit quand la chaussette sera finie. Bon tricot !

04.03.2013 - 09:26

country flag Elisabeth wrote:

Disse blir kjempefine, men OBS OBS nesten ikke forskjell på str 35 - 43.Det er heller ikke oppgitt annen forskjell på lengden , enn 1 mindre tåfelling på den minste størrelsen. På andre par jeg skal strikke,kommer jeg til å begynne M3 på omg 9 - slik at jeg starter med helt hjerte,- og gjenta mønsteret så mye jeg trenger for de ulike str. Tror og jeg vil ha litt flere i opplegg på den største 41/43

22.02.2010 - 14:17

country flag DROPS Design wrote:

Diagrammet stemmer. Du strikke nedenfra og opp og fordi skaften på sokken strikeks ovenfra og need stemmer det til slutt.

15.02.2010 - 12:56

country flag Anette wrote:

Hvorfor er mønsteret lagt ut opp ned..oppdaget det halvveis ned i m1..litt irriterende..og det ser ut til at det er sånn på de andre mønstrene også.

13.02.2010 - 19:12