
Popular categories
Looking for a yarn?


Comments / Questions (34)
![]() Louise wrote:
Louise wrote:
In the description of the pattern it stipulate M.1 (=4 sts) M.2 (= 4 sts) Does it means that after the 2 first rows are completed the number of stitches would have i increased and that it was only stipulated once on the making of the explanation P2, K2, P4, M.1, (=4 sts)P4, K2, P4, K2, M.1, P4 M.2 ( =4 sts),P4, K2, P4, K2, P4, M.2, P4, K2..... Could you please let me know if I understand that correctly or am I missing something
14.01.2025 - 17:50DROPS Design answered:
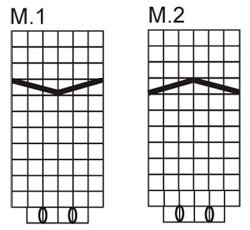
Dear Louise, the first row in M.1 and M.2 is worked over 4 sts but on this row you will increase 2 sts (K1, YO, K2, YO, K1) so that M.1 and M.2 will be now worked each over 6 sts to the end (with same number of P sts as on first row). Happy knitting!
15.01.2025 - 08:13
![]() P Rossèl wrote:
P Rossèl wrote:
Voor dit patroon heb ik jullie aanwijzingen voor het omzetten naar een ander garen gebruikt. Ik kwam hierbij uit op 28 bollen DROPS Snow en ben gestart met dubbele draad Snow, zoals aangegeven. Na een stuk gebreid te hebben heb ik de indruk dat ik veel meer bollen Snow nodig ga hebben. Kunnen jullie narekenen hoeveel bollen Snow ipv Polaris ik nodig heb? Hartelijk dank!
08.10.2023 - 12:48DROPS Design answered:
Dag P Rossèl,
Ik kom ook op 28 bollen uit. Als je twijfelt zou je wat extra bollen kunnen bestellen en je verkooppunt vragen binnen welke termijn je overgebleven bollen weer terug kunt sturen.
08.10.2023 - 16:49
![]() Nadine wrote:
Nadine wrote:
Hallo, wie stricke ich denn die Rückreihen ausserhalb von M1 und M2 ? Danke vorab für Hilfe! VG Nadine
08.11.2022 - 08:09DROPS Design answered:
Liebe Nadine, bei den Rückreihen stricken Sie rechts über rechts und links über links (= die Maschen wie sie erscheinen) mit je 2 kraus rechte Maschen beidseitig. Viel Spaß beim stricken!
08.11.2022 - 09:14
![]() Liliana wrote:
Liliana wrote:
I want to make a queen size blanket can it be done? If so how many stitches should I cast?
01.10.2022 - 01:39DROPS Design answered:
Dear Liliana, we don't make custom patterns. If you have the same gauge as stated in the pattern, you can see how many stitches you have in 10 cm. You can then use the rule of three to see how many stitches you would need in the cm/inches desired. For the repeats of the pattern, you will need to work more repeats of M.1 and M.2, with knitted and purled stitches between them, but continue knitting 2 stitches in garter stitch on each side of the blanket. Happy knitting!
03.10.2022 - 01:18
![]() Stella Galea wrote:
Stella Galea wrote:
I’m following the pattern but i have difficulty in the 7th row. I cannot understand M1 (4sts) and M2 (4 sts). Could you pls explain. I know that M1 (4 sts) and M2 (4sts) x2 make 80 stiches, but i don’t know how to work it out! Thanks!
30.10.2020 - 17:08DROPS Design answered:
Dear Mrs Galea, work the stitches as explained ie either K or P and work the 4 sts in M.2 as shown in diagram on first row= K1, YO, K2, YO, K1 (you increase 2 sts in each diagram). Turn and work next row from WS: K over K and P over P and P the stitches in diagrams. then continue diagram - read more about diagrams here. When the diagrams are done in height, repeat the last 10 rows only = cross stitches every 10th row). Happy knitting!
02.11.2020 - 07:25
![]() Kerstin Lundkvist wrote:
Kerstin Lundkvist wrote:
Hej! Jag har en fråga om stickfastheten. Jag stickar med 12 mm sticka (stickar rätt fasthet enligt provlapp, stickar ganska fast, tycker jag). När jag stickat fram till flätorna mäter kudden ca 52 cm. Vilken sticka ska jag välja föreslår ni?
01.03.2020 - 14:44DROPS Design answered:
Hej Kerstin, Flätorna vill dra ihop måttet på kudden, men om du tycker det blir för löst får du prova med en mindre sticka. Lycka till :)
03.03.2020 - 14:45
![]() Tina Brødløs wrote:
Tina Brødløs wrote:
Får i garn til denne opskrift i andre farver? Det er utrolig smukt. Hvilken garn kan man evt. bruge i stedet for?
21.09.2019 - 10:59DROPS Design answered:
Hej Tina, du kan også strikke den i dobbelt tråd DROPS Eskimo :)
25.09.2019 - 08:20
![]() Simone wrote:
Simone wrote:
Guten Abend , ich habe 2 Fragen zum Diagramm. wann sollen die Umschläge zwischen 2 Maschen gemacht werden? Wie viele Musterrunden und ab wann sollen die Musterrunden gearbeitet werden? In der 1. Musterunde wird beschrieben, dass M1 und M2 übe 4 Maschen gearbeitet werden , hab ich das richtig gelesen. VG und einen schönen Abend -Simone
31.03.2019 - 20:24DROPS Design answered:
Liebe Simone, die 2 Umschläge bei der 1. Reihe in M.1 und M.2 sollen nur bei der 1. Reihe im Muster gestrickt werden. Wenn M.1 und M.2 einmal in der Höhe gestrickt sind, wiederholen Sie nur die 10 letzen Reihen. Viel Spaß beim stricken!
01.04.2019 - 14:10
![]() Jan Kolenda wrote:
Jan Kolenda wrote:
Has the previous comment been corrected? I think you mention that you have a correction and new M1 and M2 charts? Can you share the updated pattern please? I am going to try this for my daughter's birthday gift!
07.02.2018 - 22:40DROPS Design answered:
Dear Jan, yes, pattern and charts are correct, you can use it whitout doubt. Happy knitting!
08.02.2018 - 07:46
![]() Sandy wrote:
Sandy wrote:
I am unclear when to repeat the cable pattern. Is it every 10th row? I love the blanket but am having difficulty with the directions. I am adding 8 stitches when I begin the cable but continue the cable pattern with the 6 stitches every ??? Row?
02.12.2017 - 18:14DROPS Design answered:
Hi Sandy, The diagrams of M1 and M2 are helpful in combination with the text. After repeating rows 1 and 2, you only work the top 10 rows in M1 and M2. Reading from the bottom, you knit 6 rows then work a row with the cable needle then knit 3 rows then begin at bottom again and knit 6 rows before using the cable needle again. I hope this helps and happy knitting!
03.12.2017 - 06:28
|
|||||||||||||
Cuddle Me#cuddlemeblanket |
|||||||||||||
|
|
|||||||||||||
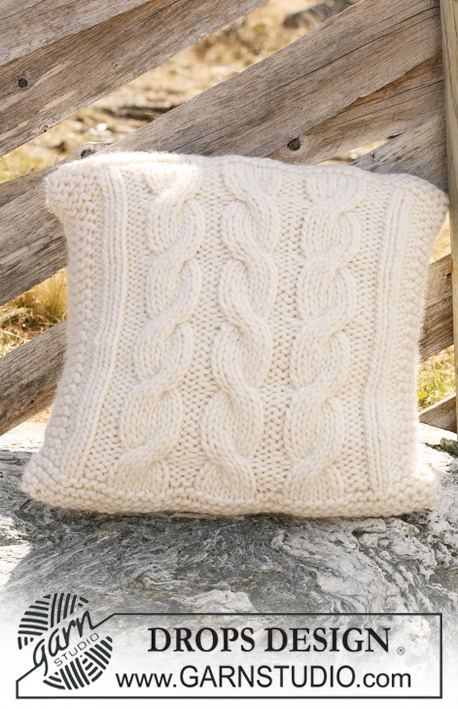
Knitted DROPS blanket in ”Polaris” with cables.
DROPS 117-55 |
|||||||||||||
|
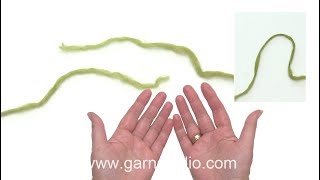
GARTER ST (back and forth on needle): K all rows. PATTERN: See diagram M.1 and M.2. Diagram shows pattern from RS. NEW BALL TIP: When beg a new ball of yarn, split the strands, moisture them and twist tog. -------------------------------------------------------- -------------------------------------------------------- BLANKET: Worked back and forth on circular needle. Cast on 72 sts on circular needle size 15 mm / US 19 with Polaris. Work 6 rows GARTER ST – see above, and continue as follows from RS: 2 garter sts, P2, K2, P4, M.1 (= 4 sts), P4, K2, P4, K2, P4, M.1, P4, M.2 (= 4 sts), P4, K2, P4, K2, P4, M.2, P4, K2, P2, 2 garter sts. After the first 2 rows in M.1/M.2 there are 80 sts on needle. Continue in pattern like this, but only repeat the top 10 rows in M.1/ M.2. When piece measures 157 cm / 61¾" K2 tog at the side in each repeat of M.1/M.2 from RS = 72 sts on needle. Work 6 rows garter st on all sts and bind off, piece measures approx 160 cm / 63". |
|||||||||||||
Diagram explanations |
|||||||||||||
|
|||||||||||||
|
|||||||||||||
Have you finished this pattern?Tag your pictures with #dropspattern #cuddlemeblanket or submit them to the #dropsfan gallery. Do you need help with this pattern?You'll find 15 tutorial videos, a Comments/Questions area and more by visiting the pattern on garnstudio.com. © 1982-2025 DROPS Design A/S. We reserve all rights. This document, including all its sub-sections, has copyrights. Read more about what you can do with our patterns at the bottom of each pattern on our site. |
|||||||||||||


With over 40 years in knitting and crochet design, DROPS Design offers one of the most extensive collections of free patterns on the internet - translated to 17 languages. As of today we count 314 catalogs and 11822 patterns - 11812 of which are translated into English (US/in).
We work hard to bring you the best knitting and crochet have to offer, inspiration and advice as well as great quality yarns at incredible prices! Would you like to use our patterns for other than personal use? You can read what you are allowed to do in the Copyright text at the bottom of all our patterns. Happy crafting!
Post a comment to pattern DROPS 117-55
We would love to hear what you have to say about this pattern!
If you want to leave a question, please make sure you select the correct category in the form below, to speed up the answering process. Required fields are marked *.