Richard by DROPS Design

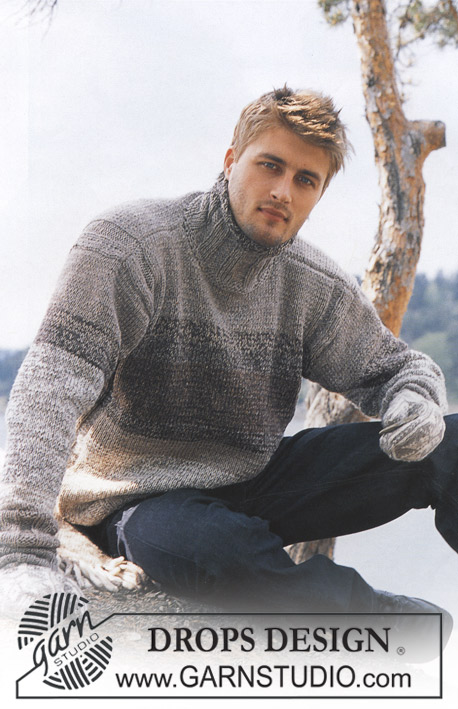
Knitted jacket for men, with raglan, high neck and zipper in DROPS Karisma and DROPS Alpaca

DROPS 85-13
Sizes: 12/14 years - S/M - L - XL - XXL

Finished measurements:
Chest: 102-108-114-124-136 cm
[40-1/8" - 42.5" - 44-7/8" - 48-7/8" - 53.5"]
Hem: 92-98-104-114-124 cm
[36.25" - 38-5/8" - 41" - 44-7/8" - 48-7/8"]

Materials: DROPS KARISMA SUPERWASH from Garnstudio
600-700-800-850-950 gr nr 01, natural
and use:
DROPS ALPACA from Garnstudio
400-450-500-550-600 gr nr 0618, beige

DROPS 4.5 mm [US 7] and 5.5 mm [US 9] circular and double-pointed needles, or sizes needed to obtain correct gauge.

1 Zipper: 55-65-70-70-70 cm long

-------------------------------------------------------

Knitting tension – See how to measure it and why here
Alternative Yarn – See how to change yarns here
Yarn Groups A to F – Use the same pattern and change the yarn here
Yarn usage using an alternative yarn – Use our yarn converter here

-------------------------------------------------------


100% Wool
from 3.00 $ /50g
DROPS Karisma uni colour DROPS Karisma uni colour 3.00 $ /50g
Wool Warehouse Direct Ltd
Order
DROPS Karisma mix DROPS Karisma mix 3.00 $ /50g
Wool Warehouse Direct Ltd
Order

100% Alpaca
from 3.40 $ /50g
DROPS Alpaca uni colour DROPS Alpaca uni colour 3.40 $ /50g
Wool Warehouse Direct Ltd
Order
DROPS Alpaca mix DROPS Alpaca mix 3.55 $ /50g
Wool Warehouse Direct Ltd
Order
needles DROPS Needles & Hooks
You can get the yarn to make this pattern from 72.60$. Read more.

Pattern instructions

NOTE: This pattern is written in American English. All measurements in charts are in cm. For conversion from inches to cm - click here. There are different terms for crocheting in American and British English. If this pattern includes crochet, click for "crochet terms" here. For this pattern in British English, please click here.
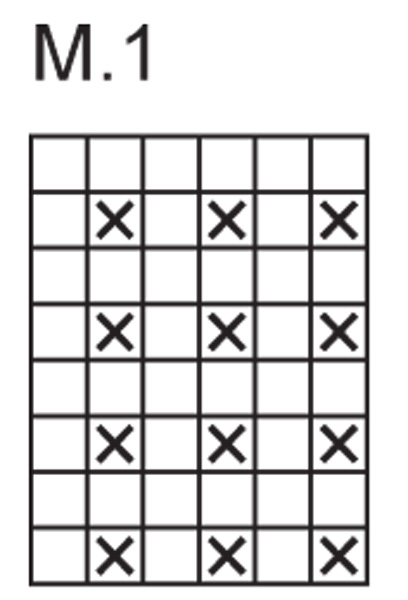
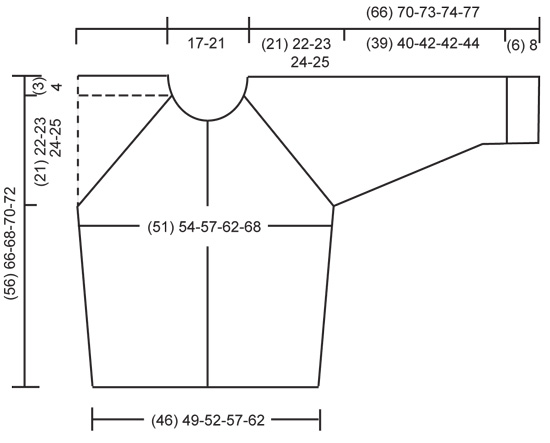
Gauge: 15 sts x 21 rows with 1 strand of each yarn on larger needles in stockinette st = 10 x 10 cm.

Rib: *K 1, P 1*, repeat from *-*.

Pattern: The diagrams are showing all rows seen from the right side.

Decreasing tips (for raglan):
All decs are made on the right side.
On front- and back piece dec before the 3 sts before/after the marker, and on the sleeves dec right beside the marker.
Start 2 sts before the marker on the sleeves and 5 sts before the marker on front and back, and work as follows:
K 2 tog, 1 st in seed st, K 1, 1 st in seed st, slip 1 st as if to knit, K 1, psso.
___________________________________________________________________

BODY
The cardigan are worked back and fort on circular needle.
Cast on 137-147-155-171-187 sts on smaller circular needles with 1 strand Karisma + 1 strand Alpaca. Knit rib, keeping 3 sts in garter st at each side for front edges, and begin and end rib with K 1 (seen from the right side).
When the piece measures 3-4-4-4-4 cm change to larger circular needles and Pattern 1, keeping 3 sts in garter st at each side for front edges. See that the K rib in the pattern is above the K rib in ribbing.
Place a marker in the 36-38-40-44-48th st in from each side (it will be a K 1), there are 65-71-75-83-91 sts between markers on back.
When the piece measures 10-12-12-12-12 cm inc 1 st at each side of both sts with markers. Inc every 5-6-6-6-6 cm a total of 4 times = 153-163-171-187-203 sts – knit the increased sts into the pattern as you go along.
When the piece measures 32-40-41-42-43 cm bind off 7 sts at each side for armholes (= bind off the st with the marker + 3 sts each side of that st) = 67-73-77-85-93 sts on back and 36-38-40-44-48 sts on each front.
Lay piece aside and knit the sleeves.

SLEEVES
Sleeves knitted in the round.
Cast on 32-34-36-36-40 sts on smaller double-pointed needles with 1 strand Karisma + 1 strand Alpaca; join and place a marker at the join. Knit rib – start with K 1 at marker.
When the piece measures 6-8-8-8-8 cm change to larger double-pointed needles and Pattern 1 – see that the K rib in the pattern is above the K rib in the ribbing.
When the piece measures 10-14-10-14-10 cm inc 1 st each side of the K st at marker every 2.5-2-2.5-2-2.5 cm a total of 14-16-16-17-17 times = 60-66-68-70-74 sts – knit the increased sts in the pattern as you go along.
When the piece measures 45-48-50-50-52 cm bind off 7 sts at marker (bind off the the K st at marker + 3 sts each side of it) = 53-59-61-63-67 sts.
Lay piece aside and knit second sleeve.

YOKE
Put the sleeves in on the same circular needles as Body where you bound off for armholes = 245-267-279-299-323 sts
Put a marker in each transition between Body and sleeves = 4 markers. Knit 3-1-1-1-0 rows before beginning shaping.
Read entire section before knitting:
Raglan shaping: Dec at each side of all markers (= 8 decs) – see Decreasing tips above – every other row 21-23-24-25-27 times.

Neck:
When the piece measures 49-57-59-60-62 cm put 3-4-5-6-6 sts at each center front edge on st holders for the neck. Then bind off at each neck edge every other row: 2 sts 2-0-0-2-4 times and 1 st 2-6-6-4-2 times.
After all shaping is complete 59-63-65-71-75 sts remain.

Neckband:
Pick up and knit approx. 10-16 sts at each side of neck on fronts (including sts on st holders) with 1 strand of each yarn and put all sts on smaller circular needles. K 1 row from wrong side, then K 1 row from right side, adjusting (inc/dec) to 83-83-91-103-111 sts on 2nd row. Then knit rib, keeping 3 sts in garter st at each side and beginning rib with K 1 (as seen from the right side). When the collar measures 20-22-22-24-24 cm bind off all sts in rib.

ASSEMBLY
Sew opening under the sleeve.
Sew in zipper – start at lower edge. Fold the collar in half to wrong side and stitch in place, covering end of zipper.

Diagram

All measurements in charts are in cm.

symbols = K from RS, P from WS
symbols = P from RS, K from WS
diagram
diagram

Do you need help with this pattern?

Thank you for choosing a DROPS Design pattern. We take pride in providing patterns that are correct and easy to understand. All patterns are translated from Norwegian and you can always check the original pattern (DROPS 85-13) for measurements and calculations.

Are you having trouble following the pattern? See below for a list of resources to help you finish your project in no time - or why not, learn something new.

signature-image signature

Are you having trouble following the pattern? See below for a list of resources to help you finish your project in no time - or why not, learn something new.

Each of our patterns has specific tutorial videos to help you.

We have also step-by-step guides for different techniques which you'll find here.

1) Why is the knitting/crochet tension so important?

Knitting tension is what determines the final measurements of your work, and is usually measured per 10 x 10 cm. It is provided like so: number of stitches in width x number of rows in height - eg: 19 stitches x 26 rows = 10 x 10 cm.

The knitting tension is very individual; some people knit/crochet loosely while others work tightly. You adjust the knitting tension with the needle size, which is why the suggested needle size only serve as a guide! You need to adjust this (up or down) to ensure that YOUR knitting tension matches the knitting tension provided in the pattern. If you work with a different knitting tension than provided you will have a different yarn consumption, and your work will have different measurements than what the pattern suggests.

The knitting tension also determines which yarns can replace each other. As long as you achieve the same knitting tension you can replace one yarn with another.

See DROPS lesson: How to measure your tension/gauge

See DROPS video: How to make a gauge tension swatch

to top

2) What are the yarn groups?

All our yarns are categorised into yarn groups (from A to F) according to thickness and knitting tension – group A contains the thinnest yarns and group F the thickest. This makes it easier for you to find alternative yarns to our patterns, should you wish to switch yarn. All yarns within the same group have a similar knitting tension and can easily replace each other. However, different yarn qualities have different structures and properties which will give the finished work a unique look and feel.

Click here for an overview of the yarns in each yarn group

to top

3) Can I use a different yarn than what the pattern suggests?

The important thing when changing from one yarn to another is that the knitting/crochet tension remains the same. This is so that the measurements of the finished piece will be the same as on the sketch provided. It is easier to achieve the same knitting tension using yarns from the same yarn group. It is also possible to work with multiple strands of a thinner yarn to achieve the knitting tension of a thicker one. Please try our yarn converter. We recommend you to always work a test swatch.

Please NOTE: when changing yarn the garment might have a different look and feel to the garment in the photo, due to individual properties and qualities of each yarn.

See DROPS lesson: Can I use a different yarn than the one mentioned in the pattern?

to top

4) How do I use the yarn converter?

At the top of all our patterns you’ll find a link to our yarn converter, which is a helpful tool should you wish to use a different yarn than suggested. By filling in the yarn quality you wish to replace, the amount (in your size) and number of strands, the converter will present good alternative yarns with the same knitting tension. Additionally it will tell you how much you’ll require in the new qualities and whether you’ll need to work with multiple strands. Most skeins are 50g (some are 25g or 100g).

If the pattern is worked with multiple colours, every colour will have to be converted separately. Similarly, if the pattern is worked with several strands of different yarns (for example 1 strand Alpaca and 1 strand Kid-Silk) you will have to find alternatives for each, individually.

Click here to see our yarn converter

to top

5) Why do I get the wrong knitting tension with the suggested needle size?

The needle size provided in the pattern serves only as a guide, the important thing is to follow the knitting tension. And since knitting tension is very individual, you will have to adjust the needle size to ensure that YOUR tension is the same as in the pattern – maybe you’ll have to adjust 1, or even 2 needle sizes, up or down to achieve the correct tension. For this, we recommend that you work test swatches.

Should you work with a different knitting tension than the one provided, the measurements of the finished garment might deviate from the measurement sketch.

See DROPS lesson: How to measure your tension/gauge

See DROPS video: How to make a gauge tension swatch

to top

6) Why is the pattern worked top-down?

Working a garment top-down provides more flexibility and room for personal adjustment. For example it is easier to try the garment on while working, as well as making adjustments to length of yoke and shoulder caps.

The instructions are carefully explaining every step, in the correct order. Diagrams are adjusted to the knitting direction and are worked as usual.

to top

7) Why are the sleeves shorter in larger sizes?

The total width of the garment (from wrist-to-wrist) will be larger in the larger sizes, despite the actual sleeves being shorter. The larger sizes have longer sleeve caps and wider shoulders, so there will be a good fit in all sizes.

to top

8) What is a repeat?

Diagrams are often repeated on the round or in height. 1 repeat is the diagram the way it appears in the pattern. If it says to work 5 repeats of A.1 in the round, then you work A.1 a total of 5 times after/next to each other in the round. If it says to work 2 repeats of A.1 vertically/in height you work the entire diagram once, then begin again at the start and work the entire diagram one more time.

to top

9) How do I work according to a knitting diagram?

The diagram depicts all rows/rounds, and every stitch seen from the right side. It is read from bottom to top, from right to left. 1 square = 1 stitch.

When working back and forth, every other row is worked from the right side and every other row is worked from the wrong side. When working from the wrong side, the diagram will have to be worked reversed: from left to right, knit stitches are purled, purl stitches are knit etc.

When working in the round every round is worked from the right side and the diagram are worked from right to left on all rounds.

See DROPS lesson: How to read knitting diagrams

to top

10) How do I work according to a crochet diagram?

The diagram depicts all rows/rounds, and every stitch seen from the right side. It is worked from bottom to top, from right to left.

When working back and forth every other row is worked from the right side: from right to left and every other row is worked from the wrong side: from left to right.

When working in the round, every row in the diagram are worked from the right side, from right to left.

When working a circular diagram you start in the middle and work your way outwards, counter clockwise, row by row.

The rows usually start with a given number of chain stitches (equivalent to the height of the following stitch), this will either be depicted in the diagram or explained in the pattern.

See DROPS lesson: How to read crochet diagrams

to top

11) How do I work several diagrams simultaneously on the same row/round?

Instructions for working several diagrams after each other on the same row/round, will often be written like so: “work A.1, A.2, A.3 a total of 0-0-2-3-4 times". This means you work A.1 once, then A.2 is worked once, and A.3 is repeated (in width) the number of times provided for your size – in this case like so: S = 0 times, M = 0 times, L=2 times, XL= 3 times and XXL = 4 times.

The diagrams are worked as usual: begin with the first row in A.1, then work the first row in A.2 etc.

See DROPS lesson: How to read knitting diagrams

See DROPS lesson: How to read crochet diagrams

to top

12) Why does the piece start with more chain stitches than it’s worked with?

Chain stitches are slightly narrower than other stitches and to avoid working the cast-on edge too tight, we simply chain more stitches to begin with. The stitch count will be adjusted on the following row to fit the pattern and measurement sketch.

to top

13) Why increase before the rib edge when the piece is worked top-down?

The rib edge is more elastic and will contract slightly compared to, for example, stocking stitch. By increasing before the rib edge, you avoid a visible difference in width between the rib edge and the rest of the body.

to top

14) Why increase in the cast-off edge?

It’s very easy to cast off too tightly, and by making yarn overs while casting off (and simultaneously casting these off) you avoid a too tight cast off edge.

See DROPS video: How to bind off with yarn overs (yo)

to top

15) How do I increase/decrease on every 3rd and 4th row/round alternately?

To achieve an even increase (or decrease) you can increase on, for example: every 3rd and 4th row alternately, like so: work 2 rows and increase on the 3rd row, work 3 rows and increase on the 4th. Repeat this until the increase is complete.

See DROPS lesson: Increase or decrease 1 st on every 3rd and 4th row alternately

to top

16) Why is the pattern slightly different than what I see in the photo?

Pattern repeats can vary slightly in the different sizes, in order to get the correct proportions. If you’re not working the exact same size as the garment in the photo, yours might deviate slightly. This has been carefully developed and adjusted so that the complete impression of the garment is the same in all sizes.

Make sure to follow instructions and diagrams for your size!

to top

17) How can I work a jacket in the round instead of back and forth?

Should you prefer to work in the round instead of back and forth, you may of course adjust the pattern. You’ll need to add steeks mid-front (usually 5 stitches), and follow the instructions. When you would normally turn and work from the wrong side, simply work across the steek and continue in the round. At the end you’ll cut the piece open, pick up stitches to work bands, and cover the cut edges.

See DROPS video: How to knit steeks and cut open

to top

18) Can I work a jumper back and forth instead of in the round?

Should you prefer to work back and forth instead of in the round, you may of course adjust the pattern so you work the pieces separately and then assemble them at the end. Divide the stitches for the body in 2, add 1 edge stitch in each side (for sewing) and work the front and back pieces separately.

See DROPS lesson: Can I adapt a pattern for circular needles into straight needles?

to top

19) Why do you show discontinued yarns in the patterns?

Since different yarns have different qualities and textures we have chosen to keep the original yarn in our patterns. However, you can easily find options among our available qualities by using our yarn converter, or simply pick a yarn from the same yarn group.

It is possible that some retailers still have discontinued yarns in stock, or that someone has a few skeins at home that they would like to find patterns for.

The yarn converter will provide both alternative yarn as well as required amount in the new quality.

to top

20) How do I make a women’s size garment into a men’s size one?

If you have found a pattern you like which is available in women’s size it’s not very difficult to convert it to men’s size. The biggest difference will be the length of sleeves and body. Start working on the women size that you think would fit across the chest. The additional length will be worked right before you cast off for the armhole/sleeve cap. If the pattern is worked top-down you can add the length right after the armhole or before the first decrease on sleeve.

Regarding additional yarn amount, this will depend on how much length you add, but it is better with a skein too many than too few.

to top

21) How do I prevent a hairy garment from shedding?

All yarns will have excess fibres (from production) that might come off as lint or shedding. Brushed yarns (ie hairier yarns) have more of these loose, excess fibres, causing more shedding.

Shedding also depends on what is worn under or over the garment, and whether this pulls at the yarn fibres. It’s therefore not possible to guarantee that there will be no shedding

Below are some tips on how to get the best result when working with hairier yarns:

1. When the garment is finished (before you wash it) shake it vigorously so the looser hairs come off. NOTE: do NOT use a lint roller, brush or any method that pulls at the yarn.

2. Place the garment in a plastic bag and put it in your freezer - the temperature will cause the fibres to become less attached to each other, and excess fibres will come off easier.

3. Leave in the freezer for a few hours before taking it out and shaking it again.

4. Wash the garment according to the instructions on the yarn label.

to top

22) Where on the garment is the length measured?

The measurement sketch/schematic drawing provides information regarding the full length of the garment. If it’s a jumper or a jacket the length is measured from the highest point on the shoulder (usually closest to the neckline), and straight down to the bottom of the garment. It is NOT measured from the tip of shoulder. Similarly, the length of yoke is measured from the highest point on the shoulder and down to where yoke is split into body and sleeves.

See DROPS lesson: How to read a schematic drawing

to top

23) How do I know how many balls of yarn I need?

The required amount of yarn is provided in grams, eg: 450 g. To calculate how many balls you’ll need you first need to know how many grams are in 1 ball (25g, 50g or 100g). This information is available if you click on the individual yarn quality on our pages. Divide the amount required with the amount of each ball. For example, if each ball is 50g (the most common amount), the calculation will be as follows: 450 / 50 = 9 balls.

to top

Have you purchased DROPS yarn to make this pattern? Then you are entitled to receive help from the store where you bought the yarn. Find a list of DROPS stores here!
Still can't find the answer you need? Then scroll down and leave your question so one of our experts can try to help you. This will be done normally within 5 to 10 working days. In the meantime, you can read the questions and answers that others have left to this pattern or join the DROPS Workshop on Facebook to get help from fellow knitters/crocheters!

Comments / Questions (135)

country flag Lourdes wrote:

Cuando hay que incorporar aumentos en el cuerpo y mangas, cómo se incorporan al patrón? Se altera el patrón original? Gracias!

02.10.2023 - 18:18

DROPS Design answered:

Hola Lourdes, aumentas 1 punto a cada lado del punto con marcapuntos (es decir, uno a la derecha y otro a la izquierda del mismo punto). En total hay 4 puntos aumentados en la fila. Estos puntos se trabajan después dentro del patrón. Puede quedar un ligero desajuste en el lateral, pero el dibujo general no debería variar demasiado.

09.10.2023 - 00:37

country flag Wil Kerkmeer wrote:

Ik brei herenvest 85-13 en volgens mij kloppen het aantal steken niet in maat L. Ik begin met de pas 279 st, 24 x 8 (192) minderingen = 87 st, min 2 x 5 st op hulpnaald = 77 steken, jullie geven aan 65 st over, zie ik iets over het hoofd? Vrgr

19.06.2023 - 13:57

DROPS Design answered:

Dag Wil,

Je hebt gelijk, je komt niet uit met het aantal steken. Vermoedelijk moeten er, nadat je 5 steken aan elke kant voor de hals apart hebt gezet, ook voor maat L nog een aantal steken afgekant worden, om een ronding in de halslijn te krijgen en op 65 steken uit te komen. Ik zal het doorgeven aan de ontwerpafdeling om te controleren en aan te passen.

29.06.2023 - 07:07

country flag Hella wrote:

Uiteindelijk heb ik prima hulp gekregen van de Breiwebshop waar ik mn wol had gekocht. Het resultaat is prachtig, kleinzoon helemaal tevreden! Helaas zit ik niet op social media, dus ik kan het hier niet delen.

26.03.2023 - 22:15

country flag Anneke Van Leusden wrote:

In het Nederlandse patroon zit een fout bij de minderingen voor de hals: Er staat Kant hierna aan beide halskanten af in elke 2e nld: 2-0-0-2-4 x 2 st en 2-0-0-2-4 x 1 st. Dit moet zijn: Kant hierna aan beide graslanden af in elke 2e nld: 2-0-0-2-4 × 2 st en 2-6-6-2-4 × 1 st. Ik kwam erachter door het Noorse patroon te checken. Ik hield teveel steken over! Kunnen jullie dit in het Nederlandse patroon aanpassen? Met vriendelijke groet, Anneke

01.03.2023 - 13:50

country flag Hella wrote:

Lastig, zo communiceren. Willen jullie de hele beschrijving geven van eerste reeks : r.voorpand, waar beginnen met mindering (en welke : samenbreien of overhalen) op voorpand vóor markering; r.mouw: ná 1e markering: waar en welke mindering; overgang r. mouw - achterpand vóor markering: welke mindering waar? na die markering: waar en welke? dan overgang achterpand l. mouw wat en welke voor markering en erna en dan nog l.mouw/l. voorpand id.

12.02.2023 - 17:59

DROPS Design answered:

Dag Hella,

Misschien is het voor jou mogelijk om bij een verkooppunt langs te gaan, waar onze garens worden verkocht? Hopelijk dat ze je daar verder kunnen helpen. Het is inderdaad wat lastiger om op deze manier uit te leggen.

19.02.2023 - 18:47

country flag Hella wrote:

Voor de verduidelijking: jullie beschrijven in het antwoord telkens "voor de markeerdraad": "Als je op een pand bent (dus de steken op je rechter naald horen dan bij het voor- of achterpand) begin je 5 steken voor de markeerdraad/merkdraad en minder je 2 steken zoals beschreven.Als je op een mouw bent begin je 2 steken voor de markeerdraad/merkdraad en minder je 2 steken zoals beschreven." Maar je moet toch ook minderen na de markeerdraad? Dat staat er niet bij #wanhopig!

11.02.2023 - 22:16

DROPS Design answered:

Dag Hella,

Ja, je mindert ook altijd na iedere markeerdraad. Het gaat erom dat je de meerderingen die je op de panden maakt, 3 steken voor of na de markeerdraad maakt. Daarvoor moet je 5 steen voor de merkdraad beginnen. Als je op de mouw aan het breien bent begin je 2 steken voor de merkdraad.

12.02.2023 - 17:41

country flag Edyta wrote:

Dzień dobry. Czy po 3 oczka na ścieg francuski są już w tych 155 oczkach, czy trzeba dodać po 3 oczka? Pozdrawiam

09.02.2023 - 08:59

DROPS Design answered:

Witaj Edyto, oczka brzegowe są wliczone do ogólnej liczby oczek, czyli w Twoim przypadku powinnaś mieć na drucie 155 oczek. Pozdrawiamy!

09.02.2023 - 14:52

country flag Hella wrote:

Dank voor het antwoord op mijn vraag over het minderen. Toch ben ik er nog niet uit. De ene keer moet je samenbreien en de andere keer afhalen, breien en over de gebreide steek heen halen. In de beschrijving staat 1 richting besproken, maar je moet dan toch de ene keer naar de ene kant minderen, de andere keer andersom? Er staat maar 1 reeks beschreven. Ik wil graag weten wanneer ik welke kant op moet minderen op resp. voorpand r. 1x, mouw 2x, achterpand 2x, mouw (2x), voorpand 1x

08.02.2023 - 12:22

country flag Hella wrote:

Hallo. Ik raak in de war van de beschrijving vd mindering. Heb alle vragen doorgelopen, en daar wordt het alleen maar warriger van. In de breivolgorde aan de goede kant heb ik: rechtervoorpand/mouw; mouw/achterpand; achterpand/mouw; mouw/linkervoorpand. De beschrijving voor minderen geeft 1 richting aan, maar de minderingen moeten naar elkaar toebuigen bij raglan en dus omwisselen. Als ik van mouw naar achterpand ga, moet ik dan eerst op 2 steken afhalen en overhalen en dan vijf op het pand?

07.02.2023 - 23:03

DROPS Design answered:

Dag Hella,

Als je op een pand bent (dus de steken op je rechter naald horen dan bij het voor- of achterpand) begin je 5 steken voor de markeerdraad/merkdraad en minder je 2 steken zoals beschreven.Als je op een mouw bent begin j 2 steken voor de markeerdraad/merkdraad en minder je 2 steken zoals beschreven.

08.02.2023 - 11:17

country flag Caitlin R wrote:

In the English translation it says “ Knit rib, keeping 3 sts in garter st at each side for front edges,” but the piece appears to be knit in the round, so I don’t know where this garter stitch part is supposed to go. Later in the pattern it says “ Place a marker in the 36-38-40-44-48th st in from each side,” but again, I don’t know where the side starts and ends if it’s knit in the round. Thank you for your help!

22.01.2023 - 19:26

DROPS Design answered:

Dear Caitlin, body is worked back and forth on circular needle, ie you will work rib pattern with 3 sts in garter stitch on each side. Count the number of sts from the beginning of the row, first seen from RS (1st side) and then from WS (2nd side). The sts between markers are for back piece. Happy knitting!

23.01.2023 - 10:11

Post a comment to pattern DROPS 85-13

We would love to hear what you have to say about this pattern!

If you want to leave a question, please make sure you select the correct category in the form below, to speed up the answering process. Required fields are marked *.