
Looking for a yarn?


Comments / Questions (74)
![]() Rosy wrote:
Rosy wrote:
Bonjour, est-il possible de tricoter ce modèle en Baby-Merinos ?
06.05.2025 - 16:18DROPS Design answered:
Bonjour Rosy, tout à fait car Alpaca et Baby Merino appartiennent au même groupe A - utilisez le convertisseur pour savoir la quantité correspondante. Bon tricot!
07.05.2025 - 08:45
![]() Christine Stegmann wrote:
Christine Stegmann wrote:
In der Anleitung für die Jacke / Vorderteil heißt es: „Stricke bis die Arbeit circa 16 – 18 – 19 (20,5 - 22) Zentimeter misst“, bevor die Maschen für den Ärmel angeschlagen werden. Wird diese Breite an der unteren Kante gemessen? Vielen Dank. Christine
13.02.2025 - 22:31DROPS Design answered:
Liebe Frau Stegmann, ja genau, an den längsten Länge, dh an der unteren Kante der Jacke. Viel Spaß beim Stricken!
14.02.2025 - 09:23
![]() Elisabet Williams wrote:
Elisabet Williams wrote:
Hej! Jag har stickat koftan. Och så fin den blir! Nu stickar jag byxorna. Men jag får inte ihop matematiken... Det står att när man har ökat upp till (i mitt fall med storlek 6/9 mån) 76 maskor, så ska man sedan minska i ena sidan fyra gånger till 68 maskor. Men 76 - 4 är 72. Vad är det jag missförstår? Vänliga hälsningar Elisabet
05.11.2024 - 10:42DROPS Design answered:
Hej Elisabeth. Du har missat denna mening "När arb mäter 18-21-24 (29-34) cm avm 2 m i varje sida." Så innan du avmaskar 1 m i den ena sidan (mot mitt fram) totalt 4 gånger så ska du avmaska 2 maskor i varje sida. Mvh DROPS Design
06.11.2024 - 07:20
![]() Sharareh wrote:
Sharareh wrote:
Bonjour, pour la veste, au niveau de col je ne comprends pas : «Tricoter 3 rangs point mousse (1er rang = sur l’envers du travail), >>? en même temps, ajuster à 62-64-66 (70-72) m au 1er rang. ?
16.02.2024 - 15:37DROPS Design answered:
Bonjour Sharareh, vous relevez les mailles du col sur l'endroit, puis tricotez 1 rang endroit sur l'envers en diminuant à intervalles réguliers (cf cette leçon pour avoir le nombre de mailles indiqué pour la taille concernée, tricotez encore 2 rangs endroit (3 au total) et rabattez au rang suivant. Bon tricot!
19.02.2024 - 07:29
![]() Sharareh wrote:
Sharareh wrote:
Bonjour, pour la veste 4ans. J’ai mis les 65 m de bas en attente. Je monte 70m depuis le col (de l’autre côté en haut de la veste). Car le fil se situe côté col. (Couleur gris) . À quelle endroit précisément je dois monter les mailles de la manche et en quelle couleur? Au milieu du rang ou tout en haut niveau col ? Merci
14.11.2023 - 12:52DROPS Design answered:
Bonjour Sharareh, quand vous avez mis les 65 m en attente coupez le fil, avec ce même fil, montez maintenant 70 mailles (= bas de la manche), et tricotez les mailles de l'empiècement restées sur l'aiguille et tricotez les nouveaux rangs raccourcis. pour former la manche. Bon tricot!
14.11.2023 - 15:42
![]() Sba wrote:
Sba wrote:
Knittig size 6/9 month size, am I putting sts on holder at the widest or narrow edge where the neck is ? "Now put the outermost 41-45-52 (60-65) sts towards lower edge on a thread (= side) and cast on 36-42-46 (60-70) new sts on beginning of row for sleeve, before continuing as follows" Do I need to cut the tread?
14.04.2023 - 21:46DROPS Design answered:
Dear Sba, you put on holder the stitches on the side, so on the wider edge. Yes, you need to cut the thread. Happy knitting!
16.04.2023 - 19:50
![]() Kristina wrote:
Kristina wrote:
Hej, När man har satt maskor på tråd för att sedan börja på den fösta ärmen, klipper man då av trådarna? Eller ska de på något sätt följa med uppåt? Tacksam för svar! Med vänlig hälsning, Kristina
15.02.2023 - 07:30DROPS Design answered:
Hej Kristina, du fortsætter med samme tråd når du strikker over ærmerne. Hvis du ikke har strikket maskerne først så kan du blive nødt til at klippe tråden :)
16.02.2023 - 13:57
![]() MARJON BENSCHOP wrote:
MARJON BENSCHOP wrote:
In dit mooie patroon mis ik de beschrijving van het rugpand. Kunt u dit patroon kompleet maken. Mijn hartelijke dank en groet, Marjon
06.01.2023 - 23:18DROPS Design answered:
Dag Marjon,
De panden worden in een stuk gebreid en overdwars, beginnend bij midden voor. Je breit eerst een voorpand, dan brei je door over het achterpand en dan weer een voorpand. Vandaar dat de panden niet los beschreven staan.
08.01.2023 - 10:24
![]() Kerstin wrote:
Kerstin wrote:
Hej! Vilken färg ska jag använda när jag lägger upp nya maskor för att sticka ärmarna? Tack på förhand!
12.12.2022 - 11:42DROPS Design answered:
Hej Kerstin, samme farve som du strikker bærestykket med :)
15.12.2022 - 08:59
![]() Kerstin wrote:
Kerstin wrote:
Hej! Tröjan Little Fern är klar och nu fattas bara halskanten. Kan inte förstå beskrivningen: \\\\\\\"sticka upp \\\\\\\" Menar man \\\\\\\"ta upp\\\\\\\" 1m i vartannat v runt halsen? Jag stickar i strl 6/9 mån. Nu har jag 90m i halsringningen. Då kan jag ju omöjligt få 95 m om jag skall ta upp 1 m i vartannat v. Jag förstår ingenting. Tacksam för hjälp!
03.08.2022 - 18:04DROPS Design answered:
Hej Kerstin, ja du strikker 95 masker op rundt i halsen. Se gerne vores video hvordan man strikker op :)
05.08.2022 - 14:20
|
|
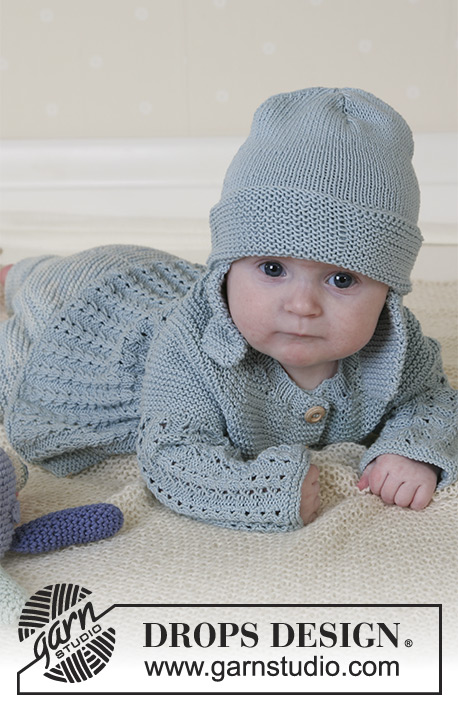
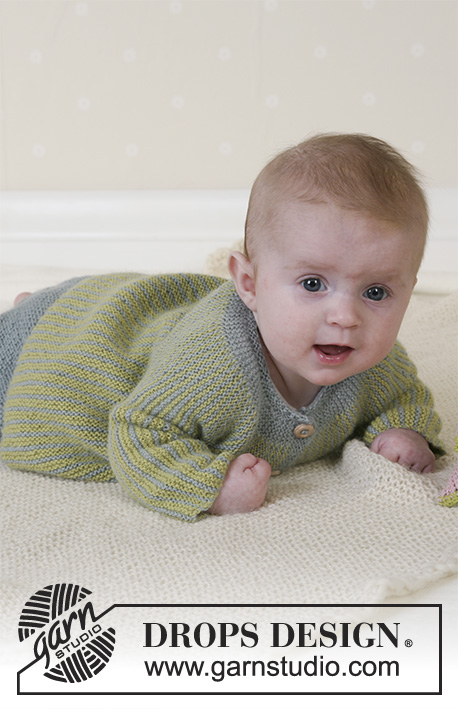
Little Fern#littlefernjacket |
|
 |
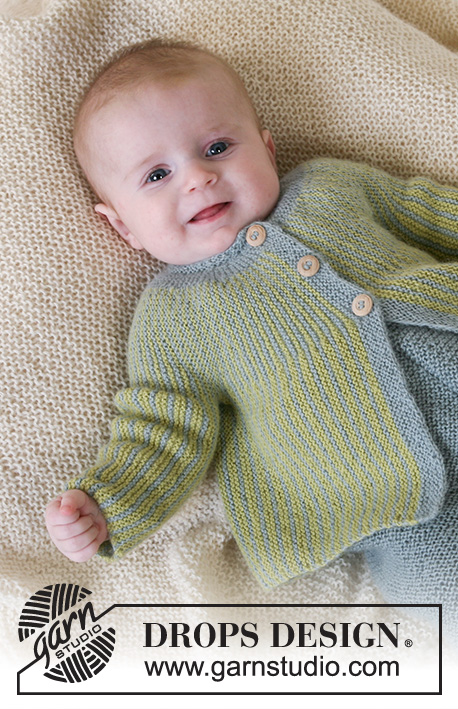 |
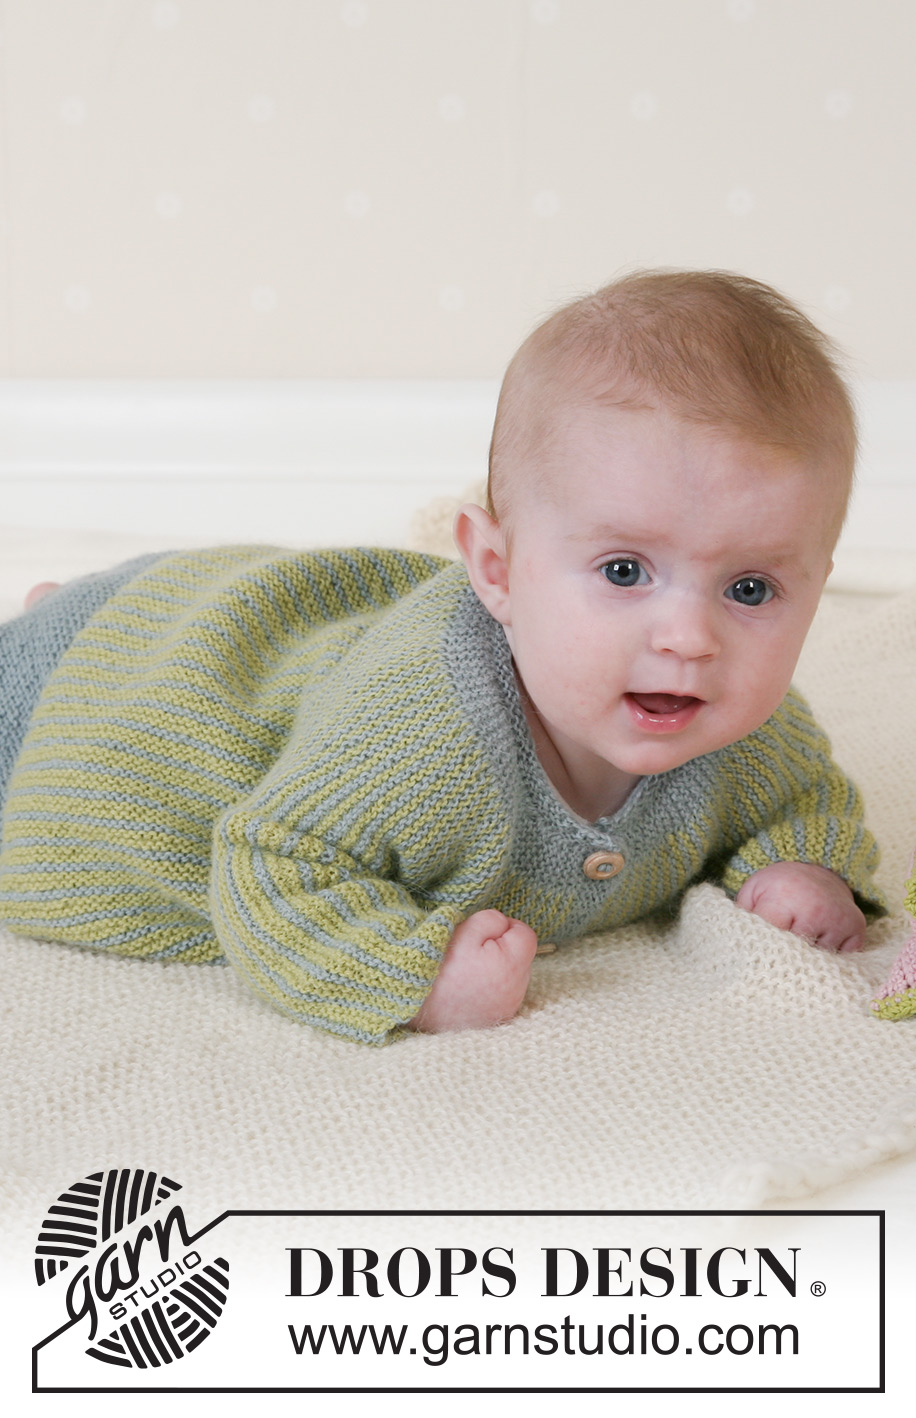
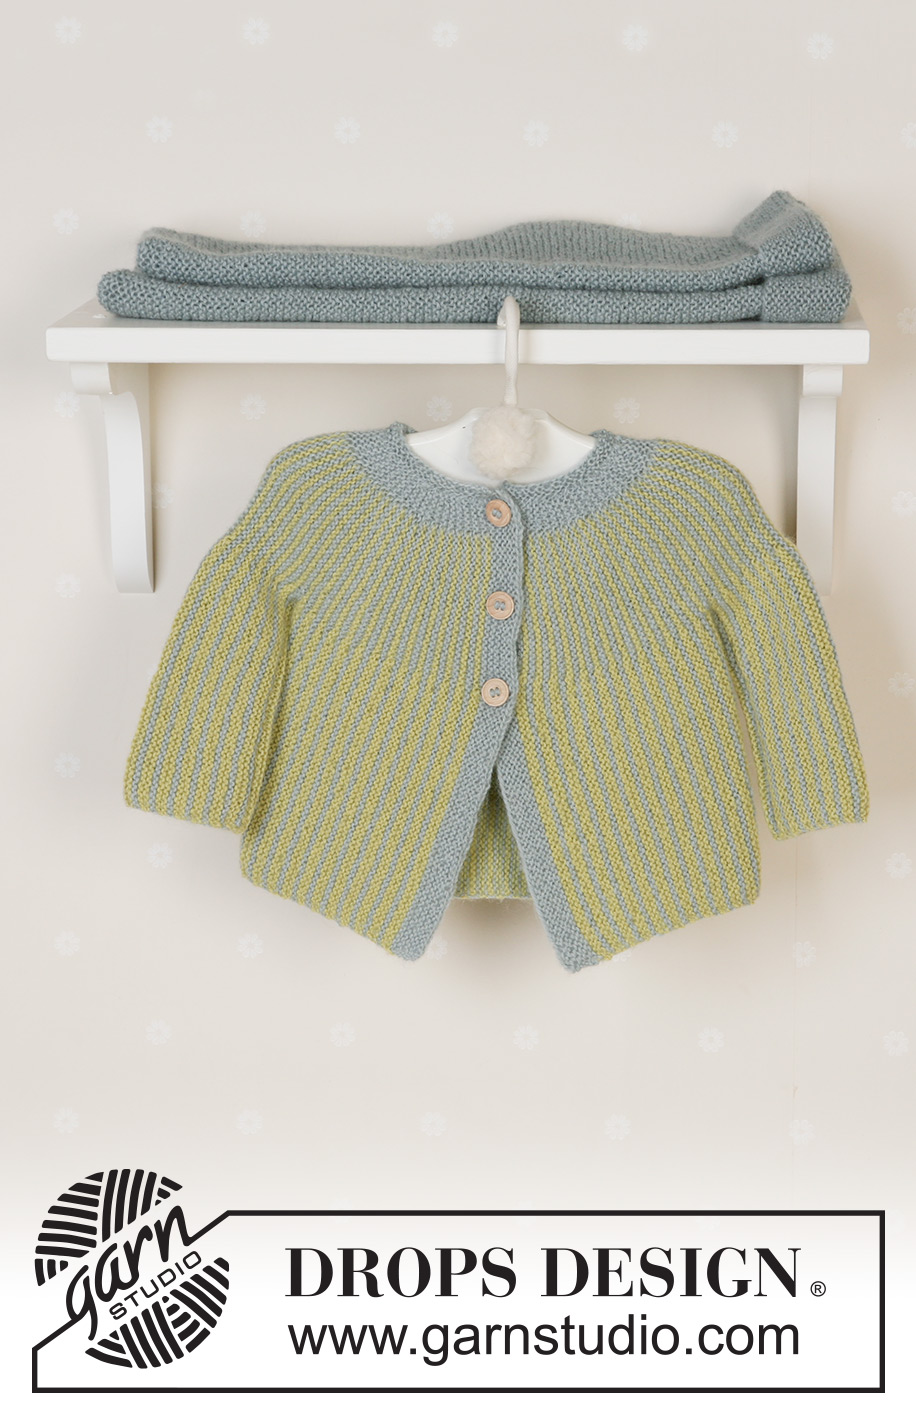
Set of pants and jacket in garter stitch in DROPS Alpaca. Sizes baby and children from 1 month to 4 years.
DROPS Baby 14-27 |
|
|
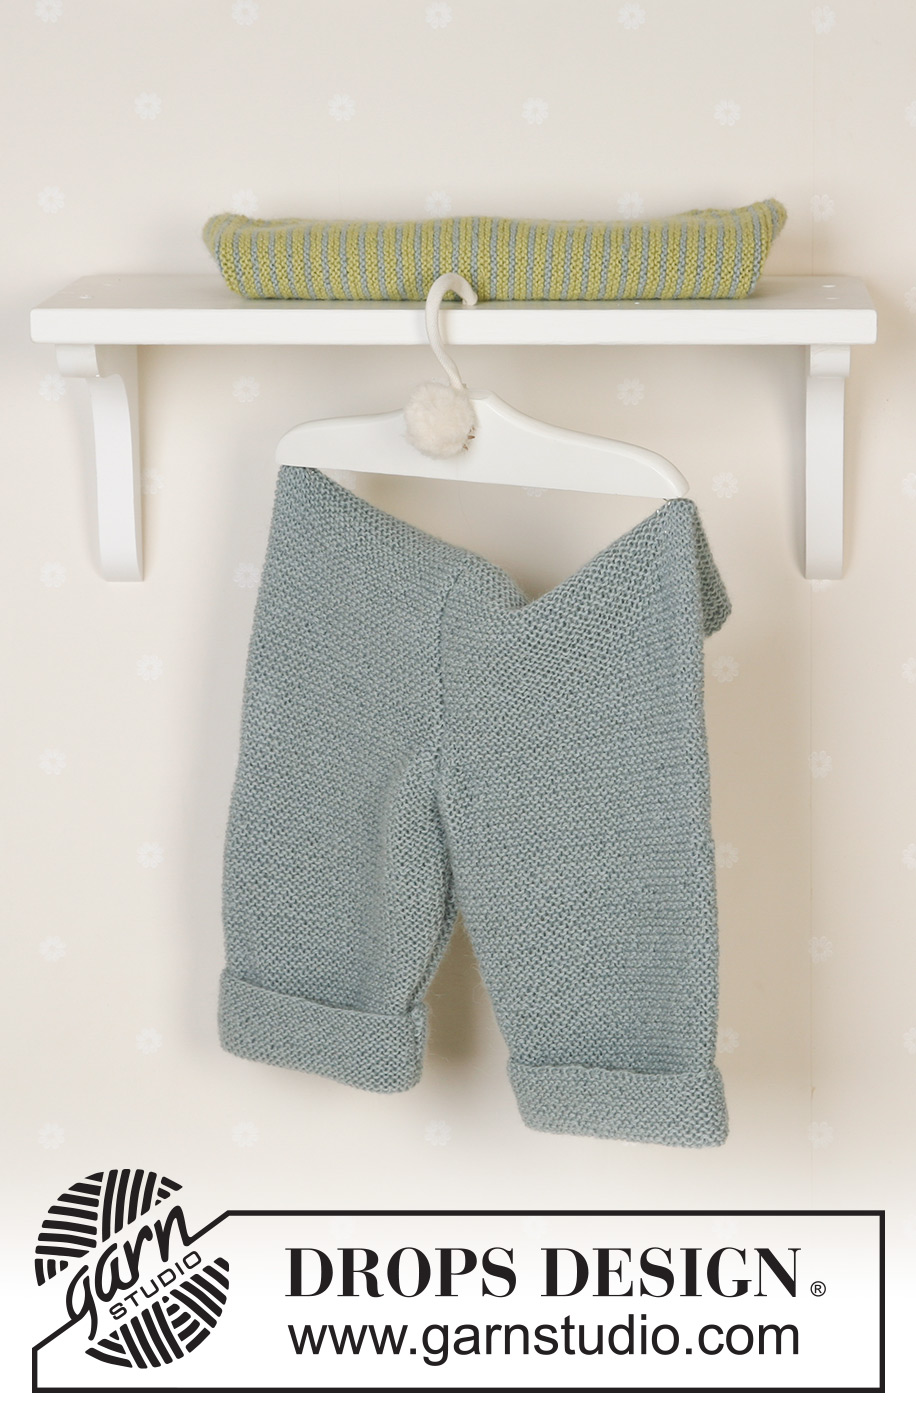
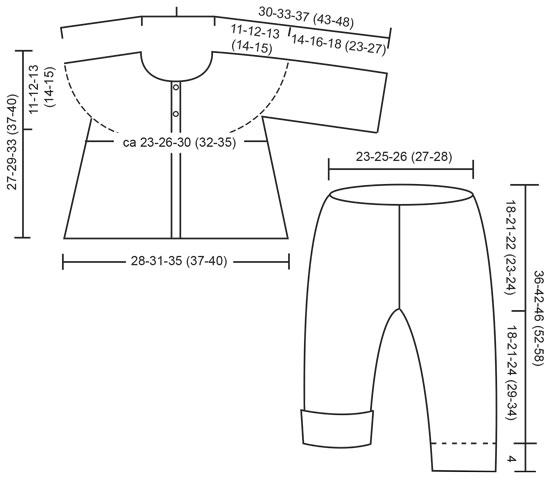
Knitting gauge: 26 sts x 52 rows on needles size 2.5 mm / US 1 in garter sts = 10 x 10 cm / 4" x 4". Garter sts: Knit all rows Knitting tips: Every time you turn the piece, slip 1 st after turning and tighten thread before continuing. Do this to avoid holes in transitions. JACKET: Start on left front, knit towards the sleeve, the back, the other sleeve and finish with right front. Loosely cast on 70-76-86 (96-104) sts with light mint on needle size 2.5/US 1 and knit 10 rows garter sts (= front band, 1st row = right side). Continue as follows – read Knitting tips: *2 rows garter sts over the first 46-50-57 (65-70) sts with lime (i.e. knit from right side over the first 46-50-57 (65-70) sts, turn the piece and knit back), 2 rows garter sts over the first 64-70-80 (90-98) sts with lime, 2 rows garter sts over all 70-76-86 (96-104) sts with light mint*, repeat from *-* until piece measures 16-18-19 (20.5-22) cm / 6¼"-7"-7½" (8⅛"-8¾") from cast-on row (measured where widest). Now put the outermost 41-45-52 (60-65) sts towards lower edge on a thread (= side) and cast on 36-42-46 (60-70) new sts on beginning of row for sleeve, before continuing as follows: *2 rows garter sts over the first 41-47-51 (65-75) sts with lime, 2 rows garter sts over the first 59-67-74 (90-103) sts with lime, 2 rows garter sts over all 65-73-80 (96-109) sts with light mint. When piece measures 16-17-18 (18-20) cm / 6¼"-6¾"-7" (7"-8") from sts cast on for sleeve (measured where widest), bind off the outermost 36-42-46 (60-70) sts towards lower edge of sleeve. Put the 41-45-52 (60-65) sts from thread back on needle and insert a marker in piece. Now knit from *-* as described for front piece. When piece measures 28-31-35 (37-40) cm / 11"-12¼"-13¾" (14½"-15¾") from marker (measured where widest), put the outermost 41-45-52 (60-65) sts from lower edge on a thread (= side). Cast on 36-42-46 (60-70) new sts for sleeve and knit as before from *-* as described for the other sleeve until you have knitted as many rows as on the other sleeve. Bind off the outermost 36-42-46 (60-70) sts towards lower edge of sleeve and put the 41-45-52 (60-65) sts from thread back on needle and continue as before until you have knitted as many rows as on the other front piece. Change to light mint and knit front band as follows: Knit 4 rows garter sts over all sts, on next row make 3 button holes as follows from the right side (i.e. from lower edge towards the top): knit 43-47-55 (63-67) garter sts, yo, K2 tog, knit 10-11-12 (13-15) garter sts, yo, K2 tog, knit 10-11-12 (13-15) sts, yo, K2 tog and finish with K1. Turn and knit garter sts over all sts. Now knit 4 rows garter sts over all sts and bind off loosely. Assembly: Sew the openings under the arms. Neck: Pick up 1 st in every other row round the neck using needle size 2.5/US 1 and light mint = approx 88-95-102 (106-113) sts. Knit 3 rows garter sts (1st row = wrong side), at the same time, adjusting number of sts evenly on first row to 62-64-66 (70-72). Bind off in rib, K1, P1. Sew on buttons. PANTS: Right leg: Cast on 52-60-64 (70-74) sts (incl 1 edge st each side) using needle size 2.5/US 1 and light mint and knit garter sts. Insert a marker when piece measures 4 cm / 1½" (= turn-up) and measure piece from here. When piece measures 4 cm / 1½" inc 1 st each side on every 1.5-2-2.5 (3-4) cm / ½"-¾"-1" a total of 8 times = 68-76-80 (86-90) sts. When piece measures 18-21-24 (29-34) cm / 7"-8¼"-9½" (11⅜"-13⅜"), bind off 2 sts each side. Now dec 1 st on one side of piece (= towards mid front) on every other row a total of 2-4-6 (10-12) times = 62-68-70 (72-74) sts. Continue in garter sts until piece measures 36-42-46 (52-58) cm / 14¼"-16½"-18" (20½"-22¾") from marker. Now knit 2 cm / ¾" stockinette sts and bind off loosely. Left leg: As right leg, but mirrored. Assembly: Fold right leg double and sew inner leg seam within 1 edge st – note! On the lower 4 cm / 1½" (turn-up) sew with seam on the right side so that it doesn’t show when you turn it. Sew left leg in the same way. Sew together the trousers front and back within 1 edge st and sew the opening between the legs. Turn the 2 cm / ¾" stockinette sts at the top against the wrong side and sew with small, neat sts – leave a little opening for the elastic band. Turn the turn-ups. SOFT TOY: see baby pattern no 14-30 BLANKET: see baby pattern no 14-12 |
|
|
|
Have you finished this pattern?Tag your pictures with #dropspattern #littlefernjacket or submit them to the #dropsfan gallery. Do you need help with this pattern?You'll find 15 tutorial videos, a Comments/Questions area and more by visiting the pattern on garnstudio.com. © 1982-2025 DROPS Design A/S. We reserve all rights. This document, including all its sub-sections, has copyrights. Read more about what you can do with our patterns at the bottom of each pattern on our site. |
|


With over 40 years in knitting and crochet design, DROPS Design offers one of the most extensive collections of free patterns on the internet - translated to 17 languages. As of today we count 314 catalogs and 11822 patterns - 11812 of which are translated into English (US/in).
We work hard to bring you the best knitting and crochet have to offer, inspiration and advice as well as great quality yarns at incredible prices! Would you like to use our patterns for other than personal use? You can read what you are allowed to do in the Copyright text at the bottom of all our patterns. Happy crafting!
Post a comment to pattern DROPS Baby 14-27
We would love to hear what you have to say about this pattern!
If you want to leave a question, please make sure you select the correct category in the form below, to speed up the answering process. Required fields are marked *.