
Popular categories
Looking for a yarn?


Comments / Questions (25)
![]() Allard Brigitte wrote:
Allard Brigitte wrote:
Taille M merci
03.04.2025 - 10:41DROPS Design answered:
Bonjour Mme Allard, après les diminutions des manches, vous avez 214 mailles, vous allez diminuer d’abord 5 fois puis 7 fois (12 fois au total 2 mailles pour les épaules) soit 12x8m=96 m ; en même temps vous mettez en attente pour l’encolure : 8 m et vous rabattez 18 m de chaque côté (18+8)x2=52 m. On a ainsi : 214-96-52=66 m. Vous aviez 50 m pour les devants – 12x2 m (épaules) – 26 m (encolure)= toutes les mailles des devants ont été diminuées. Il reste toujours 14 m pour chaque manche. Pour le dos : 86-(12x4)=38. Et donc au total : 14+38+14=66. Bon tricot !
03.04.2025 - 13:44
![]() Brigitte ALLARD wrote:
Brigitte ALLARD wrote:
Merci pour votre réponse mais j'ai un autre problème ; une fois que j'ai diminué les 10 puis 3 puis 2 puis 3 x un et les 2 mailles avant et après les 14 mailles des manches il ne me reste pas assez de mailles pour en diminuer 8 x 7 (qui se transforment en 12 fois). Je suis perdue (I am lost) Excusez mon ignorance mais je n'ai jamais tricoter ce genre de vêtement. merci encore de votre patience à mon égard
02.04.2025 - 21:15DROPS Design answered:
Bonjour Mme Allard, pouvez-vous m'indiquer quelle taille vous tricotez? Ce sera ainsi plus facile de vous détailler les opérations. Merci pour votre compréhension.
03.04.2025 - 08:45
![]() Brigitte ALLARD wrote:
Brigitte ALLARD wrote:
Bonjour, Je suis bien arrivée jusqu'à "épaule manches marteau 1" et là je cale. Je ne sais plus comment continuer. Mon embarras commence avec 'diminutions encolure'. Pouvez vous m'aider? Merci beaucoup d'avance
01.04.2025 - 21:15DROPS Design answered:
Bonjour Mme Allard, vous devez d'abord faire toutes les diminutions des épaules/manches marteau-1 avant de commencer à former l'encolure. Autrement dit, lorsque ces diminutions sont faites, rabattez pour l'encolure au début de chaque rang de chaque côté les mailles indiquées pour votre taille (= en début de rang sur l'endroit et en début de rang sur l'envers), et, en même temps, diminuer pour les épaules exactement comme avant pour les diminutions-1. Il vous restera 62-78 mailles quand l'encolure et les dernières diminutions des épaules sont faites. Bon tricot!
02.04.2025 - 07:53
![]() Magdalena wrote:
Magdalena wrote:
Co to znaczy zamknąć 1 raz 11 oczek przy wykończaniu dekoltu , czy to znaczy złapać 11 oczek i przerobić razem Hi what does it mean to close 11 stiches ,is it like make it ,catching them altogether once
31.01.2025 - 20:17DROPS Design answered:
Witaj Magdo, zamykasz te oczka w taki sam sposób jakbyś kończyła robótkę, zobacz na przykład video TUTAJ. Pozdrawiamy!
03.02.2025 - 11:00
![]() Eva Müller wrote:
Eva Müller wrote:
Hej! Stickar Moonrise Cardigan storlek M och har nått till oket. Det ska påbörjas med höger framstycke 50 maskor men höger framstycke avslutades med 48 maskor? Därefter ärm 52 maskor ärmen avslutades med 56?, Bakstycke 86 maskor avslutades med 82? Vet inte hur jag ska hantera detta? Vänlig hälsning Eva Müller
29.01.2025 - 11:01DROPS Design answered:
Hei Eva. Jo, når du skal strikke forstykkene, ermene og bakstykket sammen, skal du strikke de 48 maskene fra høyre forstykket og så skal du strikke 2 masker fra ermet = 50 masker. Disse 50 maskene tilhører nå høyre forstykket. Du har altså tatt 2 masker av ermet som nå er blitt til høyre forsykke. Så strikker du 52 masker som er høyre erme, de 2 maskene som er igjen skal så strikkes sammen med bakstykket. Samme gjøres på den andre siden. mvh DROPS Design
03.02.2025 - 11:02
![]() Petra Dujardin wrote:
Petra Dujardin wrote:
Als ik dit patroon wil maken met DROPS Brushed Alpaca Silk, maat L. Hoeveel bollen heb ik dan nodig? En is dit dan met enkele draad of dubbele draad breien? Vast dank.
11.11.2024 - 16:32DROPS Design answered:
Dag Petra,
Dit vest wordt met 3 draden uit garengroep A gebreid. In plaats van 3 draden uit groep A kun je ook 1 draad uit groep D kiezen. Helaas valt DROPS Brushed Alpaca Silk in categorie C, waardoor je een andere stekenverhouding hebt en het patroon om zou moeten rekenen. In dit artikel kun je meer lezen over het vervangen van garens>
05.12.2024 - 20:14
![]() Mirjam wrote:
Mirjam wrote:
Oh oké met middenvoor bedoel je dus de rechtetzijkant. En is middenvoor omdat het een helft van het vest is. Ik dacht dat er bedoelt werd in het midden van het rechtergedeelte ook een bies. Maar het betreft gewoon de twee zijkanten
10.11.2024 - 15:28
![]() Mirjam wrote:
Mirjam wrote:
Ik ben begonnen met het rechter voorpand van de moonrise cardigan. Na het boord staat er:ga verder met tricotsteek (dat snap ik)4 kantstelen op de zijkant en 8 voorbiessteken midden voor daar snap ik niks van
07.11.2024 - 22:23DROPS Design answered:
Dag Mirjam,
Aan de zijkant brei je steeds 4 kantsteken. Deze kantsteken worden recht aan de goede kant en recht aan de verkeerde kant gebreid. Midden voor (dus aan de andere kant van de naald) brei je een bies en deze bies wordt toevallig ook in ribbesteek gebreid, dus recht aan de goede kant en recht aan de verkeerde kant. Je breit daar dus steeds 8 ribbelsteken.
10.11.2024 - 13:50
![]() Yvonne Klok wrote:
Yvonne Klok wrote:
Ik heb het gevonden!! Ik moet aan weerszijden 2 steken van de mouwen bij de voor- en achterpand breien.
07.09.2024 - 14:29DROPS Design answered:
Dag Yvonne,
Dankjewel voor de terugkoppeling en veel breiplezier!
10.09.2024 - 07:32
![]() Yvonne wrote:
Yvonne wrote:
Ik begrijp het aantal steken van de pas niet. Het voor en achterpand hebben 48 steken (maat M), Maar ik moet 50 steken breien, hetzelfde geldt voor de mouwen en het achterpand. Klopt het aantal niet of moet ik steken meerderen
05.09.2024 - 20:31
|
|
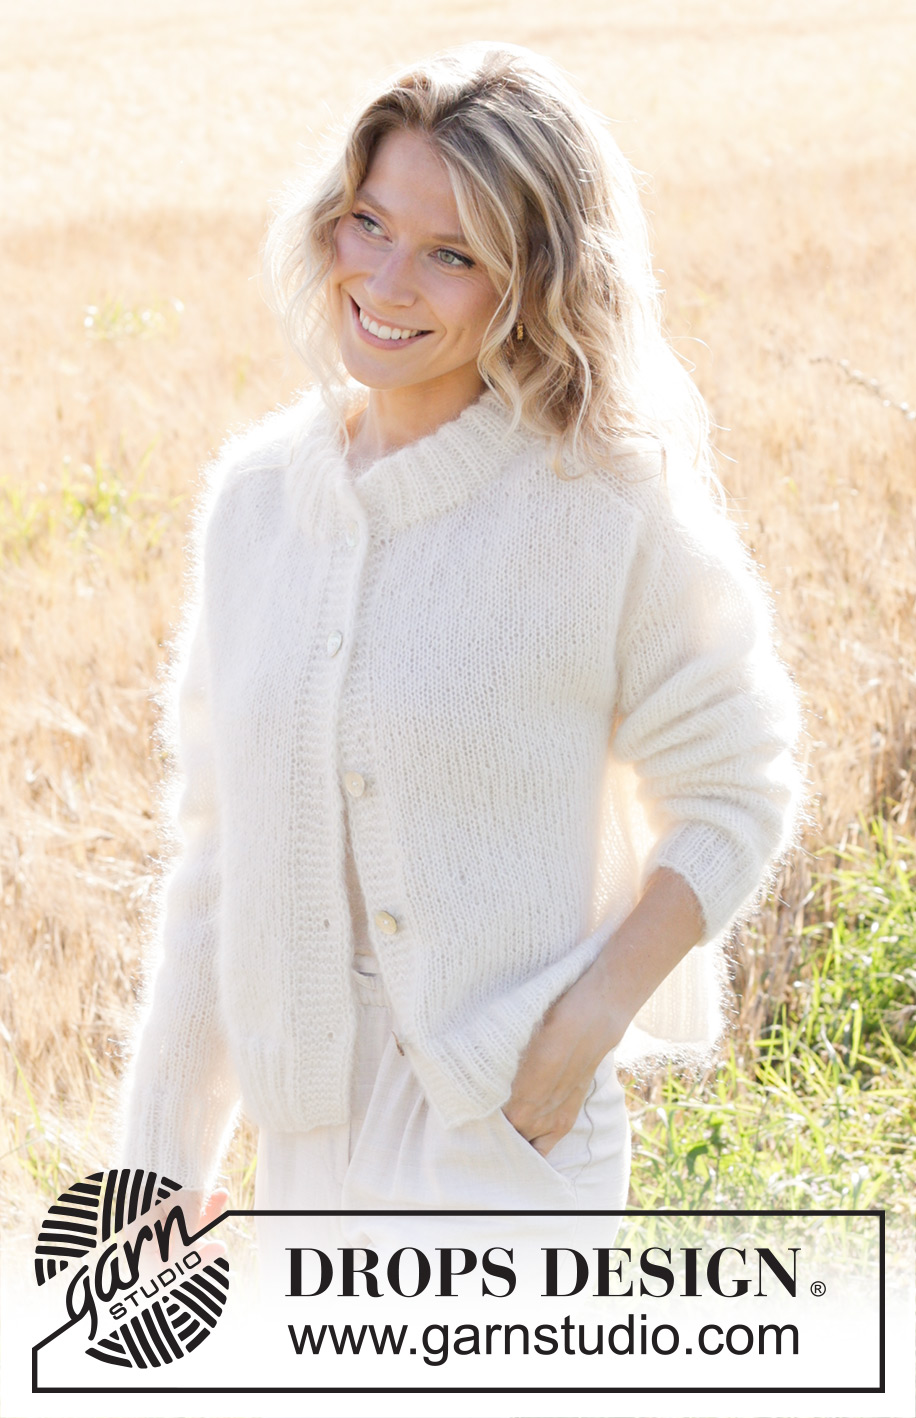
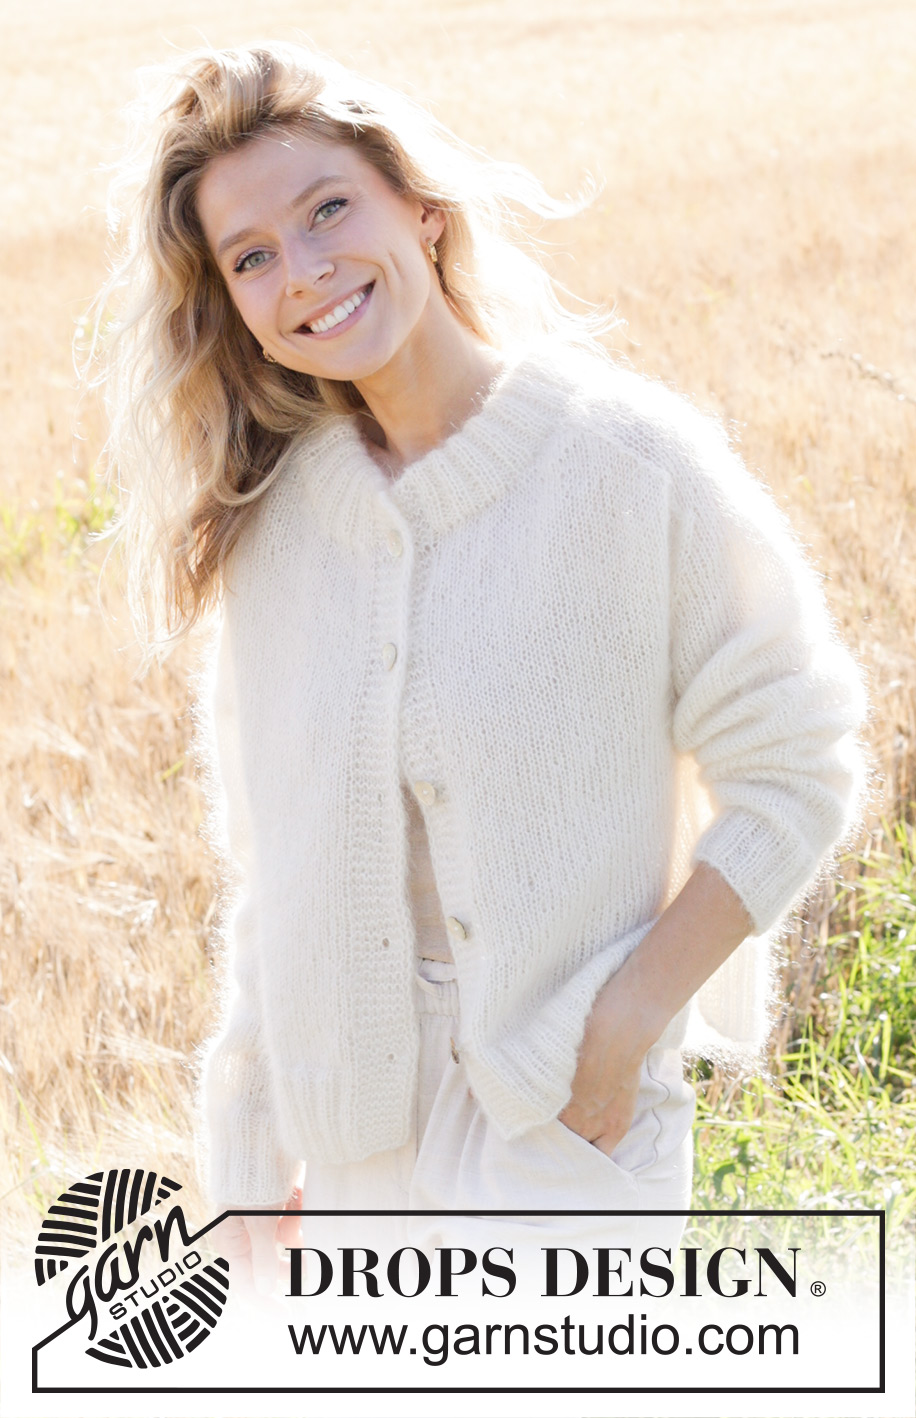
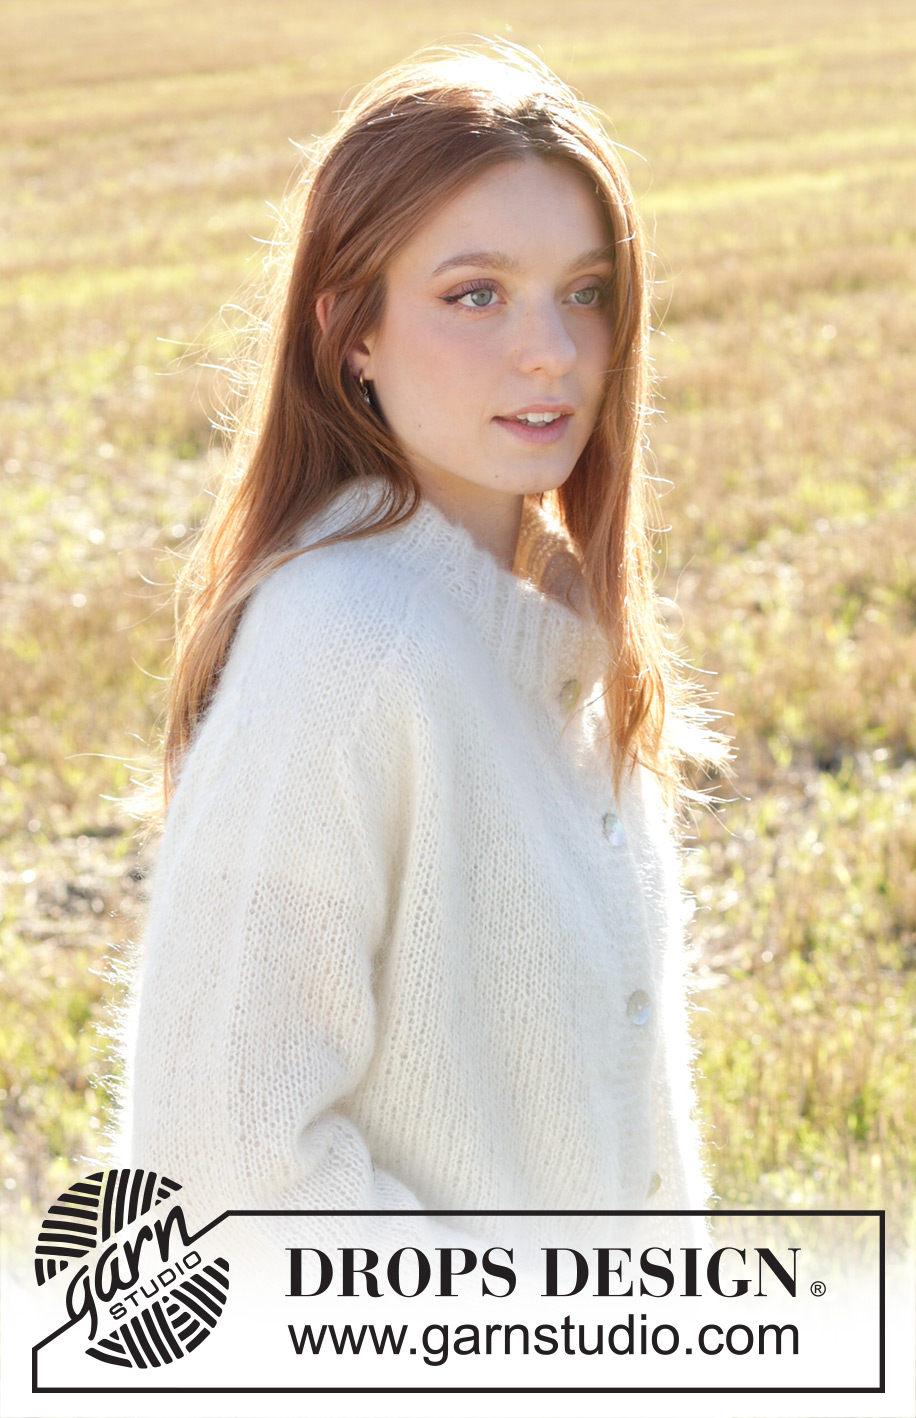
Moonrise Cardigan#moonrisecardigan |
|
 |
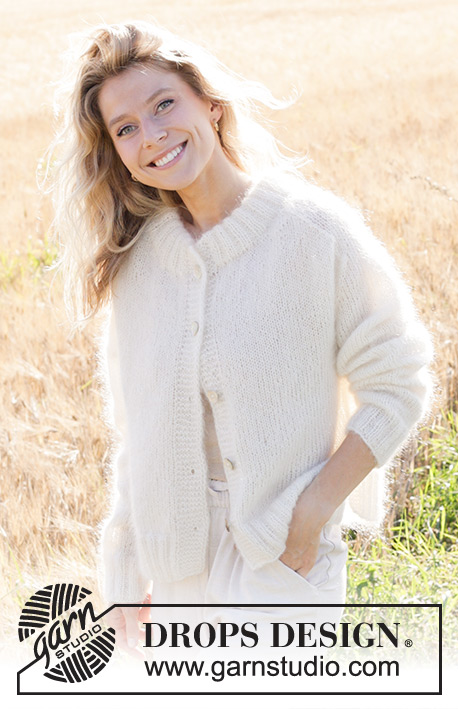 |
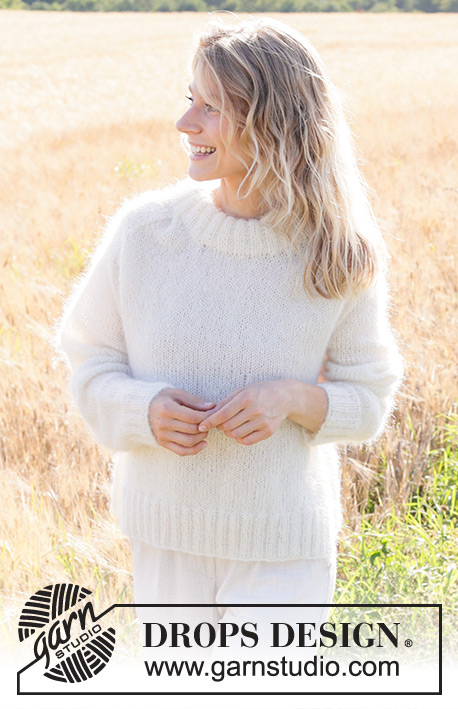
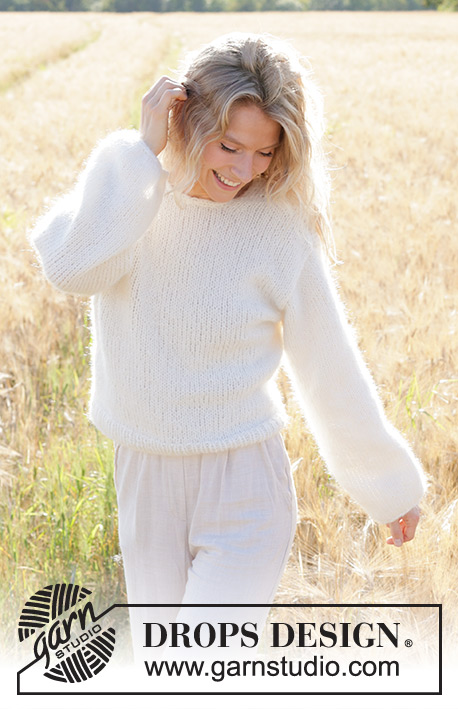
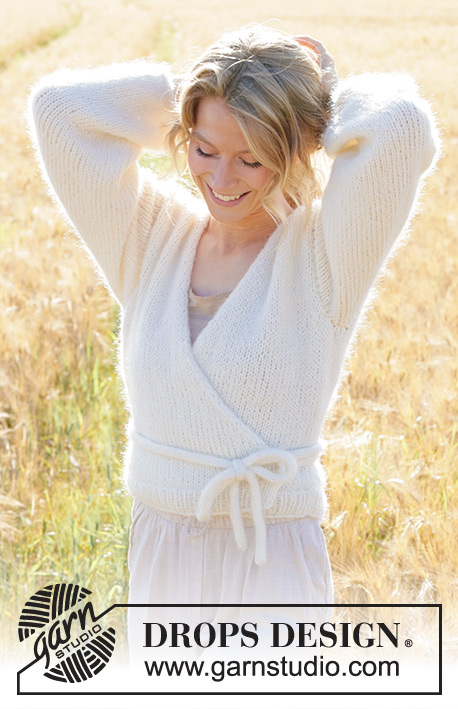
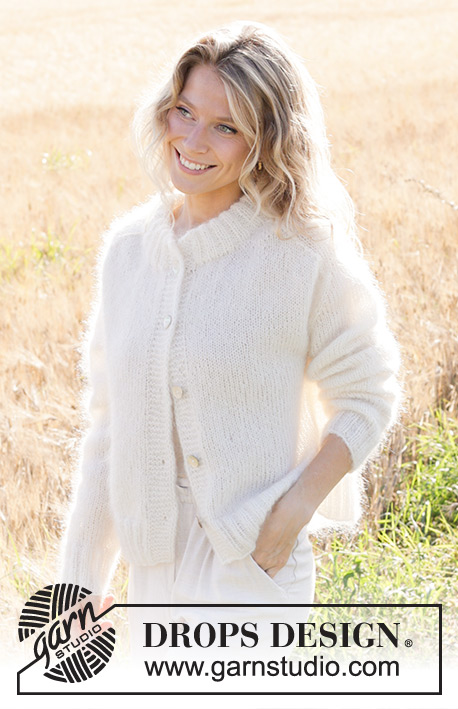
Knitted jacket in 3 strands DROPS Kid-Silk. The piece is worked bottom up with saddle shoulders, double neck, split in sides and I-cord. Sizes XS - XXL.
DROPS 249-30 |
|
|
------------------------------------------------------- EXPLANATIONS FOR THE PATTERN: ------------------------------------------------------- GARTER STITCH (worked back and forth): Knit all rows, from both the right and wrong side. 1 ridge in height = knit 2 rows. RIGHT BAND WITH I-CORD: RIGHT SIDE: Slip 1 stitch purl-wise with yarn in front, knit 1, work 6 garter stitches. WRONG SIDE: Work 6 garter stitches, slip 1 stitch purl-wise with yarn in front, knit 1. LEFT BAND WITH I-CORD: RIGHT SIDE: Work 6 garter stitches, slip 1 stitch purl-wise with yarn in front, knit 1. WRONG SIDE: Slip 1 stitch purl-wise with yarn in front, knit 1, work 6 garter stitches BUTTONHOLES: Work the buttonholes on the right band from the right side (band = 8 stitches). ROW 1: Work the first 3 band stitches as before, knit together the 4th and 5th stitch, make 1 yarn over and finish the band as before. ROW 2: Knit the yarn over to leave a hole. The first buttonhole is worked when the band measures 9-9-10-8-10-9½ cm. The other buttonholes when the piece measures: XS: 17½-26-34½-43 cm. S: 18-27-36-45 cm. M: 18½-28-37½-47 cm. L: 16-24-32-40-48 cm. XL: 18-26-34-42-50 cm. XXL: 18-26½-35-43½-52 cm. (= last buttonhole is worked on the first row on the neck). DECREASE TIP-1 (for saddle shoulders): All decreases are worked from the right side! BEFORE MARKER: Work until there are 3 stitches left before the marker, knit 3 together (= 2 stitches decreased). AFTER MARKER: Slip 1 stitch knit-wise, knit 2 together, pass slipped stitch over knitted-together stitches (= 2 stitches decreased). DECREASE TIP-2 (for sleeves): All decreases are worked from the right side! BEFORE MARKER: Work until there are 2 stitches left before the marker, knit 2 together (= 1 stitch decreased). AFTER MARKER: Slip 1 stitch knit-wise, knit 1, pass slipped stitch over knitted stitch (= 1 stitch decreased). INCREASE TIP (for sleeves): Start 1 stitch before the marker-thread, make 1 yarn over, knit 2 (marker-thread sits between these 2 stitches), 1 yarn over. On the next round knit the yarn overs twisted to avoid holes (2 increased stitches). Then work the new stitches in stocking stitch. ------------------------------------------------------- START THE PIECE HERE: ------------------------------------------------------- JACKET – SHORT OVERVIEW OF THE PIECE: The pattern uses both long and short needles; start with the length which fits the number of stitches and change when necessary. The piece is worked bottom up. The front and back pieces are worked separately as far as the armhole. The sleeves are worked bottom up as far as the armholes, then placed on the same circular needle as the front and back pieces. The yoke is continued back and forth, decreasing for the saddle shoulders and sleeves. The double neck is worked in rib. The side seams are sewn together to finish. RIGHT FRONT PIECE: Cast on 62-66-70-78-82-86 stitches with circular needle size 3.5 mm and 3 strands DROPS Kid-Silk. Purl 1 row from the wrong side. Then work as follows from the right side: Work RIGHT BAND WITH I-CORD – read description above, * knit 2, purl 2 *, work from *-* until there are 6 stitches left, knit 2 and work 4 edge stitches in GARTER STITCHES - read description above. Continue this rib back and forth for 8 cm – remember the BUTTONHOLES - read description above. Change to circular needle size 5.5 mm. Purl 1 row from the wrong side and decrease 17-17-18-22-21-21 stitches evenly spaced – do not decrease over the band or edge stitches = 45-49-52-56-61-65 stitches. Continue with stocking stitch, 4 edge stitches on the side and 8 band stitches mid-front. REMEMBER THE KNITTING TENSION! Work until the piece measures 25 cm. On the next row from the wrong side cast off the first 3-3-4-4-5-5 stitches for the armhole = 42-46-48-52-56-60 stitches. Work to end of row. Cut the strand. Lay the piece to one side. LEFT FRONT PIECE: Cast on 62-66-70-78-82-86 stitches with circular needle size 3.5 mm and 3 strands DROPS Kid-Silk. Purl 1 row from the wrong side. Then work as follows from the right side: 4 edge stitches in garter stitch, * knit 2, purl 2 *, work from *-* until there are 10 stitches left, knit 2 and LEFT BAND WITH I-CORD – read description above. Continue this rib back and forth for 8 cm. Change to circular needle size 5.5 mm. Purl 1 row from the wrong side and decrease 17-17-18-22-21-21 stitches evenly spaced – do not decrease over the band or edge stitches = 45-49-52-56-61-65 stitches. Continue with stocking stitch, 4 edge stitches on the side and 8 band stitches mid-front. Work until the piece measures 25 cm. On the next row from the wrong side cast off the last 3-3-4-4-5-5 stitches for the armhole = 42-46-48-52-56-60 stitches. Cut the strand. Lay the piece to one side. BACK PIECE: Cast on 106-118-126-134-150-162 stitches with circular needle size 3.5 mm and 3 strands DROPS Kid-Silk. Purl 1 row from the wrong side. Then work as follows from the right side: 4 edge stitches in garter stitch, knit 2, purl 2 *, work from *-* until there are 6 stitches left, knit 2 and 4 edge stitches in garter stitch. Continue this rib back and forth for 8 cm. Change to circular needle size 5.5 mm. Purl 1 row from the wrong side and decrease 30-34-36-36-42-46 stitches evenly spaced – do not decrease over the edge stitches = 76-84-90-98-108-116 stitches. Continue with stocking stitch and 4 edge stitches in garter stitch on each side. Work until the piece measures 25 cm, with the next row from the right side. Cast off 3-3-4-4-5-5 stitches for the armholes at the beginning of the next 2 rows = 70-78-82-90-98-106 stitches. Cut the strand. Lay the piece to one side. SLEEVES: The sleeves are worked in the round. Cast on 56-60-60-64-64-68 stitches with double pointed needles size 3.5 mm and 3 strands DROPS Kid-Silk. Work rib (knit 2, purl 2) for 8 cm. Knit 1 round and decrease 14-16-14-18-16-18 stitches evenly spaced = 42-44-46-46-48-50 stitches. Insert 1 marker-thread at the beginning of the round (= mid-under sleeve). Allow the thread to follow your work onwards, it is used when increasing under the sleeves. Change to needle size 5.5 mm and work stocking stitch. When the sleeve measures 11-10-11-11-12-11 cm, increase 1 stitch on each side of the marker-thread – read INCREASE TIP. Repeat this increase every 4½-4-2½-2-1½-1½ cm a total of 6-7-9-12-13-13 times = 54-58-64-70-74-76 stitches. Work until the sleeve measures 37-36-35-35-34-32 cm. There is approx. 25-27-29-30-32-34 cm to the neckline – try the sleeve on and work to desired length. Cast off 6-6-8-8-10-10 stitches under the sleeve (i.e., 3-3-4-4-5-5 stitches on each side of the marker-thread) = 48-52-56-62-64-66 stitches. Cut the strand. Lay the piece to one side. YOKE: All pieces are now placed on the same circular needle, stocking stitch is continued with the bands as before and 4 markers are inserted on the first row (between 2 stitches and which are used when working the saddle shoulders). Start from the right side on the right front piece, then work a sleeve, the back piece, the second sleeve and finally the left front piece as follows: Work 46-48-50-51-52-54 stitches (= right front piece), insert marker-1 here, work 40-48-52-64-72-78 stitches (= sleeve), insert marker-2 here, work 78-82-86-88-90-94 stitches (= back piece), insert marker-3 here, work 40-48-52-64-72-78 stitches (= sleeve), insert marker-4 here, work 46-48-50-51-52-54 stitches (= left front piece) = 250-274-290-318-338-358 stitches. Allow the 4 markers to follow your work onwards. Work 1-0-0-1-0-0 cm of stocking stitch back and forth, with 8 band stitches on each side. Now decrease for the sleeves as follows: SLEEVE DECREASES-1: Read the next section before continuing! NOTE! Do not work this section in size S, go straight to SLEEVE DECREASES-2. On the next row from the right side decrease 8 stitches on the sleeves as follows: Decrease 2 stitches AFTER markers 1 and 3 and decrease 2 stitches BEFORE markers 2 and 4 – read DECREASE TIP-1. Decrease only on the sleeves (the number of stitches on the front and back pieces remains the same). Decrease like this every 2nd row (each row from the right side) a total of 0-1-2-7-8-9 times = 250-266-274-262-274-286 stitches. SLEEVE DECREASES -2: On the next row from the right side, decrease 4 stitches on the sleeves as follows. Decrease 1 stitch AFTER markers 1 and 3 and decrease 1 stitch BEFORE markers 2 and 4 – read DECREASE TIP-2. Only decrease on the sleeves (the number of stitches on the front and back pieces remains the same). Decrease like this every 2nd row (each row from the right side) a total of 13-15-15-10-12-13 times = 198-206-214-222-226-234 stitches (there are 14-14-14-16-16-16 stitches left on each sleeve). The piece measures approx. 14-16-17-18-20-22 cm from where the pieces were joined. Now work the saddle shoulders. SADDLE SHOULDERS-1: On the next row from the right side decrease 8 stitches as follows: Decrease 2 stitches BEFORE markers 1 and 3 and decrease 2 stitches AFTER markers 2 and 4 – remember DECREASE TIP-1. Only decrease on the front and back pieces (the number of stitches on the sleeves remains the same). Decrease like this every 2nd row (each row from the right side) a total of 4-4-5-5-5-5 times = 166-174-174-182-186-194 stitches, with the last row worked from the wrong side. The piece measures approx. 44-46-47-48-50-52 cm from the cast-on edge. Cut the strand, place the 8 band stitches on each side on separate threads = 150-158-158-166-170-178 stitches. Now begin to decrease for the neckline, AT THE SAME TIME continue decreasing for the saddle shoulders. Read NECKLINE DECREASES and SADDLE SHOULDERS-2 before continuing! NECKLINE DECREASES: Start from the right side and cast off at the beginning of each row as follows: 8-10-10-11-12-14 stitches 1 time, 3 stitches 1 time, 2 stitches 1 time and 1 stitch 3 times on each side. SADDLE SHOULDERS -2: Continue decreasing 8 stitches for the saddle shoulders every 2nd row 7-7-7-7-7-7 more times (a total of 11-11-12-12-12-12 times), with the next row from the wrong side. AFTER LAST DECREASE: There are 62-66-66-72-74-78 stitches (14-14-14-16-16-16 stitches on each sleeve, zero stitches on the front pieces and 34-38-38-40-42-46 stitches on the back piece). The yoke measures approx. 25-27-29-30-32-34 cm from where the pieces were joined and the jacket measures approx. 54-56-58-60-62-64 cm from the shoulder. Cut the strand and continue from the right side on the right band. Work RIGHT BAND over the 8 band stitches from the first thread, knit up 16-18-18-19-20-22 stitches along the right neckline, knit to end of row, knit up 16-18-18-19-20-22 stitches along the left neckline, work LEFT BAND over the 8 band stitches from the second thread = 110-118-118-126-130-138 stitches. Purl 1 row from the wrong side (bands as before) and decrease 0-4-4-4-4-8 stitches evenly over the purled stitches = 110-114-114-122-126-130 stitches. DOUBLE NECK: Use circular needle size 3.5 mm and work rib from the right side as follows: 8 band stitches as before, rib (knit 2, purl 2) until there are 10 stitches left, knit 2 and 8 band stitches as before. Continue this rib back and forth for 5 cm. At the beginning of the next 2 rows, cast off the outermost 7 stitches on each side. Continue the rib with 1 edge stitch in garter stitch on each side. When the neck measures 10 cm, cast off a little loosely. Fold the neck double to the inside and fasten down. Sew the openings on the bands with small stitches. ASSEMBLY: Sew the side seams, starting by the armhole and sewing in the outermost loop of the outermost stitch so the seam is flat. Leave a split at the bottom on each side of desired length (you will have 8 garter stitches down each side seam). Sew together the openings under each sleeve. Sew the buttons onto the left band. |
|

|
|
Have you finished this pattern?Tag your pictures with #dropspattern #moonrisecardigan or submit them to the #dropsfan gallery. Do you need help with this pattern?You'll find 36 tutorial videos, a Comments/Questions area and more by visiting the pattern on garnstudio.com. © 1982-2025 DROPS Design A/S. We reserve all rights. This document, including all its sub-sections, has copyrights. Read more about what you can do with our patterns at the bottom of each pattern on our site. |
|


With over 40 years in knitting and crochet design, DROPS Design offers one of the most extensive collections of free patterns on the internet - translated to 17 languages. As of today we count 314 catalogues and 11822 patterns translated into English (UK/cm). 11822
We work hard to bring you the best knitting and crochet have to offer, inspiration and advice as well as great quality yarns at incredible prices! Would you like to use our patterns for other than personal use? You can read what you are allowed to do in the Copyright text at the bottom of all our patterns. Happy crafting!
Post a comment to pattern DROPS 249-30
We would love to hear what you have to say about this pattern!
If you want to leave a question, please make sure you select the correct category in the form below, to speed up the answering process. Required fields are marked *.