
Popular categories
Looking for a yarn?


|
|||||||||||||
Around Town |
|||||||||||||
 |
 |
||||||||||||
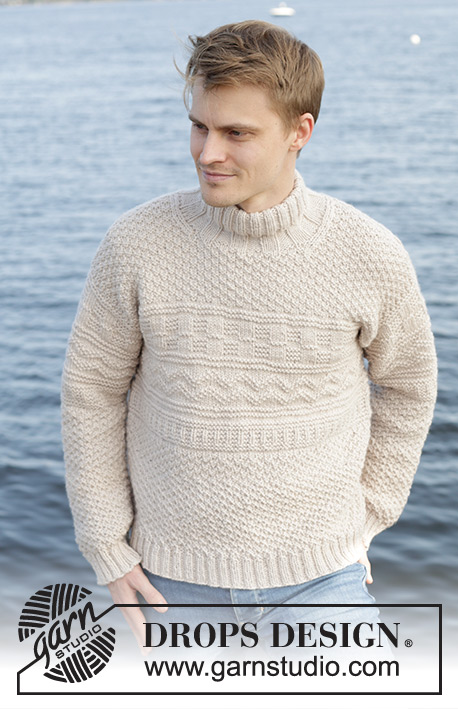
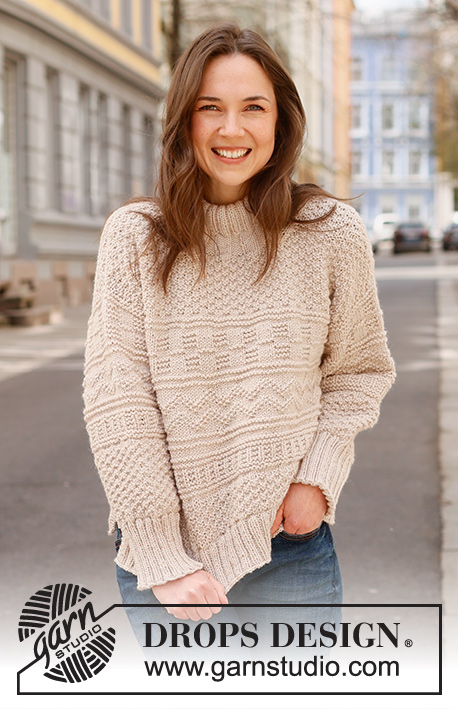
Knitted jumper in DROPS Alaska or DROPS Big Merino. Piece is knitted bottom up with relief pattern and double neck edge. Size XS – XXL.
DROPS 237-7 |
|||||||||||||
|
---------------------------------------------------------- EXPLANATION FOR THE PATTERN: ---------------------------------------------------------- GARTER STITCH (back and forth): Knit all rows. 1 ridge vertically = knit 2 rows. PATTERN: See diagrams A.1 to A.5. Choose diagram for your size (applies to A.2). Diagrams show all rows in pattern seen from the right side. DECREASE TIP-1 (applies to neck): All decreases are done from the right side! DECREASE AT BEGINNING OF ROW AS FOLLOWS FROM RIGHT SIDE: Work 2 stitches in stocking stitch, slip 1 stitch knitwise, knit 1, pass slipped stitch over stitch worked (1 stitch decreased). DECREASE AS FOLLOWS AT THE END OF ROW FROM RIGHT SIDE: Work until 4 stitches remain, knit 2 together and 2 stitches in stocking stitch (1 stitch decreased). DECREASE TIP-2 (applies to mid under sleeves): Decrease 1 stitch on each side of marker thread as follows: Work until 2 stitches remain before marker thread, knit/purl 2 together depending on pattern, marker thread, slip 1 stitch knitwise, knit 1, pass slipped stitch over stitch worked/purl 2 twisted together depending on pattern (2 stitches decreased). ---------------------------------------------------------- START THE PIECE HERE: ---------------------------------------------------------- JUMPER - SHORT OVERVIEW OF THE PIECE: Front and back piece back and forth on circular needle, bottom up until rib has been worked, then place piece together. Body is worked in the round on circular needle up to armholes. Then finish back piece and front piece back and forth on circular needle separately until finished measurements. Sew the shoulder seams. Pick up stitches along armholes and work the sleeves top down. Work sleeve cap back and forth on circular needle, work the rest of sleeve in the round on double pointed needles/a short circular needle, top down. Finish with a double neck edge. BACK PIECE: Cast on 110-118-126-138-150-162 stitches on circular needle size 3.5 mm with DROPS Alaska or DROPS Big Merino. Purl 1 row from wrong side. Work next row as follows from right side: 2 stitches in GARTER STITCH - read explanation above - * knit 2, purl 2 *, work from *-* until 4 stitches remain, knit 2 and finish with 2 stitches in garter stitch. Continue rib like this for 7 cm – adjust after a row from wrong side. Put piece aside and work the front piece. FRONT PIECE: Cast on the same number of stitches as on back piece and work piece the same way as back piece until piece measures 7 cm - finish after a row from wrong side. BODY: Put piece together as follows: Knit stitch from front piece and decrease at the same time 26-28-30-32-34-36 stitches evenly, knit over stitch from back piece and decrease at the same time 26-28-30-32-34-36 stitches evenly = 168-180-192-212-232-252 stitches on needle (84-90-96-106-116-126 stitches on front piece and 84-90-96-106-116-126 stitches on back piece). Switch to circular needle size 5 mm. Knit 1 round. Then work A.1 in the round on body. REMEMBER THE KNITTING TENSION! When piece measures 13-13-13-13-15-15 cm, work A.2 in the round - AT THE SAME TIME adjust number of stitches to 168-180-192-213-231-252 on the first round. On last round in A.2 increase 0-4-0-3-1-4 stitches evenly = 168-184-192-216-232-256 stitches. When A.2 has been worked, piece measures approx. 22-22-22-23-25-25 cm from cast-on edge on front/back piece. If the garment is shorter than this, continue in stocking stitch until correct measurements. Then work A.3 in the round on body. Repeat A.3 2-2-3-3-3-4 times in total vertically. When A.3 has been worked, piece measures approx. 27-27-30-31-33-35 cm from cast-on edge. If the garment is shorter than this, continue until correct measurements. Knit 1 round while decreasing 0-4-0-4-0-4 stitches evenly = 168-180-192-212-232-252 stitches. Insert 1 marker thread mid front and 1 marker thread mid back, insert in addition 1 marker in each side on body - this is done as follows: Insert 1 marker at beginning of round, count 42-45-48-53-58-63 stitches, insert 1 marker thread before next stitch (mid front), count 42-45-48-53-58-63 stitches, insert 1 marker before next stitch, count 42-45-48-53-58-63 stitches, insert 1 marker thread before next stitch (mid back). 42-45-48-53-58-63 stitches remain on round after last marker thread. Work A.4 as follows: Count out from symbol marked as the middle in diagram and marker thread mid from where pattern should start in the side, work A.4 as far as you can towards the marker in the side (marker thread mid front should fit symbol for the middle in A.4), then begin A.4 again the same way as on beginning of round, and work A.4 as far as you can until marker at the beginning of round (marker thread mid back should fit symbol for the middle in A.4). Continue pattern like this, and cast off for armholes as explained below. ARMHOLE: When piece measures 29-30-31-32-33-34 cm, cast off for armholes as follows: Begin 3-2-5-6-7-8 stitches remain before marker at the beginning of round, cast off 6-4-10-12-14-16 stitches for armhole, work as before until 3-2-5-6-7-8 stitches remain before marker in the other side, cast off 6-4-10-12-14-16 stitches for armhole, work as before the rest of round. Finish back piece and front piece separately. BACK PIECE: = 78-86-86-94-102-110 stitches. Begin from wrong side and continue A.4 with 1 stitch in garter stitch in each side. On last row from right side, increase 2 stitches evenly in all sizes = 80-88-88-96-104-112 stitches. When A.4 has been worked, A.1 with 1 stitch in garter stitch in each side. Repeat A.1 vertically until finished measurements. Then cast off for diagonal shoulder and neck as explained below. DIAGONAL SHOULDER: When piece measures 48-50-52-54-56-58 cm, slip stitches on a thread in each side for diagonal shoulder (to avoid cutting the yarn work stitches before slipping them on the thread): Slip stitches on a thread from the side as follows: 4-4-4-5-5-6 stitches 4 times and then the last the last 10-12-12-12-14-14 stitches towards the neck. When all stitches are on a thread, slip stitch back on needle size 5 mm. Purl 1 row from wrong side (to avoid a hole in the transitions where stitches where slipped on a thread, pick up the yarn between 2 stitches and purl them twisted together with first stitch on left needle). Cast off knitting from right side. NECK: At the same time when piece measures 49-51-53-55-57-59 cm, cast off the middle 24-28-28-28-32-32 stitches for neck and finish each shoulder separately. Continue A.1, continue to slip stitches on a thread for diagonal shoulder and work in addition the 3 stitches towards the neck in stocking stitch. AT THE SAME TIME on next row from right side, decrease 1 stitch for neck - read DECREASE TIP-1. Decrease like this on every row from right side 2 times in total. When all stitches have been cast off, piece measures approx. 52-54-56-58-60-62 cm from highest point on the shoulder and down. Repeat on the other shoulder. FRONT PIECE: = 78-86-86-94-102-110 stitches. Cast on and work pattern the same way as on back piece. In addition decrease for neck and diagonal shoulder as explained below. NECK: When piece measures 46-48-49-51-52-54 cm, slip the middle 20-24-24-24-26-26 stitches on a thread for neck, and finish each shoulder separately. Continue A.1 but work the outermost 3 stitches towards the neck in stocking stitch. AT THE SAME TIME on next row from right side, decrease 1 stitch for neck - read DECREASE TIP-1. Decrease like this on every row from right side 4-4-4-4-5-5 times in total. DIAGONAL SHOULDER: At the same time when piece measures 48-50-52-54-56-58 cm, slip stitches on a thread for diagonal shoulder the same way as on back piece, i.e. slip 4-4-4-5-5-6 stitches on a thread 4 times then slip the last 10-12-12-12-14-14 stitches towards the neck. When all stitches have been slipped on a thread, purl 1 row from wrong side as on back piece before casting off by knitting from right side. Repeat on the other shoulder. ASSEMBLY: Sew the shoulder seams. SLEEVES: Use circular needle size 5 mm and DROPS Alaska or DROPS Big Merino, pick up from right side 32-34-36-37-39-41 stitches from the bottom of armhole up to shoulder and 32-34-36-37-39-41 stitches from the shoulder and down to the bottom of armhole on the other side = 64-68-72-74-78-82 stitches along armhole. Insert 1 marker thread in the middle of the row - measure sleeve from this marker and use the marker thread when counting to where pattern should begin. Begin from wrong side and work A.5 as follows: Count out from the symbol marked as the middle in diagram and marker thread on sleeve where pattern should begin, and work A.5 back and forth with 1 stitch in garter stitch in each side. When sleeve measures 2-1-3-4-4-5 cm from where marker thread was inserted, put piece together on a short circular needle or double pointed needles size 5 mm – work the rest of sleeve in the round. Insert 1 marker thread at the beginning of round (mid under sleeve). Move marker thread upwards when working. Begin round mid under sleeve and continue pattern in the round (symbol for the middle in diagram should still fit marker thread mid on top of sleeve - pattern does not fit mid under sleeve). When piece measures 5-4-6-7-7-8 cm from where marker thread was inserted mid on top of sleeve, decrease 2 stitches mid under sleeve - read DECREASE TIP-2. Decrease like this every 4-4-3½-3-2½-2 cm 8-9-10-11-12-13 times in total = 48-50-52-52-54-56 stitches. When A.5 has been worked vertically, work A.1 in the round. Work until sleeve measures 39-38-39-38-36-35 cm from marker. 10 cm remain until finished measurements. Try the jumper and work to desired length before rib. Knit 1 round while increasing 12-14-12-16-18-16 stitches evenly = 60-64-64-68-72-72 stitches. Switch to double pointed needles size 3.5 mm. Work rib (knit 2/purl 2) for 10 cm. Loosely cast off. Sleeve measures approx. 49-48-49-48-46-45 cm from marker mid on top of sleeve. Work the other sleeve the same way. Sew bottom of armholes - see chart. DOUBLE NECK EDGE: Begin at one shoulder, use a short circular needle size 3.5 mm and pick up approx. 80-96-96-104-112-112 stitches around the neck inside 1 stitch (including stitches on thread). Work rib in the round (knit 4/purl 4 -adjust beginning of rib so that there are 4 purl stitches or 4 knit stitches on mid front). Insert 1 marker on row when rib measures 4 cm, use marker for measurements. Then work knit 2/purl 2 over all stitches. When rib measures 9-9-9-11-11-11 cm from marker, switch to a short circular needle size 5 mm. Cast off stitches with knit over knit and purl over purl. Fold the rib (knit 2/purl 2) down on the inside of garment. Fasten rib to get a double neck edge of approx. 4-4-4-5-5-5 cm. To avoid a tight neck edge that sticks out it is important to keep the seam elastic. |
|||||||||||||
Diagram explanations |
|||||||||||||
|
|||||||||||||

|
|||||||||||||

|
|||||||||||||

|
|||||||||||||
|
Have you made this or any other of our designs? Tag your pictures in social media with #dropsdesign so we can see them! Do you need help with this pattern?You'll find tutorial videos, a Comments/Questions area and more by visiting the pattern on garnstudio.com. © 1982-2024 DROPS Design A/S. We reserve all rights. This document, including all its sub-sections, has copyrights. Read more about what you can do with our patterns at the bottom of each pattern on our site. |
|||||||||||||


With over 40 years in knitting and crochet design, DROPS Design offers one of the most extensive collections of free patterns on the internet - translated to 17 languages. As of today we count 304 catalogues and 11422 patterns - 11422 of which are translated into English (UK/cm).
We work hard to bring you the best knitting and crochet have to offer, inspiration and advice as well as great quality yarns at incredible prices! Would you like to use our patterns for other than personal use? You can read what you are allowed to do in the Copyright text at the bottom of all our patterns. Happy crafting!
Comments / Questions (47)
Este patrón se entiende muy mal. He llegado hasta el A.4 y ahí ya me he perdido. He seguido adelante, pero cuando he llegado a la explicación de la sisa no he entendido nada. ¿Hay que reducir los 7 puntos por cada lado cuando se lleven 33 cm y cuando empieza el patrón A.4 (talla XL)?
22.12.2022 - 01:28DROPS Design answered:
Hola Eva, en la sisa tienes un marcapuntos en cada lateral. Tienes que cerrar 7 pts a cada lado de cada marcapuntos, pero empiezas a cerrar 7 pts antes del marcapuntos del inicio de la vuelta (es decir, empieza a cerrar al final de la vuelta anterior). Se cierra cuando la labor mida 33 cm, independientemente de la fila de A.4 que estés trabajando.
26.12.2022 - 00:31Ik kom er niet uit met diagonale schouder rugpand moet je 4x 5steken op hulpnld zetten en tijdens breien ook aan de andere kant, en er staat in het patroon dan de laatste de laatste 14 steken richting hals. bij hals tegelijktijd de middelste 32st af ik vind het moeilijk om te volgen als het niet lukt dan brei ik gewoon een schouder afkanting
17.12.2022 - 20:55DROPS Design answered:
Dag Joke,
Je begint met 104 steken in totaal en je zet vanaf beide zijkanten 4 keer 5 steken op een hulpdraad. Je hebt dan nog 14 steken over aan beide kanten omdat je ondertussen bij een hoogte van 57cm de middelste 32 steken afkant voor de hals. Je kunt de 2 buitenste steken aan elke kant als extra kantsteek rekenen.
18.12.2022 - 15:17The instruction about diagonal should decrease is unclear. I tried to read comments but I don't understand the language used. Could you clarify the section about diagonal should decrease? Also I wonder if you could translate comments above to English. I know it is too much to ask. I thought I mention. Thank you
10.12.2022 - 18:30DROPS Design answered:
Dear Roya, the diagonal shoulder is worked like short rows, ie starting from armhole (eg from RS on right shoulder back piece and left shoulder front piece/ from WS on left shoulder back piece and right shoulde front piece), you work short rows working fthe first 4,5 or 6 sts (see size) then slip them on a thread, work to the end of the row, turn and work return row; repeat these 2 rows 3 more times, than slip the remaining sts on a thread, then work one row over all stitches and cast off. Hope it can help- Happy knitting!
12.12.2022 - 09:22Hoi, ik heb een vraag wat betreft het oppakken van steken voor de mouwen. Er staat geschreven dat je vanaf de onderkant van de mouw steken op dient te pakken. Is dit in het midden van de onderkant van het armsgat (de helft dus van de steken daar) of bedoeld men vanaf de zijkant. ( Waardoor je dus later een langer stuk van onderkant arm maast) alvast bedankt.
03.12.2022 - 07:38J'ai trouvé il ne faut pas retirer les 4 mailles demandé plus haut et là le dessin est bien centré
09.11.2022 - 15:58Ça fonctionne avec 160 ou 192 mailles mais pas avec les 180 m de la taille S 🤷
09.11.2022 - 15:39DROPS Design answered:
Bonjour Karine, commencez par tricoter les 3 dernières mailles de A.4 (3 m point mousse), répétez 5 fois les 8 mailes de A.4, tricotez le A.4 suivant (le marqueur est après la 2ème de ces 8 mailles), tricotez 4 fois les 8 mailles de A.4, et terminez par les 7 premières mailles de A.4 (vous terminez par 3 m point mousse) - soit: 3+40+8+32+7= 90 m, vous répétez encore une fois = vous avez bien 180 mailles. Bon tricot!
09.11.2022 - 16:44Re bonjour C'est ce que j'ai fait mais rien a faire ça ne correspond pas 🤷
09.11.2022 - 15:35DROPS Design answered:
Bonjour Karine, indiquez-nous quelle taille vous tricotez, nous vous expliquerons comment vous devez faire =)
09.11.2022 - 16:32Bonjour Je n'arrive pas à faire A4 , je commence par 2 mailles endroit au niveau du symbole de la grille et au marqueur du milieu du devant mais ça ne fonctionne pas je ne tombe pas juste à la fin du tour pourtant j'ai le bon nombre de mailles. Pourriez vous m'aider merci
09.11.2022 - 12:36DROPS Design answered:
Bonjour Karine, comme vous centrez le motif A.4 au milieu devant et au milieu dos (le fil marqueur doit être au niveau du triangle), le motif sera automatiquement symétrique de chaque côté (début/fin de la partie devant/dos). Cette leçon explique comment centrer un diagramme et devrait ainsi vous aider. Bon tricot!
09.11.2022 - 14:06Kan ik de juiste tekening krijgen bij de trui around town?
09.11.2022 - 10:32Kan ik de juiste tekening met maten krijgen?
09.11.2022 - 10:31