
Popular categories
Looking for a yarn?


Comments / Questions (113)
![]() Fiona Caldwell wrote:
Fiona Caldwell wrote:
I do not understand the decrease for collar you suggest decreasing 4 Sts into cable and this is not possible as the cable pattern would be changed. Why don't you say slip 33 Sts etc rather than two-times and one time? Thanks
22.02.2022 - 11:49DROPS Design answered:
Dear Mrs Caldwell, the 4 sts decreased in the cable on the side (so that you get 57-59-60-64-67-70 sts) won't be worked anymore since they will be slipped on a stitch holder afterwards. You need to decrease in the cable to avoid shoulder getting wider than required. You have then to slip 10-14 sts (see size) 2 times then 11-14 sts 1 time = stitches for collar remain on needle. Happy knitting!
22.02.2022 - 13:23
![]() Fiona Caldwell wrote:
Fiona Caldwell wrote:
At the start of the front right side the grid A2 has a slanting angle saying= from wrong side: knit 2 together. I cannot understand the " knit 2 together" it does not make sense to k 2 together reducing Sts where they are not made again on the right side. Also the first row on the grid should be the right side ? not the wrong side. Thank you
02.02.2022 - 10:38DROPS Design answered:
Dear Mrs Caldwell, diagrams are read bottom up, and this row will be worked from the wrong side (last row in A.2/A.3 is worked from WS), so that you will decrease the number of sts worked P from RS/K from WS by K2 tog when explained. Happy knitting!
02.02.2022 - 14:20
![]() Fiona Caldwell wrote:
Fiona Caldwell wrote:
Thank you
11.01.2022 - 14:41
![]() Fiona Caldwell wrote:
Fiona Caldwell wrote:
The yarn amounts for M are Nepal 750g and Kid -Silk 150g knitted together two strands. Surely that is not sufficient Kid -silk to complete the garment. Thank you
11.01.2022 - 12:00DROPS Design answered:
Dear Mrs Caldwell, the yarn amount both yarn should be enough and match, note that Nepal is approx. 75 m for 50 g a ball and Kid-Silk is approx. 210 m for 25 g a ball; this means you need 1125 m Nepal and 1260 m Kid-Silk, yardage is almost the same, considering the meterage of a ball. Hope this will help, happy knitting!
11.01.2022 - 14:22
![]() Sony wrote:
Sony wrote:
Hello, I need help with the sleeve. 1. The pattern asks to pick 56 stitches along arm hole inside 1 edge stitch in garter stitch. Which edge stitch is this? 2. A note says: "Do not pick up stitches along the bottom of arm hole." Does this mean I should not pick stitches along the 8 stitches which were cast off for armhole?
18.10.2021 - 10:05DROPS Design answered:
Dear Sony, correct, you don't pick up sts along the 8 sts (size XL + XXL) cast off for armhole on front/back pieces, only pick up stitches from the first row after these 8 sts have been cast off up to shoulder then down before these 8 sts cast off - inside the edge stitch in garter stitch worked towards armhole on front/back piece. Happy knitting!
18.10.2021 - 16:07
![]() Jayne Rutledge wrote:
Jayne Rutledge wrote:
Where do I find the mesurments for the sizes.? I can't fid the size chart.
26.04.2021 - 18:36DROPS Design answered:
Dear Jayne, there is no one general size chart, but you can see the measurements of the finished piece at each pattern on the schematic drawing. Happy Knitting!
26.04.2021 - 19:40
![]() Laurel Bennett wrote:
Laurel Bennett wrote:
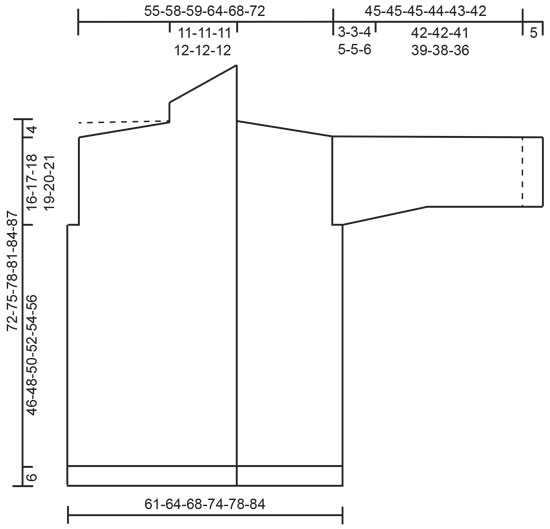
Sorry, I should have been a little bit more clear with my question. I understand slipping the stitches onto holders, it’s the part after that for working the collar, which in the diagram shows a slant. The person who commented directly below my first comment had the same question but I’m unclear with your answer.
09.11.2020 - 19:42DROPS Design answered:
Dear Mrs Bennett, sorry for misunderstanding, the slant edge of the collar on the chart will be worked with the short rows over the 26 remaining sts for collar - starting from RS (right front piece), you will work 23 sts only (leave the remaining sts unworked), turn and work these 23 sts. Turn and work now 2 rows over all the 26 sts = you have now worked 4 rows over the first 23 sts and 2 rows only over the 3 sts towards shoulder. Repeat these 4 rows will shape this slant edge for shawl collar. Hope it's now more clear for you. Happy knitting!
10.11.2020 - 09:06
![]() Laurel Bennett wrote:
Laurel Bennett wrote:
I’m confused on the Part after placing all the stitches on holders. I follow what the pattern says but I don’t get how to get the slant that is shown in the assembly diagram. I also followed your instructions you gave to someone who asked the same question in October but I still don’t get how to get the slant? Am I doing something wrong?
08.11.2020 - 07:47DROPS Design answered:
Dear Mrs Bennet, you will get the slant shoulders by slipping the stitches on a stitch holder while working the remaining stitch, eg on back piece, 1st size work: row 1: work the first 10 sts, slip them on a thread, work row to the end, turn and work the first 10 sts, slip them on a thread, work row to the end. Repeat these 2 rows one more time, then same but slipping this time the first 11 sts on each side on a thread. You have worked more rows over the stitches on the middle (neck) and less over the stitches on each side (on the thread). This gives you a slanted edge - work then SHOULDERS = all sts. Hope this helps. Happy knitting!
09.11.2020 - 10:46
![]() Kerry wrote:
Kerry wrote:
I don't understand the part of the pattern on the right front that says 'row 1 (right side) work as before over the the first 23- etc stitches... ' but there are still 26- etc stitches left on the needle. Do the remaining three stitches go on the stitch holder?
25.10.2020 - 15:52DROPS Design answered:
Dear Kerry, you are here working short rows, this means you work the first row from the wrong side over the first 23 sts only (leaving the last 3 sts unworked), turn and work row 2 from the right side as before, turn and work all stitches from the wrong side as before, turn and work all stitches from the right side as before = you worked 4 rows over the first 23 stitches and 2 rows over the lasts 3 sts. Continue repeating these 4 rows until collar measures 9 cm. Happy knitting!
26.10.2020 - 08:38
![]() Sylvie wrote:
Sylvie wrote:
Merci mais je bloque encore pour autre chose, je pense que je vais simplifier le modèle qui est trop compliqué pour mon petit cerveau ! pouvez vous m'aider justement si je souhaite uniquement faire sur les devants droit et gauche la torsade comme sur le dessin, une torsade milieu manche et une milieu dos ? et le reste en point ordinaire ??? qu'en pensez vous ??? mais pour cela dois je effectuer beaucoup de changement niveau nombre de points.... encore merci et navrée de vous importuner !!!
14.10.2020 - 11:42DROPS Design answered:
Bonjour Sylvie, je suis désolée, nous ne sommes pas en mesure de pouvoir adapter chacun de nos modèles à chaque demande, n'hésitez pas à vous adresser à votre magasin si vous souhaitez modifier le modèle/les torsades, ils pourront probablement vous aider, même par mail ou téléphone. Bon tricot!
14.10.2020 - 12:57
|
||||||||||||||||
Winter Cardinal Cardigan#wintercardinalcardigan |
||||||||||||||||
 |
 |
|||||||||||||||
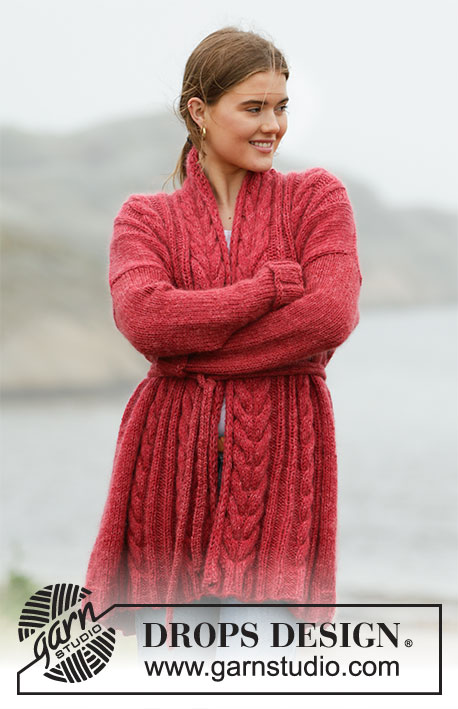
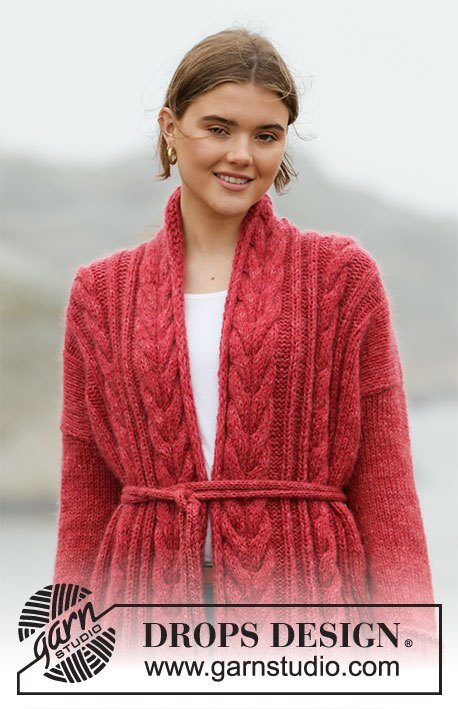
Knitted long jacket in DROPS Nepal and DROPS Kid-Silk. Piece is knitted with cables, shawl collar and belt. Size: S - XXXL
DROPS 205-24 |
||||||||||||||||
|
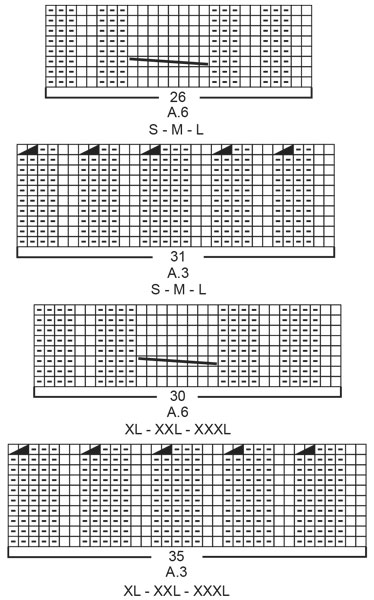
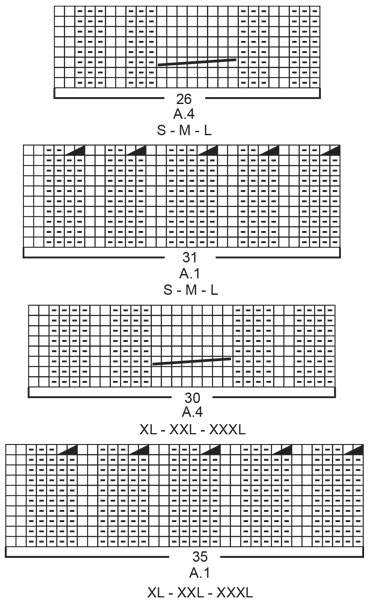
---------------------------------------------------------- EXPLANATION FOR THE PATTERN: ---------------------------------------------------------- GARTER STITCH (back and forth): Knit all rows. 1 ridge vertically = knit 2 rows. I-CORD EDGE RIGHT FRONT PIECE (applies to outermost edge along mid front): Begin from right side, * pass the first 3 stitches on needle loosely onto right needle without working the stitches (pass 1 by 1 with thread at the back of piece), tighten yarn a bit, and work pattern and stocking stitch over the other stitches as explained in pattern, turn piece, work stocking stitch and pattern as before until 3 stitches remain on row towards mid front, purl these stitches, turn piece *, work from *-* until finished measurements. NOTE! You need to work a few cm and pull the edge a bit before you see the best result. I-CORD EDGE LEFT FRONT PIECE (applies to outermost edge along mid front): Begin from right side, * work stocking stitch and pattern as before until 3 stitches on needle remain towards mid front, pass the last 3 stitches on needle loosely onto right needle without working the stitches (pass them 1 by 1 with thread at the back of piece), turn piece, tighten yarn, and purl the first 3 stitches, then work pattern and stocking stitch over the other stitches as explained in pattern, turn piece *, work from *-* until finished measurements. NOTE! You need to work a few cm and pull the edge a bit before you see the best result. PATTERN: See diagrams A.1 to A.6. Choose diagram for your size. Diagrams show all rows in pattern seen from the right side. DECREASE TIP-1 (evenly): Decrease from wrong side before cables begin. To calculate how to decrease evenly, count number of stitches to decrease over (e.g. 16 stitches) and divide by number of decreases to be done (e.g. 3) = 5.3. In this example decrease by working approx. every 4th and 5th stitch purl together. DECREASE TIP-2 (applies to mid under sleeves): Begin 3 stitches before marker thread and knit 2 together, knit 2 (marker thread is between these 2 stitches), slip 1 stitch knitwise, knit 1, pass slipped stitch over stitch worked (= 2 stitches decreased). INCREASE TIP (evenly): To calculate how to increase evenly, use the total number of stitches to increase over (e.g. 34 stitches) and divide stitches by number of increases to be done (e.g. 8) = 4.25. In this example increase by making 1 yarn over after approx. every 4th stitch. On next round work yarn overs twisted to avoid holes. TUBE KNITTING: Knit 1 row from right side, * slide all stitches to the right side of needle without turning the piece, tighten yarn and knit over all stitches *, work from *-*. ---------------------------------------------------------- START THE PIECE HERE: ---------------------------------------------------------- JACKET - SHORT OVERVIEW OF THE PIECE: Front pieces and back piece are worked back and forth on circular needle, bottom up. There are cables on both front pieces and back piece. On front piece the outermost 26-26-26-28-28-28 stitches towards mid front count as band with overlap. Sew piece together on the shoulders. Pick up stitches along the armholes and work sleeves back and forth on circular needle top down until sleeve cap is done, then work the sleeves in the round until finished measurements. Work sleeves top down to adjust sleeve length to desired measurements. Then sew sleeve and side seams and collar to neck line at the back of neck. RIGHT FRONT PIECE: Cast on 79-79-84-90-90-95 stitches (including 26-26-26-28-28-28 band stitches towards mid front and 1 edge stitch in the side) on circular needle size 5 mm with 1 strand Nepal and 1 strand Kid- Silk (= 2 strands). Purl 1 row (= wrong side). Work next row as follows from the right side (i.e. from mid front): Work I-CORD EDGE RIGHT FRONT PIECE over the first 3 stitches - read explanation above, work A.2 (= 28-28-28-30-30-30 stitches), work A.3 (= 31-31-31-35-35-35 stitches), * knit 2, purl 3 *, work from *-* over the next 15-15-20-20-20-25 stitches, knit 1 and finish with 1 edge stitch in garter stitch. Continue rib like this but work last row in A.3 and A.2 as follows from wrong side: 1 edge stitch in garter stitch, work 16-16-21-21-21-26 stitches in stocking stitch and decrease at the same time 3-1-3-4-1-2 stitches evenly over these 16-16-21-21-21-26 stitches - read DECREASE TIP 1, work last row in A.3 and A.2, and finish with i-cord edge over the last 3 stitches towards mid front. Piece measures approx. 6 cm from cast-on edge and there are 66-68-71-76-79-83 stitches on needle. Switch to circular needle size 6 mm. Now begin cables, i.e. work next row as follows from right side: Continue with i-cord edge over the first 3 stitches mid front, work A.5 (= 23-23-23-25-25-25 stitches), work A.6 (= 26-26-26-30-30-30 stitches), work 13-15-18-17-20-24 stitches in stocking stitch and finish with 1 edge stitch in garter stitch towards the side. Continue pattern like this. REMEMBER THE KNITTING TENSION! When piece measures 52-54-56-58-60-62 cm, cast off 5-5-7-8-8-9 stitches for armhole at the beginning of row from the side = 61-63-64-68-71-74 stitches. Continue pattern as before with 1 edge stitch in garter stitch towards armhole until piece measures 68-71-74-77-80-83 cm. On next row from right side, knit stitches in the outermost cable towards the side together 2 by 2 (= 4 stitches decreased) = 57-59-60-64-67-70 stitches remain on needle. Then slip stitches on stitch holder for diagonal shoulder as explained below. Begin in the side at armhole and slip stitches on a stitch holder on every row from armhole like this (to avoid cutting the yarn work stitches before slipping them on a stitch holder): Slip 10-11-11-12-13-14 stitches on stitch holder 2 times and 11-11-12-12-13-14 stitches on a stitch holder 1 time = 26-26-26-28-28-28 stitches remain on needle for collar, work the rest of row as before. Continue to work back and forth over these 26-26-26-28-28-28 stitches as follows: Row 1 (right side): Work as before over the first 23-23-23-24-24-24 stitches, turn and tighten yarn. Row 2 (= wrong side): Work as before the rest of row, turn piece and tighten yarn. Row 3 (right side): Work as before over all stitches, turn piece and tighten yarn. Row 4 (= wrong side): Work as before the rest of row, turn piece and tighten yarn. Repeat rows 1-4 until collar measures approx. 9-9-9-10-10-10 cm on the inside at the shortest. Work 1 ridge back and forth over all stitches. Loosely cast off by knitting from right side. LEFT FRONT PIECE: Cast on 79-79-84-90-90-95 stitches (including 1 edge stitch in the side and 26-26-26-28-28-28 band stitches towards mid front) on circular needle size 5 mm with 1 strand Nepal + 1 strand Kid-Silk (= 2 strands). Purl 1 row (= wrong side). Work next row as follows from the right side (i.e. from the side): Work 1 edge stitch in garter stitch, knit 1, * purl 3, knit 2 *, work from *-* over the next 15-15-20-20-20-25 stitches, work A.1 (= 31-31-31-35-35-35 stitches), work A.2 (= 28-28-28-30-30-30 stitches), and finish with I-CORD EDGE LEFT FRONT PIECE over the 3 last stitches. Continue rib like this but work last row in A.2 and A.1 as follows from wrong side: Work i-cord edge over the 3 first stitches, work last row in A.2 and A.1, work 16-16-21-21-21-26 stitches in stocking stitch and decrease at the same time 3-1-3-4-1-2 stitches evenly over these 16-16-21-21-21-26 stitches and finish with 1 edge stitch in garter stitch. Piece measures approx. 6 cm from cast-on edge and there are 66-68-71-76-79-83 stitches on needle. Switch to circular needle size 6 mm. Now begin cables, i.e. work next row as follows from right side: 1 edge stitch in garter stitch, work 13-15-18-17-20-24 stitches in stocking stitch, work A.4 (= 26-26-26-30-30-30 stitches), work A.5 (= 23-23-23-25-25-25 stitches), finish with i-cord edge over the last 3 stitches mid front as before. Continue pattern like this. When piece measures 52-54-56-58-60-62 cm, cast off 5-5-7-8-8-9 stitches for armhole at the beginning of row from the side = 61-63-64-68-71-74 stitches. Continue pattern as before with 1 edge stitch in garter stitch towards armhole until piece measures 68-71-74-77-80-83 cm. On next row from right side, knit stitches in the outermost cable towards the side together 2 by 2 (= 4 stitches decreased) = 57-59-60-64-67-70 stitches remain on needle. Then slip stitches on stitch holder for diagonal shoulder as explained below. Begin in the side at armhole and slip stitches on a stitch holder on every row from armhole like this (to avoid cutting the yarn work stitches before slipping them on a stitch holder): Slip 10-11-11-12-13-14 stitches on stitch holder 2 times and 11-11-12-12-13-14 stitches on a stitch holder 1 time = 26-26-26-28-28-28 stitches remain on needle for collar, work the rest of row as before. Continue to work back and forth over these 26-26-26-28-28-28 stitches as follows: Row 1 (= wrong side): Work as before over the first 23-23-23-24-24-24 stitches, turn and tighten yarn. Row 2 (right side): Work as before the rest of row, turn piece and tighten yarn. Row 3 (= wrong side): Work as before over all stitches, turn piece and tighten yarn. Row 4 (right side): Work as before the rest of row, turn piece and tighten yarn. Repeat rows 1-4 until collar measures approx. 9-9-9-10-10-10 cm on the inside at the shortest but finish after a row from wrong side. Work 1 ridge back and forth over all stitches. Loosely cast off by knitting from right side. BACK PIECE: Cast on 124-124-134-144-144-154 stitches (including 1 edge stitch in each side) on circular needle size 5 mm with 1 strand Nepal and 1 strand Kid- Silk (= 2 strands). Purl 1 row (= wrong side). Work next row as follows from right side: 1 edge stitch in GARTER STITCH - read explanation above, knit 1, * purl 3, knit 2 *, work from *-* over the next 15-15-20-20-20-25 stitches, work A.1 (= 31-31-31-35-35-35 stitches), work A.2 (= 28-28-28-30-30-30 stitches), work A.3 (= 31-31-31-35-35-35 stitches), * knit 2, purl 3 *, work from *-* over the next 15-15-20-20-20-25 stitches, knit 1 and finish with 1 edge stitch in garter stitch. Continue rib like this but work last row in A.3, A.2 and A.1 as follows from wrong side: 1 edge stitch in garter stitch, work 16-16-21-21-21-26 stitches in stocking stitch and decrease 3-1-3-4-1-2 stitches evenly over these 16-16-21-21-21-26 stitches - read DECREASE TIP-1, work last row in A.3, A.2 and A.1, work 16-16-21-21-21-26 stitches in stocking stitch and decrease 3-1-3-4-1-2 stitches evenly over these 16-16-21-21-21-26 stitches and finish with 1 edge stitch in garter stitch. Piece measures approx. 6 cm from cast-on edge and there are 103-107-113-121-127-135 stitches on needle. Switch to circular needle size 6 mm. Now begin cables, i.e. work next row as follows from right side: 1 edge stitch in garter stitch, 13-15-18-17-20-24 stitches in stocking stitch, work A.4 (= 26-26-26-30-30-30 stitches), work A.5 (= 23-23-23-25-25-25 stitches), work A.6 (= 26-26-26-30-30-30 stitches), work 13-15-18-17-20-24 stitches in stocking stitches and finish with 1 edge stitch in garter stitch. Continue pattern like this. When piece measures 52-54-56-58-60-62 cm, cast off 5-5-7-8-8-9 stitches at the beginning of the next 2 rows for armhole = 93-97-99-105-111-117 stitches remain. Continue with pattern as before with 1 edge stitch in garter stitch in each side until piece measures 68-71-74-77-80-83 cm. On next row from right side, knit stitches in the outermost cable in each side together 2 by 2 (= 8 stitches decreased on row) = 85-89-91-97-103-109 stitches remain on needle. Then slip stitches on a stitch holder for diagonal shoulder in each side and cast at the same time off for neck as explained below. Begin at armhole and slip stitches on a stitch holder on every row from armhole in each side like this (to avoid cutting the yarn work stitches before slipping them on a stitch holder): Slip 10-11-11-12-13-14 stitches on a stitch holder 2 times in each side and 11-11-12-12-13-14 stitches on a stitch holder 1 time in each side. AT THE SAME TIME when piece measures 69-72-75-78-81-84 cm, decrease 8 stitches over the 2 cables mid back (knit stitches in each cable together 2 by 2). On next row cast off the middle 13-13-13-15-15-15 stitches for neck and finish each shoulder separately. Continue to slip stitches on a stitch holder and cast at the same time off 1 stitch for neck on next row from neck. When all stitches have been slipped on a stitch holder for diagonal shoulder and cast off for neck, back piece measures approx. 72-75-78-81-84-87 cm from the highest point on shoulder and down. Finish the other shoulder the same way. SHOULDER: Slip the 31-33-34-36-39-42 stitches from stitch holder on one of the shoulder back on circular needle size 6 mm. Knit 1 row from wrong side over these stitches but to avoid holes in every transition where stitches were slipped on stitch holder, pick up loop between 2 stitches and slip it twisted on left needle before working it together with next stitch on left needle. Then loosely cast off all stitches by knitting from right side. Work the same way along the 3 other shoulders. ASSEMBLY: Sew shoulder seams inside cast-off edge. Sew collar tog mid back (make sure that seam is facing inwards when collar is folded down). Sew collar to neckline in the back of neck. SLEEVE: Pick up 44-48-50-54-56-58 stitches along armhole inside 1 edge stitch in garter stitch on circular needle size 6 mm with 1 strand of each quality (= 2 strands) - NOTE: Do not pick up stitches along the bottom of armhole. Work in stocking stitch back and forth for 3-3-4-5-5-6 cm (= sleeve cap and as far as the bottom of armhole). Then work sleeves in the round on double pointed needles/a short circular needle size 6 mm. Insert 1 marker thread at beginning of round (= mid under sleeve). Move the marker thread upwards when working; it should be used for decrease mid under sleeve. Work in stocking stitch in the round. When sleeve measures 2 cm from where marker thread was inserted, decrease 2 stitches mid under sleeve - read DECREASE TIP-2. Decrease like this every 3-3-2½-2-2-1½ cm 5-6-7-8-8-9 times in total = 34-36-36-38-40-40 stitches. Work until sleeve measures 42-42-41-39-38-36 cm from where marker thread was inserted (sleeve has been worked to finished length, try the jacket on and work to desired length). Switch to double pointed needles size 5 mm. Knit 1 round while increasing 8-6-6-4-8-8 stitches evenly - read INCREASE TIP = 42-42-42-42-48-48 stitches. Work rib in the round = knit 2/purl 4 for 5 cm. Knit 1 round and then loosely cast off by purling. Work the other sleeve the same way. Fold the rib at the bottom upwards on both sleeves and fasten with a couple of stitches. MORE ASSEMBLY: Sew side seams inside 1 edge stitch in garter stitch. Sew bottom of armhole. BELT: Cast on 5 stitches on double pointed needles size 6 mm with 1 strand Nepal + 1 strand Kid-Silk and work TUBE KNITTING - read explanation above, until belt measures approx. 250-300 cm (or desired length). Cast off. Place belt double when using it. |
||||||||||||||||
Diagram explanations |
||||||||||||||||
|
||||||||||||||||
 |
||||||||||||||||
 |
||||||||||||||||
 |
||||||||||||||||
 |
||||||||||||||||
Have you finished this pattern?Tag your pictures with #dropspattern #wintercardinalcardigan or submit them to the #dropsfan gallery. Do you need help with this pattern?You'll find 31 tutorial videos, a Comments/Questions area and more by visiting the pattern on garnstudio.com. © 1982-2026 DROPS Design A/S. We reserve all rights. This document, including all its sub-sections, has copyrights. Read more about what you can do with our patterns at the bottom of each pattern on our site. |
||||||||||||||||


With over 40 years in knitting and crochet design, DROPS Design offers one of the most extensive collections of free patterns on the internet - translated to 17 languages. As of today we count 325 catalogues and 12298 patterns translated into English (UK/cm). 12298
We work hard to bring you the best knitting and crochet have to offer, inspiration and advice as well as great quality yarns at incredible prices! Would you like to use our patterns for other than personal use? You can read what you are allowed to do in the Copyright text at the bottom of all our patterns. Happy crafting!
Post a comment to pattern DROPS 205-24
We would love to hear what you have to say about this pattern!
If you want to leave a question, please make sure you select the correct category in the form below, to speed up the answering process. Required fields are marked *.