
Popular categories
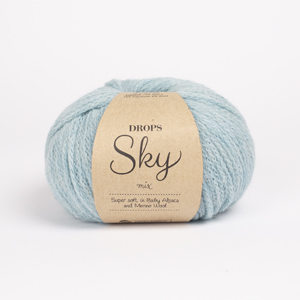
Looking for a yarn?


Comments / Questions (51)
![]() Andrea wrote:
Andrea wrote:
Liebes Team, warum benötige ich in Größe S 550g Sky und bei anderen geringelten Pullovern nur 250g? Ist das "Muster" so aufwendig? Liebe Grüße
24.08.2020 - 17:37DROPS Design answered:
Liebe Andrea, dieses Pullover ist mit Streifen gestrickt, deshalb braucht man mehr Garn im Total als einen unifarbigen Pullover. Viel Spaß beim stricken!
25.08.2020 - 09:08
![]() Helle wrote:
Helle wrote:
Hej Jeg er meget glad for min trøje i Drops Sky, men jeg er i tvivl om, hvordan jeg tørrer den efter vask. I jeres vaskeanvisninger står der, at man ikke må lægge dryppende vådt tøj til tørre, men hvad gør jeg så, når den skal håndvaskes, og den hverken må trykkes eller vrides?
28.07.2020 - 15:23DROPS Design answered:
Hej Helle, jo du må gerne trykke vandet ud af blusen med et håndklæde eller 2 og så lade den ligge over et tørrestativ til den er helt tør. (Man kan også centrifugere den let om man har et sådan program i sin vaskemasken). God fornøjelse!
28.07.2020 - 15:30
![]() Barbara wrote:
Barbara wrote:
Dear DROPS Team, I think there is a mistake in section with BODY decrease (it is every 4th row, and I think IT SHOULD BE every 2nd row). Otherwise the jumper will not be in straight shape/line. I will appreciate your feedback (I have checked both English and Polish versions of this pattern) My Best Regards!
15.05.2020 - 22:54DROPS Design answered:
Dear Barbara, our Design Team checked and pattern is right, you have a slight a-shape, but there shouldn't be so many increases neither. Happy knitting!
02.06.2020 - 11:41
![]() Karin Sørensen wrote:
Karin Sørensen wrote:
Jeg kan se jeg har skrevet 23 cm det er en fejl det er 27 cm
21.04.2020 - 15:16
![]() Karin Sørensen wrote:
Karin Sørensen wrote:
Jeg har 6 striber
21.04.2020 - 15:07
![]() Karin Sørensen wrote:
Karin Sørensen wrote:
Hej strikker Drops 205-1. Str xl. Bærestykke. Når jeg har taget ud 28 gange og har 300 masker skulle mit arbejde måle ca 37 cm. Når jeg ser på måleskemaet skulle det kun måle 23 cm. Strikkefastheden passer.. kan I hjælpe mig.Venlig hilsen Karin
18.04.2020 - 06:31DROPS Design answered:
Hej Karin, hvor mange striber har du? En stribe som måler 5 cm = ca 8 omgange....
21.04.2020 - 14:40
![]() Donatella wrote:
Donatella wrote:
Scusi, rettifico aumento 8 e diminuisco 4...
28.03.2020 - 17:02
![]() Donatella wrote:
Donatella wrote:
Buongiorno. Ho appena iniziato il corpo e non mi risulta chiara una questione. Se aumento una maglia a lato dei due segnapunti (centro davanti e centro dietro) ogni due giri quindi ogni due giri aumento 4 maglie. Invece nei 2 segnapunti ai lati ne devo diminuire 4 ogni 4 giri (vedi suggerimento diminuzioni1). Ma a questo punto nel corpo mi ritrovo 2 maglie in piu ogni 4 giri.... Se aumento 4 e diminuisco 2..... La maglia nello schema è diritta. C'è qualche errore o non ho capito io? Grazie
28.03.2020 - 16:10DROPS Design answered:
Buongiorno Donatella. Quando prosegue solo sul davanti/dietro, aumenta 2 m al cento davanti e 2 m al centro dietro (4 m aumentate) e diminuisce 2 maglie da ciascun lato (4 m diminuite). Il numero delle maglie quindi non cambia. Non ci sono più gli aumenti sulle maniche. Buon lavoro!
30.03.2020 - 12:40
![]() June Ramstad wrote:
June Ramstad wrote:
Hvis jeg vil bruke har garn kategori D (Drops Melodi) skal jeg da bruke dobbelt garn ?
24.12.2019 - 01:43DROPS Design answered:
Hej June, hvis du vil strikke denne i DROPS Melody, så skal du kun bruge 1 tråd, men sørg for at få 13 masker på 10 cm i bredden :)
15.01.2020 - 14:37
![]() Ingrid Van Den Bosch wrote:
Ingrid Van Den Bosch wrote:
Waar vind in uitleg om aan de aan de binnenkant van de afkantrand steken op te nemen zodat het afkanten verborgen word. Bedankt
30.10.2019 - 14:44DROPS Design answered:
Dag Ingrid,
Het gaat erom dat de (rommelige) rand niet zichtbaar is aan de voorkant. In deze video kun je zien hoe je dat kunt doen.
05.11.2019 - 13:47
|
|||||||||||||
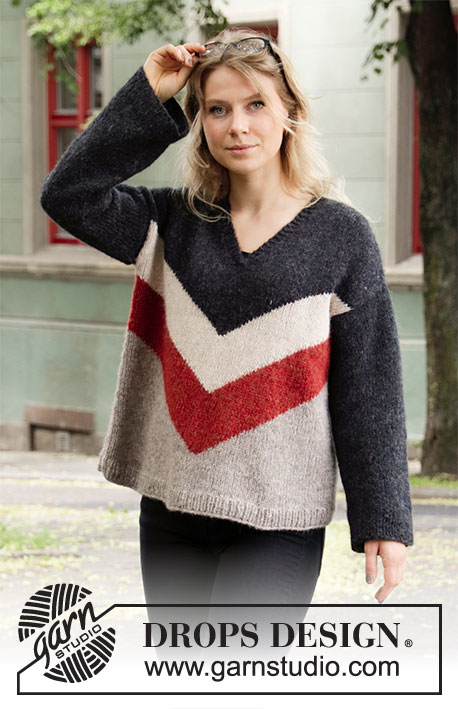
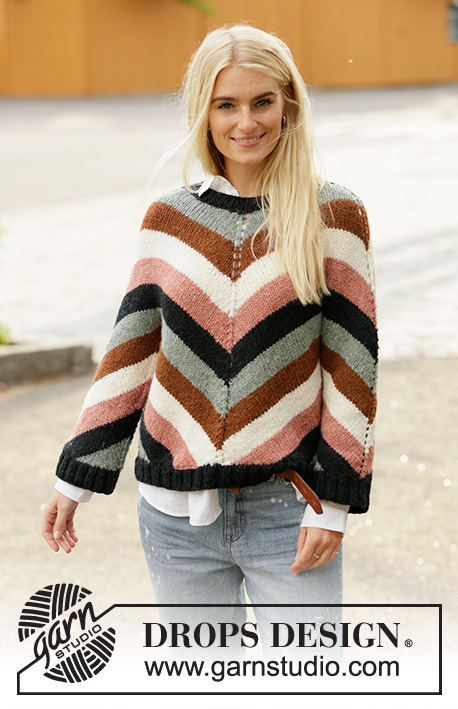
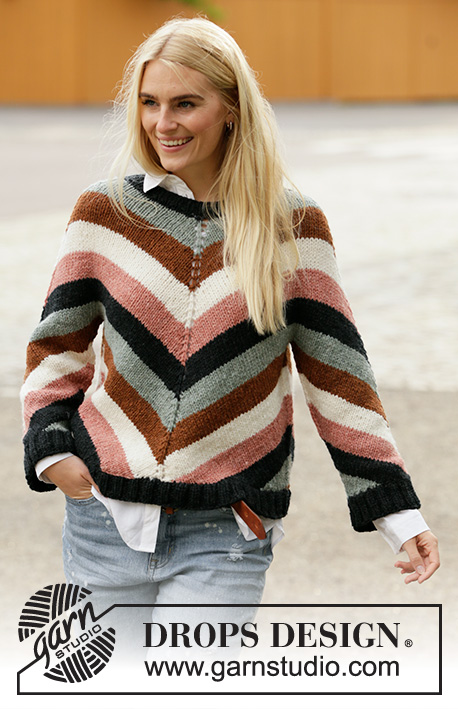
Past to Present#pasttopresentsweater |
|||||||||||||
 |
 |
||||||||||||
Knitted jumper in 2 strands DROPS Sky. The piece is worked top down, at an angle with stripes. Sizes S - XXXL.
DROPS 205-1 |
|||||||||||||
|
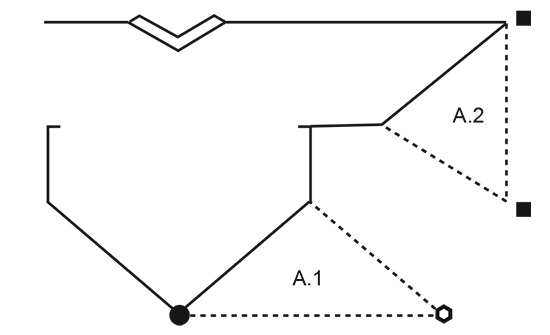
------------------------------------------------------- EXPLANATIONS FOR THE PATTERN: ------------------------------------------------------- INCREASE TIP-1 (evenly spaced): To work out how to increase evenly, count the total number of stitches on the needle (e.g. 58 stitches) and divide by the number of increases to be made (e.g. 10) = 5.8. In this example, increase by making 1 yarn over after approx. each 6th stitch. On the next round knit the yarn overs twisted to avoid holes. STRIPES: The stripes are worked in stocking stitch, top down as follows: 4½-4½-4½-5-5-5 cm (= approx. 7-7-7-8-8-8 rounds/rows) with 2 strands light sea green 4½-4½-4½-5-5-5 cm (= approx. 7-7-7-8-8-8 rounds/rows) with 2 strands hazelnut 4½-4½-4½-5-5-5 cm (= approx. 7-7-7-8-8-8 rounds/rows) with 2 strands white 4½-4½-4½-5-5-5 cm (= approx. 7-7-7-8-8-8 rounds/rows) with 2 strands brick 4½-4½-4½-5-5-5 cm (= approx. 7-7-7-8-8-8 rounds/rows) with 2 strands black Repeat these 5 stripes to finished length. INCREASE TIP-2 (for mid front/back + shoulders): Work to the stitch with the marker, make 1 yarn over, knit 1 (marker in this stitch), 1 yarn over. Then work the new stitches in stocking stitch (= holes). Increase a total of 8 stitches on each increase-round. DECREASE TIP-1 (for sides of body and sleeves): Work until there are 2 stitches left before the stitch with the marker, knit 2 together, knit 1 (marker in this stitch), slip 1 stitch as if to knit, knit 1 and pass the slipped stitch over the knitted stitch. CASTING OFF TIP: To avoid the cast-off edge being tight you can cast off with a ½-size larger needle. PATTERN: See diagrams A.1 and A.2. The illustrations show how to work the pieces back and forth. ------------------------------------------------------- START THE PIECE HERE: ------------------------------------------------------- JUMPER – SHORT OVERVIEW OF THE PIECE: The neck and yoke are worked in the round with circular needle, top down. The yoke is divided for body and sleeves and the body continued in the round. Then the piece is divided mid front/back and continued in 2 sections back and forth, finishing by working rib in the round. The sleeves are worked in the round with short circular needle/double pointed needles, top down. Then they are divided mid top/underneath and finished working back and forth in one section (= underside of sleeve). The rib is worked in the round to finish. NECK: Cast on 58-60-62-64-68-72 stitches with circular needle size 6 mm and 2 strands black. Knit 1 round then work rib (= knit 1/ purl 1) for 3 cm. Change to circular needle size 7 mm and knit 1 round where you increase 10-8-14-12-16-12 evenly spaced – read INCREASE TIP-1 = 68-68-76-76-84-84 stitches. THE PIECE IS NOW MEASURED FROM HERE! YOKE: The next round is worked as follows at the same time as inserting 4 markers (allow the markers to follow your work onwards; they will be used when increasing): Knit 1 and insert the first marker in this stitch (= mid top of shoulder), knit 16-16-18-18-20-20 stitches, knit 1 and insert the second marker in this stitch (= mid back), knit 16-16-18-18-20-20 , knit 1 and insert the third marker in this stitch (= mid top of shoulder), knit 16-16-18-18-20-20, knit 1 and insert the fourth marker in this stitch (= mid front), knit the remaining16-16-18-18-20-20 stitches. Continue with stocking stitch and STRIPES – read description above, AT THE SAME TIME on the first round increase by all markers – read INCREASE TIP-2. Continue increasing every 2nd round a total of 22-24-26-28-29-32 times on each side of all 4 markers. REMEMBER THE KNITTING TENSION! After the last increase there are 244-260-284-300-316-340 stitches on the needle (= 60-64-70-74-78-84 stitches between each stitch with a marker). The piece measures approx. 29-32-35-37-39-43 cm measured in the knitting direction from after the neck. Cut the strand. The next round is worked as follows: Place the first 25-25-29-31-31-31 stitches on 1 thread for half the sleeve, cast on 3-3-4-4-5-5 new stitches on the needle (= in side under sleeve), work the next 73-81-85-89-97-109 stitches (= back piece), place the next 49-49-57-61-61-61 stitches on 1 thread for sleeve, cast on 5-5-7-7-9-9 new stitches on the needle (= in side under sleeve), work the next 73-81-85-89-97-109 stitches (= front piece), place the remaining 24-24-28-30-30-30 stitches on the first thread for the sleeve and cast on 2-2-3-3-4-4 new stitches on the needle (= in side under sleeve). Insert 1 marker in the middle stitch on each shoulder and 1 marker in the middle stitch mid-front. Leave the markers where they are – THE PIECE IS NOW MEASURED FROM HERE! BODY: = 156-172-184-192-212-236 stitches. Insert 1 marker in the first stitch on the round and 1 marker in the 3rd-3rd-4th-4th-5th-5th stitch of the 5-5-7-7-9-9 stitches cast on under the other sleeve; allow these markers to follow your work onwards (= sides). Continue with stocking stitch, stripes, increases mid back and front as before and, AT THE SAME TIME decrease 2 stitches by each of the 2 new markers in the sides – read DECREASE TIP-1. Decrease like this every 4th row to finished length. Work until the piece measures 13-13-13-13-11-7 cm mid front measured from the marker from the division (or continue to desired length; there is now approx. 5 cm left to finished length) – adjust so the last round is worked without either increases or decreases. Cut the strand. Place the mid-back-stitch (with the marker) + the stitches as far as the mid-front-stitch (with the marker) on 1 thread (= half back piece + half front piece); these stitches will be worked later. You now have half the front piece and half the back piece on the needle. HALF FRONT/BACK PIECE: See illustration A.1 for this section. Start from the right side and cast off the stitch with the marker mid front/mid back. Continue with stocking stitch, stripes and decreasing in the side – AT THE SAME TIME cast off 2 stitches at the beginning of each row. Continue like this until there are 3 stitches left, cut the strand, pull it through the remaining stitches and fasten well. HALF FRONT/BACK PIECE: Place the stitches from the thread on circular needle size 7 mm and work in the same way as the first half front/back piece. BOTTOM EDGE: Start on one side and knit up 156-168-180-196-216-232 stitches along the whole bottom edge with circular needle size 6 mm and 2 strands black (the number of stitches should be divisible by 4) – knit up inside the cast-off edge so all casting-off is hidden. Work rib (= knit 2/ purl 2) for 5 cm. Cast off with knit over knit and purl over purl – read CASTING OFF TIP. SLEEVE: Place the 49-49-57-61-61-61 stitches from the thread on the one side of the piece on short circular needle size 7 mm and knit up 1 stitch in each of the 5-5-7-7-9-9 stitches cast on under the sleeve = 54-54-64-68-70-70 stitches. Insert 1 marker in the 3rd-3rd-4th-4th-5th-5th stitch in the 5-5-7-7-9-9 stitches under the sleeve and allow the marker to follow your work onwards. Continue with stocking stitch, stripes and increases mid top of sleeve as before, AT THE SAME TIME decrease by the marker under the sleeve – remember DECREASE TIP-1. Decrease like this every 2nd round to finished length. Work until the piece measures approx. 23-21-20-18-14-9 cm mid top of sleeve, measured from the marker from the division (or continue to desired length; there is approx. 5 cm left to finished length) – adjust so the last round is worked without either increases or decreases. Now work back and forth – see illustration A.2 for this section. Start from the right side and cast off the stitch with the marker on top of sleeve. Continue with stocking stitch, stripes and decrease by the marker mid under sleeve – AT THE SAME TIME cast off 2 stitches at the beginning of each row. Continue like this until there are 3 stitches left, cut the strand, pull it through the remaining stitches and fasten well. Work the other sleeve in the same way. CUFF: Start mid under sleeve and knit up approx. 52-56-64-64-68-72 stitches along the whole bottom edge with double pointed needles size 6 mm and 2 strands black (the number of stitches should be divisible by 4) – knit up inside the cast-off edge so all casting-off is hidden. Work rib (= knit 2/ purl 2) for 5 cm. Cast off with knit over knit and purl over purl. |
|||||||||||||
Diagram explanations |
|||||||||||||
|
|||||||||||||
 |
|||||||||||||
 |
|||||||||||||
Have you finished this pattern?Tag your pictures with #dropspattern #pasttopresentsweater or submit them to the #dropsfan gallery. Do you need help with this pattern?You'll find 25 tutorial videos, a Comments/Questions area and more by visiting the pattern on garnstudio.com. © 1982-2026 DROPS Design A/S. We reserve all rights. This document, including all its sub-sections, has copyrights. Read more about what you can do with our patterns at the bottom of each pattern on our site. |
|||||||||||||


With over 40 years in knitting and crochet design, DROPS Design offers one of the most extensive collections of free patterns on the internet - translated to 17 languages. As of today we count 325 catalogues and 12298 patterns translated into English (UK/cm). 12298
We work hard to bring you the best knitting and crochet have to offer, inspiration and advice as well as great quality yarns at incredible prices! Would you like to use our patterns for other than personal use? You can read what you are allowed to do in the Copyright text at the bottom of all our patterns. Happy crafting!
Post a comment to pattern DROPS 205-1
We would love to hear what you have to say about this pattern!
If you want to leave a question, please make sure you select the correct category in the form below, to speed up the answering process. Required fields are marked *.