
Popular categories
Looking for a yarn?


Comments / Questions (108)
![]() Isabelle wrote:
Isabelle wrote:
Bonjour aucun soucis vous êtes excusée 😹je redéfaisais et je n’arrivais pas à trouver votre nombre de mailles je comprends pourquoi 😅 Merci
20.05.2026 - 18:21
![]() Isabelle wrote:
Isabelle wrote:
Je termine la dernière diminutions qui est de 1 m de chaque côté Et j’ai plus que 3 m avant le diagramme de chaque côté Du coup une lisière et 2 m jersey et j’ai bien retiré 9 m ( 1x4 et 1x2 puis 1x3 ) =82 m Du coup 1 m lisière et 2 m jersey avant A1 et après A3 Comme vous m’avez indiqué 1 lisière et 3 m jersey je suis perdue 🥴
19.05.2026 - 17:26DROPS Design answered:
Bonjour Isabelle et oups mes maths étaient mauvaises hier désolée, il vous reste effectivement 3 mailles de chaque côté, 2 m jersey et 1 m lisière. Bonne continuation!
20.05.2026 - 07:39
![]() Isabelle wrote:
Isabelle wrote:
Ah je pense que j’ai saisie ça doit être 3 fois 1 mailles donc sur 6 rangs Est-ce que c’est cela ça ferais bien les 9 m Merci
19.05.2026 - 15:58DROPS Design answered:
Tout à fait, j'ai détaillé à nouveau ci-dessous ;) Bonne continuation!
19.05.2026 - 16:11
![]() Isabelle wrote:
Isabelle wrote:
J’ai démarré l’emmanchure par 1 fois 4 m a l’endroit au retour à l’envers 1 fois 4 m puis 1 fois 2 m a l’endroit au retour à l’envers 1 fois 2 m Et là je ne saisie pas l’info il est entouré le 3 et il est dit 4 fois 1 m donc c’est pas très clair 🥴
19.05.2026 - 15:51DROPS Design answered:
Bonjour Isabelle, vous rabattez d'abord 4 m au début des 2 rangs suivants (fait apparemment), puis 2 m au début des 2 rangs suivants (fait aussi apparemment), puis vous rabattez 1 m au début des 6 rangs suivants (soit 3 x 1 m de chaque côté) = vous avez rabattu 4+2+1+1+1=9 m au total de chaque côté - en taille L toujours, exact? Bon tricot!
19.05.2026 - 16:11
![]() Isabelle wrote:
Isabelle wrote:
Merci beaucoup je vais essayer cela 😁
19.05.2026 - 15:05
![]() Isabelle wrote:
Isabelle wrote:
Merci pour votre réponse je vais tenter cela 😁
19.05.2026 - 15:03
![]() Isabelle wrote:
Isabelle wrote:
Bonjour je suis arrivée au diminutions emmanchures j’ai terminé sur le diagramme A1 jusqu’en haut pour que se soit plus simple lorsque je diminue je dois continuer le diagramme A2 du coup mais en retirant les mailles diminuées donc il faut tout recalculer Merci
19.05.2026 - 09:30DROPS Design answered:
Bonjour Isabelle, en taille L on rabat 9 m de chaque côté pour les emmanchures - avant A.1 vous aviez 1 m lisière + 11 m jersey = il doit vous rester 1 m lisière et 3 m jersey avant A.1 et de même après A.3, vous aviez 11 m jersey et 1 m lisière, il doit vous rester 3 m jersey et 1 m lisière après A.3 - vous ne touchez pas le point fantaisie, vous avez juste moins de mailles jersey de chaque côté. Pour l'encolure vous rabattez les 28 m centrales en diminuant en même temps 2 m (= 2 m ens à l'end, 24 m, 2 m ens à l'end = 28 m tricotées mais 26 m rabattues). Bon tricot!
19.05.2026 - 11:48
![]() Isabelle wrote:
Isabelle wrote:
Bonjour merci pour votre aide J’ai utilisée les marqueurs et enfin j’ai réussi le rang avec le compte de mailles Pourtant j’avais recommencé plusieurs fois c’est étonnant 🫣 Votre aide est précieuse pour nous a chaque difficulté rencontrée Merci à vous
12.05.2026 - 09:03DROPS Design answered:
Merci Isabelle, n'hésitez pas à revenir si vous avez une autre question. Bonne continuation!
12.05.2026 - 14:12
![]() Isabelle wrote:
Isabelle wrote:
Bonjour merci pour votre réponse J’ai recommencé 5 fois au moins le diagramme en suivant bien 🤔et a chaque fois il me manque une m arrivée au bout dans les 11 m jersey C’est pour ça que je ne comprend pas et j’ai essayé de compter les mailles sur le diagramme et il manque bien une C’est un mystère 😁 Je vais tenter à nouveau mais si je le trouve dans la même situation je dois faire quoi du coup ?
11.05.2026 - 11:32DROPS Design answered:
Bonjour Isabelle, vérifiez que vous avez bien 100 mailles et vérifiez que vous avez bien le bon nombre de mailles à chaque rang (d'où l'idée des marqueurs): 1 m lisière, 11 m jersey, 9 m de A.1, 3 x les 19 m de A.2 (= 57 m au total), 10 m de A.3, 11 m jersey et 1 m point mousse = 1+11+9+57+10+11+1=100 mailles. Bon tricot!
11.05.2026 - 16:12
![]() Isabelle wrote:
Isabelle wrote:
Je continue car je ne pouvais plus écrire Donc le A3 :3 m ens end 3x 1 m endroit et un double jeté 3 fois le diagramme se termine par 1 m endroit et les 11 m end et la m lisière pour terminer et il me manque une maille à chaque fois pourquoi ? Merci à vous
09.05.2026 - 16:58DROPS Design answered:
Bonjour Isabelle, attention quand vous tricotez les diagrammes vous devez procéder comme indiqué, autrement dit en L, vous tricotez 1 m lis, puis 11 m jersey, puis 1 x A.1 (= 9 m), puis 3 fois A.2 (3 x 19=57 m), puis 1 x A.3 (10 m) et 11 m jersey + 1 m lis. Autrement dit, dans A.3 vous tricotez: (2 m ens à l'end)x3, puis (1 m end, 1 double jeté)x3 et 1 m end = 3+6+1=10 m. Mettez peut-être un marqueur entre chaque diagramme pour bien vérifier votre nombre de mailles, pour que vous ayez toujours bien 9 m dans A.1, 19 dans chaque A.2 et 10 dans A.3; Bon tricot!
11.05.2026 - 08:33
|
||||||||||
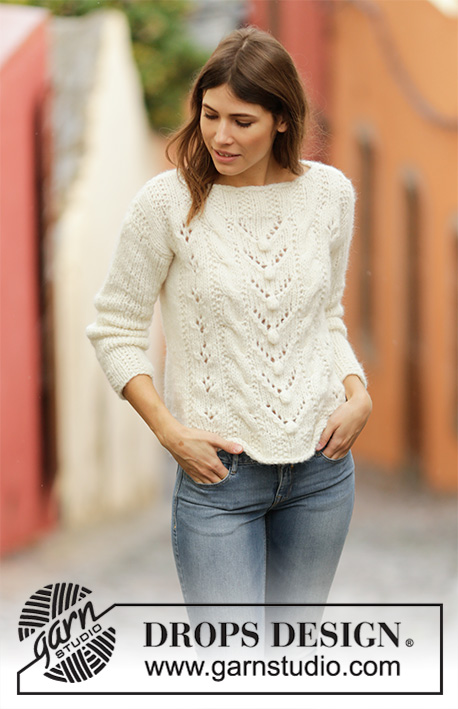
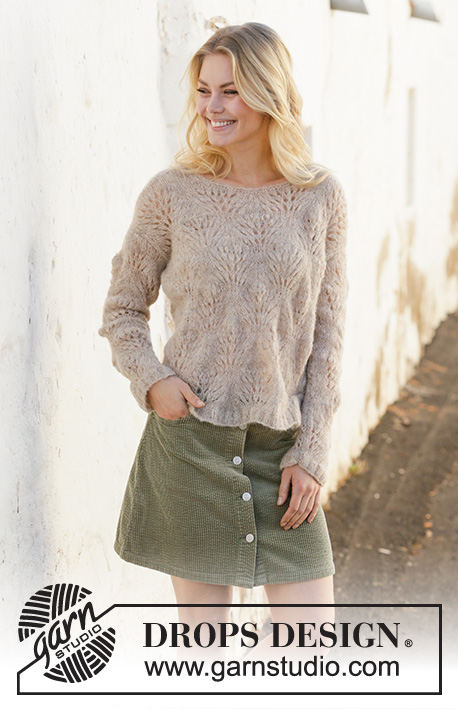
Footprints in the Sand#footprintsinthesandsweater |
||||||||||
 |
 |
|||||||||
Knitted jumper with wave pattern in DROPS Brushed Alpaca Silk. Sizes S - XXXL.
DROPS 202-3 |
||||||||||
|
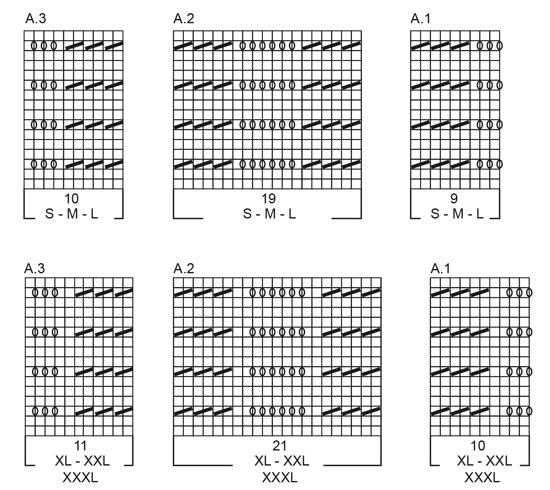
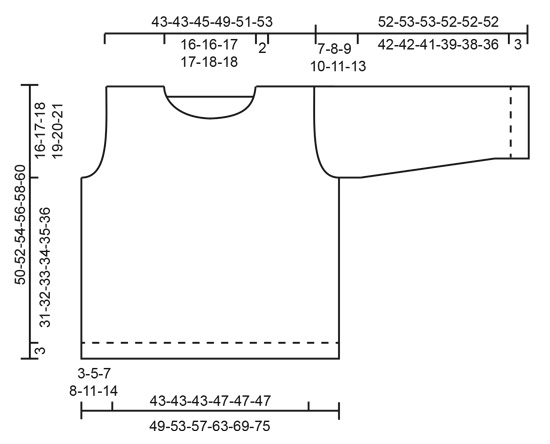
------------------------------------------------------- EXPLANATIONS FOR THE PATTERN: ------------------------------------------------------- RIDGE/GARTER STITCH (worked back and forth): Knit all rows. 1 ridge in height = Knit 2 rows. RIDGE/GARTER STITCH (worked in the round): 1 ridge in height = 2 rounds, i.e. knit 1 round and purl 1 round. PATTERN: See diagrams A.1 to A.3. Choose diagram for your size. The diagrams show all the rows in the pattern seen from the right side. DECREASE TIP (evenly spaced): To work out how to decrease evenly, count the total number of stitches on the needle (e.g.124 stitches) minus edge stitches (= 2 stitches) and divide the remaining stitches by number of decreases to be made (e.g. 36) = 3.38. In this example, decrease by alternately knitting together each 2nd and 3rd stitch and each 3rd and 4th stitch. INCREASE TIP (for sleeves): Increase 1 stitch by making 1 yarn over inside the 1 edge stitch on each side. On the next row work the yarn overs twisted to avoid holes. ------------------------------------------------------- START THE PIECE HERE: ------------------------------------------------------- JUMPER - SHORT OVERVIEW OF THE PIECE: The piece is worked back and forth with circular needle, bottom up and sewn together to finish. BACK PIECE: Cast on 124-132-140-156-172-180 stitches (including 1 edge stitch on each side) with circular needle size 4 mm and Brushed Alpaca Silk. Purl 1 row from the wrong side, then work rib from the right side as follows: 1 edge stitch in GARTER STITCH – read description above, (knit 2, purl 2) until there are 3 stitches left, knit 2 and 1 edge stitch in garter stitch. Continue this rib back and forth for 3 cm – adjust so that the next row is worked from the right side. Knit 1 row with 1 edge stitch in garter stitch on each side where you decrease 36-38-40-44-50-50 stitches evenly spaced – read DECREASE TIP = 88-94-100-112-122-130 stitches. Work 1 row stocking stitch back from the wrong side with 1 edge stitch in garter stitch on each side. Change to circular needle size 5.5 mm. Now work pattern – choose diagram for your size, as follows: 1 edge stitch in garter stitch, stocking stitch over the next 5-8-11-13-18-22 stitches, A.1 over the next 9-9-9-10-10-10 stitches, A.2 over the next 57-57-57-63-63-63 stitches (= 3 repeats in width), A.3 over the next 10-10-10-11-11-11 stitches, 5-8-11-13-18-22 stitches in stocking stitch and 1 edge stitch in garter stitch. Continue back and forth like this until the diagrams have been completed in height. REMEMBER THE KNITTING TENSION! Now work pattern – choose diagram for your size, as follows: 1 edge stitch in garter stitch, 5-8-11-13-18-22 stitches in stocking stitch, A.2 over the next 76-76-76-84-84-84 stitches (= 4 repeats in width), 5-8-11-13-18-22 stitches in stocking stitch and 1 edge stitch in garter stitch. When the diagram has been completed in height, continue this pattern, i.e. work first A.1, A.2 and A.3 as described at the beginning of the piece and then 4 repeats of A.2 in width so that the wave pattern is displaced each time it is worked in height. The remaining stitches are worked in stocking stitch and 1 edge stitch in garter stitch on each side. When the piece measures 34-35-36-37-38-39 cm from the cast-on edge (measure from where the rib at the beginning of the piece slopes downwards/is longest) cast off for armholes in each side as follows: Cast off 4 stitches 1-1-1-1-2-2 times, 2 stitches 0-1-1-2-2-3 times and 1 stitch 1-2-3-3-3-4 times (= 5-8-9-11-15-18 stitches cast off on each side) = 78-78-82-90-92-94 stitches. When the armhole measures approx. 13-14-15-16-17-18 cm from where the casting off began (there is approx. 3 cm left to finished length) cast off the middle 26-26-28-28-30-30 stitches from the right side at the same time as the 2 first and 2 last of these 26-26-28-28-30-30 stitches are knitted together before casting off (= 24-24-26-26-28-28 stitches for neck) = 26-26-27-31-31-32 stitches for shoulder on each side. Continue with as many whole repeats as there is room for in width and the remaining stitches are worked in stocking stitch with 1 edge stitch in garter stitch on each side. AT THE SAME TIME on the next row from the neck cast off 1 stitch = 25-25-26-30-30-31 stitches for shoulder. When the armhole measures 16-17-18-19-20-21 cm work stocking stitch with 1 edge stitch in garter stitch on each side where you decrease 2-2-3-3-3-2 stitches evenly on row = 23-23-23-27-27-29 stitches. Cast off. Make sure that the cast-off edge is not tight. Work the other shoulder in the same way. The piece measures a total of 50-52-54-56-58-60 cm from the shoulder down. FRONT PIECE: Cast on, work pattern and cast off for the armhole in the same way as for the back piece = 78-78-82-90-92-94 stitches. When the piece measures 41-43-44-46-47-49 cm from the cast-on edge work the next row from the right side as follows: Work pattern as before over the first 31-31-33-37-37-38 stitches, knit the next 16-16-16-16-18-18 stitches and at the same time decrease 2 stitches evenly (= 14-14-14-14-16-16 stitches) and place these stitches 14-14-14-14-16-16 on a thread for the neck, work pattern as before over the remaining 31-31-33-37-37-38 stitches. Then work each shoulder separately. Continue with as many repeats of the pattern in width as there is room for and the remaining stitches are worked in stocking stitch with 1 edge stitch in garter stitch on each side. AT THE SAME TIME cast off stitches for the neck on each row as follows: Cast off 3 stitches 1 time, 2 stitches 1 time and 1 stitch 1-1-2-2-2-2 times = 25-25-26-30-30-31 stitches on shoulder. When the armhole measures 16-17-18-19-20-21 cm work stocking stitch with 1 edge stitch in garter stitch on each side where you decrease 2-2-3-3-3-2 stitches evenly on row = 23-23-23-27-27-29 stitches. Cast off. Make sure that the cast-off edge is not tight. Work the other shoulder in the same way. The piece measures a total of 50-52-54-56-58-60 cm from the shoulder down. SLEEVES: The sleeves are worked back and forth with circular needle, bottom up. Cast on 54-54-58-62-66-66 stitches with circular needle size 4 mm and Brushed Alpaca Silk. Purl 1 row from the wrong side and then work rib from the right side as follows: 1 edge stitch in garter stitch, (knit 2, purl 2) until there is 1 stitch left on row and 1 edge stitch in garter stitch. Continue this rib back and forth for 3 cm – adjust so that the next row is worked from the right side. Knit 1 row with 1 edge stitch in garter stitch on each side where you decrease 12-10-12-14-16-16 stitches evenly spaced = 42-44-46-48-50-50 stitches. Work 1 row stocking stitch back from the wrong side with 1 edge stitch in garter stitch on each side. Change to circular needle size 5.5 mm. READ THIS WHOLE SECTION BEFORE CONTINUING. Work pattern – choose diagram for your size, as follows: 1 edge stitch in garter stitch, 1-2-3-2-3-3 stitches in stocking stitch, A.1 over the next 9-9-9-10-10-10 stitches, A.2 over the next 19-19-19-21-21-21 stitches, A.3 over the next 10-10-10-11-11-11 stitches, 1-2-3-2-3-3 stitches stocking stitch and 1 edge stitch in garter stitch. When A.1 to A.3 have been completed in height, work 2 repeats of A.2 in width – choose diagram for your size, over the 38-38-38-42-42-42 stitches in the pattern. When the 2 repeats of A.2 have been completed in height, work A.1, A.2 and A.3 as before over the 38-38-38-42-42-42 stitches with pattern. Continue this pattern upwards, i.e. work alternately in height first A.1, A.2 and A.3 and then A.2 (2 repeats in width). AT THE SAME TIME when the piece measures 9-8-7-7-6-6 cm increase 1 stitch on each side of the piece – read INCREASE TIP (for sleeves). Increase as follows in the different sizes: Size S: Increase every 8 cm a total of 5 times. Size M: Increase alternately every 5 cm and 6 cm a total of 7 times. Size L: Increase alternately every 5 cm and 6 cm a total of 7 times. Size XL: Increase alternately every 4 cm and 5 cm a total of 8 times. Size XXL Increase every 4 cm a total of 9 times. Size XXXL: Increase every 3 cm a total of 11 times. When all the increases are finished there are 52-58-60-64-68-72 stitches on the needle. The new stitches are worked in stocking stitch. When the piece measures 45-45-44-42-41-39 cm (shorter measurements in larger sizes due to wider yoke) continue the pattern as before and cast off stitches for the sleeve cap on the beginning of each row on each side as follows: Cast off 4 stitches 1 time, 2 stitches 2 times, 1 stitch 0-2-2-2-2-4 times, 2 stitches 2-2-4-5-6-5 times and 4 stitches 2-2-1-1-1-1 time = 12-14-16-16-16-20 stitches left. Cast off the remaining stitches. The sleeve measures approx. 52-53-53-52-52-52 cm. Work the other sleeve in the same way. ASSEMBLY: Sew shoulder seams with grafting stitches. Sew sleeves to body inside the 1edge stitch in garter stitch on body and inside the cast-off edge on sleeves. Make sure that the seam is not tight! Sew sleeve and side seams in one go. Repeat on the other side. NECK: Start mid top of shoulder and knit up 74-74-82-82-88-88 stitches with Brushed Alpaca Silk and circular needle size 4 mm. Work 2 ridges and cast off. |
||||||||||
Diagram explanations |
||||||||||
|
||||||||||
 |
||||||||||
 |
||||||||||
Have you finished this pattern?Tag your pictures with #dropspattern #footprintsinthesandsweater or submit them to the #dropsfan gallery. Do you need help with this pattern?You'll find 25 tutorial videos, a Comments/Questions area and more by visiting the pattern on garnstudio.com. © 1982-2026 DROPS Design A/S. We reserve all rights. This document, including all its sub-sections, has copyrights. Read more about what you can do with our patterns at the bottom of each pattern on our site. |
||||||||||


With over 40 years in knitting and crochet design, DROPS Design offers one of the most extensive collections of free patterns on the internet - translated to 17 languages. As of today we count 325 catalogues and 12298 patterns translated into English (UK/cm). 12298
We work hard to bring you the best knitting and crochet have to offer, inspiration and advice as well as great quality yarns at incredible prices! Would you like to use our patterns for other than personal use? You can read what you are allowed to do in the Copyright text at the bottom of all our patterns. Happy crafting!
Post a comment to pattern DROPS 202-3
We would love to hear what you have to say about this pattern!
If you want to leave a question, please make sure you select the correct category in the form below, to speed up the answering process. Required fields are marked *.