
Popular categories
Looking for a yarn?


Comments / Questions (57)
![]() Sophie wrote:
Sophie wrote:
Hallo, immer in der ersten Reihe eines Musters, wenn 1 Masche wie zum Rechtsstricken abgehoben, 2 Maschen rechts zusammengestrickt, die abgehobene Masche über die zusammengestrickten gezogen wird, entsteht bei mir eine kleine Beule auf der Rückseite der Decke, die sich auch nicht beim weiter stricken verzieht. Wie kann ich diese Beule vermeiden oder was mache ich evtl. falsch? Vielen Dank im Voraus,
11.04.2019 - 10:16DROPS Design answered:
Liebe Sophie, beachten Sie, daß diese Masche nicht zu locker gestrickt wird, waschen/spannen die fertige Decke sollen dann auch mal die maschen mehr regelmäßig aussehen. Viel Spaß beim stricken!
25.04.2019 - 10:13
![]() Kerstin Schneider wrote:
Kerstin Schneider wrote:
Hallo, ich habe meinen Denkfehler gefunden. Es ist schon sehr verwirrend, wenn die "Eckmasche" in der Strickschrift nicht mit erscheint.
15.03.2019 - 19:14
![]() Kerstin Schneider wrote:
Kerstin Schneider wrote:
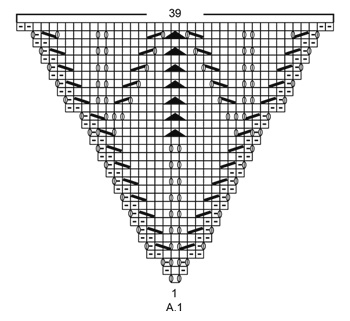
Hallo, ich verstehe die Strickschrift zu A1 nicht ganz. Ich schlage 8 Maschen an und stricke eine Runde rechte Maschen, soweit klar. Aber wie fange ich dann die erste Reihe der Stickschrift an? Ich habe ja auf jeder Nadel je 2 Maschen. Laut Strickschrift 1 Umschlag, 1 Masche rechts, 1 Umschlag. Werden dann 2 Umschläge gestrickt? Danke schon mal im Voraus.
15.03.2019 - 17:45DROPS Design answered:
Liebe Frau Schneider, nach der 1. Reihe stricken Sie *A.1 (= 1 Umschlag, 1 M re, 1 Umschlag), 1 M re* x 4 in der Runde (= 8 M - am Ende der 1. Runde haben Sie 16 M. Die Maschen nach A.1 wird immer rechts gestrickt. Viel Spaß beim stricken!
18.03.2019 - 08:33
![]() Michèle wrote:
Michèle wrote:
Guten Tag Wie manche Klungel Wolle muss ich bestellen für diese Decke im angegebenen Garn, Farbe puder? 9 Stück? Danke für Ihre Hilfe
04.03.2019 - 14:02DROPS Design answered:
Liebe Michèle, ja genau, Baby Merino ist 50 g Knäuel, so daß Sie 9 Knäuel (x 50 g = 450 g) für die Decke brauchen. Viel Spaß beim stricken!
04.03.2019 - 16:02
![]() Bente Nielsen wrote:
Bente Nielsen wrote:
Jeg havde en kamp med at komme igang, Start opskrift meget kringlet. Hjernecellerne skulle godt nok igang (er ikke nybegynder)
24.02.2019 - 20:49
![]() Pia Van Es-Lund wrote:
Pia Van Es-Lund wrote:
Vil gerne se et billede af hele tæppet
07.10.2018 - 12:34
![]() Martine wrote:
Martine wrote:
Vil se helt bilde sv det også
21.09.2018 - 22:54
|
|||||||||||||||||||
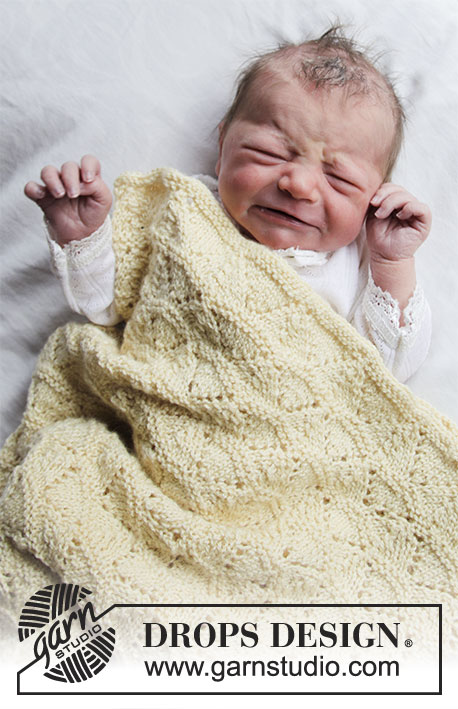
Golden Slumber#goldenslumberblanket |
|||||||||||||||||||
 |
 |
||||||||||||||||||
Knitted blanket for babies in DROPS BabyMerino. The piece is worked with a leaf pattern from the middle out in a square. Theme: Baby blanket
DROPS Baby 33-2 |
|||||||||||||||||||
|
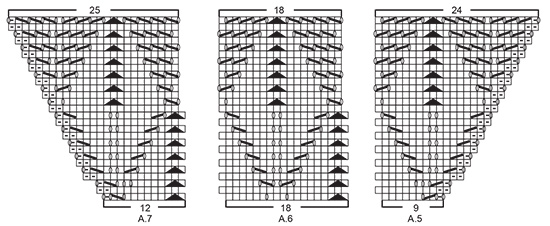
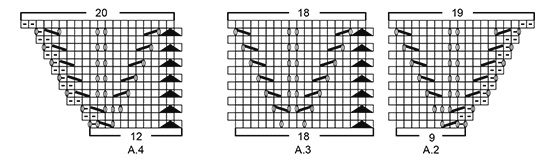
EXPLANATIONS FOR THE PATTERN: ------------------------------------------------------- PATTERN: See diagrams A.1 to A.7. The diagrams show all the rows in the pattern seen from the right side. ------------------------------------------------------- START THE PIECE HERE: ------------------------------------------------------- BLANKET - SHORT OVERVIEW OF THE PIECE: The piece is worked in the round with double pointed needles / circular needle from the middle outwards in a square. Change to a longer circular needle when necessary. BLANKET: Cast on 8 stitches with double pointed needles size 3.5 mm and BabyMerino. Divide the stitches so that there are 2 stitches on each needle. Knit 1 round. The next round is worked as follows: Work * A.1 (= 1 stitch), knit 1 (= corner stitch – to be able to see the corner stitch more easily, you can insert a marker thread in this stitch) *, work from *-* a total of 4 times. Continue with A.1 and 1 knitted corner stitch between each repeat of A.1. REMEMBER THE KNITTING TENSION! When A.1 has been completed there are 39 stitches between each corner stitch and a total of 160 stitches on the needle. The next round is worked as follows: * Work A.2 (= 9 stitches), A.3 (= 18 stitches), A.4 (= 12 stitches) and knit the corner stitch *, work from *-* a total of 4 times. Continue working A.2 to A.4 like this. When A.2 - A.4 have been worked 1 time in height there are 232 stitches on the row (57 stitches between each corner stitch). Continue to repeat A.2, A.3 and A.4 in height. For each repetition in height, you will work one more A.3 between A.2 and A.4. Work diagrams A.2 to A.4. a total of 9 times in height (or to desired length) = 808 stitches on the needle (201 stitches between each corner stitch). The next round is worked as follows: * Work A.5 (= 9 stitches), A.6 until there are 12 stitches left before the corner stitch (i.e. work 10 repeats of 18 stitches, if A.2 to A.4 were worked 9 times in height), work A.7 (= 12 stitches) and knit the corner stitch * work from *-* a total of 4 times. When A.5 to A.7 have been completed there are 920 stitches on the needle (229 stitches between each corner stitch) and the piece measures approx. 100 cm between each corner stitch. CASTING OFF: Cast off, but to avoid the cast-off edge being tight you can make 1 yarn over after each yarn over from the previous round at the same time as you cast off. The yarn overs are cast off as normal stitches. Tack a strand up and down around the hole in the middle of the blanket (by the cast-on edge). Tighten the strand so that the hole is closed and then fasten well. |
|||||||||||||||||||
Diagram explanations |
|||||||||||||||||||
|
|||||||||||||||||||
 |
|||||||||||||||||||
 |
|||||||||||||||||||
 |
|||||||||||||||||||
Have you finished this pattern?Tag your pictures with #dropspattern #goldenslumberblanket or submit them to the #dropsfan gallery. Do you need help with this pattern?You'll find 17 tutorial videos, a Comments/Questions area and more by visiting the pattern on garnstudio.com. © 1982-2026 DROPS Design A/S. We reserve all rights. This document, including all its sub-sections, has copyrights. Read more about what you can do with our patterns at the bottom of each pattern on our site. |
|||||||||||||||||||


With over 40 years in knitting and crochet design, DROPS Design offers one of the most extensive collections of free patterns on the internet - translated to 17 languages. As of today we count 324 catalogues and 12245 patterns translated into English (UK/cm). 12245
We work hard to bring you the best knitting and crochet have to offer, inspiration and advice as well as great quality yarns at incredible prices! Would you like to use our patterns for other than personal use? You can read what you are allowed to do in the Copyright text at the bottom of all our patterns. Happy crafting!
Post a comment to pattern DROPS Baby 33-2
We would love to hear what you have to say about this pattern!
If you want to leave a question, please make sure you select the correct category in the form below, to speed up the answering process. Required fields are marked *.