Comments / Questions (160)
![]() Line wrote:
Line wrote:
Avec des aiguilles no 6, j'arrive à 15 cm de large, comment régler la confection ?
19.12.2019 - 22:37DROPS Design answered:
Bonjour Line, tricotez-vous bien Merino Extra Fine ou Lima? Vous devez avoir 21 m x 28 rangs = 10 x 10 cm. Si vous utilisez une autre laine d'une épaisseur différente, et donc d'un échantillon différent, il vous faudra recalculer le modèle en fonction de vos mesures. N'hésitez pas à contacter le magasin où vous avez acheté votre laine. Bon tricot!
20.12.2019 - 09:15
![]() Anne Grethe Tønnesen Evensen wrote:
Anne Grethe Tønnesen Evensen wrote:
Strikker denne i str L, holder på med a3 i mønster har strikket 2 økninger og skal til på tredje mønster med hvitt men det stemmer ikke med mønster, disse mønstrene skal være jevnt , h å er galt?
18.09.2019 - 22:35DROPS Design answered:
Hej Anne Grethe, Jo mønsteret stemmer. Sæt gerne et mærke imellem hver rapport, så du er sikker på at få økningerne med i alle rapporter hele vejen rundt. God fornøjelse!
02.10.2019 - 11:49
![]() Morag MacNeil wrote:
Morag MacNeil wrote:
Hi, I cannot seem to find a size chart ( like a previous knitter) at the bottom of the pattern, I also looked at your sizing guide and couldn’t make that out either, please can you tell me what an average Uk size 16 /18 would be on this pattern. Many thanks.
15.09.2019 - 10:23DROPS Design answered:
Dear Mrs MacNeil, measure one similar garment you have and like the shape, then compare these measurements to those in the measurement chart to find out the matching size. Read more about sizing here. Happy knitting!
16.09.2019 - 11:07
![]() Astrid Fredriksen wrote:
Astrid Fredriksen wrote:
Strikker genser i str L Har begynt med økninger og det ser ut som det er 20 masker på hver runde med økninger på bærestykket. Likevel så står det at det skal være 270 igjen til slutt men hvis jeg teller 20 så står jeg igjen med 272masker?
11.09.2019 - 13:08DROPS Design answered:
Hej Astrid, du har 7 udtagninger for hver gang du strikker A.1 og 6 i A.2 og 4 i A.3 (så det stemmer ikke med 20 pr omgang). Hvis du ellers har fået mønsteret til at stemme, så er det lettere at tage de 2 masker ind (jævnt fordelt) som du har for meget end at trevle det hele op. God fornøjelse!
12.09.2019 - 13:45
![]() Tanja wrote:
Tanja wrote:
Same problem as Barbara, 10.12.2018 - 17:32: when trying to print this pattern, you will only get 1 page (to the part about needles). This is the only pattern with this problem, so it is not about the printer.
01.09.2019 - 17:53DROPS Design answered:
Dear Tanja, we successfully could print this pattern in your language, make sure your settings are right, you can try to refresh the page before trying to print it again. Happy knitting!
02.09.2019 - 11:42
![]() Eva wrote:
Eva wrote:
Hei. Finnes det oppskrift på denne i ett tynnere garn? Gjerne 26/10.
28.08.2019 - 23:33DROPS Design answered:
Hei Eva. Nei, det har vi dessverre ikke. mvh DROPS deisgn
09.09.2019 - 12:20
![]() Lois wrote:
Lois wrote:
I\'m knitting the Large. When I add the heights for the yoke and body (including top and bottom ribs), 9.75\" + 11.75\", I get 21.5\". However, the pattern says that the total for the jacket is 22.75\". Am I missing something, or is this an error? Lois
26.07.2019 - 22:50DROPS Design answered:
Dear Lois, the measurements in pattern are measured from neck, then total length for jumper is given measured from shoulder, these are the extra inches missing - see also measurement chart. Happy knitting!
06.08.2019 - 10:39
![]() Hanne Gundersen wrote:
Hanne Gundersen wrote:
Hej Drops, jeg kan se mit spørgsmål allerede er stillet af Helle Iversen 18/11-2018, MEN vil det sige at maskeantallet mellem de to A2 bliver forskelligt? Når der startes med to gange A1= 12 masker, A2 = 12 m, A1 8 gange = 48 m, A2 = 12 m, A1 8 gange = 48 m. Det forstår jeg, men så vil maskeantallet mellem de to A2 være henholdsvis 48 m og 60 m. Skal der ikke være lige mange? Hilsen Hanne
16.04.2019 - 13:29DROPS Design answered:
Hej Hanne, det stemmer, tanken er at det ikke skal være symmetrisk, men du er naturligvis velkommen til selv at flytte på det store får, så det bliver symmetrisk. God fornøjelse!
06.05.2019 - 10:28
![]() Giorgia wrote:
Giorgia wrote:
Come si intrecciano le maglie quando si arriva alla fase di chiusura? a diritto tutte le maglie o a diritto su diritto e rovescio su rovescio visto che il corpo e le maniche finiscono con coste 2/2 ? Grazie
02.04.2019 - 16:16DROPS Design answered:
Buongiorno Giorgia. Viene indicato di intrecciare lavorando le maglie a diritto. Se preferisce può intrecciare lavorando le maglie come si presentano o seguendo il metodo di chiusura che la soddisfa maggiormente. Buon lavoro!
02.04.2019 - 16:31
![]() Giorgia wrote:
Giorgia wrote:
Hallo. Thank you very much for the beautiful pattern. I'm a knitting beginner and I've just started with this pattern but I have a doubt about the size , thinking the small was good for a size 42 (= 10 english size). The 92 cast -on-stitches seem to be too small for the neck and even to pass the head through. The small size is for baby?
04.02.2019 - 01:07DROPS Design answered:
Dear Giorgia, you will find all measurements in each size in the chart at the bottom of the page. Make sure you get the correct tension to have the same measurements as in the chart. Read more about sizing and chart here. Happy knitting!
04.02.2019 - 14:06
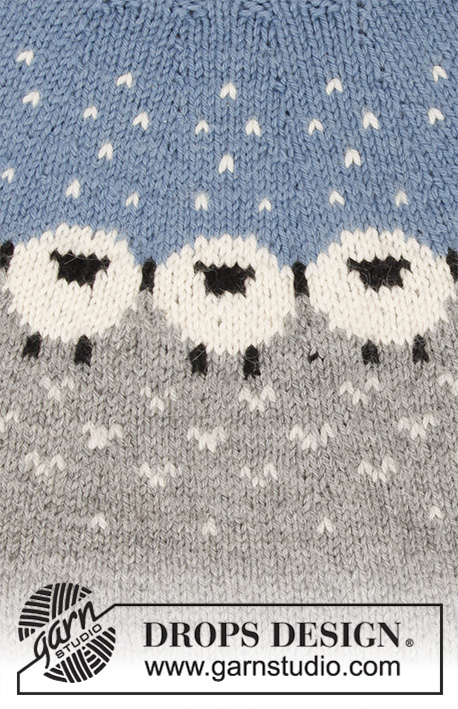
Sheep Happens!#sheephappenssweater |
||||||||||||||||
|
|
||||||||||||||||
Knitted jumper with round yoke in DROPS Merino Extra Fine or Lima. The piece is worked top down in Nordic pattern with sheep S - XXXL.
DROPS 194-2 |
||||||||||||||||
|
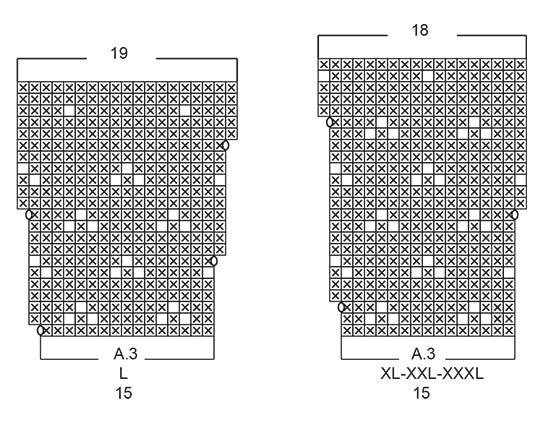
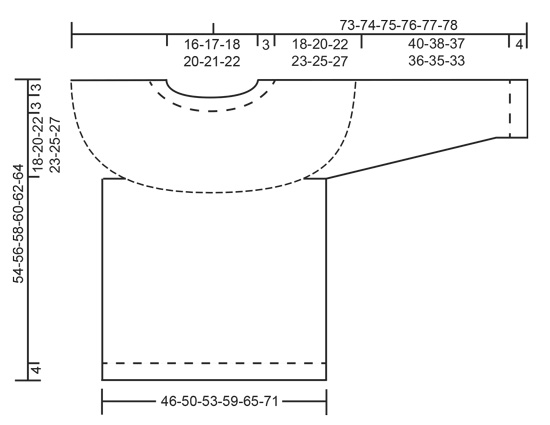
EXPLANATIONS FOR THE PATTERN: ------------------------------------------------------- PATTERN: See diagrams A.1 to A.3. Choose diagram for your size. The diagrams are worked in stocking stitch. As there are long spaces between colour changes, you should twist the strands together approx. every 7th stitch to avoid having long, loose strands at the back. INCREASE TIP (evenly spaced): To work out how to increase evenly, count the total number of stitches on the row (e.g. 90 stitches) and divide these stitches by the number of increases to be made (e.g. 31) = 2.9. In this example, make 1 yarn over after approx. each 3rd stitch. On the next row work the yarn overs twisted to avoid holes. DECREASE TIP (for sleeves): Decrease 1 stitch on each side of the marker thread as follows: Work until there are 3 stitches left before the marker thread, knit 2 together, knit 2 (the marker thread sits in the middle of these 2 stitches), slip 1 stitch as if to knit, knit 1, pass the slipped stitch over the knitted stitch (= 2 stitches decreased). ------------------------------------------------------- START THE PIECE HERE: ------------------------------------------------------- JUMPER - SHORT OVERVIEW OF THE PIECE: The yoke is worked in the round with circular needle, top down. The yoke is divided for body and sleeves and the body is continued in the round. The sleeves are worked in the round with double pointed needles. YOKE: Cast on 92-96-100-104-112-120 stitches with circular needle size 3 mm and light grey blue. Knit 1 round. Then work rib (= knit 2 / purl 2). Work rib for 3 cm. Change to circular needle size 4 mm. Knit 1 round and increase 28-24-32-30-32-34 stitches evenly spaced – read INCREASE TIP = 120-120-132-134-144-154 stitches. Then work pattern as follows (the round starts mid back): Work A.1 (= 6-6-6-5-5-5 stitches) over the first 12-12-12-10-10-10 stitches (= a total of 2 times), A.2 (= 12 stitches), A.1 over the next 42-42-48-50-55-60 stitches (= a total of 7-7-8-10-11-12 times), A.2 over the next 12 stitches, A.1 over the last 42-42-48-50-55-60 stitches (= a total of 7-7-8-10-11-12 times). REMEMBER THE KNITTING TENSION! When A.1 and A.2 have been worked 1 time in height there are 244-244-270-322-348-374 stitches on the needle. The piece measures approx. 16 cm (including the rib). Knit 1 round with light grey and increase 11-11-15-8-12-1 stitches evenly on round = 255-255-285-330-360-375 stitches. Work A.3 (= 15 stitches) over all stitches (= a total of 17-17-19-22-24-25 times in width). When A.3 has been worked 1 time in height there are 306-340-361-396-432-450 stitches on the needle. The piece is now worked with light grey to finished length. Work stocking stitch until the piece measures 21-23-25-26-28-30 cm (including the rib). Then divide the piece for body and sleeves as follows: Work 44-48-50-56-62-67 stitches stocking stitch (= half back piece), place the next 64-72-79-84-90-90 stitches on a thread for sleeve and cast on 8-8-10-10-10-14 new stitches under the sleeve, work 89-99-102-115-127-135 stitches stocking stitch (= front piece), place the next 64-72-79-84-90-90 stitches on a thread for sleeve and cast on 8-8-10-10-10-14 new stitches under the sleeve, finally work 45-49-51-57-63-68 stitches stocking stitch (= half back piece) = 194-212-223-248-272-298 stitches. BODY: Continue working in stocking stitch. When the piece measures 26-26-26-27-27-27 cm from where the body was divided from the sleeves, increase 26-32-33-32-40-42 stitches evenly on next round = 220-244-256-280-312-340 stitches. Change to circular needle size 3 mm and work rib (= knit 2 / purl 2) over all stitches (the yarn overs are worked twisted to avoid holes). Cast off with knit when the rib measures 4 cm (i.e. the piece measures a total of approx. 30-30-30-31-31-31 cm from where the body was divided from the sleeves). The jacket measures a total of 54-56-58-60-62-64 cm, measured from the shoulder. SLEEVE: Place the 64-72-79-84-90-90 stitches from the thread on the one side of the piece on double pointed needles size 4 mm and knit up 1 stitch in each of the 8-8-10-10-10-14 stitches cast on under the sleeve = 72-80-89-94-100-104 stitches. Insert 1 marker thread in the middle of the 8-8-10-10-10-14 stitches (= mid under sleeve). Work stocking stitch in the round with light grey. When the piece measures 1 cm from where the sleeve was divided from the body, decrease 2 stitches mid under sleeve – read DECREASE TIP. Decrease like this every 3-2-1½-1½-1½-1 cm a total of 11-15-18-19-22-23 times = 50-50-53-56-56-58 stitches. When the sleeve measures 40-38-37-36-35-33 cm from where the sleeve was divided from the body, increase 2-2-3-0-4-2 evenly on round = 52-52-56-56-60-60 stitches. Change to double pointed needles size 3 mm. Work rib in the round (= knit 2 / purl 2). Cast off with knit when the piece measures 44-42-41-40-39-37 cm from where the sleeve was divided from the body (approx. 4 cm rib). Work the other sleeve in the same way. |
||||||||||||||||
Diagram explanations |
||||||||||||||||
|
||||||||||||||||
 |
||||||||||||||||
 |
||||||||||||||||
 |
||||||||||||||||
 |
||||||||||||||||
 |
||||||||||||||||
Have you finished this pattern?Tag your pictures with #dropspattern #sheephappenssweater or submit them to the #dropsfan gallery. Do you need help with this pattern?You'll find 24 tutorial videos, a Comments/Questions area and more by visiting the pattern on garnstudio.com. © 1982-2026 DROPS Design A/S. We reserve all rights. This document, including all its sub-sections, has copyrights. Read more about what you can do with our patterns at the bottom of each pattern on our site. |
||||||||||||||||


Post a comment to pattern DROPS 194-2
We would love to hear what you have to say about this pattern!
If you want to leave a question, please make sure you select the correct category in the form below, to speed up the answering process. Required fields are marked *.