
Popular categories
Looking for a yarn?


Comments / Questions (138)
![]() Ursula wrote:
Ursula wrote:
Liebes Drops - Team, ich versuche mich am sheep happens- Pulli. Meine Frage ist, wie ich in der zweiten Zunahmereihe vorgehe. Gilt da ebenfalls die Einteilung A1 7 x A 2 2 x etc. - denn es stimmt ja dann nicht mehr mit der Maschenanzahl, weil ich schon in 1 Runde zugenommen habe. Vielen Dank für eure Hilfe.
17.03.2025 - 13:45DROPS Design answered:
Liebe Ursula, ja genau, die Diagramme sollen in die beschriegben Reihenfolge gestrickt, von der 1. bis der lezte Reihe. Setzen Sie Markierer zwischen jedes Diagram, so können Sie die Maschenanzahl von jedem Diagram/Rapport prüfen; so soll die Maschenanzahl stimmen. Viel Spaß beim Stricken!
17.03.2025 - 15:35
![]() Monique Piejede wrote:
Monique Piejede wrote:
Ich habe die Anleitung durchgelesen , und mir ist aufgefallen, dass bei diesem Modell keine Erhöhung im Rücken gestrickt wird. Hat das einen bestimmten Grund, oder kann ich trotzdem eine Erhöhung im Rücken stricken. Gibt es ein Modell bei dem ich mich orientieren kann, wegen der Maschenzahl. Vielen Dank im voraus. Liebe Grüße
10.01.2025 - 19:52DROPS Design answered:
Liebe Frau Piejede, richtig, bei diesem Pullover gibt es keine Erhöhung, gerne können Sie eine dazu stricken, nehmen Sie ein ähnliches Modell mit selber Maschenprobe als Inspiration. Viel Spaß beim Stricken!
13.01.2025 - 08:33
![]() Lynda Stevens wrote:
Lynda Stevens wrote:
Bonjour, J'ai suivi le modèle pour faire la ligne 1 des chartes A.1 et A.2, mais je suis embêtée pour la réalisation des lignes suivantes. Doit-on suivre le modèle de la ligne 1 pour les autes ???? Ou si je tricote par exemple la ligne 8 de la charte A.1 puis la ligne 8 de la charte A.2 et reviens à la charte A.1 jusqu'au bout du rang. Et ainsi de suite jusqu'à la fin de la charte ?
25.09.2024 - 14:34DROPS Design answered:
Bonjour Mme Stevens, lorsque vous tricotez les diagrammes, tricotez le même rang de chaque diagramme sur le même rang, ainsi, au 1er tour, tricotez le 1er rang des diagrammes dans l'ordre indiqué, puis au tour suivant, le 2ème tour de chacun des diagrammes dans le même ordre qu'auparavant et ainsi de suite. Retrouvez plus d'infos sur les diagrammes ici. Bon tricot!
26.09.2024 - 08:00
![]() Kari wrote:
Kari wrote:
Hello! I am currently on the top of the pattern with a solid color and white flecks. The white fleck stitches seem to be disappearing into my solid color. Is this something that when I wash and block the sweater the white will become more visible? Or is it possible I did something wrong with the white stitches?
01.09.2024 - 20:14DROPS Design answered:
Dear Kari, make sure you keep correct tension and also make sure the white yarn is not tightening piece from WS, twist yarns from WS in the middle of each stitch with white can help, stretch piece a bit on right needle after you have worked some stitches from solid colour to make sure white yarn won't tighten piece. Happy knitting!
02.09.2024 - 09:14
![]() Helle T Gregersen wrote:
Helle T Gregersen wrote:
Hvad er målene på en str M
04.08.2024 - 11:32DROPS Design answered:
Hej Helle, du finder målene i måleskitsen nederst i opskriften :)
06.08.2024 - 14:16
![]() Martine CANU wrote:
Martine CANU wrote:
Je vous ai posé une question précédemment que je le permets de vous reposer Dans ce modèle vous préconisez de réaliser les manches avec 3 aiguilles Pourquoi pas continuer avec l’aiguille circulaire qui a servi à réaliser le corps ? Merci pour votre réponse
21.07.2024 - 21:21DROPS Design answered:
Bonjour Mme Canu, comme indiqué ci-dessous, vous pouvez tricoter soit sur aiguille circulaire, soit sur aiguilles doubles pointes, c'est juste une question de choix personnel, la styliste avait ici choisi des aiguilles doubles pointes. Bon tricot!
29.07.2024 - 10:36
![]() Martine CANU wrote:
Martine CANU wrote:
Bonjour pour les manches, pourquoi préférez vous les aiguilles double pointes plutot qu'une aiguille circulaire ???? merci pour votre réponse
07.07.2024 - 18:38DROPS Design answered:
Bonjour Mme Canu, vous pouvez tout à fait utiliser une aiguille circulaire si vous êtes plus à l'aise ainsi, soit en magic loop soit sur une 40 cm, au choix. Bon tricot!
29.07.2024 - 08:24
![]() Martine CANU wrote:
Martine CANU wrote:
Bonjour Quand vous dites démarrer A1 « au milieu du dos » Comment le déterminer ?? Est ce l’endroit où j’ai mis le marqueur de démarrage ?
12.06.2024 - 10:29DROPS Design answered:
Bonjour Mme Canu, les tours commencent au milieu du dos = là où vous avez joint votre ouvrage au tout 1er tour, autrement dit, vous commencez le jacquard A.1 au milieu dos. Bon tricot!
12.06.2024 - 16:20
![]() CANU Bernadette-Martine wrote:
CANU Bernadette-Martine wrote:
Bonjour y a t il une tricoteuse française qui a réalisé ce pull avec qui je pourrais communiquer ?? pour les petits moutons j'ai acheté de la DROPS bouclée !!
11.06.2024 - 15:12DROPS Design answered:
Bonjour Mme Canu, vous pouvez demander sur notre groupe DROPS Workshop ou bien simplement poser vos questions ici, nous essaierons de vous répondre. Bon tricot!
12.06.2024 - 08:02
![]() Nicolette wrote:
Nicolette wrote:
Hi there, is this pattern available for crochet also? Thanks, Nicolette
26.05.2024 - 05:44DROPS Design answered:
Hi Nicole, no, we do not have this exact pattern in crochhet, but if you search the pattern-library, there are a number of colorful crochet sweaters. Happy Crafting!
26.05.2024 - 11:23
|
||||||||||||||||
Sheep Happens!#sheephappenssweater |
||||||||||||||||
|
|
||||||||||||||||
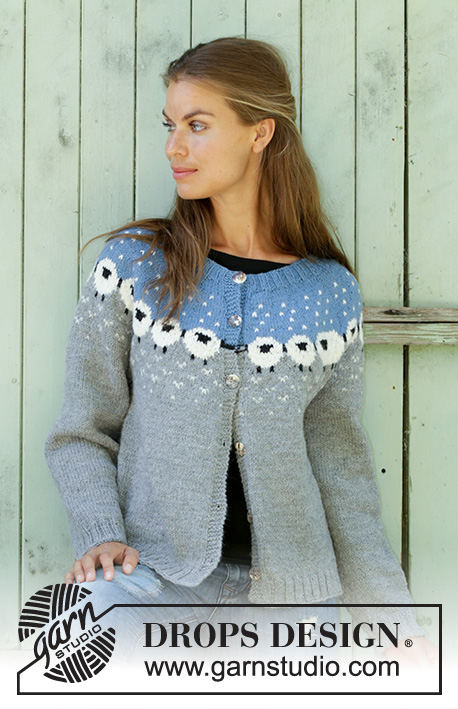
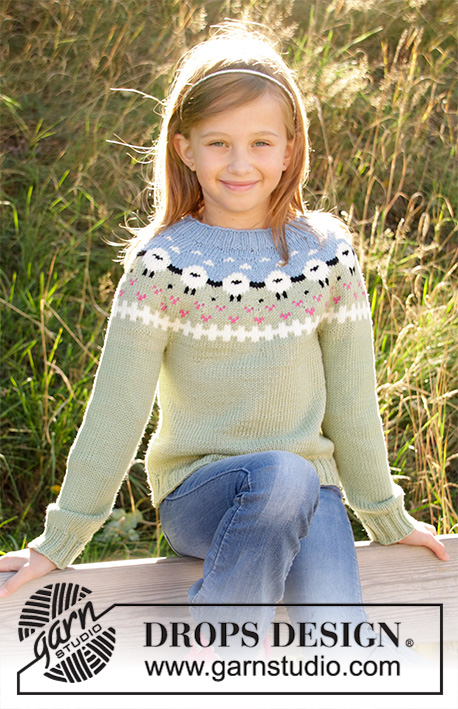
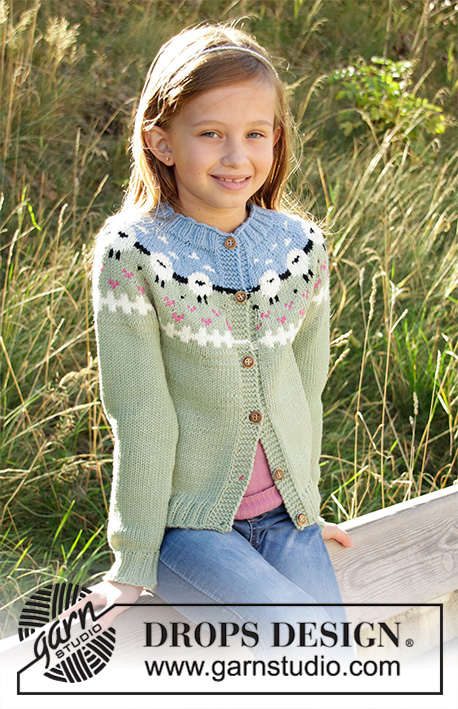
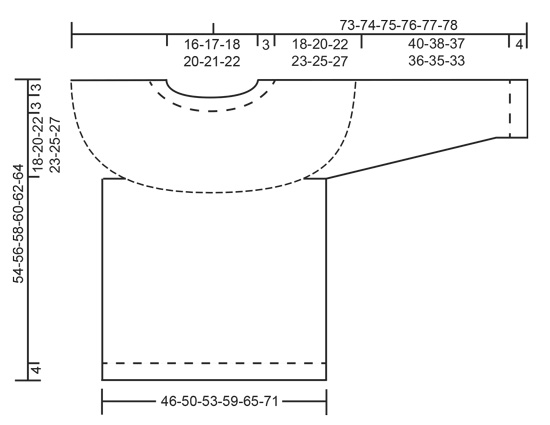
Knitted jumper with round yoke in DROPS Merino Extra Fine or Lima. The piece is worked top down in Nordic pattern with sheep S - XXXL.
DROPS 194-2 |
||||||||||||||||
|
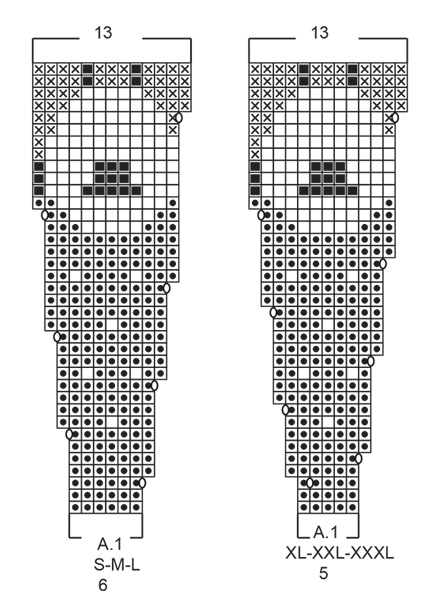
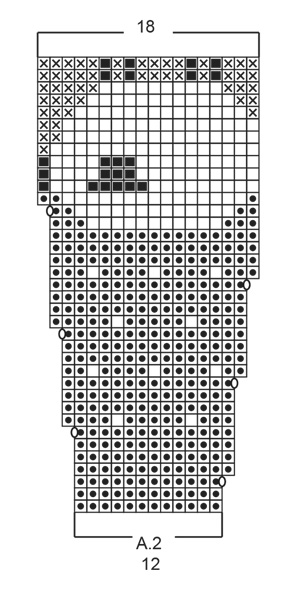
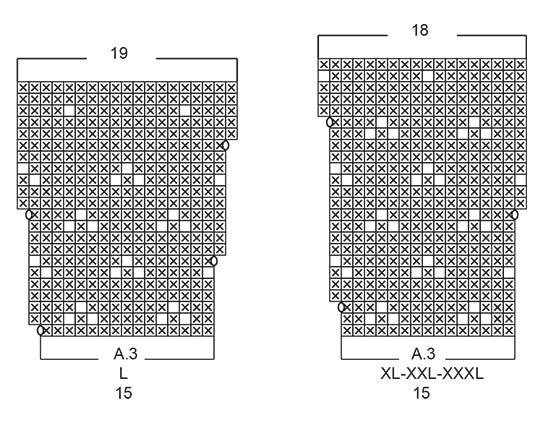
EXPLANATIONS FOR THE PATTERN: ------------------------------------------------------- PATTERN: See diagrams A.1 to A.3. Choose diagram for your size. The diagrams are worked in stocking stitch. As there are long spaces between colour changes, you should twist the strands together approx. every 7th stitch to avoid having long, loose strands at the back. INCREASE TIP (evenly spaced): To work out how to increase evenly, count the total number of stitches on the row (e.g. 90 stitches) and divide these stitches by the number of increases to be made (e.g. 31) = 2.9. In this example, make 1 yarn over after approx. each 3rd stitch. On the next row work the yarn overs twisted to avoid holes. DECREASE TIP (for sleeves): Decrease 1 stitch on each side of the marker thread as follows: Work until there are 3 stitches left before the marker thread, knit 2 together, knit 2 (the marker thread sits in the middle of these 2 stitches), slip 1 stitch as if to knit, knit 1, pass the slipped stitch over the knitted stitch (= 2 stitches decreased). ------------------------------------------------------- START THE PIECE HERE: ------------------------------------------------------- JUMPER - SHORT OVERVIEW OF THE PIECE: The yoke is worked in the round with circular needle, top down. The yoke is divided for body and sleeves and the body is continued in the round. The sleeves are worked in the round with double pointed needles. YOKE: Cast on 92-96-100-104-112-120 stitches with circular needle size 3 mm and light grey blue. Knit 1 round. Then work rib (= knit 2 / purl 2). Work rib for 3 cm. Change to circular needle size 4 mm. Knit 1 round and increase 28-24-32-30-32-34 stitches evenly spaced – read INCREASE TIP = 120-120-132-134-144-154 stitches. Then work pattern as follows (the round starts mid back): Work A.1 (= 6-6-6-5-5-5 stitches) over the first 12-12-12-10-10-10 stitches (= a total of 2 times), A.2 (= 12 stitches), A.1 over the next 42-42-48-50-55-60 stitches (= a total of 7-7-8-10-11-12 times), A.2 over the next 12 stitches, A.1 over the last 42-42-48-50-55-60 stitches (= a total of 7-7-8-10-11-12 times). REMEMBER THE KNITTING TENSION! When A.1 and A.2 have been worked 1 time in height there are 244-244-270-322-348-374 stitches on the needle. The piece measures approx. 16 cm (including the rib). Knit 1 round with light grey and increase 11-11-15-8-12-1 stitches evenly on round = 255-255-285-330-360-375 stitches. Work A.3 (= 15 stitches) over all stitches (= a total of 17-17-19-22-24-25 times in width). When A.3 has been worked 1 time in height there are 306-340-361-396-432-450 stitches on the needle. The piece is now worked with light grey to finished length. Work stocking stitch until the piece measures 21-23-25-26-28-30 cm (including the rib). Then divide the piece for body and sleeves as follows: Work 44-48-50-56-62-67 stitches stocking stitch (= half back piece), place the next 64-72-79-84-90-90 stitches on a thread for sleeve and cast on 8-8-10-10-10-14 new stitches under the sleeve, work 89-99-102-115-127-135 stitches stocking stitch (= front piece), place the next 64-72-79-84-90-90 stitches on a thread for sleeve and cast on 8-8-10-10-10-14 new stitches under the sleeve, finally work 45-49-51-57-63-68 stitches stocking stitch (= half back piece) = 194-212-223-248-272-298 stitches. BODY: Continue working in stocking stitch. When the piece measures 26-26-26-27-27-27 cm from where the body was divided from the sleeves, increase 26-32-33-32-40-42 stitches evenly on next round = 220-244-256-280-312-340 stitches. Change to circular needle size 3 mm and work rib (= knit 2 / purl 2) over all stitches (the yarn overs are worked twisted to avoid holes). Cast off with knit when the rib measures 4 cm (i.e. the piece measures a total of approx. 30-30-30-31-31-31 cm from where the body was divided from the sleeves). The jacket measures a total of 54-56-58-60-62-64 cm, measured from the shoulder. SLEEVE: Place the 64-72-79-84-90-90 stitches from the thread on the one side of the piece on double pointed needles size 4 mm and knit up 1 stitch in each of the 8-8-10-10-10-14 stitches cast on under the sleeve = 72-80-89-94-100-104 stitches. Insert 1 marker thread in the middle of the 8-8-10-10-10-14 stitches (= mid under sleeve). Work stocking stitch in the round with light grey. When the piece measures 1 cm from where the sleeve was divided from the body, decrease 2 stitches mid under sleeve – read DECREASE TIP. Decrease like this every 3-2-1½-1½-1½-1 cm a total of 11-15-18-19-22-23 times = 50-50-53-56-56-58 stitches. When the sleeve measures 40-38-37-36-35-33 cm from where the sleeve was divided from the body, increase 2-2-3-0-4-2 evenly on round = 52-52-56-56-60-60 stitches. Change to double pointed needles size 3 mm. Work rib in the round (= knit 2 / purl 2). Cast off with knit when the piece measures 44-42-41-40-39-37 cm from where the sleeve was divided from the body (approx. 4 cm rib). Work the other sleeve in the same way. |
||||||||||||||||
Diagram explanations |
||||||||||||||||
|
||||||||||||||||
|
||||||||||||||||
|
||||||||||||||||

|
||||||||||||||||
|
||||||||||||||||
|
||||||||||||||||
Have you finished this pattern?Tag your pictures with #dropspattern #sheephappenssweater or submit them to the #dropsfan gallery. Do you need help with this pattern?You'll find 25 tutorial videos, a Comments/Questions area and more by visiting the pattern on garnstudio.com. © 1982-2025 DROPS Design A/S. We reserve all rights. This document, including all its sub-sections, has copyrights. Read more about what you can do with our patterns at the bottom of each pattern on our site. |
||||||||||||||||


With over 40 years in knitting and crochet design, DROPS Design offers one of the most extensive collections of free patterns on the internet - translated to 17 languages. As of today we count 314 catalogues and 11822 patterns translated into English (UK/cm).
We work hard to bring you the best knitting and crochet have to offer, inspiration and advice as well as great quality yarns at incredible prices! Would you like to use our patterns for other than personal use? You can read what you are allowed to do in the Copyright text at the bottom of all our patterns. Happy crafting!
Post a comment to pattern DROPS 194-2
We would love to hear what you have to say about this pattern!
If you want to leave a question, please make sure you select the correct category in the form below, to speed up the answering process. Required fields are marked *.