
Popular categories
Looking for a yarn?


Comments / Questions (163)
![]() Doris wrote:
Doris wrote:
Vielen Dank für die schnelle Antwort! Es beruhigt mich sehr, dass es nicht nur mir so geht, sondern generell schwierig ist. Doris
18.11.2022 - 07:56
![]() Doris wrote:
Doris wrote:
Hallo, gibt es einen Trick, wie man das Verdrehen des Bündchens beim Zusammenschließen zu einer Runde verhindern kann? ich habe es mehrmals versucht, irgendetwas mache ich falsch. Vielen Dank! Doris
15.11.2022 - 16:09DROPS Design answered:
Liebe Doris, leider kenne ich selber keinen Trick, bei der 1. Runde muss man immer sehr vorsichtig sein, damit die Runde am Ende dieser 1. Runde verdreht wird. Vielleicht hat aber Ihr Wollladen irgendeinen Tipp. Viel Spaß beim stricken!
16.11.2022 - 09:07
![]() Salla wrote:
Salla wrote:
Hi. I would love to use this pattern but I would like to do this sweatshirt for a male person. Is this suitable for male also or only women? Is it hard to modify this pattern to fit male since its designed for female? Thank you!
12.09.2022 - 21:56DROPS Design answered:
Dear Salla, you will find under our FAQ here how to convert a women's size jacket into a men's size one. Happy knitting!
13.09.2022 - 09:45
![]() Dea wrote:
Dea wrote:
Ciao, ci sono dei refusi dove dice: " dal momenti che....per evirare..." .
03.04.2022 - 14:25DROPS Design answered:
Buonasera Dea, grazie per la segnalazione, abbiamo corretto il testo. Buon lavoro!
03.04.2022 - 22:06
![]() Colleen wrote:
Colleen wrote:
I want to start Sheep Happens sweater 194-2 but am having a problem reading the diagram to choose my size.. All pattern directions are in centimeters but the diagram numbers look like inches to me. (Unless the bottom measurement is 9” wide for the adult large which is unlikely!) Please confirm whether or not diagram is in inches. Thank you.
28.02.2022 - 16:07
![]() Alex wrote:
Alex wrote:
Bonjour, est-il possible de tricoter ce pull avec la laine Puna ? Si oui les quantités de laines changent-elles ? Merci !
13.01.2022 - 00:06DROPS Design answered:
Bonjour Alex, Puna et Merino Extra Fine appartiennent toutes deux au groupe de fils C, vous pouvez ainsi utiliser notre convertisseur pour laisser calculer les nouvelles quantités nécessaires. Bon tricot!
13.01.2022 - 08:43
![]() Elisabeth Eide Tharaldsen wrote:
Elisabeth Eide Tharaldsen wrote:
Hei. Hvorfor er ermlemngden 40 cm i str S, og kortest i størst størrelse? Det føles veldig unaturlig å ØKE rett før vrangborden nede på genseren, skal det felles?
09.01.2022 - 18:00DROPS Design answered:
Hei Elisabeth. Man har ikke lengre ermer selv om man bruker str XXXL. I de største størrelsene er overvidden større og da blir ermlengden på plagg kortere. Tidligere var motebildet slik at vrangborden skulle være smal og maskeantallet på vrangborden skulle være mindre enn bolen. Nå ønsker man en jevnere overgang mellom vrangbord og bol, slik at da øker man masker før vrangbord og bytter til mindre pinnestr. (om man strikker nedenifra og opp feller man masker). mvh DROPS Design
14.01.2022 - 14:48
![]() Brit Sønnøve wrote:
Brit Sønnøve wrote:
Jeg har strikka i str 7/8, men virker som str 4. Hvilken str skal jeg strikke i for å få den stor nok? Str guiden stemmer ikke i drt hele tatt!
19.11.2021 - 10:53DROPS Design answered:
Hej Britt, for at få størrelsen som står i måleskitsen, er det vigtigt at du holder strikkefastheden som står i opskriften, altså 21 masker på 10 cm i bredden og 28 pinde på 10 cm i højden. Strikker du i DROPS Merino Extra Fine eller DROPS Lima?
19.11.2021 - 13:47
![]() Martine wrote:
Martine wrote:
Er dette unisex? Tenker å lage denne til herre
08.11.2021 - 20:46DROPS Design answered:
Hej Martine. Om du hittar en storlek som passar så kan du göra denna till även till herr. Se på måttskissen längst ner för att hitta den storlek du ska göra. Mvh DROPS Design
09.11.2021 - 09:04
![]() Nina Solveig Matzow wrote:
Nina Solveig Matzow wrote:
Jeg er i gang med å strikke genser Sheep Happens i str. XXL. Jeg har ikke den lyse grå hovedfargen. Hvor, Hvordan og Hvor mange nøster skal jeg bestille ? Vennligst, Nina M.
22.09.2021 - 10:45DROPS Design answered:
Hej Nina, til størrelse XXL skal du bruge 13 nøgler DROPS Merino Extra Fine i hovedfarven uanset hvilken farve du vælger :)
22.09.2021 - 15:54
|
||||||||||||||||
Sheep Happens!#sheephappenssweater |
||||||||||||||||
|
|
||||||||||||||||
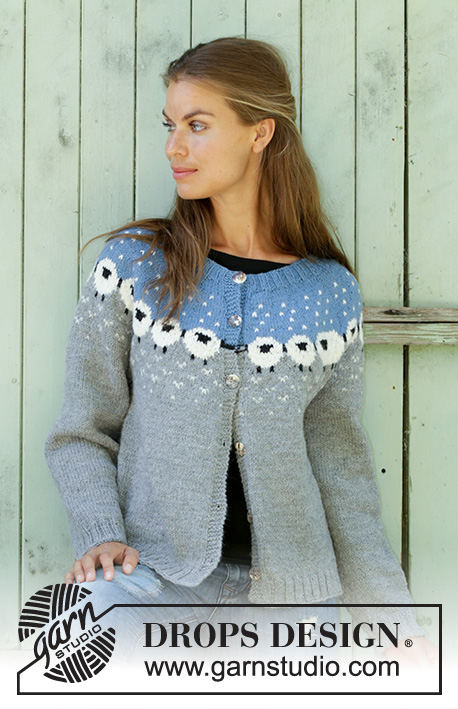
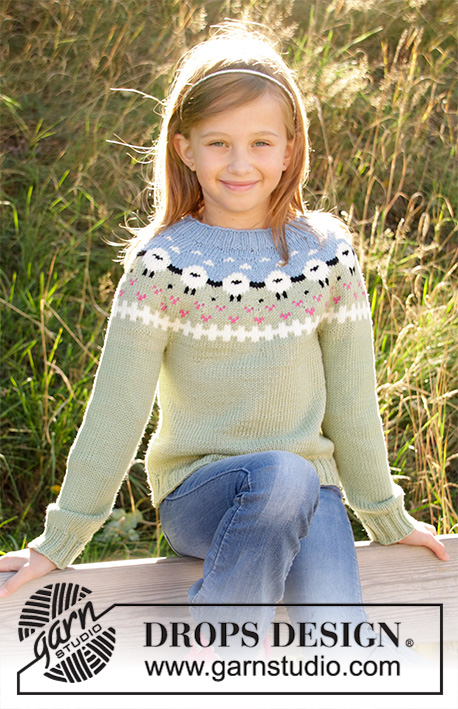
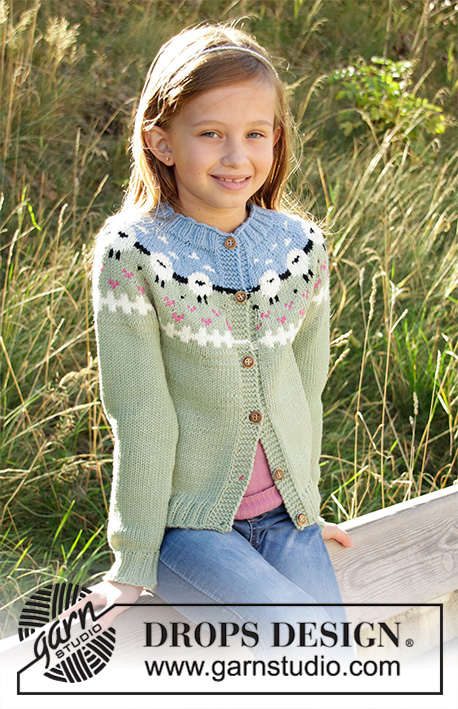
Knitted jumper with round yoke in DROPS Merino Extra Fine or Lima. The piece is worked top down in Nordic pattern with sheep S - XXXL.
DROPS 194-2 |
||||||||||||||||
|
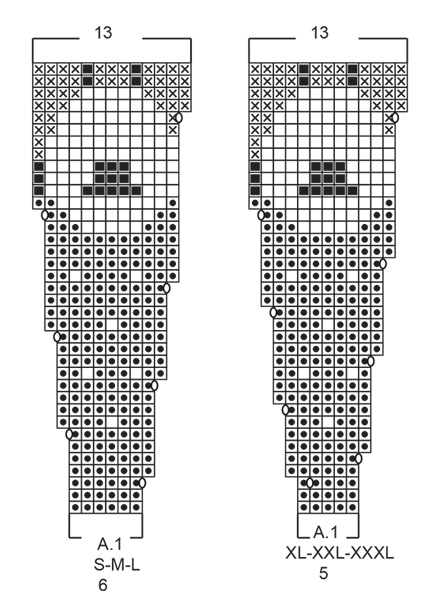
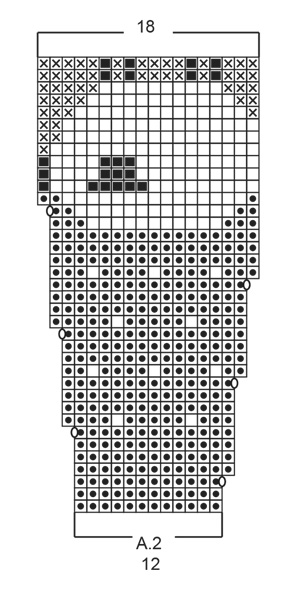
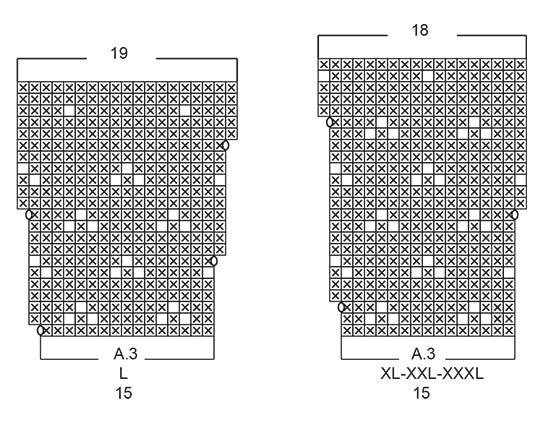
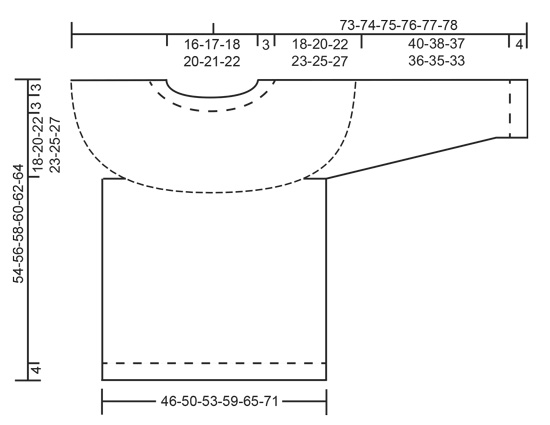
EXPLANATIONS FOR THE PATTERN: ------------------------------------------------------- PATTERN: See diagrams A.1 to A.3. Choose diagram for your size. The diagrams are worked in stocking stitch. As there are long spaces between colour changes, you should twist the strands together approx. every 7th stitch to avoid having long, loose strands at the back. INCREASE TIP (evenly spaced): To work out how to increase evenly, count the total number of stitches on the row (e.g. 90 stitches) and divide these stitches by the number of increases to be made (e.g. 31) = 2.9. In this example, make 1 yarn over after approx. each 3rd stitch. On the next row work the yarn overs twisted to avoid holes. DECREASE TIP (for sleeves): Decrease 1 stitch on each side of the marker thread as follows: Work until there are 3 stitches left before the marker thread, knit 2 together, knit 2 (the marker thread sits in the middle of these 2 stitches), slip 1 stitch as if to knit, knit 1, pass the slipped stitch over the knitted stitch (= 2 stitches decreased). ------------------------------------------------------- START THE PIECE HERE: ------------------------------------------------------- JUMPER - SHORT OVERVIEW OF THE PIECE: The yoke is worked in the round with circular needle, top down. The yoke is divided for body and sleeves and the body is continued in the round. The sleeves are worked in the round with double pointed needles. YOKE: Cast on 92-96-100-104-112-120 stitches with circular needle size 3 mm and light grey blue. Knit 1 round. Then work rib (= knit 2 / purl 2). Work rib for 3 cm. Change to circular needle size 4 mm. Knit 1 round and increase 28-24-32-30-32-34 stitches evenly spaced – read INCREASE TIP = 120-120-132-134-144-154 stitches. Then work pattern as follows (the round starts mid back): Work A.1 (= 6-6-6-5-5-5 stitches) over the first 12-12-12-10-10-10 stitches (= a total of 2 times), A.2 (= 12 stitches), A.1 over the next 42-42-48-50-55-60 stitches (= a total of 7-7-8-10-11-12 times), A.2 over the next 12 stitches, A.1 over the last 42-42-48-50-55-60 stitches (= a total of 7-7-8-10-11-12 times). REMEMBER THE KNITTING TENSION! When A.1 and A.2 have been worked 1 time in height there are 244-244-270-322-348-374 stitches on the needle. The piece measures approx. 16 cm (including the rib). Knit 1 round with light grey and increase 11-11-15-8-12-1 stitches evenly on round = 255-255-285-330-360-375 stitches. Work A.3 (= 15 stitches) over all stitches (= a total of 17-17-19-22-24-25 times in width). When A.3 has been worked 1 time in height there are 306-340-361-396-432-450 stitches on the needle. The piece is now worked with light grey to finished length. Work stocking stitch until the piece measures 21-23-25-26-28-30 cm (including the rib). Then divide the piece for body and sleeves as follows: Work 44-48-50-56-62-67 stitches stocking stitch (= half back piece), place the next 64-72-79-84-90-90 stitches on a thread for sleeve and cast on 8-8-10-10-10-14 new stitches under the sleeve, work 89-99-102-115-127-135 stitches stocking stitch (= front piece), place the next 64-72-79-84-90-90 stitches on a thread for sleeve and cast on 8-8-10-10-10-14 new stitches under the sleeve, finally work 45-49-51-57-63-68 stitches stocking stitch (= half back piece) = 194-212-223-248-272-298 stitches. BODY: Continue working in stocking stitch. When the piece measures 26-26-26-27-27-27 cm from where the body was divided from the sleeves, increase 26-32-33-32-40-42 stitches evenly on next round = 220-244-256-280-312-340 stitches. Change to circular needle size 3 mm and work rib (= knit 2 / purl 2) over all stitches (the yarn overs are worked twisted to avoid holes). Cast off with knit when the rib measures 4 cm (i.e. the piece measures a total of approx. 30-30-30-31-31-31 cm from where the body was divided from the sleeves). The jacket measures a total of 54-56-58-60-62-64 cm, measured from the shoulder. SLEEVE: Place the 64-72-79-84-90-90 stitches from the thread on the one side of the piece on double pointed needles size 4 mm and knit up 1 stitch in each of the 8-8-10-10-10-14 stitches cast on under the sleeve = 72-80-89-94-100-104 stitches. Insert 1 marker thread in the middle of the 8-8-10-10-10-14 stitches (= mid under sleeve). Work stocking stitch in the round with light grey. When the piece measures 1 cm from where the sleeve was divided from the body, decrease 2 stitches mid under sleeve – read DECREASE TIP. Decrease like this every 3-2-1½-1½-1½-1 cm a total of 11-15-18-19-22-23 times = 50-50-53-56-56-58 stitches. When the sleeve measures 40-38-37-36-35-33 cm from where the sleeve was divided from the body, increase 2-2-3-0-4-2 evenly on round = 52-52-56-56-60-60 stitches. Change to double pointed needles size 3 mm. Work rib in the round (= knit 2 / purl 2). Cast off with knit when the piece measures 44-42-41-40-39-37 cm from where the sleeve was divided from the body (approx. 4 cm rib). Work the other sleeve in the same way. |
||||||||||||||||
Diagram explanations |
||||||||||||||||
|
||||||||||||||||
 |
||||||||||||||||
 |
||||||||||||||||
 |
||||||||||||||||
 |
||||||||||||||||
 |
||||||||||||||||
Have you finished this pattern?Tag your pictures with #dropspattern #sheephappenssweater or submit them to the #dropsfan gallery. Do you need help with this pattern?You'll find 25 tutorial videos, a Comments/Questions area and more by visiting the pattern on garnstudio.com. © 1982-2026 DROPS Design A/S. We reserve all rights. This document, including all its sub-sections, has copyrights. Read more about what you can do with our patterns at the bottom of each pattern on our site. |
||||||||||||||||


With over 40 years in knitting and crochet design, DROPS Design offers one of the most extensive collections of free patterns on the internet - translated to 17 languages. As of today we count 325 catalogues and 12298 patterns translated into English (UK/cm). 12298
We work hard to bring you the best knitting and crochet have to offer, inspiration and advice as well as great quality yarns at incredible prices! Would you like to use our patterns for other than personal use? You can read what you are allowed to do in the Copyright text at the bottom of all our patterns. Happy crafting!
Post a comment to pattern DROPS 194-2
We would love to hear what you have to say about this pattern!
If you want to leave a question, please make sure you select the correct category in the form below, to speed up the answering process. Required fields are marked *.