
Popular categories
Looking for a yarn?


Comments / Questions (44)
![]() Regine Hersche wrote:
Regine Hersche wrote:
I thought that when you knit in the round in stockinette you knit every row but the pattern mentions knit and purl so I am confused, don't know what to do,please help
08.07.2020 - 22:53DROPS Design answered:
Dear Mrs Hersche, you are right, when you work stocking stitch in the round you have to knit all rounds, but when you work garter stitch in the round you will alternately knit 1 round and purl 1 round. In this pattern you will work some stitches knit and some other will be purled - as shown in diagrams. Happy knitting!
09.07.2020 - 09:36
![]() Enrica wrote:
Enrica wrote:
Buongiorno Sto provando a fare il modello per una taglia S, non riesco a capire come fare l’aumento raglan. Perché nel giro successivo mi trovo con una maglia gettata di troppo. Come posso fare? Grazie dell’aiuto
09.05.2020 - 11:00DROPS Design answered:
Buonasera Enrica, le spiegazioni sono corrette, e non è semplice capire perchè si ritrova con una maglia in più: ha contato correttamente e lavorato gli aumenti come descritto? Ci rispieghi nel dettaglio il suo problema. Buon lavoro!
11.05.2020 - 22:22
![]() Nidaa wrote:
Nidaa wrote:
After I finish the raglan YOs increases , still I continue doing the YOs between A.1 and A.2 as described at yoke part? Thanks for u r time replying to my Question :)
20.02.2020 - 22:26DROPS Design answered:
Dear Nidaa, when all increases for raglan are done, continue in pattern without yarn overs on each side of each A.1 until piece measures 17 cm. The yarn overs explained under yoke were for raglan increases, you do not need them anymore now. Happy knitting!
21.02.2020 - 08:32
![]() Nidaa wrote:
Nidaa wrote:
All the YOs before and after the sleeve cap are always worked at Stocking stitch? they aren't recorded at a diagram?
16.02.2020 - 16:57DROPS Design answered:
Dear Nidaa, the yarn overs worked for the increases on sleeves are worked in stocking stitch, the yarn overs worked for the increases on front and back pieces are worked as shown in diagramA.2. Happy knitting!
17.02.2020 - 09:29
![]() Nicole wrote:
Nicole wrote:
Genauso hab ich's gemacht, danke! Eine Frage noch: die 56 M, die ich in Gr. M für den Ärmel stillgelege, sind das die M, die ich für die Armkugel zugenommen habe plus 2x A1? Ich habe leider nur 54. Ist das dramatisch?
07.11.2019 - 20:09DROPS Design answered:
Liebe Nicole, für den 1. Ärmel legen Sie: 8 M A.1 + 38 M + 8 M A.1 + 2 M = 56 M, dh die 2 ersten (und 2 letzten) Zunahmen von Vorder bzw Rückenteil werden mit den Ärmeln stillgelegt. Beachten Sie ob Sie die richtige Zunahmenanzahl gestrickt haben, sonnst wird die Arbeit zu klein. Viel Spaß beim stricken!
08.11.2019 - 08:51
![]() Nicole wrote:
Nicole wrote:
Gibt es ein Problem mit meiner Frage? Ich würde so gerne weiterstricken... ☺️
02.11.2019 - 21:57DROPS Design answered:
Liebe Nicole, Ihre letzte Frage wurde als Kommentar veröffentlicht, wir beantworten gleich. :)
04.11.2019 - 16:31
![]() Nicole wrote:
Nicole wrote:
Ich verstehe nicht ganz was gemeint ist mit ": Wenn A.2 zu Ende gestrickt wurde, im Muster ebenso weiterstricken, jedoch die nächsten zugenommenen Maschen beidseitig jedes A.1 werden glatt rechts gestrickt." Heißt das statt eines Lochs stricke ich die Zunahme in der Folgerunde verschränkt? Oder was ist mit glatt rechts gemeint?
28.10.2019 - 20:11DROPS Design answered:
Liebe Nicole, die Zunahmen sollen wie zuvor gestrickt werden, dh wie unter RAGLANZUNAHMEN, Löchter sollen entstehen. Viel Spaß beim stricken!
04.11.2019 - 16:35
![]() Nicole wrote:
Nicole wrote:
Sind bei der Passe-beschreibung die Raglanzunahmen bereits mitangeben? Dort ist vor und nach A1 ein Umschlag beschrieben. Oder müssen die Raglanzunahmen zusätzlich eingearbeitet werden? Dann müssten aber zwei Umschläge nacheinander gemacht werden, das kommt mir komisch vor...Ausserdem: werden alle Umschläge im Muster als Loch gestrickt oder auch welche verschränkt?
21.10.2019 - 17:05DROPS Design answered:
Liebe Nicole, die erste Raglanzunahmen sind unter der Passe beschrieben, so nehmen Sie weiter zu - siehe RAGLANZUNAHMEN dh die Umschläge werden rechts gestrickt, so daß Löcher entstehen. Diese Umschläge sind nicht im Diagram gezeichnet, aber A.2 zeigt wie man die neuen Maschen strickt. Viel Spaß beim stricken!
22.10.2019 - 10:30
![]() Pamela wrote:
Pamela wrote:
Hola, quisiera saber cómo tengo que medir la talla, el patrón muestra números, pero no especifica unidad de medida; además tengo la duda si estas medidas son en plano(ej: sólo delantero) o en redondo. Ya tuve problemas con las tallas de otro chaleco que venía indicado del mismo modo, traté de seguir la lógica de las medidas, pero queda gigante :( o sea, mi talla era 1 o 2 menor; por eso que preferí preguntar antes de comenzar éste. Muchas gracias!
06.05.2019 - 05:19DROPS Design answered:
Hola Pamela. Todas las medidas están en cm. El número en en el diagrama es la mitad de la medida de la prenda p.e. en el pecho o en las caderas. No son las medidas completas de estas partes del cuerpo. Tienes que tomar tus medidas y elegir la talla correspondiente, dado que las medidas actuales para las tallas S-M-L-XL-XL-XXL-XXXL pueden variar de entre países,
07.05.2019 - 10:40
![]() Solana Godeau wrote:
Solana Godeau wrote:
Hello in your answer you mentioned that doing A.2 2 times would give me 70 sts but I’m working on the XL Size, meaning I was working from the other A.2 chart which is 41 stitches across (x2=82). Should I just work from the S+M+L A.2 chart instead? Thank you so much for you help!
15.02.2019 - 19:55DROPS Design answered:
Dear Mrs Godeau, in size XL you are working the 118 sts as follows: A.1 (= 8 sts x 4 (raglan line) ) + 2 sts for each sleeve x 2 sleeves + A.2 (= 41 sts x 2 = 82 sts) = 32 + 4 + 82 = 118 sts and increase 1 st on each side of A.1 (= 8 sts inc on 1st round) = 118 + 8 = 126 sts after 1st round. Happy knitting!
18.02.2019 - 08:53
|
|||||||||||||||||||||||||
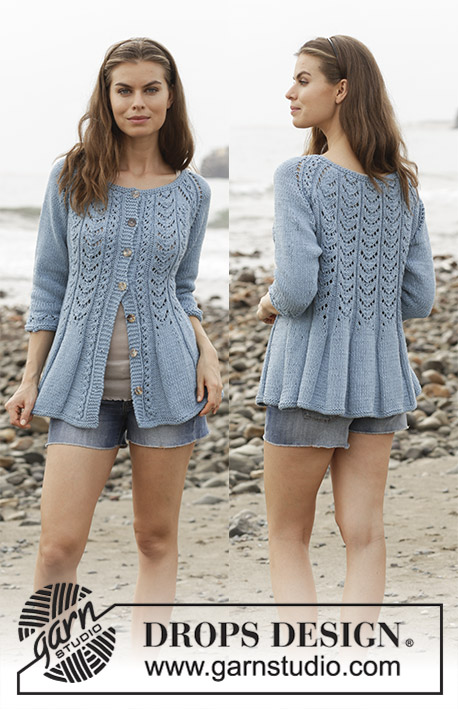
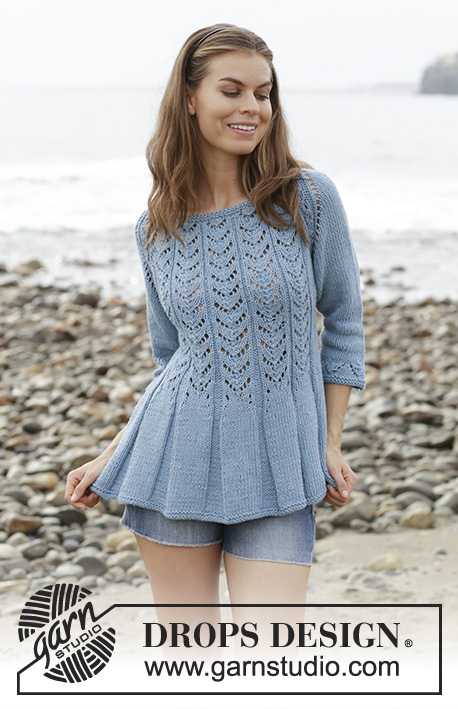
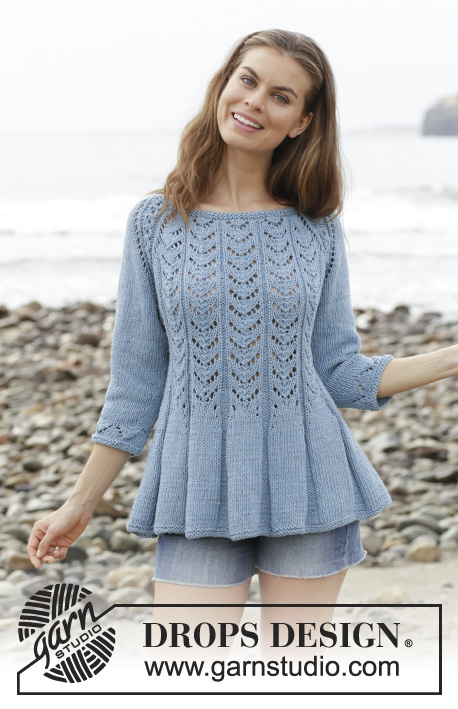
Belle Époque Sweater#belleepoquesweater |
|||||||||||||||||||||||||
 |
 |
||||||||||||||||||||||||
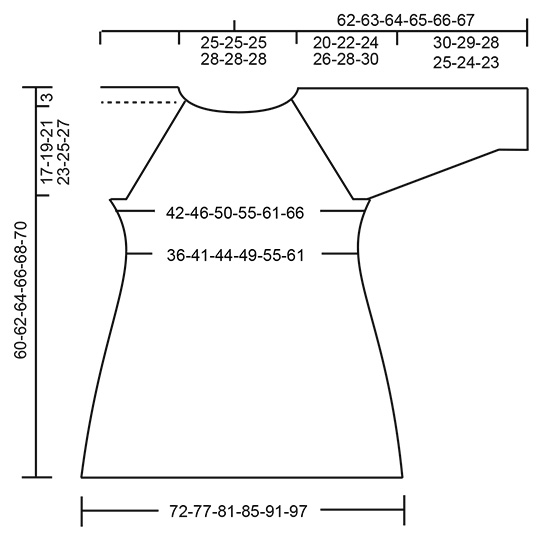
Fitted jumper with lace pattern, raglan and ¾ sleeves, knitted top down. Size: S - XXXL Piece is knitted in DROPS Big Merino.
DROPS 186-6 |
|||||||||||||||||||||||||
|
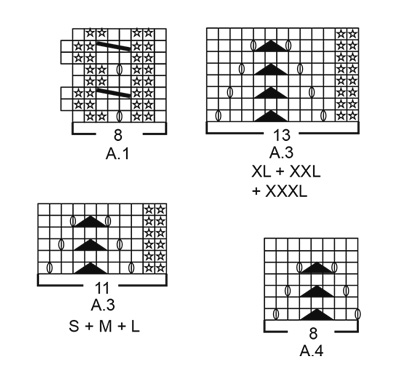
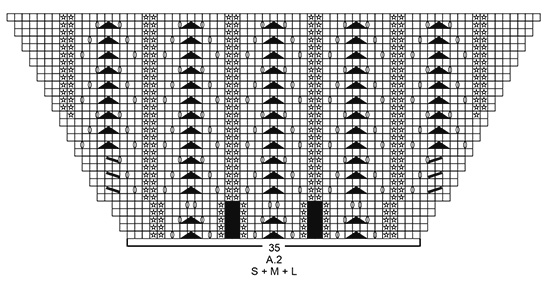
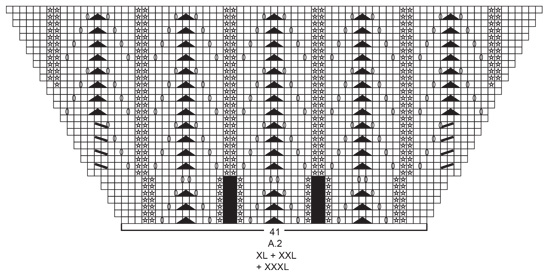
INFORMATION FOR PATTERN: GARTER STITCH (worked in the round): 1 ridge = 2 rounds. Knit 1 round and purl 1 round. INCREASE TIP-1: To calculate how to increase evenly, use the total number of stitches on row (e.g. 88 stitches) and divide stitches by number of increases to be done (e.g. 18) = 4.9. In this example increase by making 1 yarn over after approx. every 5th stitch. On next round knit yarn overs twisted to avoid holes. PATTERN: See diagrams A.1 to A.4. Choose diagram for your size (applies to A.2 and A.3). RAGLAN: Increase for raglan on each side of A.1 in every transition between body and sleeves (= 8 stitches increased on every increase round). Increase 1 stitch by making 1 yarn over, on next round knit yarns over to make holes. Work the increased stitches in stocking stitch on sleeves and according to diagram on front and back piece. DECREASE TIP (applies to sides on body and mid under sleeves): Begin 4 stitches before marker and knit 2 together, knit 4 (marker is between these 4 stitches), slip 1 stitch knitwise, knit 1, pass slipped stitch over stitch worked (= 2 stitches decreased). INCREASE TIP-2 (applies to purl sections on body): Increase 1 stitch in every purl section by making 1 yarn over before all 2 purl stitches. On next round purl yarn overs twisted to avoid holes. On next increase make 1 yarn over after every 3 purl stitches. Continue increase by alternately increasing at beginning and end of purl section. INCREASE TIP-3 (applies to sides of body): Begin 3 stitches before marker thread, make 1 yarn over, knit 6 (marker thread is in the middle of these 6 stitches), make 1 yarn over (= 2 stitches increased). On next round knit yarn overs twisted to avoid holes. INCREASE TIP-4 (applies to sections in stocking stitch over A.3 on body): When A.3 has been done, work in stocking stitch over the 9-9-9-11-11-11 stitches with lace pattern. Increase over these 9-9-9-11-11-11 stitches as follows: Work 1 stitch in stocking stitch, make 1 yarn over, work in stocking stitch until 1 stitch in stocking stitch remains, make 1 yarn over, work 1 stitch in stocking stitch. On next round knit yarn overs twisted to avoid holes. ---------------------------------------------------------- JUMPER: Worked in the round on circular needle from top down. Work sleeves in the round on double pointed needles/a short circular needle, top down. NECK EDGE: Cast on 88-92-96-100-104-108 stitches on a short circular needle size 4 mm with Big Merino. Work 2 ridges in GARTER STITCH in the round - see explanation above. Knit 1 round while increasing 18-14-10-18-14-10 stitches evenly - read INCREASE TIP-1 = 106-106-106-118-118-118 stitches. Knit 1 round. Switch to circular needle size 5 mm and work yoke as explained below. YOKE: Insert 1 marker at beginning of round and work first round as follows: Work A.1 (= 8 stitches), make 1 yarn over, work 2 stitches in stocking stitch (= sleeve cap), make 1 yarn over, work A.1, make 1 yarn over, work A.2 (= 35-35-35-41-41-41 stitches), make 1 yarn over, work A.1, make 1 yarn over, work 2 stitches in stocking stitch (= sleeve cap), make 1 yarn over, work A.1, make 1 yarn over, work A.2 (= 35-35-35-41-41-41 stitches), make 1 yarn over = 118-118-118-130-130-130 stitches (including yarn overs in A.1). Continue pattern like this. AT THE SAME TIME on every other round increase for RAGLAN - see explanation above, until increase has been done 14-18-20-21-24-26 times on each side of A.1 (including increases on first round after neck edge). REMEMBER THE KNITTING TENSION! NOTE! When A.2 has been worked, continue pattern the same way, but work the next increased stitches on each side of A.1 in stocking stitch. In size S the increases for raglan is done when 3 rounds remain in A.2, continue pattern without increase as explained below. After last increase for raglan there are 230-262-278-298-322-338 stitches on needle if it is on a round with 8 stitches in A.1 or 234-266-282-302-326-342 stitches if it is on a round with 9 stitches in A.1. Continue pattern as before without increases for raglan until piece measures 17-19-21-23-25-27 cm from cast-on edge mid front, but finish so that last round on needle is a round with 8 stitches in A.1. Work next round as follows: Work 0-0-0-0-0-1 stitches in stocking stitch, slip the next 48-56-60-62-67-68 stitches on 1 stitch holder for sleeve, cast on 6-6-8-8-10-12 new stitches on needle (= in the side under sleeve), continue with stocking stitch and pattern as before over the next 65-73-77-85-93-101 stitches (= front piece), slip the next 50-58-62-64-68-68 stitches on 1 stitch holder for sleeve, cast on 6-6-8-8-10-12 new stitch on needle (= in the side under sleeve), continue with stocking stitch and pattern as before over the next 65-73-77-85-93-100 stitches (= back piece) and slip the remaining 2-2-2-2-1-0 stitches on stitch holder for first sleeve. Finish body and sleeves separately. NOW MEASURE PIECE FROM HERE! BODY: = 142-158-170-186-206-226 stitches. Insert 1 marker thread in the middle of the 6-6-8-8-10-12 new stitches that were cast on under sleeve in each side. Begin round at one of the marker thread and move the marker threads when working. Work first round as follows: Work in stocking stitch over the first 7-11-14-13-18-23 stitches, work A.3 over the next 55-55-55-65-65-65 stitches (= 5 repetitions of 11-11-11-13-13-13 stitches, continue on correct round in diagram), purl 2, 14-22-28-26-36-46 stitches in stocking stitch, A.3 over the next 55-55-55-65-65-65 stitches, purl 2 and work in stocking stitch over the remaining 7-11-14-13-18-23 stitches. Continue the pattern like this – READ THE REST OF BODY BEFORE CONTINUING! DECREASE IN THE SIDES: When piece measures 1 cm from division, decrease 1 stitch on each side of both marker threads - read DECREASE TIP (= 4 stitches decreased). Decrease like this every other round 5 times in total in each side = 122-138-150-166-186-206 stitches. INCREASE IN PURL SECTIONS: When piece measures 6 cm from division, increase 1 stitch in every purl section (= 12 stitches increased on round) – read INCREASE TIP-2. Increase like this every 5 cm 6 times in total in every purl section (there are now 8 stitches in each of these purl sections). INCREASE IN THE SIDES: AT THE SAME TIME when piece measures 7 cm from division, increase 1 stitch on each side of both marker threads - read INCREASE TIP-3 (= 4 stitches increased). Increase like this every 6 cm 3 times in total in each side. INCREASE IN STOCKING STITCH SECTIONS: AT THE SAME TIME when piece measures approx. 15 cm from division, finish A.3. Then work knit over knit and purl over purl over these stitches. On next round increase 2 stitches in each stocking stitch section over A.3 - read INCREASE TIP-4 (= 20 stitches increased). Repeat this increase after 2 cm (= 20 stitches increased). When all increases are done there are 246-262-274-290-310-330 stitches on row. Continue with knit over knit and purl over purl until piece measures approx. 59-61-63-65-67-69 cm from shoulder and down. Switch to circular needle size 4.5 mm. Work 2 ridges in the round. Switch back to circular needle size 5 mm and cast off by knitting. Jumper measures approx. 60-62-64-66-68-70 cm from shoulder and down. SLEEVE: Slip the 50-58-62-64-68-68 stitches from stitch holder in one side of piece on double pointed needles or a short circular needle size 5 mm and pick in addition up 1 stitch in each of the 6-6-8-8-10-12 new stitches cast on under sleeve = 56-64-70-72-78-80 stitches. Insert 1 marker thread in the middle of the 6-6-8-8-10-12 stitches under sleeve and begin round here. Work in stocking stitch in the round. When piece measures 2-2-2-2-3-3 cm from division, decrease 2 stitches mid under sleeve - read DECREASE TIP. Decrease like this every 3½-2½-2-1½-1-1 cm 7-10-12-12-14-14 times in total = 42-44-46-48-50-52 stitches. Continue until sleeve measures 26-25-24-21-20-19 cm (shorter measurements in the larger sizes because of longer yoke). Knit 1 round while adjusting number of stitches to 40-40-48-48-48-48. Work A.4 in the round (= 5-5-6-6-6-6 repetitions of 8 stitches). When A.4 has been worked, switch to double pointed needles size 4 mm. Work 2 ridges in the round. Switch back to double pointed needles size 5 mm and cast off by knitting. Sleeve measures approx. 30-29-28-25-24-23 cm from division. Work the other sleeve the same way. |
|||||||||||||||||||||||||
Diagram explanations |
|||||||||||||||||||||||||
|
|||||||||||||||||||||||||
 |
|||||||||||||||||||||||||
 |
|||||||||||||||||||||||||
 |
|||||||||||||||||||||||||
 |
|||||||||||||||||||||||||
Have you finished this pattern?Tag your pictures with #dropspattern #belleepoquesweater or submit them to the #dropsfan gallery. Do you need help with this pattern?You'll find 28 tutorial videos, a Comments/Questions area and more by visiting the pattern on garnstudio.com. © 1982-2026 DROPS Design A/S. We reserve all rights. This document, including all its sub-sections, has copyrights. Read more about what you can do with our patterns at the bottom of each pattern on our site. |
|||||||||||||||||||||||||


With over 40 years in knitting and crochet design, DROPS Design offers one of the most extensive collections of free patterns on the internet - translated to 17 languages. As of today we count 324 catalogues and 12245 patterns translated into English (UK/cm). 12245
We work hard to bring you the best knitting and crochet have to offer, inspiration and advice as well as great quality yarns at incredible prices! Would you like to use our patterns for other than personal use? You can read what you are allowed to do in the Copyright text at the bottom of all our patterns. Happy crafting!
Post a comment to pattern DROPS 186-6
We would love to hear what you have to say about this pattern!
If you want to leave a question, please make sure you select the correct category in the form below, to speed up the answering process. Required fields are marked *.