
Popular categories
Looking for a yarn?


Comments / Questions (27)
![]() Therese Meland wrote:
Therese Meland wrote:
Det er størrelse M/L eg prøved meg på fikk ikkje den til
19.10.2020 - 14:31DROPS Design answered:
Hej Therese, når du kommer til fellingen kan du ikke strikke lige så mange hjerter, efter de 2 hjerter får du 15 masker (mellem hjerterne) som tages ind til 13 masker. Sørg for at spidserne på de 2 hjerter kommer imellem hjerterne på rækken nedenfor. God fornøjelse!
22.10.2020 - 15:14
![]() Therese Meland wrote:
Therese Meland wrote:
Eg trur oppskriften på luen er ikkje heilt riktige og det.får ikkje heilt til
16.10.2020 - 11:21
![]() Therese Meland wrote:
Therese Meland wrote:
Eg får ikkje mønster til å stemme på luen
16.10.2020 - 09:16
![]() Therese Meland wrote:
Therese Meland wrote:
Eg får ikkje mønster til å stemme når eg skal begynne å fellingen
16.10.2020 - 08:46DROPS Design answered:
Hei Therese. Hvilken størrelse strikker du? Når du skal starte med fellingene, 4. omgang av A.2 vil det være ulike sorte masker mellom hvert hjerte. Husk å hake av for "Spørsmål" når du har spørsmål til en oppskrift, hakes det av for "Kommentarer" vil det ikke bli besvart. mvh DROPS design
19.10.2020 - 11:37
![]() Tiia wrote:
Tiia wrote:
Saisiko ohjeeseen siitä puuttuvat ruutupiirrokset?
30.09.2020 - 05:18DROPS Design answered:
Piirrokset on lisätty ohjeeseen.
12.03.2021 - 13:55
![]() Brigitte wrote:
Brigitte wrote:
Bonjour, je ne comprends pas comment on intègre le pouce dans la moufle. Comment intégrer le pouce qui est déjà tricoté en rond pour continuer le diagramme? Faut-il continuer le gousset à partir des mailles du pouce? Pourquoi avoir rabattu les 3 mailles du pouce alors qu'on aurait pu les laisser en attente pour y créer ensuite le pouce? Ce n'est pas clair. Merci pour votre aide.
05.02.2020 - 22:58DROPS Design answered:
Bonjour Brigitte , Le pouce se tricote également de haut en bas = en commençant par le bout jusqu'aux mailles à intégrer sur la moufle. Les 3 mailles rabattues pour le pouce doivent se trouver au-dessus des 3 mailles rabattues pour la moufle (ces mailles seront ensuite assemblées entre elles) continuez ensuite tout simplement comme indiqué dans les diagrammes. Bon tricot!
06.02.2020 - 10:19
![]() Murielle Pham wrote:
Murielle Pham wrote:
Bonjour, J'ai fait mon pouce je dois maintenant le relier à la moufle mais je n'étais pas sûre de comprendre la méthode... Je rassemble à quel endroit ? Pour le gousset, je dois monter des mailles ??? La vidéo indiquée parle du gousset qui part du bas de la moufle hors celle ci se tricoté par le haut... Merci pour votre aide
11.11.2019 - 15:39DROPS Design answered:
Bonjour Mme Pham, la vidéo n'est effectivement pas la bonne, quand le pouce est fait, vous le placez sur la 1ère partie de la moufle, les 3 m rabattues du pouce doivent être au niveau des 3 m rabattues pour le pouce. Continuez maintenant les diagrammes en tricotant les mailles du pouce comme dans A.6. Bon tricot!
11.11.2019 - 16:20
![]() Annika wrote:
Annika wrote:
Buonasera,potrei utilizzare i ferri diritti per il berretto,aggiungendo una maglia di vivagno per lato?Grazie.
10.11.2019 - 21:34DROPS Design answered:
Buonasera Annika, può usare i ferri dritti ponendo particolare attenzione alla lavorazione del diagramma. Buon lavoro!
10.11.2019 - 23:40
![]() Sunniva wrote:
Sunniva wrote:
Går det an å strikke vottene nedenfra og opp, noe tilsvarende metoden for en selbuvott? Eller er det en spesiell grunn til at oppskriften er fra tuppen og ned til håndleddet?
03.11.2019 - 15:57DROPS Design answered:
Hei Sunniva. De fleste vottene våre er strikket fra håndleddet og opp, mens denne votten er skrevet omvendt. For å ha litt variasjon i oppskriftene. mvh DROPS design
04.11.2019 - 14:27
![]() Ingamay Granberg wrote:
Ingamay Granberg wrote:
Ska man verkligen sticka vanten uppå ned och hur kan man börja jag fattar noll
14.03.2019 - 14:12DROPS Design answered:
Hei Ingamay. Ja, denne votten strikkes rundt, fra tuppen og ned til håndleddet. Du begynner med å legge opp 8 masker med sort og magisk sirkel (om du ikke vil strikke magisk sirkel kan du legge opp vanlig og snurpe igjen hullet senere). Videre følger du diagram A.3 - diagrammet leses på vanlig måte (nedenfra og opp, fra høyre mot venstre). Du strikker altså 1 omgang slik: 1 maske grand canyon, 1 kast, 1 sort, 1 kast, 1 grand canyon, 1 sort, 1 grand canyon, 1 kast, 1 sort, 1 kast, 1 grand canyon. God fornøyelse.
25.03.2019 - 11:49
|
||||||||||||||||||||||
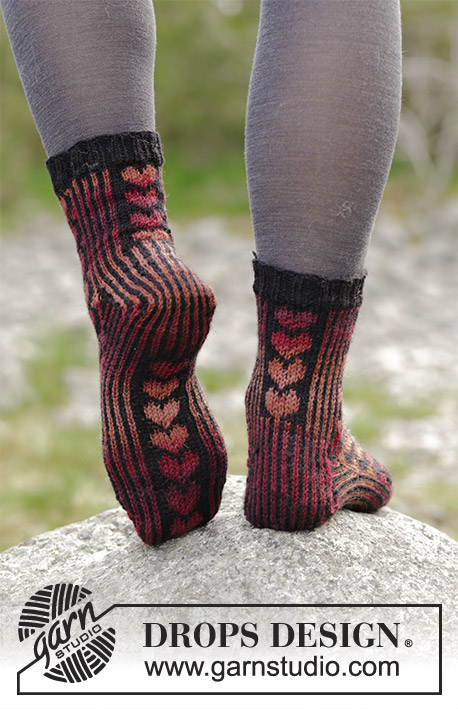
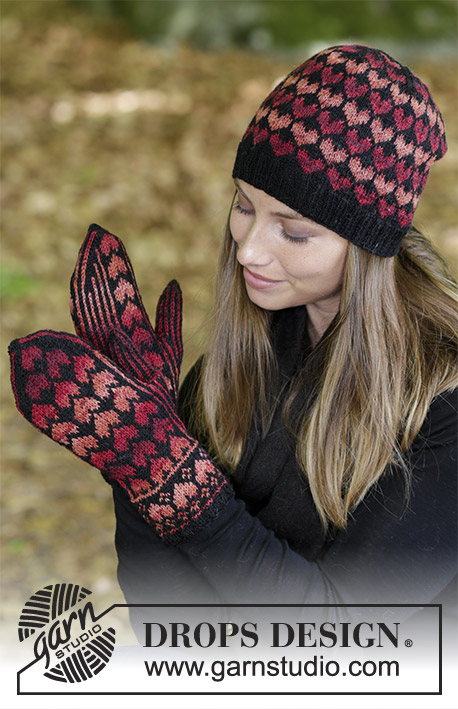
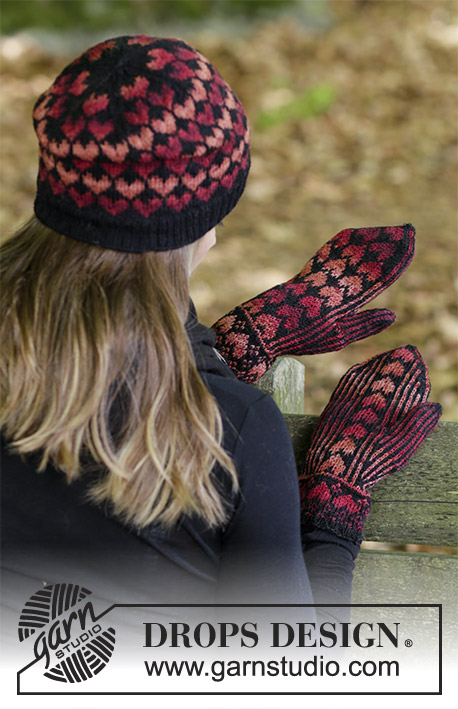
Queen of Hearts#queenofheartsset |
||||||||||||||||||||||
 |
 |
|||||||||||||||||||||
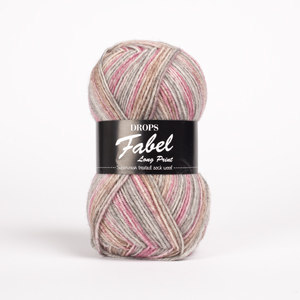
Set consists of: Hat and mittens with hearts. Piece is knitted in DROPS Fabel.
DROPS 183-23 |
||||||||||||||||||||||
|
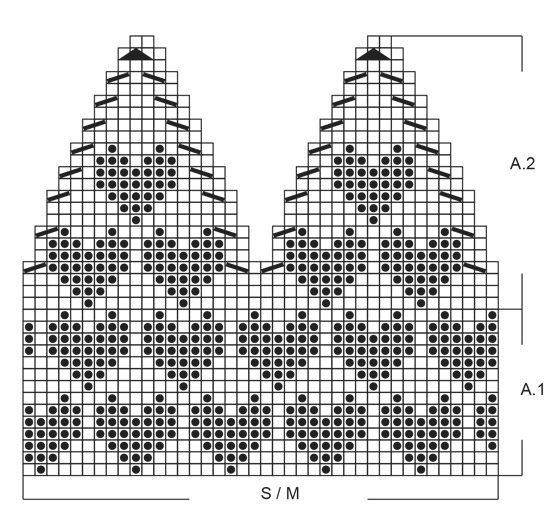
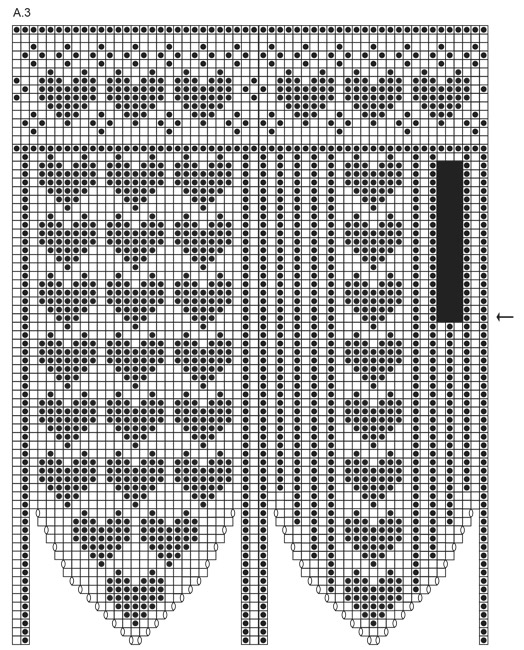
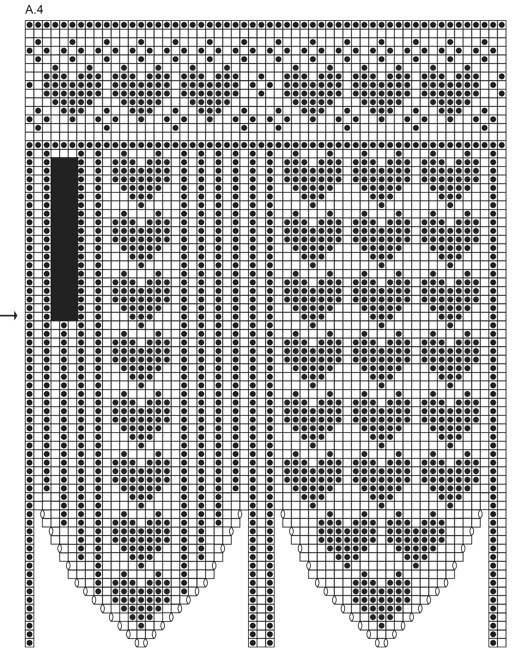
INFORMATION FOR PATTERN: MAGIC CIRCLE: To avoid hole in the middle beg with this technique: Hold yarn end in the left hand and make a loop around left index finger (from left to right). Hold the loop with left thumb and index finger. Insert needle through loop, get yarn from ball (i.e. place yarn 1 time over needle from you), pull yarn back through loop, 1 yarn over (now place yarn from the back and towards you) and pull yarn over through stitches on needle, * insert needle through loop, 1 yarn over (place yarn from the back and towards you), pull yarn over through loop, 1 yarn over (from the back and towards you) and pull yarn over through outermost stitch on right needle (i.e. the last stitch made) *, repeat from *-* until there are 8 stitches on needle. Distribute stitches on 4 double pointed needles size 2.5 mm as explained in pattern. Then work as explained in pattern – AT THE SAME TIME pull yarn end so that loop is tighten tog and the hole disappears. PATTERN: See diagrams A.1 to A.5. Diagrams show all rows in pattern seen from the right side. See diagrams A.1 and A.2 - choose diagram for your size. ---------------------------------------------------------- HAT: Worked in the round on circular needle, switch to double pointed needles when decreasing at the top of hat. Due to the pattern on the hat, it is available in sizes XS/S and M/L. Should you wish to make a size S/M (fits head size 54/56 cm) you can follow instructions for XS/S but increase ½ needle size. Cast on 128-152 stitches on circular needle size 2 mm with black and knit 1 round. On next round work rib knit 2 and purl 2 until piece measures approx. 4 cm. Switch to circular needles size 2.5 mm, knit 1 round while decreasing 8 stitches evenly on round = 120-144 stitches. Work diagram A.1 (pattern in diagram is divisible with 8 stitches, but since the diagrams should fit above each other you must start on different part of the pattern depending on size). Work A.1 3-6 times in width. REMEMBER THE KNITTING TENSION! Work diagram 3 times vertically, piece measures approx. 17 cm. Then work A.2 over A.1. When diagram has been worked vertically, 12 stitches remain on needle. Knit stitches together 2 by 2 = 6 stitches. Cut the yarn. Pull yarn through the remaining stitches a couple of times and fasten. ---------------------------------------------------------- MITTENS: Work mittens in the round on double pointed needles. Work hand from fingers and upwards to thumb gusset. Thumb is worked in the round from the top before casting off for thumb gusset and slip it together with the rest of mitten. Then continue in the round. MITTEN PART 1: Start with black and MAGIC CIRCLE - see explanation above = 8 stitches distributed on 4 double pointed needles 2.5 mm - NOTE: If you do not want to start with a magic circle cast on 8 stitches with black (when mitten is done baste a yarn up and down through stitches around hole at the tip and tighten tog). Then work pattern in the round according to diagram A.3 for left mitten and A.4 for right mitten. When increases in diagram are done, there are 56 stitches on round. REMEMBER THE KNITTING TENSION! Continue until round marked with arrow in diagram (piece measures approx. 12 from tip), on this round cast off 3 stitches for thumb gusset (the black squares in diagram shows where to cast off). Put mitten aside and work the thumb. THUMB: Start with black and MAGIC CIRCLE = 8 stitches distributed on double pointed needles 2.5 mm. Work in the round according to diagram A.5. When increases in diagram are done, there are 20 stitches on round. On last round in diagram cast off 3 stitches for thumb gusset on round (the black squares in diagram shows where to cast off). 17 stitches remain on thumb. The thumb is now done. MITTEN PART 2: Now work thumb together with mitten, place thumb on needles where stitches for thumb gusset were cast off on mitten. Continue in the round according to diagram A.3/A.4 over stitches on mitten as before, skip the black squares, here work diagram A.6 (= thumb gusset). Star in A.6 should fit star in A.5 to continue pattern. When diagram A.6 is done, there are 56 stitches on round. Continue according to A.3/A.4. When diagram has been worked, switch to double pointed needle size 2 mm and knit 1 round, then work rib knit 2 and purl 2 for 5 rounds. Loosely cast off stitches with K over K and P over P. Sew the opening between thumb and mitten. Cut the yarn and fasten yarn ends. |
||||||||||||||||||||||
Diagram explanations |
||||||||||||||||||||||
|
||||||||||||||||||||||
 |
||||||||||||||||||||||
 |
||||||||||||||||||||||
 |
||||||||||||||||||||||
 |
||||||||||||||||||||||
Have you finished this pattern?Tag your pictures with #dropspattern #queenofheartsset or submit them to the #dropsfan gallery. Do you need help with this pattern?You'll find 22 tutorial videos, a Comments/Questions area and more by visiting the pattern on garnstudio.com. © 1982-2026 DROPS Design A/S. We reserve all rights. This document, including all its sub-sections, has copyrights. Read more about what you can do with our patterns at the bottom of each pattern on our site. |
||||||||||||||||||||||


With over 40 years in knitting and crochet design, DROPS Design offers one of the most extensive collections of free patterns on the internet - translated to 17 languages. As of today we count 324 catalogues and 12272 patterns translated into English (UK/cm). 12272
We work hard to bring you the best knitting and crochet have to offer, inspiration and advice as well as great quality yarns at incredible prices! Would you like to use our patterns for other than personal use? You can read what you are allowed to do in the Copyright text at the bottom of all our patterns. Happy crafting!
Post a comment to pattern DROPS 183-23
We would love to hear what you have to say about this pattern!
If you want to leave a question, please make sure you select the correct category in the form below, to speed up the answering process. Required fields are marked *.