
Popular categories
Looking for a yarn?


Comments / Questions (39)
![]() Anne wrote:
Anne wrote:
A general comment on patterns: it would be so helpful if the diagram explanations appeared on the same page as their diagrams when the pattern is printed.
03.05.2019 - 12:09
![]() Marcia wrote:
Marcia wrote:
I'm trying to figure out the right size. How much ease is there in the bust?
13.04.2019 - 19:56DROPS Design answered:
Dear Marcia, if you're in doubt, you should always choose the largest size. You can also take as a reference the measurements in the diagram.
14.04.2019 - 11:07
![]() Jinhee Apelgren wrote:
Jinhee Apelgren wrote:
Why can\'t I see the diagram? I have a mac and could it be the problem?
10.09.2018 - 13:42DROPS Design answered:
Dear Jinhee, unfortunately we are experiencing some problems with teh side and teh pictures on it. We are aware of the problem, and our technicians work really hard to get everything back to normal as soon as possible. Please be patient with us a while longer. Thank you for understanding.
10.09.2018 - 23:26
![]() Angélique Rieux wrote:
Angélique Rieux wrote:
Très mal expliquer ça par dans tout les sens
30.08.2018 - 16:11DROPS Design answered:
Bonjour Mme Rieux, lisez attentivement toutes les explications en entier, et, n'hésitez pas à poser ici votre question si besoin. N'oubliez pas que votre magasin DROPS se tient à votre disposition pour toute assistance complémentaire, même par mail ou téléphone. Bon tricot!
06.09.2018 - 09:54
![]() Judy wrote:
Judy wrote:
Please provide translation (to English) of other knitters' questions, the information could help all knitters. Thank you
10.06.2018 - 18:16DROPS Design answered:
Dear Judy, we are not able to translate every question/answer/comment into every language, please feel free to use any online translator or ask your question here, or contact the store where you bought the yarn for any individual assistance. Happy knitting!
11.06.2018 - 10:06
![]() Renata wrote:
Renata wrote:
Buongiorno, per favore mi potete dire dopo posiziono i 4 segnapunti quando ho 116 maglie iniziali . Grazie
20.05.2018 - 15:20DROPS Design answered:
Buongiorno Renata, ci può spiegare meglio il suo problema? I segnapunti vengono inseriti quando si lavorano gli scalfi e si avviano nuove maglie per il sottomanica. Buon lavoro!
20.05.2018 - 17:31Sandra wrote:
Hello. I am having difficulty understanding the increases as they are stated. Front and back piece information is the same as increase tip for sides of body? Is there another way to explain the raglan increase? Thank you so much.
17.04.2018 - 23:29DROPS Design answered:
Dear Sandra, you will increase for raglan as explained under RAGLAN, ie before 1 st + A.1 and/or after A.1+1 st. Increase for raglan are done on a different rythm to get the correct shape, depending on your size you will increase either 8 sts per inc round (= body and sleeves) or only 4 sts per inc round (= either only on body or only on sleeves). Which size are you working on?
18.04.2018 - 09:40
![]() Annette Enk wrote:
Annette Enk wrote:
Guten Tag, ich habe den Pullover gestrickt und es hat auch alles gut geklappt. Beim Tragen ist es nur so, dass der Pullover, weil er vorne und hinten ja gleich ist, nach hinten (Rücken) rutscht und dort dann ein optisch tieferer Ausschnitt zu sehen ist als vorne. Das ist sehr unschön. Wie kann ich das im Nachgang noch ausgleichen? Wäre für eine Tipp (vermutlich muss ich oben anstricken) dankbar.
25.03.2018 - 14:26DROPS Design answered:
Liebe Annette, aufgrund des Musters ist es schwierig, den Pullover noch nachträglich zu verändern. Ansonsten ließen sich über den hinteren Halsrand verkürzte Reihen stricken, sodass der hintere Halsrand höher wird. Im Übrigen soll der Pullover aber auch als Sommerpulli einen etwas tieferen Rückenausschnitt haben.
02.04.2018 - 09:58
![]() Agnès wrote:
Agnès wrote:
Bonjour, je compte 368 mailles du montage aux augmentations en taille L au lieu de 360. POuvez vous m'aider. Et je voudrais savoir si les augmentations je dois les faire les unes après les autres ou simultanément au moins pour les augmentations du dos/devant et manches. Merci de me répondre
25.01.2018 - 19:47DROPS Design answered:
Bonjour Agnès, vous partez avec 116 m et augmentez pour le dos et le devant 30 x 4 m (= 2 m sur le devant + 2 m sur le dos) tous les 2 tours = 120 augm. En même temps, augmentez pour les manches 4 m (= 2 m par manche): 2 x tous les tours et 29 x tous les 2 tours = 4x31= 124 augm. (au 2ème tour du raglan, vous augmenterez 4 m pour les manches seulement, augmentez ensuite 8 m au total tous les 2 tours), soit 116 + 120 + 124 = 360 m. Bon tricot!
26.01.2018 - 08:12
![]() Silvana wrote:
Silvana wrote:
Grazie mille per la pazienza!
21.09.2017 - 12:08
|
|||||||||||||||||||
Maren#marensweater |
|||||||||||||||||||
 |
 |
||||||||||||||||||
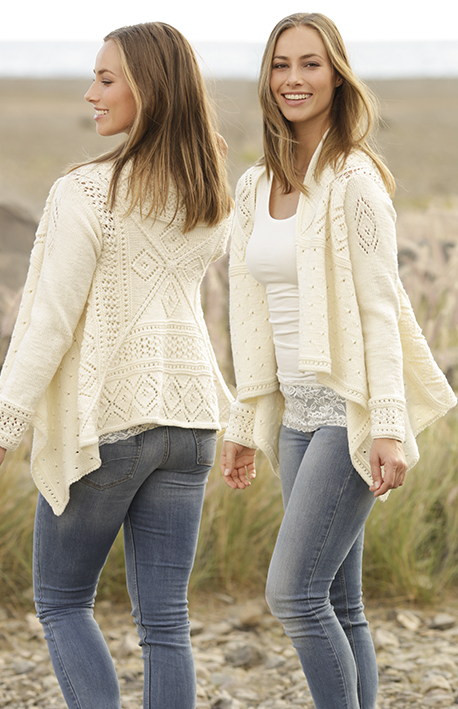
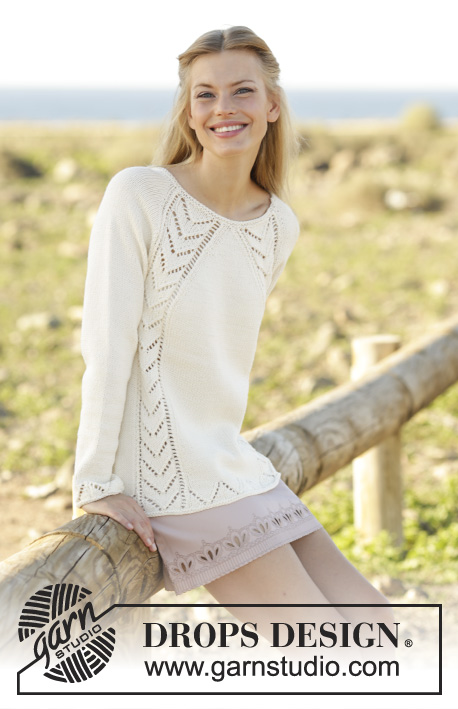
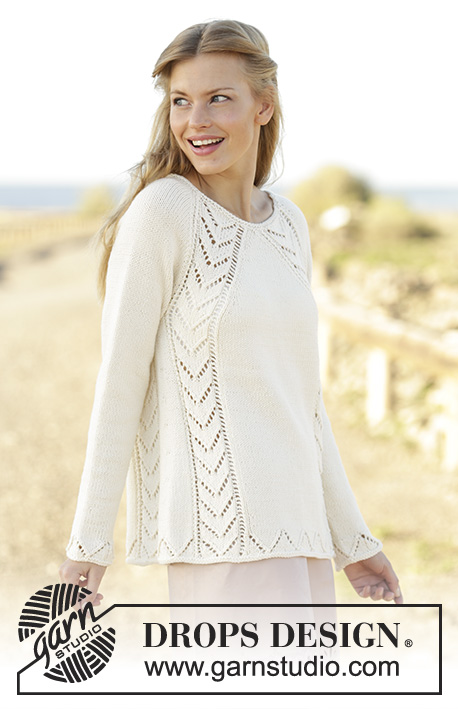
Knitted jumper with lace pattern and raglan, worked top down in DROPS Cotton Merino. Size: S - XXXL
DROPS 176-27 |
|||||||||||||||||||
|
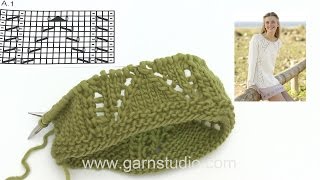
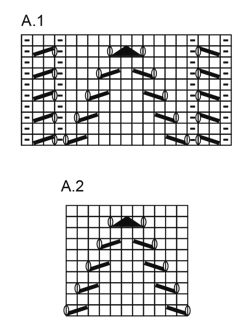
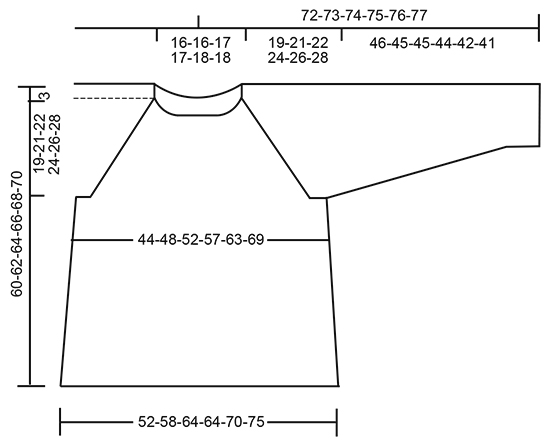
GARTER STITCH (worked in the round): 1 ridge = 2 rounds. Knit 1 round and purl 1 round. GARTER STITCH (back and forth): 1 ridge = knit 2 rows. PATTERN: See diagrams A.1 and A.2. Diagrams show all rows in pattern seen from the right side. RAGLAN: Increase for raglan on each side of A.1 + 1 stitch in stocking stitch in each side (on each side of 21 stitches). Increase 1 stitch by making 1 yarn over, on next round work yarn over twisted to avoid holes. Work the increased stitches in stocking stitch. NOTE: Increase differently on body and sleeves as explained in pattern. DECREASE TIP: Decrease mid under sleeve as follows: Begin 3 stitches before marker thread and knit 2 together, knit 1 (= stitch with marker thread), slip 1 stitch knitwise, knit 1, pass slipped stitch over stitch worked (= 2 stitches decreased). INCREASE TIP (applies to increase in the sides of body): Begin 1 stitch before stitch with marker thread, 1 yarn over, knit 3 (marker thread is in the middle stitch), 1 yarn over (= 2 stitches increased). On next round knit yarn over twisted to avoid holes. ---------------------------------------------------------- JUMPER: Worked in the round on circular needle from top down. YOKE: Cast on 102-102-102-102-106-106 stitches on circular needle size 4 mm with Cotton Merino. Work 2 ridges in GARTER STITCH - see explanation above. Knit 1 round while increasing 14 stitches evenly in all sizes = 116-116-116-116-120-120 stitches. REMEMBER THE KNITTING TENSION Work next round as follows: 1 yarn over, 15 stitches in stocking stitch, 1 yarn over (= sleeve), 1 stitch in stocking stitch, A.1 (= 19 stitches), 1 stitch in stocking stitch, 1 yarn over, 1-1-1-1-3-3 stitches in stocking stitch, 1 yarn over, 1 stitch in stocking stitch, A.1, 1 stitch in stocking stitch (= front piece), 1 yarn over, 15 stitches in stocking stitch, 1 yarn over (= sleeve), 1 stitch in stocking stitch, A.1, 1 stitch in stocking stitch, 1 yarn over, 1-1-1-1-3-3 stitches in stocking stitch, 1 yarn over, 1 stitch in stocking stitch, A.1, 1 stitch in stocking stitch (= back piece). First increase for RAGLAN is now done. Continue upwards with this division with pattern and stocking stitch. Increase for raglan as explained above. NOTE: Increase differently on yoke and sleeves as follows: FRONT AND BACK PIECE: Increase 4 stitches every round 0-0-0-5-10-16 times in total, then every other round 18-22-30-30-30-30 times in total and finally every 4th round 4-4-0-0-0-0 times in total. SLEEVES: Increase 4 stitches every round 0-0-2-1-0-0 times in total, then every other round 20-24-29-32-35-35 in total and finally every 4th round 3-3-0-0-0-2 times in total. After all increases are done there are 296-328-360-388-420-452 stitches on round. Piece measures approx. 22-24-25-27-29-31 cm from shoulder (19-21-22-24-26-28 cm from cast-on edge). Now work as follows: Cast on 7 new stitch on needle (insert 1 marker thread in the middle stitch), slip the first 61-69-77-81-85-89 stitches on a stitch holder (= sleeve), work pattern and in stocking stitch as before over the next 87-95-103-113-125-137 stitches (= front piece), slip the next 61-69-77-81-85-89 stitches on a stitch holder, cast on 7 new stitches under sleeve, (insert 1 marker thread in the middle stitch), work pattern and in stocking stitch as before over the remaining 87-95-103-113-125-137 stitches (= back piece). NOW MEASURE THE PIECE FROM HERE. BODY: = 188-204-220-240-264-288 stitches. Continue with A.1 and in stocking stitch as before. When piece measures 3 cm, increase 1 stitch on each side of both marker threads - READ INCREASE TIP (= 4 stitches increased), work the increased stitches in stocking stitch. Increase every 4 cm 7 times in total = 216-232-248-268-292-316 stitches. Continue stocking stitch and A.1 until piece measures 34-34-35-35-35-35 cm, adjust so that next round worked is last round in A.1. Work last round in A.1, AT THE SAME TIME adjust number of stitches between A.1 and A.1 in the middle of front piece and in the middle of back piece to 47-59-71-71-83-95 stitches (= 220-240-264-264-288-312 stitches in total). Then work as follows - from beginning of round: A.2 (= 11 stitches), purl 1, A.2, A.1 as before, *A.2, purl 1 *, work from *-* 3-4-5-5-6-7 times in total, A.2, A.1 as before, A.2, purl 1, A.2, A.1 as before, *A.2, purl 1 *, work from *-* 3-4-5-5-6-7 times in total, A.2, A.1 as before. Work A.1/A.2 1 time vertically, then work 1 ridge before casting off. SLEEVE: Slip stitches from sleeve back on a short circular needle/double pointed needles size 4 mm, pick up 1 stitch in each of the 7 stitches cast on under sleeve = 68-76-84-88-92-96 stitches. Insert 1 marker thread in the middle stitch under sleeve – NOW MEASURE PIECE FROM HERE. Work in stocking stitch in the round on circular needle/double pointed needles. When piece measures 3 cm, decrease 1 stitch on each side of marker threads - READ DECREASE TIP. Repeat decrease every 3-2-2-1½-1½-1½ cm 13-16-19-20-21-22 times in total. After all decreases are done, 42-44-46-48-50-52 stitches remain on round. When sleeve measures 42-41-41-40-38-37 cm, adjust number of stitches to 48 in all sizes. Then work as follows: * A.2, purl 1 *, work from *-* 4 times in total. When A.1 has been worked 1 time vertically, work 1 ridge and then cast off. Sleeve measures approx. 46-45-45-44-42-41 cm in total. Work the other sleeve the same way. |
|||||||||||||||||||
Diagram explanations |
|||||||||||||||||||
|
|||||||||||||||||||
 |
|||||||||||||||||||
 |
|||||||||||||||||||
Have you finished this pattern?Tag your pictures with #dropspattern #marensweater or submit them to the #dropsfan gallery. Do you need help with this pattern?You'll find 29 tutorial videos, a Comments/Questions area and more by visiting the pattern on garnstudio.com. © 1982-2026 DROPS Design A/S. We reserve all rights. This document, including all its sub-sections, has copyrights. Read more about what you can do with our patterns at the bottom of each pattern on our site. |
|||||||||||||||||||


With over 40 years in knitting and crochet design, DROPS Design offers one of the most extensive collections of free patterns on the internet - translated to 17 languages. As of today we count 324 catalogues and 12245 patterns translated into English (UK/cm). 12245
We work hard to bring you the best knitting and crochet have to offer, inspiration and advice as well as great quality yarns at incredible prices! Would you like to use our patterns for other than personal use? You can read what you are allowed to do in the Copyright text at the bottom of all our patterns. Happy crafting!
Post a comment to pattern DROPS 176-27
We would love to hear what you have to say about this pattern!
If you want to leave a question, please make sure you select the correct category in the form below, to speed up the answering process. Required fields are marked *.