
Popular categories
Looking for a yarn?


Comments / Questions (120)
![]() Sylvie wrote:
Sylvie wrote:
Bonsoir, Lorsque le travail en rond est terminé pour faire le devant gauche doit-on travailler en rangs raccourcis ou bien cela n'est pas nécessaire? Merci de votre réponse
28.09.2017 - 00:59DROPS Design answered:
Bonjour Sylvie, quand on tricote le devant gauche on doit effectivement tricoter des rangs raccourcis: on laisse 2 m à la fin de chaque rang de chaque côté sans les tricoter jusqu'à ce qu'il reste 47-75-49 m sur l'aiguille. Bon tricot!
28.09.2017 - 10:25
![]() Benedetta wrote:
Benedetta wrote:
Scusate,mi sono spiegata male.ho finito il lavoro e devo attaccare le maniche ma non riesco a capire quale è la parte superiore e la parte inferiore del cardigan.Spero di essere stata un po più chiara! Grazie mille
21.09.2017 - 16:12DROPS Design answered:
Buongiorno Benedetta. Se ha seguito lo stesso ordine delle istruzioni, la parte del davanti che ha lavorato per prima dovrebbe essere il davanti sinistro. Potrebbe anche aiutarla confrontare il dietro con la fotografia per la corretta posizione del motivo. Inoltre la parte più lunga, dagli scalfi al bordo, è la parte inferiore. Buon lavoro!
21.09.2017 - 16:23
![]() Benedetta wrote:
Benedetta wrote:
Buonasera,volevo sapere se la cucitura che si forma deve poi andare verso il collo o verso il basso? Grazie
20.09.2017 - 23:05DROPS Design answered:
Buongiorno Benedetta. Molto probabilmente non ci è chiara la domanda. Riesce, per cortesia, a chiarirci a quale cucitura fa riferimento? Grazie. Buon lavoro!
21.09.2017 - 14:40
![]() Iris wrote:
Iris wrote:
Hallo! Das war mal eine richtige Herausforderung. Ich hab sie geschafft und die Jacke sieht schon ohne Ärmel klasse aus. Ich hab BabyMerino verwendet. In der gleichen Nadelstärke war das kein Problem.
09.09.2017 - 18:01
![]() Benedetta wrote:
Benedetta wrote:
Buonasera,non riesco a capire come "riprendere le maglie tra le 2 e 2maglie che sono state messe sul fermamaglie a ogni lato ". Esiste in video? Grazie mille per il Vs aiuto
04.09.2017 - 22:55DROPS Design answered:
Buongiorno Benedetta. Le maglie sono state trasferite sul ferma maglie due per volta. Quando lavora le maglie dal ferma maglie, prima di ognuno di questi gruppi di 2 maglie, riprende il filo tra le maglie del giro precedente e lo mette ritorto sul ferro destro. Buon lavoro!
05.09.2017 - 08:34
![]() Benedetta wrote:
Benedetta wrote:
Buonasera,sono sul davanti del lavoro e ad ogni fine ferro ho lasciato 2 m in sospeso.Vorrei chiedervi se è giusto che ad un certo punto viene eliminata prima una foglia ed in seguito anche l'altra. Grazie anche x le vostre risposte precedenti!
29.08.2017 - 22:40DROPS Design answered:
Buonasera Benedetta. Sì, le foglie si eliminano per via della riduzione del numero delle maglie. Buon lavoro!
29.08.2017 - 23:40
![]() Benedetta wrote:
Benedetta wrote:
Buonasera, non capisco il grafico A2 .ad esempio se io lavoro il giro 2 (rov del lavoro) la m centrale devo lavorarla a diritto ma sul diritto del lavoro risulterà a rovescio.Spero mi possiate aiutare! Grazie
28.08.2017 - 21:41DROPS Design answered:
Buonasera Benedetta. I diagrammi mostrano il motivo sul diritto del lavoro. Quando lavora il diagramma A.2 la maglia centrale sui ferri pari viene lavorata a rovescio. Quindi risulta una maglia rasata. Buon lavoro!
28.08.2017 - 21:59
![]() Benedetta wrote:
Benedetta wrote:
Buonasera,sono al davanti sinistro e non capisco se devo trasferire le ultime 2 m sia sul diritto che sul rovescio del lavoro. Grazie mille!
25.08.2017 - 21:40DROPS Design answered:
Buonasera Benedetta, le ultime 2 maglie su ogni ferro vanno messe in sospeso, su un fermamaglie o su un filo di scarto. Buon lavoro!
25.08.2017 - 22:02
![]() Leonie wrote:
Leonie wrote:
Hallo, Dank der Kommentare habe ich verstanden, über welche maschen das rechte Vorderteil gestrickt werden soll. Das ist leider nicht schön formuliert. Des Weiteren frage ich mich, wie es danach weitergeht. Stricke ich tatsächlich in Reihen weiter? Müsste es nicht in Runden weiter gehen? Und falls nicht, wo startet die Reihe? Beim Rundenanfang? Vielen Dank im Voraus!
09.08.2017 - 22:11DROPS Design answered:
Liebe Leonie, wenn beiden Vorderteilen hin- und zurück gestrickt sind, dann wird es wieder in der Runde gestrickt: alle stillgelegten Maschen in einer Hin-Reihe (= von der Vorderseite) zurückstricken (und neue Maschen auffassen), dann 3 Krausrippen in der Runde stricken. Viel Spaß beim stricken!
10.08.2017 - 09:25
![]() Christiane wrote:
Christiane wrote:
Bekomme unschöne Rundenübergänge, geben diese sich nach dem ersten Waschen oder muss ich sie beim Stricken vermeiden?
07.08.2017 - 10:11DROPS Design answered:
Liebe Christiane, So wird es bei diesem Modell gestrickt, vielleicht hat Ihr DROPS Laden irgendein Tipp dafür, gerne können Sie ihnen fragen, auch per Mail or telefonish. Viel Spaß beim stricken!
07.08.2017 - 17:36
|
||||||||||||||||||||||
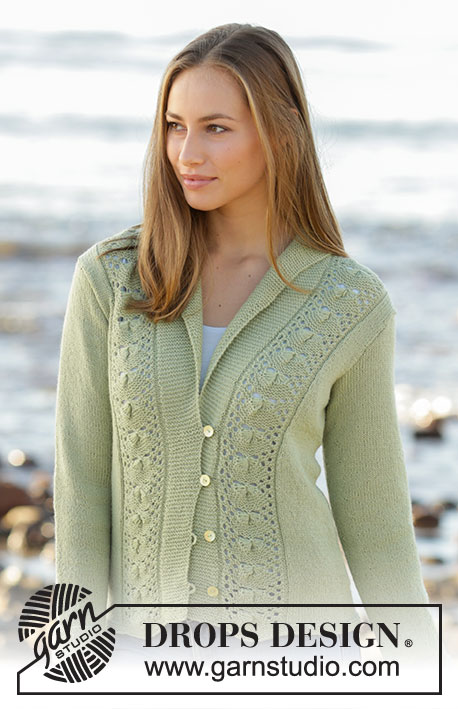
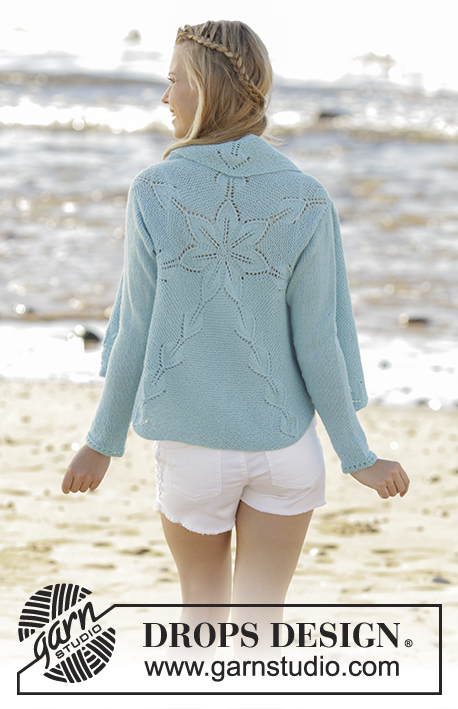
Andromeda#andromedacardigan |
||||||||||||||||||||||
 |
 |
|||||||||||||||||||||
Knitted jacket worked in a circle with leaf pattern in DROPS Alpaca. Size: S - XXXL
DROPS 175-14 |
||||||||||||||||||||||
|
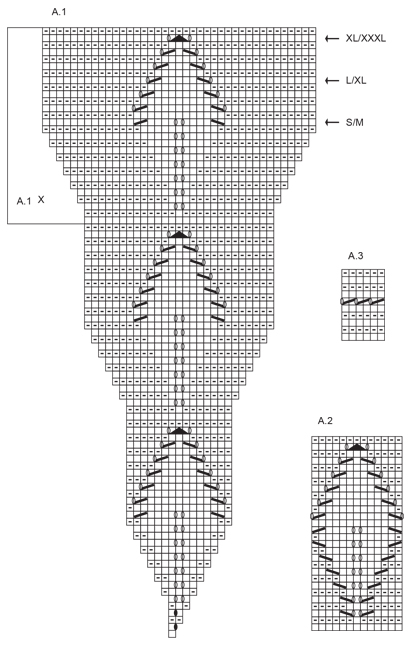
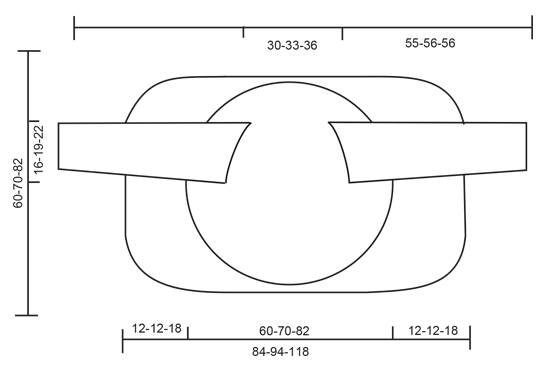
INCREASE TIP: Work until 1 stitch remains before marker thread. Make 1 yarn over, knit 2 (marker is between these 2 stitches) and make 1 yarn over. On next round work yarn overs twisted to avoid holes - work increased stitches in stocking stitch. GARTER STITCH (worked in the round): 1 ridge = 2 rounds. Knit 1 round and purl 1 round. GARTER STITCH (back and forth): 1 ridge = knit 2 rows. ---------------------------------------------------------- JACKET WORKED IN A CIRCLE: Work jacket in the round from centre of motif (back), then back and forth in each side. Work sleeves separately and sew them in when finished. Cast on 7 stitches with Alpaca and divide them on 4 double pointed needles size 3 mm. Work according to A.1 (= 7 repetitions of A.1 on round). Insert a marker thread at beginning of round. Work until round marked with arrow for desired size. There are now 273 stitches on needle. Make armholes as follows: Work the first 58 stitches on needle (= 1½ repetition), cast off the next 39-46-53 stitches, work the next 117-103-89 stitches, cast off the next 39-46-53 stitches, work the last 20 stitches. On next round cast on 39-46-53 new stitches over the cast off stitches = 273 stitches in all sizes. Finish A.1. When A.1 has been worked 1 time vertically, repeat A.1X above A.1. Every time A.1X is worked vertically, 6 stitches have been increased on each side of A.1X, work the new stitches as the outermost stitches in A.1X. Work A.1X 2-3-4 times in total vertically (84 stitches increase every time A.1X is worked) = 441-525-609 stitches. LEFT FRONT PIECE: Then work as follows: Slip the first 63-75-87 stitches on a stitch holder (= 1 repetition), keep the next 153-187-217 stitches on needle, slip the rest of stitches on a stitch holder. Now work back and forth over all stitches on needle. Work A.2 directly over leaves in A.1X and GARTER STITCH between leaves as before - see explanation above. At the end of every row slip the last 2 stitch on to stitch holder (do not work them, turn). Continue until 41-75-49 stitches remain on the needle (A.2 has now been worked 2-2-3 times vertically). Slip the last 41-75-49 stitches on stitch holder. RIGHT FRONT PIECE: Slip the last 153-187-217 stitches on round back on needle, and work as left front piece over these stitches. Then knit all stitches from stitch holders from right side back onto circular needle size 3 mm, pick up stitches between the 2 and 2 stitches that were put on holders in each side as follows: Pick up the strand between 2 stitches, twist the strand and place in on the right hand needle (i.e. between 2 and 2 stitches 1 stitch is increased and holes in transitions are avoided) = 553-637-777 stitches. Work 3 ridges over all stitches and loosely cast off. SLEEVES: Work sleeves in the round on double pointed needles bottom up, switch to short circular needle when needed. Cast on 46-50-56 stitches on double pointed needles size 3 mm with Alpaca. Work A.3 over all stitches. When A.3 has been worked 1 time vertically, continue in stocking stitch. Insert 1 marker thread at beginning of round = mid under sleeve. When piece measures 6-10-4 cm, increase 1 stitch on each side of marker thread mid under sleeve - READ INCREASE TIP. Increase every 3-2-2 cm 15-21-25 times in total = 76-92-106 stitches. When sleeve measures approx. 55-56-56 cm, loosely cast off. Knit another sleeve the same way. ASSEMBLY: Sew in sleeves. |
||||||||||||||||||||||
Diagram explanations |
||||||||||||||||||||||
|
||||||||||||||||||||||
 |
||||||||||||||||||||||
 |
||||||||||||||||||||||
Have you finished this pattern?Tag your pictures with #dropspattern #andromedacardigan or submit them to the #dropsfan gallery. Do you need help with this pattern?You'll find 27 tutorial videos, a Comments/Questions area and more by visiting the pattern on garnstudio.com. © 1982-2026 DROPS Design A/S. We reserve all rights. This document, including all its sub-sections, has copyrights. Read more about what you can do with our patterns at the bottom of each pattern on our site. |
||||||||||||||||||||||


With over 40 years in knitting and crochet design, DROPS Design offers one of the most extensive collections of free patterns on the internet - translated to 17 languages. As of today we count 324 catalogues and 12245 patterns translated into English (UK/cm). 12245
We work hard to bring you the best knitting and crochet have to offer, inspiration and advice as well as great quality yarns at incredible prices! Would you like to use our patterns for other than personal use? You can read what you are allowed to do in the Copyright text at the bottom of all our patterns. Happy crafting!
Post a comment to pattern DROPS 175-14
We would love to hear what you have to say about this pattern!
If you want to leave a question, please make sure you select the correct category in the form below, to speed up the answering process. Required fields are marked *.