
Popular categories
Looking for a yarn?


Comments / Questions (120)
![]() Michaela wrote:
Michaela wrote:
Hallo, ich bin etwas verwirrt, wie ich nach den A.2 weiterarbeite. Stricke ich die Kraus Rechts über alle Maschen oder nur über die Maschen des Ausschnittes? Gibt es für die Jacke einen Verschluss? Liebe Grüße Michaela
26.01.2026 - 20:39DROPS Design answered:
Liebe Michaela, wenn Sie A.2 in der Höhe zu Ende gestrickt haben (= 2-2-3x), stricken Sie 3 Krausrippen über alle Maschen und ketten dann ab. Die Jacke hat keinen Verschluss. Viel Spaß beim Stricken!
26.01.2026 - 21:47
![]() Olga wrote:
Olga wrote:
Hallo, beim linken Vorderteil wie genau lege ich die 2M pro Reihe still? In jeder Reihe, dass heißt in der Hinreihe die letzten und dann ebenfalls die letzten in der Rückreihe, oder nur auf einer Seite. Leider konnte mit KI nicht gross weiter helfen und. Ich muss dir Jacke neu starten. Es wäre hilfreich, wenn es deutlich beschrieben wäre und auch wie man die Maschine im A2 in Hin- und Rückreihen stricken sollte , sodass die Blumen gleich erscheinen und nicht erst in den Kommentaren lesen.
03.01.2026 - 22:58
![]() Anni wrote:
Anni wrote:
525-75-187-187=84. Mitä tehdään 84 silmukalle? Onko ne keskellä alhaalla? Jos jokaisen neulotun rivin lopussa jätetään 2s apulangalle, tällä neuvotulla silmukkajaolla lehtikuviot jäävät 2s alle ennenkuin ehtii tehdä ohjeen mukaiset kaksi mallikertaa piirrosta a2. Molemmissa 187 silmukan jaossa on 37s lehtikuvion kärkeen alussa ja vähenee liian nopeasti jos pitää ottaa 2 silmukkaa apulangalle joka kierroksen lopussa?
10.06.2025 - 20:18
![]() Andrea Sikora wrote:
Andrea Sikora wrote:
Hallo ich habe mich an diese schöne Jacke gewagt und alles hat bisher geklappt jetzt bin ich bei muster A2 und komme mit den hin und rück reihen nicht klar . Wenn ich die Rückseiten laut Diagramm stricke ist vorn ein anderes Bild
08.02.2025 - 06:13DROPS Design answered:
Liebe Frau Sikora, bei den Rückreihen stricken Sie die Maschen mit den "-" rechts = krausrechte Maschen und die leere Kästen stricken Sie links (Glattrechts), so wird sich das Blatt genauso wiezuvor bilden. Viel Spaß beim Stricken!
10.02.2025 - 09:20
![]() Nina Lapeyre wrote:
Nina Lapeyre wrote:
Quand on fait les emmanchure pourquoi il n'y a pas le meme nombre de mailles puis a la fin du pull si on augmente de 6 m de chaque coté aprés a.1x plus les augmentations des feuilles on a plus de m que prévue comment les répartir merci de votre réponse
03.11.2024 - 13:20DROPS Design answered:
Bonjour Mme Lapeyre, quand vous tricotez A.1X, vous continuez à tricoter comme avant la feuille et les mailles point mousse, mais avant et après chaque feuille, vous aurez 1 maille en plus que dans le diagramme, car le diagramme monte le premier motif de A.1x que l'on tricote, comme on augmente à chaque fois, la fois suivante que l'on tricote A.1x on a plus de mailles, mais on continue à augmenter comme avant et on continue la feuille comme avant. Bon tricot!
04.11.2024 - 09:20
![]() Elvira Gustke wrote:
Elvira Gustke wrote:
Ich habe eine Frage,muss der Ärmel 55 cm lang sein? Ich finde es viel zu lang für diese schöne Jacke. Mfg Fr.Gustke
21.10.2024 - 11:10DROPS Design answered:
Liebe Frau Gustke, also in S/M ist der Ärmel 55 cm lang, aber gerne können Sie die Länge je nach Wunsch anpassen, am besten ziehen Sie die Jacke sowie den Ärmel (vor abketten) an, und so könnnen Sie bis die gewünschte Länge stricken. Viel Spaß beim Stricken!
21.10.2024 - 15:36
![]() Catherine wrote:
Catherine wrote:
Catherine, je vous remercie pour cette réponse et vous souhaite une bonne soirée
20.09.2024 - 17:14
![]() Catherine wrote:
Catherine wrote:
Pourquoi doit on rabattre les 39 mailles si au tour suivant nous devons monter 39 mailles?
20.09.2024 - 13:25DROPS Design answered:
Bonjour Catherine, on va former les emmanchures ainsi: on rabat les mailles de l'emmanchure, on continue le tour comme avant, on rabat les mailles de la 2ème emmanchure et on termine tour. Au tour suivant, on monte autant de mailles que l'on a rabattu au tour précédent pour former ainsi un trou autour duquel on va ensuite coudre les manches. Bon tricot!
20.09.2024 - 16:39
![]() Astrid wrote:
Astrid wrote:
Hallo, könnte die grafische Darstellung der Muster A1 - A3 größer dargestellt werden. Wenn die Seite 4 ausgedruckt wird ist diese Vorlage so klein, dass die Musterübersicht nicht verwendbar ist. Ich bin nicht der Typ der ständig mit elektronischen Medien strickt. Vielen Dank
15.09.2024 - 12:19
![]() Astrid wrote:
Astrid wrote:
Hallo, könnte die grafische Darstellung der Muster A1 - A3 größer dargestellt werden. Wenn die Seite 4 ausgedruckt wird ist diese Vorlage so klein, dass die Musterübersicht nicht verwendbar ist. Ich bin nicht der Typ der ständig mit elektronischen Medien strickt. Vielen Dank
15.09.2024 - 12:19DROPS Design answered:
Liebe Astrid, leider können wir die Diagramme wegen technischen Gründen nicht vergrössern, das können Sie aber sicher durch den Drucker. Viel Spaß beim Stricken!
16.09.2024 - 08:44
|
||||||||||||||||||||||
Andromeda#andromedacardigan |
||||||||||||||||||||||
 |
 |
|||||||||||||||||||||
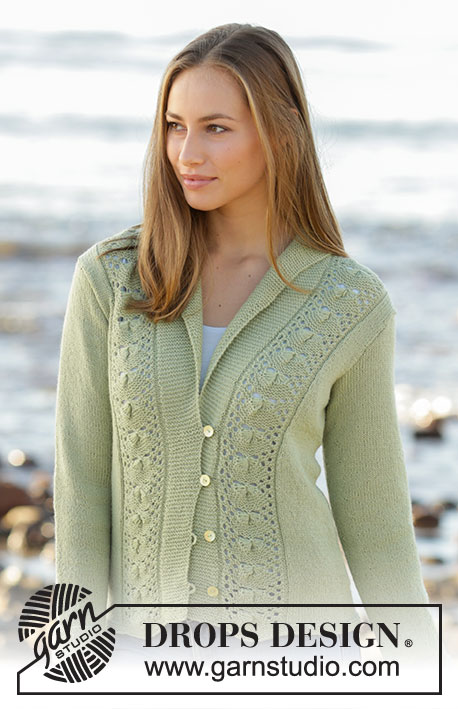
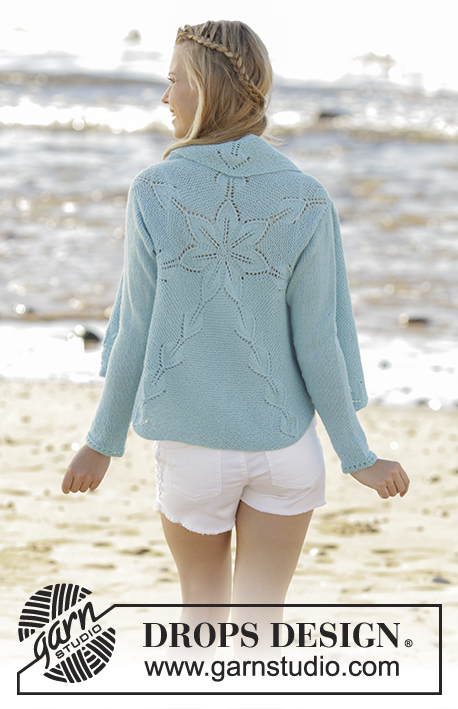
Knitted jacket worked in a circle with leaf pattern in DROPS Alpaca. Size: S - XXXL
DROPS 175-14 |
||||||||||||||||||||||
|
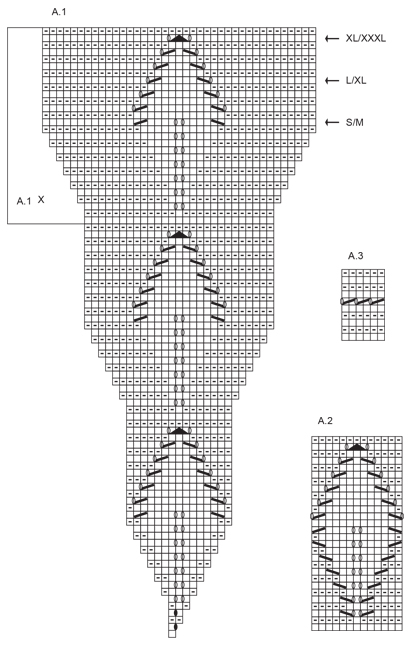
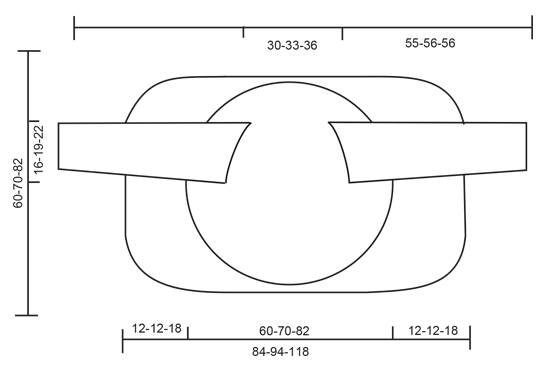
INCREASE TIP: Work until 1 stitch remains before marker thread. Make 1 yarn over, knit 2 (marker is between these 2 stitches) and make 1 yarn over. On next round work yarn overs twisted to avoid holes - work increased stitches in stocking stitch. GARTER STITCH (worked in the round): 1 ridge = 2 rounds. Knit 1 round and purl 1 round. GARTER STITCH (back and forth): 1 ridge = knit 2 rows. ---------------------------------------------------------- JACKET WORKED IN A CIRCLE: Work jacket in the round from centre of motif (back), then back and forth in each side. Work sleeves separately and sew them in when finished. Cast on 7 stitches with Alpaca and divide them on 4 double pointed needles size 3 mm. Work according to A.1 (= 7 repetitions of A.1 on round). Insert a marker thread at beginning of round. Work until round marked with arrow for desired size. There are now 273 stitches on needle. Make armholes as follows: Work the first 58 stitches on needle (= 1½ repetition), cast off the next 39-46-53 stitches, work the next 117-103-89 stitches, cast off the next 39-46-53 stitches, work the last 20 stitches. On next round cast on 39-46-53 new stitches over the cast off stitches = 273 stitches in all sizes. Finish A.1. When A.1 has been worked 1 time vertically, repeat A.1X above A.1. Every time A.1X is worked vertically, 6 stitches have been increased on each side of A.1X, work the new stitches as the outermost stitches in A.1X. Work A.1X 2-3-4 times in total vertically (84 stitches increase every time A.1X is worked) = 441-525-609 stitches. LEFT FRONT PIECE: Then work as follows: Slip the first 63-75-87 stitches on a stitch holder (= 1 repetition), keep the next 153-187-217 stitches on needle, slip the rest of stitches on a stitch holder. Now work back and forth over all stitches on needle. Work A.2 directly over leaves in A.1X and GARTER STITCH between leaves as before - see explanation above. At the end of every row slip the last 2 stitch on to stitch holder (do not work them, turn). Continue until 41-75-49 stitches remain on the needle (A.2 has now been worked 2-2-3 times vertically). Slip the last 41-75-49 stitches on stitch holder. RIGHT FRONT PIECE: Slip the last 153-187-217 stitches on round back on needle, and work as left front piece over these stitches. Then knit all stitches from stitch holders from right side back onto circular needle size 3 mm, pick up stitches between the 2 and 2 stitches that were put on holders in each side as follows: Pick up the strand between 2 stitches, twist the strand and place in on the right hand needle (i.e. between 2 and 2 stitches 1 stitch is increased and holes in transitions are avoided) = 553-637-777 stitches. Work 3 ridges over all stitches and loosely cast off. SLEEVES: Work sleeves in the round on double pointed needles bottom up, switch to short circular needle when needed. Cast on 46-50-56 stitches on double pointed needles size 3 mm with Alpaca. Work A.3 over all stitches. When A.3 has been worked 1 time vertically, continue in stocking stitch. Insert 1 marker thread at beginning of round = mid under sleeve. When piece measures 6-10-4 cm, increase 1 stitch on each side of marker thread mid under sleeve - READ INCREASE TIP. Increase every 3-2-2 cm 15-21-25 times in total = 76-92-106 stitches. When sleeve measures approx. 55-56-56 cm, loosely cast off. Knit another sleeve the same way. ASSEMBLY: Sew in sleeves. |
||||||||||||||||||||||
Diagram explanations |
||||||||||||||||||||||
|
||||||||||||||||||||||
 |
||||||||||||||||||||||
 |
||||||||||||||||||||||
Have you finished this pattern?Tag your pictures with #dropspattern #andromedacardigan or submit them to the #dropsfan gallery. Do you need help with this pattern?You'll find 27 tutorial videos, a Comments/Questions area and more by visiting the pattern on garnstudio.com. © 1982-2026 DROPS Design A/S. We reserve all rights. This document, including all its sub-sections, has copyrights. Read more about what you can do with our patterns at the bottom of each pattern on our site. |
||||||||||||||||||||||


With over 40 years in knitting and crochet design, DROPS Design offers one of the most extensive collections of free patterns on the internet - translated to 17 languages. As of today we count 324 catalogues and 12245 patterns translated into English (UK/cm). 12245
We work hard to bring you the best knitting and crochet have to offer, inspiration and advice as well as great quality yarns at incredible prices! Would you like to use our patterns for other than personal use? You can read what you are allowed to do in the Copyright text at the bottom of all our patterns. Happy crafting!
Post a comment to pattern DROPS 175-14
We would love to hear what you have to say about this pattern!
If you want to leave a question, please make sure you select the correct category in the form below, to speed up the answering process. Required fields are marked *.