
Popular categories
Looking for a yarn?


Comments / Questions (268)
![]() Grenier wrote:
Grenier wrote:
Merci Je vais essayer de comprendre !
11.02.2026 - 16:32
![]() Grenier wrote:
Grenier wrote:
Bonsoir Je ne comprends pas la différence entre A1 et A2 Je suis arrivée au moment où l’on rassemble les manches au corps Merci de votre réponse Grenier Roselyne
10.02.2026 - 17:36DROPS Design answered:
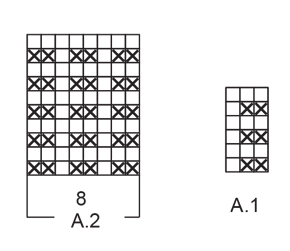
Bonjour Roselyne, A.2 correspond aux mailles des raglans = les 4 dernières mailles du dos/de chaque manche/ du devant + les 4 premières mailles de la manche/du devant/du dos. Ces 8 mailles doivent toujours être tricotées ainsi, comme dans A.2, en diminuant pour le raglan, vous allez diminuer le nombre de mailes de A.1 tricoté entre ces A.2, veillez juste bien à ajuster A.1 pour que les côtes continuent en hauteur sans les "briser". Bon tricot!
10.02.2026 - 18:18
![]() Bertorello wrote:
Bertorello wrote:
Bonjour, Pour les manches j' ai pris le modèle avec 48m et pour le corps j' ai pris le modèle xL. Je lui ai essayé le pull tout va bien . Après toutes les diminutions il me reste 102m c est a dire : 42m pour le dos et devant 9m pour chaque manche. 1) je dois partir à 4 mailles deA2 après la manche droite et tricote 84 m , j arrive juste au 4m avant deA2 de la manche . Est ce que c'est ça? Pouvez me détailler le reste . Merci
10.02.2026 - 13:27DROPS Design answered:
Bonjour Mme Bertorello, lorsque vous avez tricoté le dernier tour de diminutions, tricotez encore 84 mailles (sans diminuer), placez un marqueur, vous devez être à la transition entre A.2 et la manche droite. Vous tricotez maintenant les rangs raccourcis en diminuant comme indiqué sous DIMINUTIONS RAGLAN (RÉ-HAUSSE). Bon tricot!
10.02.2026 - 17:58
![]() Bertorello wrote:
Bertorello wrote:
Bonjour, Merci pour la réponse. Une fois toutes les dimensions faites , j ai 102m. . Je dois tricoter 84m mettre le marqueur avant les 4 m fantaisie A2 de la manche droite . Ensuite je ne comprends pas ce que je dois faire après les 84m. SVP de l aide je lis et relis , mais je ne comprends pas.merci de me détailler ce que je dois faire après les 84m.
09.02.2026 - 20:49DROPS Design answered:
Bonjour Mme Bertorello, les rangs raccourcis vont commencer ici, à partir du marqueur que vous avez mis après les 84 premières mailles du tour. Vous tricotez maintenant 61 m (en diminuant comme indiqué pour les diminutions du raglan), tournez tricotez 51 m, tournez tricotez 49 m (en diminuant pour le raglan), tournez et tricotez 39 m. En ajoutant les mailles non tricotées, il doit vous rester 86 m. (soit 102 mailles - 2 x 8 mailles diminuées = 86 m au total). Bon tricot!
10.02.2026 - 17:40
![]() Bertorello wrote:
Bertorello wrote:
Bonsoir Je suis au niveau du raglan pour les manches . Entre les 2 marqueurs il me reste 8m et je dois en diminuer encore 2m. Comment faut il faire ? Car je me trouve dans le point fantaisie A2 . ( Les 4 m avant et après le marqueur) . Merci
08.02.2026 - 23:30DROPS Design answered:
Bonjour Mme Bertorello, le raglan des manches se tricote de la même façon que celui du dos/du devant (que l'on fait en même temps, mais à un rythme différent, vous allez ainsi simplement diminuer le nombre de mailles de A.1 après A.2 (début manches, dos, devant) et avant A.2 (fin manches, dos, devant). Veillez juste à bien tricoter les mailles restantes de A.1 comme avant pour ne pas "briser" les côtes. Bon tricot!
09.02.2026 - 09:12
![]() Bertorello wrote:
Bertorello wrote:
Merci pour l explication. Pour le raglan , je suis aux diminutions. A 4 mailles du marqueur donc la 5eme m je la glisse et je tricote la suivante à l endroit puisque ma diminution se trouve sur l endroit et je passe la m glissée par dessus la m tricoté, je me retrouve avec sur l aiguille après les 4 m du marqueur 1m endroit ( diminution) 1 m envers et 1 m endroit . Est ce normal, je n ai plus le motif 1 m endroit 2m envers etc.... Merci
06.02.2026 - 17:13DROPS Design answered:
Bonjour Mme Bertorello, vous diminuez les mailles de A.1 (pas celles de A.2), donc au début du tour, vous tricotez 3 m ens torse à l'endroit, vous continuez A.1 comme avant jusqu'à ce qu'il reste 3 m avant le A.2 suivant et vous tricotez 3 m ens à l'end, puis A.2, vous continuez ainsi à chaque A.2/raglan. Les mailles de A.1 doivent continuer comme avant et pas suivre celles de A.2, autrement dit, pour le dos, le devant et les manches, vous devez toujours conserver les côtes comme dans A.1 (2 m point mousse, 1 m end), indépendamment des mailles de A.2 qui se tricoteront elle toujours pareil (et sans diminuer). Bon tricot!
06.02.2026 - 17:24
![]() Britta wrote:
Britta wrote:
Hallo liebes Drops Team In der Anleitung Rumpfteil wird beschrieben, wo ein Maschenmarkierer gesetzt wird . Dieser markiert die Seite. Es müssten aber 2 Markierer vorhanden sein für die späteren Zunahmen Rumpfteil. Oder ist der Rundenbeginn der erste Markierer? So hätte ich auf der einen Seite 79 Maschen und auf der anderen Seite 89 = 168 für Größe L. Ich hoffe Ihr könnt mir schnell helfen. Liebe Grüße Britta 🤗
06.02.2026 - 16:36DROPS Design answered:
Liebe Britta, Sie stricken ja das, was zwischen den Sternchen steht, also von *-*, noch 1 x, d.h. Sie bringen auch noch einen zweiten Markierer an, denn das Setzen des Markierers ist ja zwischen den Sternchen auch enthalten. Viel Spaß beim Stricken!
06.02.2026 - 22:32
![]() Bertorello wrote:
Bertorello wrote:
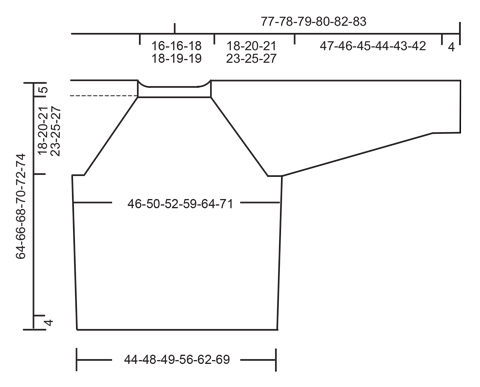
Bonjour, Je ne comprends pas. Sur l aiguille, j ai 1 marqueur les 48 mailles des manches marqueur , 90m dos Marqueur 48 m des manches marqueur 90 m du devant . Pour l empiècement, après mes 48m des manches , j' ai un marqueur . Je commence 4m après le marqueur côté dos je tricote en point fantaisie 1 mais quand faut il faire le point fantaisie A2. . Merci
04.02.2026 - 20:56DROPS Design answered:
Bonjour Mme Bertorello, (en S) commencez le tour 4 m après le début du dos, tricotez les 61 m suiv comme avant (A.1), tricotez les 8 m de A.2 (= 4 dernières m du dos+ 4 premières m de la manche), tricotez les 40 m suiv de la manche en A.1 comme avant, tricotez les 8 m de A.2 (= 4 dernières m de la manche + 4 premières m du devant),tricotez les 61 m suiv du devant comme avant en A.1, tricotez les 8 m de A.2 (= 4 dernières m du devant + 4 premières m de la manche), tricotez les 40 m suivantes de la manche en A.1 comme avant, et tricotez ensuite les 8 m de A.2 ( les 4 dernières m de la manche + les 4 premières m du dos)=61+8+40+8+61+8+40+8=234. Bon tricot!
06.02.2026 - 16:28
![]() Grenier wrote:
Grenier wrote:
C'est fomlzge que je ne puisse oas envoyer une photo qui serait plus explicite Quand j’enleve 5 mailles pis 10 mailles cela ne tombe pas au même niveau que les augmentations du dos et du devant il y a un décalage :quand on regarde verticalement l’ouvrage les mailles diminuées ne sont pas au même niveau que les mailles que l’on a augmenté precedemment
04.02.2026 - 09:37DROPS Design answered:
Bonjour Mme Grenier, vous en êtes à la séparation dos/devant? vous devez rabattre les 5 premières mailles du début du tour, tricoter ensuite jusqu'à ce qu'il reste 5 m avant le marqueur suivant, rabattez 10 mailles (=5 m de chaque côté du marqueur), tricotez jusqu'à ce qu'il reste 5 mailles et rabattez ces 5 dernières mailles = vous avez bien la symétrie parfaite car les augmentations ont été faites de chaque côté de chaque marqueur et vous avez rabattu 5 m de chaque côté de chaque marqueur. Bon tricot!
04.02.2026 - 17:42
![]() Bertorello wrote:
Bertorello wrote:
Bonjour, taille s lorsque toutes les mailles dos devant et manches sont sur les aiguilles. On doit faire A2 à chaque transition. Est ce que les 48 m des manches sont en point fantaisie A2 . Ou on prend juste. Les 4 premières et dernières des manches plus les 4 du dos ou du devant pour faire 8 m. On doit faire le raglan . Diminuer 24 fois tous les 2 tours le point fantaisie 2 va disparaitre. Merci pour votre reponse
04.02.2026 - 00:45DROPS Design answered:
Bonjour Mme Bertorello, A.2 se tricote sur les 4 dernières mailles + les 4 mailles suivantes à chaque transition (8 mailles, le marqueur est au milieu); vous commencez après A.2 = après les 4 premières mailles du dos; vous tricotez ensuite le point fantaisie des manches, du dos et du devant comme avant pour ne pas modifier le point principal, il va diminuer avant et après chaque A.2, c'est donc le point fantaisie A.11 qui doit disparaître, pas le A.2 qui n'est tricoté qu'aux raglans. Bon tricot!
04.02.2026 - 17:31
|
|||||||
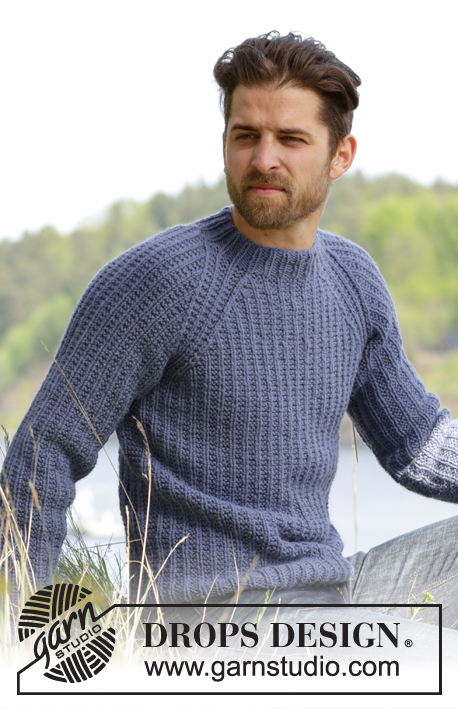
Twin River#twinriversweater |
|||||||
 |
 |
||||||
Knitted DROPS men’s jumper with textured pattern and raglan in Nepal. Size: S - XXXL.
DROPS 174-14 |
|||||||
|
PATTERN: See diagrams A.1 and A.2. RAGLAN: Dec as follows before A.2: Work until 2 sts remain before A.2, K the next 2 tog. Dec as follows after A.2: Slip 1 st as if to K, K 1, psso INCREASE TIP (BODY): Inc 4 sts on round as follows: Work until 1 st remains before marker in the side, 1 YO, work 2 sts in garter st, 1 YO (= 2 sts inc). Repeat inc in the other side of piece. On next round work YO twisted to avoid holes. Work the new sts in garter st. INCREASE TIP (SLEEVE): Inc as follows mid under sleeve: Work until 1 st remains before marker, 1 YO, work 2 sts in garter st, 1 YO. On next round work YO twisted to avoid holes. Work the inc sts gradually in the pattern. NOTE: Work sts on each side of marker in garter st. RAGLAN DEC (ELEVATION): All dec are done from RS! Dec as follows after A.2: K 3 twisted tog. Dec as follows before A.2: Work until 3 sts remain before A.2, K 3 tog. ---------------------------------------------------------- JUMPER: Worked in the round. BODY: Cast on 150-162-168-192-210-234 sts with Nepal on circular needle size 5 mm. * P 1, (K 1, P 2), repeat from (-) 23-25-26-30-33-37 more times, K 1, P 1, insert a marker here (= side) *, repeat from *-* 1 more time. NOTE: Move the markers upwards when working. Continue rib in the round like this until piece measures 4 cm. Now work pattern A.1 as follows: Work the last 2 sts in A.1, then repeat A.1 the entire round until 1 st remains on round, work the first st in A.1. REMEMBER THE KNITTING TENSION When piece measures 13-13-14-14-15-15 cm, inc 1 st on each side of each marker – see INCREASE TIP (BODY). Repeat inc when piece measures 27-28-29-29-30-30 cm = 158-170-176-200-218-242 sts. When piece measures 41-41-42-42-42-42 cm (adjust so that next round worked is 2nd round in A.1), cast off sts for armholes as follows: Cast off the first 5 sts on round, work the next 69-75-78-90-99-111 sts, cast off the next 10 sts for armhole, work the next 69-75-78-90-99-111 sts, cast off the remaining 5 sts. Cut the yarn. Put piece aside and knit the sleeves. SLEEVE: Work sleeves in the round on double pointed needles. Cast on 42-42-42-48-48-48 sts with Nepal on double pointed needles size 5 mm. Insert a marker at beg of round = mid under sleeve. Work rib as follows: P 1, K 1, * P 2, K 1 *, repeat from *-* until 1 st remains on round, P 1. Continue like this in the round until rib measures 4 cm. Now work pattern as follows: Work the last 2 sts in A.1, A.1 until 1 st remains on round, work the first st in A.1. When piece measures 9-8-7-6-10-9 cm, inc 1 st on each side of marker – see INCREASE TIP (SLEEVE). Inc like this approx. every 13th-9th-7th-7th-6th-5th round 8-11-14-14-14-17 times in total = 58-64-70-76-76-82 sts. When piece measures 51-50-49-48-47-46 cm - adjust so that next round worked is 2nd round in A.1, cast off the middle 10 sts under sleeve (= 5 sts on each side of marker) = 48-54-60-66-66-72 sts. Knit another sleeve the same way. YOKE: Slip sleeves on to same circular needle size 5 mm as body where armholes were cast off = 234-258-276-312-330-366 sts. This is done without working the sts. Insert a marker in every transition between sleeves and body = 4 markers. Beg round on back piece, 4 sts after marker between sleeve and back piece. Now continue pattern as before and work in addition A.2 (= 8 sts) in every transition between body and sleeves (markers are in the middle of A.2). On next round start dec for RAGLAN – see explanation above! NOTE: Dec differently on body and sleeves as follows: RAGLAN BODY: Dec every other round 21-24-24-24-26-26 times and then every round 0-0-0-6-7-13 times (= 21-24-24-30-33-39 times in total). RAGLAN SLEEVES: Dec every 4th round 6-6-4-3-5-5 times and then every other round 9-12-17-21-19-22 times (= 15-18-21-24-24-27 times in total). When all dec are done, 90-90-96-96-102-102 sts remain on round (= 144-168-180-216-228-264 sts in total dec). Now work pattern as before over the first 72-72-78-78-84-84 sts. Insert marker here (= between A.2 and right sleeve). Then work an elevation back and forth in neck in pattern as before AT THE SAME TIME dec for raglan on every row from RS over the sts worked – READ RAGLAN DEC (ELEVATION) as follows: NOTE: Tighten yarn at every turn to avoid holes. ROW 1 (= RS): Work 55-55-58-58-61-61 sts (including the 8 dec sts), ROW 2 (= WS): Turn and work 45-45-48-48-51-51 sts, ROW 3: Turn and work 43-43-46-46-49-49 sts (including the 8 dec sts), ROW 4: Turn and work 33-33-36-36-39-39 sts. There are now 74-74-80-80-86-86 sts on round. Turn and continue in the round with rib as follows: Work K over K and P over sts in garter st until rib measures 4 cm. Cast off sts with K over K and P over P. Jumper measures 64-66-68-70-72-74 cm from cast-on edge and up to shoulder. Fasten off. ASSEMBLY: Sew the openings under the sleeves. |
|||||||
Diagram explanations |
|||||||
|
|||||||
 |
|||||||
 |
|||||||
Have you finished this pattern?Tag your pictures with #dropspattern #twinriversweater or submit them to the #dropsfan gallery. Do you need help with this pattern?You'll find 26 tutorial videos, a Comments/Questions area and more by visiting the pattern on garnstudio.com. © 1982-2026 DROPS Design A/S. We reserve all rights. This document, including all its sub-sections, has copyrights. Read more about what you can do with our patterns at the bottom of each pattern on our site. |
|||||||


With over 40 years in knitting and crochet design, DROPS Design offers one of the most extensive collections of free patterns on the internet - translated to 17 languages. As of today we count 325 catalogues and 12291 patterns translated into English (UK/cm). 12291
We work hard to bring you the best knitting and crochet have to offer, inspiration and advice as well as great quality yarns at incredible prices! Would you like to use our patterns for other than personal use? You can read what you are allowed to do in the Copyright text at the bottom of all our patterns. Happy crafting!
Post a comment to pattern DROPS 174-14
We would love to hear what you have to say about this pattern!
If you want to leave a question, please make sure you select the correct category in the form below, to speed up the answering process. Required fields are marked *.