
Popular categories
Looking for a yarn?


Comments / Questions (268)
![]() Ariane Devacht wrote:
Ariane Devacht wrote:
Beste...ik wil heel graag dit model breien maar kan dat op 2 enkele breinaalden. ik kan niet rond breien kan ik dan dat patroon bestellen aub dank u ARIANE
14.11.2019 - 22:54
![]() Isabel wrote:
Isabel wrote:
Como se que talla debo tejer ?
11.11.2019 - 13:08
![]() Carin Ehrs wrote:
Carin Ehrs wrote:
Jag har nu gjort alla raglnminskningar (stickar storlek XL) och har 96 m på stickan. Varven har då börjat 4 maskor in från bakstycket mot höger ärm. Över vilka maskor ska jag sticka raglanminskning (förhöjning)? Dvs, vilka maskor räknas till "nacken"? Jag förstår inte varför jag bara ska sticka över 78 maskor när jag har 96 på stickan. Tacksam för all hjälp för nu har jag kört fast. Mvh/Carin
06.11.2019 - 12:51DROPS Design answered:
Hei Carin. Du strikker bare over bakstykket av genseren = forhøyningen. De 18 maskene du ikke strikker over er forstykket, som ikke trengs forhøyning. God Fornøyelse!
11.11.2019 - 10:38
![]() Anna wrote:
Anna wrote:
Vielen Dank für die tolle Anleitung. ich habe eine Maschenprobe gestrickt, welche (trocken) exakt gestimmt hat, nun kommt mir die Strickarbeit aber deutlich kleiner vor. Sind die cm-Angaben in der Skizze nach dem Spannen u. waschen? Ich komme unten nämlich nicht auf die 49cm (Größe L) und frage mich, ob ich doch eine dickere Nadelstärke nehmen muss... Für Tipps wäre ich Dankbar :)
21.10.2019 - 08:36DROPS Design answered:
Liebe Anna, Sie können Ihre Maschenprobe waschen und trocknen lassen, wenn Sie dann 10 x 10 cm haben, dann sollten die 168 Maschen ca 98 cm (= 49 cm in der Breite) messen. Viel Spaß beim stricken!
21.10.2019 - 11:51
![]() Vilma wrote:
Vilma wrote:
Hej! Kan ni förklara vad som menas med minskningarna för raglan? För ärmarna, ska man först minska ENDAST var 4e varv fyra gånger och sedan gå över till vartannat eller ska man minska var fjärde och samtidigt varannan (3 varv med minskningar över 4 varv?). Jag har gjort så men blir nu lite fundersam att minskningarna på ärmarna är klara 14 varv innan minskningarna för fram-och bakstycket... behöver jag repa upp hela raglan? :(
13.10.2019 - 21:31DROPS Design answered:
Hej Vilma, du börjar med att miska på ärmen på var 4:e varv 4 ggr, sedan minskar du på vartannat 17 ggr.Lycka till :)
14.10.2019 - 08:19
![]() Yvonne wrote:
Yvonne wrote:
Hej, undrar om garnet nr 6314 finns kvar som det står i mönstret? Kan inte hitta den jeansblåa färgen, det är väl den som visas på bilden?
26.09.2019 - 11:58DROPS Design answered:
Hej. Den färgen finns kvar, om du ser på färgkartan till Nepal och sorterar efter nummer så hittar du den lätt där (den ser dock lite mörkare ut på färgkartan). Mvh DROPS Design
01.10.2019 - 11:59
![]() Cakalo, Monika wrote:
Cakalo, Monika wrote:
Vielen Dank für die schnelle Antwort. Leider habe ich aber immer noch nicht verstanden wie ich von 72 M auf 55 M komme. Raglanabnahme normal durchführen bis 55 M übrig sind und dann die Raglanabnahme Erhöhung? Bei normaler Abnahme wären das 17 M, da ich aber per Runde nur 4 M abnehme komme ich nicht auf 55 M. Bitte um Unterstützung.
10.09.2019 - 13:28DROPS Design answered:
Liebe Frau Cakalo, zuerst stricken Sie die nächsten 72 M wie zuvor damit die 1. Reihe von der Erhöhung an der richtigen Stelle beginnt. Dann stricken Sie die 1. Reihe über die nächsten 55 M mit der Raglanabnahme (= es sind 47 M auf der Nadel), dann wenden Sie und stricken 45 Maschen, dann wenden Sie und stricken 43 m mit der Raglanabnahmen (= es sind 35 M auf der Nadel), usw. Viel Spaß beim stricken!
10.09.2019 - 14:40
![]() Rose wrote:
Rose wrote:
Bonjour, merci de votre réponse, mais elle ne me semble pas cohérente; en effet si j'augmente de 2 mailles avant le marqueur, je repars sur la deuxième maille de la grille A1 et non pas la première... Dites moi maille par maille ce que je dois faire et non pas le résultat que je devrais obtenir. Si je fais 1 jeté devant la dernière maille puis que je tricote 2 mailles puis 1 jeté, mon marqueur se trouve entre les 2 mailles tricotées...Cordialement.
10.09.2019 - 11:32DROPS Design answered:
Bonjour Rose, on n'augmente pas 2 mailles avant le marqueur mais 1 seule maille de chaque côté de chaque marqueur ; toutefois, les explications précédentes ne correspondent pas à la technique de ce modèle, c'est exact. Les marqueurs se trouvent entre 2 mailles point mousse (de chaque côté); on va augmenter avant et après ces 2 m point mousse = les augmentations vont se tricoter de sorte que le point fantaisie se suive sur le dos et sur le devant, mais elles ne tomberont pas juste sur les côtés, c'est exact. Tricotez les 2 m point mousse au niveau des marqueurs ainsi tout du long. Bon tricot!
10.09.2019 - 14:32
![]() Cakalo, Monika wrote:
Cakalo, Monika wrote:
Drops Modell 174-14. Leider bin ich nun in der Endphase mit dem Pullover und komme nicht klar. Letzter Absatz der Anleitung. Ich habe 72 M. .Gleichzeitig Raglanabnahmen (Erhöhung). Heißt dass ich führe die normale Raglanabnahme und die Abnahme Erhöhung weiter? Wie komme ich von 72 M auf 55 M? Wann beginnen die verkürzten Reihen und wann enden sie? Wo ist der Reihenanfang? Leider komme ich nicht weiter! Gibt es Video dazu?
09.09.2019 - 13:49DROPS Design answered:
Liebe Monika, Sie stricken die Raglanabnahme wie zuvor aber jetzt in Hin und Rückreihen für die Erhöhung. Sie stricken zuerst die ersten 72 M wie zuvor, setzen Sie 1 Markierung hier, und jetzt stricken Sie die 4 Reihen wie beschrieben, mit Raglanabnahmen wie zuvor bei den Hinreihen. Viel Spaß beim stricken!
09.09.2019 - 14:05
![]() Rose wrote:
Rose wrote:
Bonjour, je ne comprends pas pourquoi je ne retombe pas sur le rythme du point après les 4 premières augmentations du corps. Le point se travaille sur 3 mailles, pour moi il est évident que si on rajoute 4 mailles , on ne peut pas réaliser le point. Merci de me guider, je suis perdue!
08.09.2019 - 12:13DROPS Design answered:
Bonjour Rose, la 1ère m du tour est la 2ème m de A.1, on termine le tour par la 1ère m de A.1, on va ainsi augmenter 2 m entre la m end de la fin du tour et la m point mousse du début du tour, on aura donc, à partir de la fin du tour: 1 m end (dernière m du tour), 2 m point mousse (= 2 augmentations), marqueur côté, 1 m end, 1 m point mousse (= 2 augmentations), 1 m point mousse, 1 m end (= début de A.1 au début du tour) - ce sera la même chose pour l'autre côté. Bon tricot!
09.09.2019 - 09:10
|
|||||||
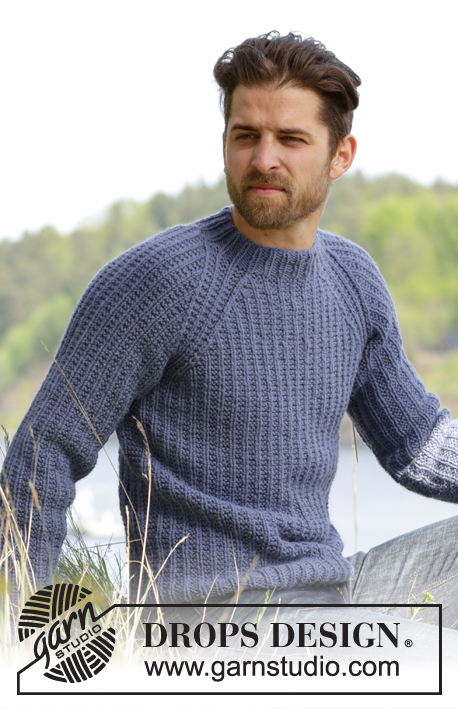
Twin River#twinriversweater |
|||||||
 |
 |
||||||
Knitted DROPS men’s jumper with textured pattern and raglan in Nepal. Size: S - XXXL.
DROPS 174-14 |
|||||||
|
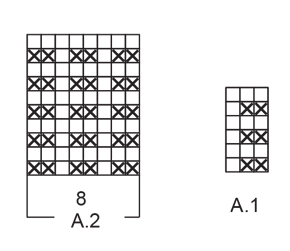
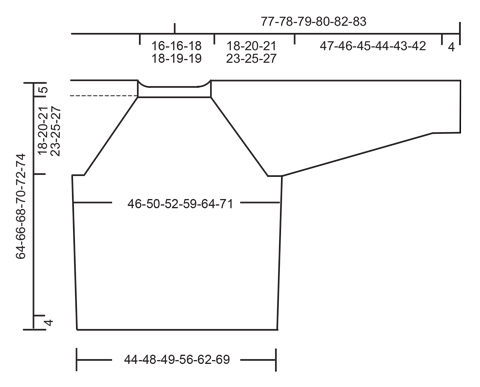
PATTERN: See diagrams A.1 and A.2. RAGLAN: Dec as follows before A.2: Work until 2 sts remain before A.2, K the next 2 tog. Dec as follows after A.2: Slip 1 st as if to K, K 1, psso INCREASE TIP (BODY): Inc 4 sts on round as follows: Work until 1 st remains before marker in the side, 1 YO, work 2 sts in garter st, 1 YO (= 2 sts inc). Repeat inc in the other side of piece. On next round work YO twisted to avoid holes. Work the new sts in garter st. INCREASE TIP (SLEEVE): Inc as follows mid under sleeve: Work until 1 st remains before marker, 1 YO, work 2 sts in garter st, 1 YO. On next round work YO twisted to avoid holes. Work the inc sts gradually in the pattern. NOTE: Work sts on each side of marker in garter st. RAGLAN DEC (ELEVATION): All dec are done from RS! Dec as follows after A.2: K 3 twisted tog. Dec as follows before A.2: Work until 3 sts remain before A.2, K 3 tog. ---------------------------------------------------------- JUMPER: Worked in the round. BODY: Cast on 150-162-168-192-210-234 sts with Nepal on circular needle size 5 mm. * P 1, (K 1, P 2), repeat from (-) 23-25-26-30-33-37 more times, K 1, P 1, insert a marker here (= side) *, repeat from *-* 1 more time. NOTE: Move the markers upwards when working. Continue rib in the round like this until piece measures 4 cm. Now work pattern A.1 as follows: Work the last 2 sts in A.1, then repeat A.1 the entire round until 1 st remains on round, work the first st in A.1. REMEMBER THE KNITTING TENSION When piece measures 13-13-14-14-15-15 cm, inc 1 st on each side of each marker – see INCREASE TIP (BODY). Repeat inc when piece measures 27-28-29-29-30-30 cm = 158-170-176-200-218-242 sts. When piece measures 41-41-42-42-42-42 cm (adjust so that next round worked is 2nd round in A.1), cast off sts for armholes as follows: Cast off the first 5 sts on round, work the next 69-75-78-90-99-111 sts, cast off the next 10 sts for armhole, work the next 69-75-78-90-99-111 sts, cast off the remaining 5 sts. Cut the yarn. Put piece aside and knit the sleeves. SLEEVE: Work sleeves in the round on double pointed needles. Cast on 42-42-42-48-48-48 sts with Nepal on double pointed needles size 5 mm. Insert a marker at beg of round = mid under sleeve. Work rib as follows: P 1, K 1, * P 2, K 1 *, repeat from *-* until 1 st remains on round, P 1. Continue like this in the round until rib measures 4 cm. Now work pattern as follows: Work the last 2 sts in A.1, A.1 until 1 st remains on round, work the first st in A.1. When piece measures 9-8-7-6-10-9 cm, inc 1 st on each side of marker – see INCREASE TIP (SLEEVE). Inc like this approx. every 13th-9th-7th-7th-6th-5th round 8-11-14-14-14-17 times in total = 58-64-70-76-76-82 sts. When piece measures 51-50-49-48-47-46 cm - adjust so that next round worked is 2nd round in A.1, cast off the middle 10 sts under sleeve (= 5 sts on each side of marker) = 48-54-60-66-66-72 sts. Knit another sleeve the same way. YOKE: Slip sleeves on to same circular needle size 5 mm as body where armholes were cast off = 234-258-276-312-330-366 sts. This is done without working the sts. Insert a marker in every transition between sleeves and body = 4 markers. Beg round on back piece, 4 sts after marker between sleeve and back piece. Now continue pattern as before and work in addition A.2 (= 8 sts) in every transition between body and sleeves (markers are in the middle of A.2). On next round start dec for RAGLAN – see explanation above! NOTE: Dec differently on body and sleeves as follows: RAGLAN BODY: Dec every other round 21-24-24-24-26-26 times and then every round 0-0-0-6-7-13 times (= 21-24-24-30-33-39 times in total). RAGLAN SLEEVES: Dec every 4th round 6-6-4-3-5-5 times and then every other round 9-12-17-21-19-22 times (= 15-18-21-24-24-27 times in total). When all dec are done, 90-90-96-96-102-102 sts remain on round (= 144-168-180-216-228-264 sts in total dec). Now work pattern as before over the first 72-72-78-78-84-84 sts. Insert marker here (= between A.2 and right sleeve). Then work an elevation back and forth in neck in pattern as before AT THE SAME TIME dec for raglan on every row from RS over the sts worked – READ RAGLAN DEC (ELEVATION) as follows: NOTE: Tighten yarn at every turn to avoid holes. ROW 1 (= RS): Work 55-55-58-58-61-61 sts (including the 8 dec sts), ROW 2 (= WS): Turn and work 45-45-48-48-51-51 sts, ROW 3: Turn and work 43-43-46-46-49-49 sts (including the 8 dec sts), ROW 4: Turn and work 33-33-36-36-39-39 sts. There are now 74-74-80-80-86-86 sts on round. Turn and continue in the round with rib as follows: Work K over K and P over sts in garter st until rib measures 4 cm. Cast off sts with K over K and P over P. Jumper measures 64-66-68-70-72-74 cm from cast-on edge and up to shoulder. Fasten off. ASSEMBLY: Sew the openings under the sleeves. |
|||||||
Diagram explanations |
|||||||
|
|||||||
 |
|||||||
 |
|||||||
Have you finished this pattern?Tag your pictures with #dropspattern #twinriversweater or submit them to the #dropsfan gallery. Do you need help with this pattern?You'll find 26 tutorial videos, a Comments/Questions area and more by visiting the pattern on garnstudio.com. © 1982-2026 DROPS Design A/S. We reserve all rights. This document, including all its sub-sections, has copyrights. Read more about what you can do with our patterns at the bottom of each pattern on our site. |
|||||||


With over 40 years in knitting and crochet design, DROPS Design offers one of the most extensive collections of free patterns on the internet - translated to 17 languages. As of today we count 325 catalogues and 12298 patterns translated into English (UK/cm). 12298
We work hard to bring you the best knitting and crochet have to offer, inspiration and advice as well as great quality yarns at incredible prices! Would you like to use our patterns for other than personal use? You can read what you are allowed to do in the Copyright text at the bottom of all our patterns. Happy crafting!
Post a comment to pattern DROPS 174-14
We would love to hear what you have to say about this pattern!
If you want to leave a question, please make sure you select the correct category in the form below, to speed up the answering process. Required fields are marked *.