
Popular categories
Looking for a yarn?


Comments / Questions (239)
![]() Deni wrote:
Deni wrote:
Hello, I'm knitting size Xl and need help with decreasing in the shawl section. Where do I make k2tog before band?
27.05.2021 - 08:42DROPS Design answered:
Dear Deni, to decrease for neck you have to work on left front piece all the stitches until 2 sts remain before the stitches in garter stitch (= front band stitches + stitches increased for collar), K2 tog and work all remaining sts in garter stitch as before. Work this decrease a total of 12 times on every other row (= every RS row) then 4 times on every 4th row (= on every other RS row). Happy knitting!
27.05.2021 - 09:40
![]() Helena wrote:
Helena wrote:
Hej, tack för snabbt svar! Jag stickar storlek L, och det blir inte den långa fina mjuka rundningen på kragens yttre kant som på bilden trots att jag följt mönster exakt. Vill inte ha den där udden på kragen som det blir likt bilden som Tina lagt in nedan, för det är så min ser ut också. Vad är det för storlek på koftan på bilden i mönstret? Ska inte kragen se ut som på bilden oavsett storlek? Hur ska jag anpassa för att få denna krage som är på bilden till mönstret?
21.05.2021 - 11:21DROPS Design answered:
Hej Helena. Jo kragen ska se ut som på bilden, men det beror lite på hur man viker kragen och hur koftan sitter. Vill du ha en längre sjalskrage med mjukare rundning kan du ev. börja tidigare med ökningarna och göra ökningarna glesare till kragen. Mvh DROPS Design
24.05.2021 - 08:30
![]() Helena wrote:
Helena wrote:
Hej! Om man följer mönstret exakt så blir kragen inte som på bilden i mönstret. Det blir inte en sjalkrage, det blir som en vanlig krage. Är koftan på bilden stickad enligt det mönster som är publicerat? Se bilden nedan som Tina lagt ut, så ser min ut också-inte alls med sjalkrage. Hur ska jag göra för att få till koftan som den ser ut på mönsterbilden, dvs med sjalkrage? Det var mycket pga snygga sjalkragen vi valde mönstret till min son. Tack på förhand för hjälp.
20.05.2021 - 22:11DROPS Design answered:
Hej Helena, jo det är samma krage och den fortsätter om bak i nacken som en sjalkrage skall. Det är möjligt att det är en annan storlek på bilden, så den här börjar tidigare. Men det är samma mönster :)
21.05.2021 - 10:41
![]() Helena wrote:
Helena wrote:
Hej! Om man följer mönstret exakt så blir kragen inte som på bilden i mönstret. Det blir inte en sjalkrage, det blir som en vanlig krage. Är koftan på bilden stickad enligt det mönster som är publicerat? Se bilden nedan som Tina lagt ut, så ser min ut också-inte alls med sjalkrage. Hur ska jag göra för att få till koftan som den ser ut på mönsterbilden, dvs med sjalkrage? Det var mycket pga snygga sjalkragen vi valde mönstret till min son. Tack på förhand för hjälp.
20.05.2021 - 22:09
![]() Deni wrote:
Deni wrote:
I'm knitting size xl and reached to the point of increasing 1 st on left front panel.can you explain how to do it?
19.05.2021 - 10:18DROPS Design answered:
Dear Deni, you increase for collar on left front piece as explained under INCREASE TIP-1 (applies to shawl collar):, ie work from RS as 2 sts remain on left needle, then knit next stitch in front and back loop (= 1 st increased - see video), knit last stitch. Repeat these increases a total of 20 times on every 2 row (= every row from RS). Then you will decrease for neck before all stitches in garter st (front edge sts + collar sts). Happy knitting!
19.05.2021 - 12:13
![]() Bodil Johansen wrote:
Bodil Johansen wrote:
Behøver ikke hjælp, har fundet ud af mønsterbeskrivelsen. men mange tak for 1. spørgsmål
09.05.2021 - 21:59
![]() Bodil Johansen wrote:
Bodil Johansen wrote:
Hvad gør jeg forkert? følger opskriften på herre trøje 174-1 kan ikke få 3 ret 7 vrang til at være på midten af ryggen på str L , Følger hvad der står ved 299 m. hvorfor skal der være 3 ret 7 vrang midt på ryggen i ripstrikning. kan ikke få det maske antal til at være midt på ryggen. Har strikket mange trøjer med diagrammer men aldrig en så forvirrende opskrift
07.05.2021 - 19:33DROPS Design answered:
Hej Bodil Du har 299 masker og strikker således: 10, 28, (3r+4vr)x15=105, 3r, 7vr, (3r+4vr)x15=105, 3r, 28, 10 God fornøjelse!
10.05.2021 - 09:39
![]() Bodil Steen Johansen wrote:
Bodil Steen Johansen wrote:
Hej. læser en opskrift på en herre trøje DROPS 174-1 Der står for eks. slå 299 m op (inklusiv 10 kantmasker i hver side mod midt foran) Vil det sige jeg skal slå 299 masker op + 20 masker mere. I alt 319 m. Syntes opskriften er svær at forstå
05.05.2021 - 17:05DROPS Design answered:
Hej Bodil, nej vi skriver hvor mange masker du skal slå op, og så beskriver vi at de yderste 10 masker i hver side = forkanter (de indgår i de masker du slår op. Er du nybegynder har vi lettere opskrifter. Eller så finder du instruktionsvideoer nederst i opskriften :) Hvordan følger man en DROPS opskrift
06.05.2021 - 11:13
![]() Darline wrote:
Darline wrote:
Quick work getting back to me. I think l figured it out. It was just reading the directions and missing one word - “turn” in the work/row. If not I will be in touch. Thanks.
04.05.2021 - 21:03DROPS Design answered:
Dear Darlene, yes, that is what made us wonder. But yes, there are short rows there. Happy Knitting!
04.05.2021 - 21:47
![]() Darline Crane wrote:
Darline Crane wrote:
I’m working on the Lunar Tides pattern and have viewed the video on “tighten the strand” but it shows with one strand. However, one has 5 or multiple stitches left on the needle to decrease.. My question is how do you handle the remaining stitches to decrease?
04.05.2021 - 18:11DROPS Design answered:
Dear Darlene, can you please be more specific, which part of the pattern you are knitting when you have the problem? Thank you, Happy Knitting!
04.05.2021 - 18:42
|
|||||||||||||||||||
Jackson#jacksoncardigan |
|||||||||||||||||||
 |
 |
||||||||||||||||||
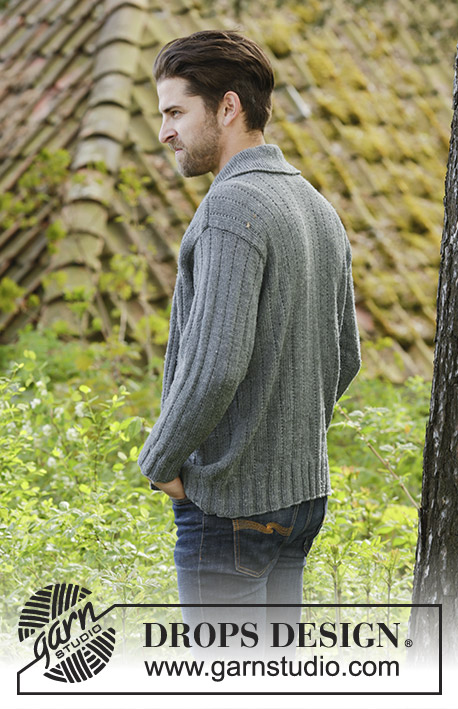
Knitted DROPS men’s jacket with simple cable, textured pattern and shawl collar in Karisma. Size: XS - XXXL.
DROPS 174-1 |
|||||||||||||||||||
|
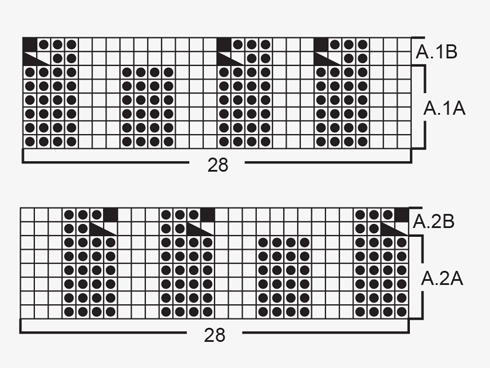
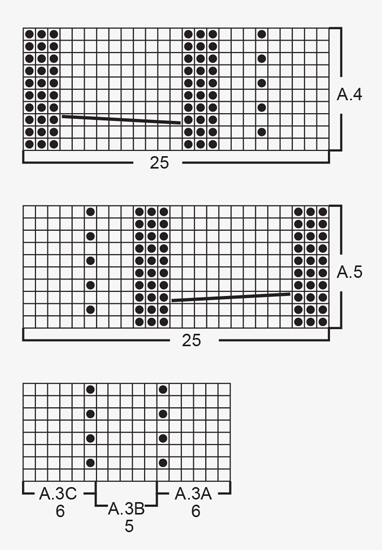
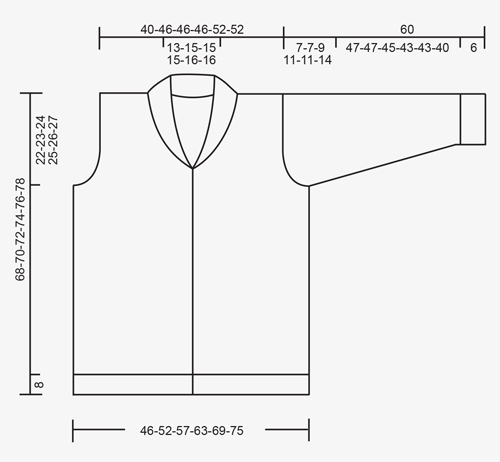
GARTER ST (back and forth): K all rows. 1 ridge = 2 rows K. PATTERN: See diagrams A.1 to A.5. The diagrams show all rows in pattern seen from RS. KNITTING TIP (applies to bands): To keep the bands from contracting vertically work short rows over bands as follows: * Beg mid front and K the outermost 10 sts (= band), turn piece, slip 1st st as if to K, tighten yarn and K the rest of row *, repeat from *-* after approx. every 10 rows in piece. INCREASE TIP-1 (applies to shawl collar): Inc 1 st in next to last st towards mid front by K in front and back loop of same st. INCREASE TIP-2 (applies to mid under sleeve): Inc 1 st on each side of st with marker mid under sleeve. Inc 1 st by making 1 YO, on next round work YO twisted to avoid holes. Work the inc sts in the pattern A.3. DECREASE TIP (applies to neckline): Dec inside 10 band sts in garter st + inc sts for shawl collar. All dec are done from RS! Dec as follows before band + collar: K 2 tog. Dec as follows after collar + band: Slip 1 st as if to K, K 1, psso. BUTTONHOLES: Dec for buttonholes from RS on left band (when garment is worn). 1 buttonhole = work 6 band sts as before, slip next to last st on right needle over outermost st on right needle, K 1, slip next to last st on right needle over outermost st on right needle (2 sts cast off), K the last 3 sts. On next row cast on 2 new sts over the cast off sts. Dec for buttonholes when piece measures: SIZE XS/S: 2, 12, 21, 31, 40 and 50 cm. SIZE M: 2, 12, 21, 31, 41 and 51 cm. Size L: 2, 12, 22, 32, 42 and 52 cm. SIZE XL: 3, 13, 23, 33, 43 and 53 cm. Size XXL: 3, 13, 23, 33, 43 and 54 cm. SIZE XXXL: 3, 13, 24, 34, 45 and 55 cm. ---------------------------------------------------------- JACKET: Worked back and forth on circular needle from mid front. BODY: Cast on 243-271-299-327-355-383 sts (incl 10 band sts in each side towards mid front) on circular needle size 3 mm with Karisma. P 1 row from WS. Work next row as follows from RS: 10 band sts in GARTER ST – see explanation above, A.1A (= 28 sts), * K 3, P 4 *, repeat from *-* 11-13-15-17-19-21 times in total, K 3, P 7 (= mid back), * K 3, P 4 *, repeat from *-* 11-13-15-17-19-21 times in total, K 3, A.2A (= 28 sts) and 10 band sts in garter st. Work back from WS with garter st over garter st, P over P, K over K. Continue rib until piece measures 8 cm, remember BUTTONHOLES on left band – see explanation above and KNITTING TIP. Work next row as follows from RS: 10 band sts as before, A.1B (= 28 sts dec to 25 sts), * K 3, P 2, P 2 tog *, repeat from *-* 11-13-15-17-19-21 times in total, K 3, P 2 tog, P 3, P 2 tog, * K 3, P 2, P 2 tog *, repeat from *-* 11-13-15-17-19-21 times in total, K 3, A.2B (= 28 sts dec to 25 sts) and 10 band sts as before = 213-237-261-285-309-333 sts. Work back from WS with garter st over garter st, P over P, K over K, (work A.1B and A.2B as shown in diagram). Switch to circular needle size 4 mm and work next row from RS as follows: 10 band sts as before, A.4 (= 25 sts), work A.3A over the next 72-84-96-108-120-132 sts (= 12-14-16-18-20-22 repetitions of 6 sts), work A.3B (= 5 sts), work A.3C over the next 66-78-90-102-114-126 sts (= 11-13-15-17-19-21 repetitions of 6 sts), work A.5 (= 25 sts) and finish with 10 band sts as before. Insert 1 marker in the 59th-65th-71st-77th-83rd-89th st in from each side (markers are in a st in garter st in the sides on body). Continue the pattern like this and move the markers upwards when working. REMEMBER THE KNITTING TENSION When piece measures 46-47-48-49-50-51 cm, cast off 7 sts in each side for armholes (i.e. cast off st with marker + 3 sts on each side of this). Then finish front and back piece separately. BACK PIECE: = 89-101-113-125-137-149 sts. Continue A.3 on back piece as before and cast off for armholes at beg of every row in each side as follows: Cast off 2 sts 0-0-2-5-5-7 times and 1 st 2-2-4-4-4-6 times = 85-97-97-97-109-109 sts. Continue to work until piece measures 66-68-70-72-74-76 cm. Now cast off the middle 23-27-27-27-29-29 sts for neck and finish each shoulder separately. Cast off 2 st on next row from neck = 29-33-33-33-38-38 sts remain on the shoulder. Continue to work until piece measures 68-70-72-74-76-78 cm and loosely cast off. Repeat on the other shoulder. LEFT FRONT PIECE: = 55-61-67-73-79-85 sts. Continue the pattern as before and cast off for armhole at beg of every row from the side as on back piece. AT THE SAME TIME when 2 rows have been worked after last buttonhole on band work 1 ridge (i.e. 2 rows K) over only the outermost 10 band sts towards mid front (do not work the other sts on row). Then work over all sts on row as before. AT THE SAME TIME inc 1 st for shawl collar towards mid front – READ INCREASE TIP-1. Inc like this every other row 18-18-18-20-20-20 times in total. AT THE SAME TIME when piece measures 52-53-54-55-56-57 cm (2 cm should now be worked after last buttonhole), dec 1 st for neckline towards mid front - READ DECREASE TIP. Dec like this every other row (i.e. every row from RS) a total of 10-12-12-12-13-13 times and then every 4th row (i.e. every other row from RS) 4 times in total in all sizes. After all inc and dec, there are 57-61-61-63-68-68 sts on needle. When piece measures 68-70-72-74-76-78 cm, cast off the outermost 29-33-33-33-38-38 sts on shoulder = 28-28-28-30-30-30 sts remain for collar. Continue back and forth in garter st over these sts as follows: * 1 ridge over all sts, 1 ridge over only the outermost 18-18-18-20-20-20 sts *, repeat from *-* until collar measures approx. 9-9-9-10-10-10 cm inside on the most narrow (collar measures approx. 18-18-18-20-20-20 cm at the edge on the widest). Cast off. RIGHT FRONT PIECE: Work as left but reversed. NOTE: Do not dec for buttonholes on right band. When working 1 ridge over only the outermost 10 sts towards mid front, adjust according to left front piece. SLEEVE: Cast on 56-56-63-63-63-70 sts on double pointed needles size 3 mm with Karisma. K 1 round. Work next round as follows: * K 3, P 4 *, repeat from *-* the entire round. When piece measures 6 cm, work next round as follows: * K 3, P 2, P 2 tog *, repeat from *-* the entire round = 48-48-54-54-54-60 sts. Switch to double pointed needles size 4 mm and work pattern in the round according to diagram A.3A. Insert 1 marker in last st on round (i.e. in st in garter st = mid under sleeve) and move the marker upwards. When piece measures 8 cm, inc 2 sts mid under sleeve - READ INCREASE TIP-2. Inc a total of 18-20-20-22-25-25 times in Size S: On every 7th round, in size M + L: On every 6th round, in size XL: On every 5th round, in size XXL: Alternately on every 4th and 5th round and size XXXL: On every 4th round = 84-88-94-98-104-110 sts. When piece measures 53-53-51-49-49-46 cm (NOTE: Shorter measurements in the larger sizes because of longer sleeve cap and wider shoulders) cast off the middle 7 sts under sleeve (cast off st with marker + 3 sts on each side of this). Now work sleeve cap back and forth on circular needle. Continue with the pattern while AT THE SAME TIME casting off at beg of every row in each side as follows: Cast off 3 sts 1 time, 2 sts 1-1-2-3-3-4 time and 1 st 2-2-3-3-3-6 times. Continue to cast off 2 sts in each side of piece until piece measures 59 cm in all sizes, cast off 3 sts 1 time in each side and cast off the remaining sts. Sleeve measures approx. 60 cm in all sizes. Knit another sleeve the same way. ASSEMBLY: Sew the shoulder seams. Sew collar tog mid back (make sure that seam is not visible when collar is folded down). Sew collar to neckline in the back of neck. Sew in sleeves. Sew the buttons on to the right band. |
|||||||||||||||||||
Diagram explanations |
|||||||||||||||||||
|
|||||||||||||||||||
 |
|||||||||||||||||||
 |
|||||||||||||||||||
 |
|||||||||||||||||||
Have you finished this pattern?Tag your pictures with #dropspattern #jacksoncardigan or submit them to the #dropsfan gallery. Do you need help with this pattern?You'll find 26 tutorial videos, a Comments/Questions area and more by visiting the pattern on garnstudio.com. © 1982-2026 DROPS Design A/S. We reserve all rights. This document, including all its sub-sections, has copyrights. Read more about what you can do with our patterns at the bottom of each pattern on our site. |
|||||||||||||||||||


With over 40 years in knitting and crochet design, DROPS Design offers one of the most extensive collections of free patterns on the internet - translated to 17 languages. As of today we count 324 catalogues and 12245 patterns translated into English (UK/cm). 12245
We work hard to bring you the best knitting and crochet have to offer, inspiration and advice as well as great quality yarns at incredible prices! Would you like to use our patterns for other than personal use? You can read what you are allowed to do in the Copyright text at the bottom of all our patterns. Happy crafting!
Post a comment to pattern DROPS 174-1
We would love to hear what you have to say about this pattern!
If you want to leave a question, please make sure you select the correct category in the form below, to speed up the answering process. Required fields are marked *.