
Popular categories
Looking for a yarn?


Comments / Questions (44)
![]() Brandi Perkins wrote:
Brandi Perkins wrote:
I noticed in rounds 9, 10, 11, and 12 of the square it says to slip stitch into next dc and chain space, but it's not a dc, it's a tr unless I'm doing something wrong. I'm left-handed so that might be the issue, but I haven't had any problems following the pattern because of this. If I'm wrong I apologize, but it seems wrong to me.
03.02.2018 - 19:26
![]() Azzarine wrote:
Azzarine wrote:
Magnifique mais le problème sur ce site, c'est que les diagrammes sont illisibles... Heureusement qu'il existe des diagrammes clairs pour faire des grannys, sur d'autre sites
10.08.2017 - 00:55DROPS Design answered:
Bonjour Azzarine, vous trouverez la légende des symboles utilisés dans les diagrammes juste au-dessus des dits diagrammes. Pour toute assistance complémentaire à la lecture de ces derniers, n'hésitez pas à contacter votre magasin DROPS, même par mail ou téléphone. Bon crochet!
10.08.2017 - 09:21
![]() Michele Marcus wrote:
Michele Marcus wrote:
Do you recommend blocking the work? And if you do, before or after assembling it? Thank you
11.07.2017 - 22:01DROPS Design answered:
Dear Mrs Marcus, some crocheters block every piece (either before assembly or after) while some other do not. Blocking a crochet piece gives it shape and sets the stitches in that shape. Happy crocheting!
12.07.2017 - 08:58
![]() Liz wrote:
Liz wrote:
Bij de symbolenuitleg voor het telpatroon zie ik vakjes met een vraagteken er in. Hoe kom ik erachter welk symbool hier wordt bedoeld?
01.07.2017 - 16:47DROPS Design answered:
Hoi Liz, Vermoedelijk gaat er iets mis bij het laden van de pagina en worden die plaatjes niet goed weegegeven in de browser. Misschien kun je proberen om even de pagina te verversen (met functietoets F5) of de pagina in een andere browser te bekijken (bijvoorbeeld chrome, edge, firfox)
04.07.2017 - 15:54
![]() Sharon Yarwood wrote:
Sharon Yarwood wrote:
Love this pattern, I am at the neck edge and my only question is where to start the first stitch, (ch3). Thanks in advance, loving this poncho!
22.05.2017 - 18:59DROPS Design answered:
Dear Sharon, it would be best if you start the neck edge at one of the shoulders. I hope this helps. Happy crocheting!
23.05.2017 - 06:59Maria wrote:
Buen día ! En el foto (la más cercana en detalle) no veo que aparezca la VUELTA 6 que sí está detallada en el patrón. En la foto pasa directamente de la vuelta 5 a la 7 que es donde cambia el color. Agradezco sus comentarios. Atentamente.
22.05.2017 - 14:02
![]() Donna Devarenne wrote:
Donna Devarenne wrote:
I'm stuck!!! I've crochet together 3 squares. What or where do I place the 4th square. The way I see it is if I crochet the 4th square, there will be no room for the head to go through???
08.04.2017 - 20:16DROPS Design answered:
Hi Donna! Look at the picture - the back of the poncho is exactly the same like the front. Happy knitting!
11.04.2017 - 14:59Rhonda Thistle wrote:
Hi-I have finished the poncho except for the neck. It is lovely! I don't understand how to do the first finishing row of the neck. The instructions seem to look different than the picture. What is the stitch pattern for the first row? Thank you, Rhonda
26.02.2017 - 04:31DROPS Design answered:
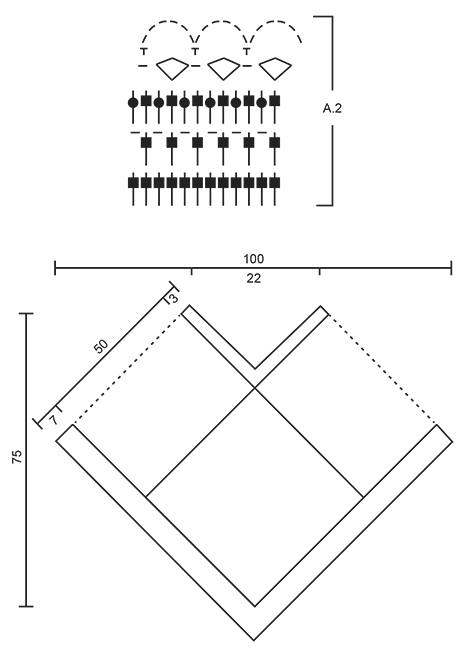
Dear Rhonda, you are working row 2 in A.2 (= row with 1 st, 1 ch around), then work row 3 in A.2 (= 1 st in each st/around each ch-space), at the same time dec as explained on mid front and mid back. Happy crocheting!
27.02.2017 - 10:40
![]() Carole A Bingert wrote:
Carole A Bingert wrote:
Thankyou. I was confused by the translation of "in total", I think. I have happily completed 3 squares by now. It is a lovely pattern.
28.01.2017 - 18:03
![]() Carole A Bingert wrote:
Carole A Bingert wrote:
It is most certainly wrong, if not for the picture,and counting what is shown in the diagram it would have been a mess, but the written directions in round 12 SHOULD READ that there should be 3 tr in the first group of 7 dc,4 in the second, 3 in the middle, 4 in the 4th and 3 in the 5th , ending tr ch 1 in the ch before the corner for a total of 19 tr in all from corner to corner. I don't see anyone on this list successfully completing anything.
25.01.2017 - 20:09DROPS Design answered:
Dear Mrs Bingert, this is how you will work when crocheting between corners: ch 1, 1 tr around first ch, (1 ch, skip 1 dc, 1 tr in next dc), repeat from (-) 17 times in total, ch 1, 1 tr around ch, 1 ch = 19 tr between the corners. Happy crocheting!
26.01.2017 - 09:48
|
||||||||||||||||||||||||||||||||||||||||
Midsummer Joy#midsummerjoyponcho |
||||||||||||||||||||||||||||||||||||||||
|
|
||||||||||||||||||||||||||||||||||||||||
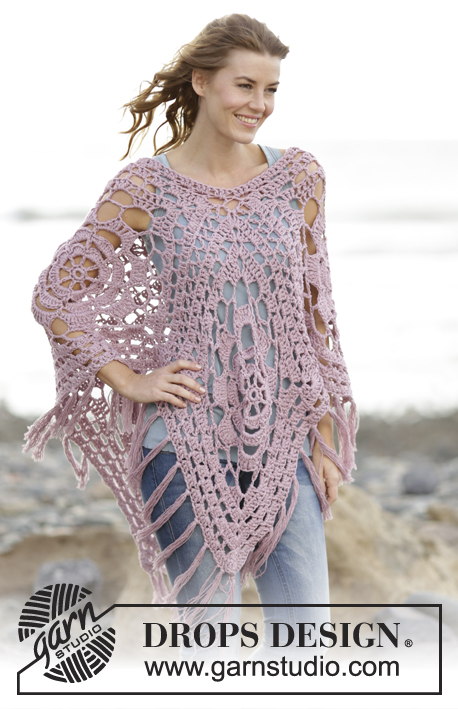
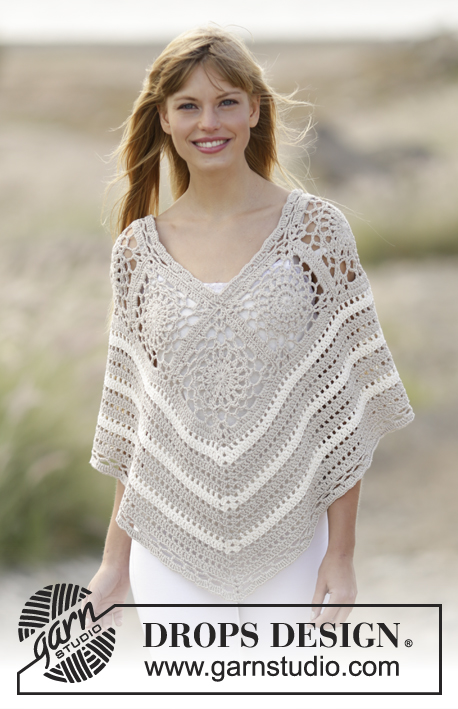
Crochet DROPS poncho with squares in ”Bomull-Lin”. One-size
DROPS 167-14 |
||||||||||||||||||||||||||||||||||||||||
|
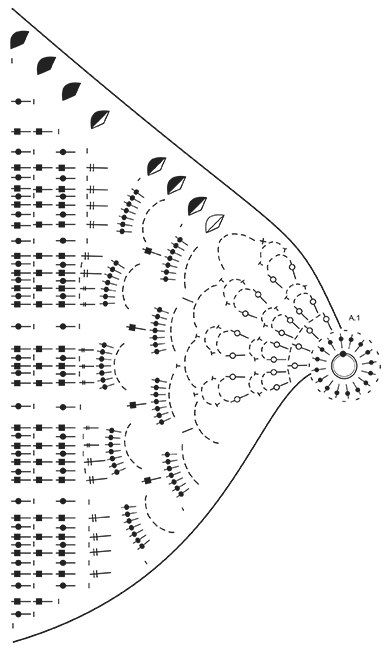
COLOURS SQUARE: Cast on + ROUND 1: beige, ROUND 2: light beige, ROUND 3-6: beige, ROUND 7: off white, ROUND 8-10: light beige and ROUND 11-15: off white. COLOURS EDGE: ROUND 1-3: light beige, ROUND 4-5: off white TR-GROUP: Work 1 tr around next ch/ch-space but wait with last YO and pull through (= 2 sts on hook), work 1 tr more around same ch/ch-space but on last pull through, pull yarn through all sts on hook. PATTERN: See diagrams A.1 and A.2. COLOUR CHANGE TIP: To get a nice transition when changing colour change colour when last YO and pull through on round remains, then pull last YO with new colour through all sts on hook. CROCHET INFO: Replace first tr at beg of every tr round with 3 ch, finish the round with 1 sl st in 3rd ch from beg of round. ---------------------------------------------------------- PONCHO: Work 4 large squares as explained below. Then work squares tog into a poncho. Work a neck edge at and an edge at the bottom around the poncho at the end. SQUARE 1: Work 4 ch on hook size 5 mm with beige and form a ring with 1 sl st in first ch. READ COLOURS SQUARE AND COLOUR CHANGE TIP. Then work according to diagram A.1, i.e. work as follows: ROUND 1: 4 ch (= 1 tr + 1 ch), * 1 tr in ring, 1 ch *, repeat from *-* a total of 15 times, switch to light beige and finish with 1 sl st in 3rd ch from beg of round (= 16 tr with 1 ch between each). ROUND 2: 1 sl st around first ch, 3 ch (= 1 tr), work 1 tr around same ch, * work 2 ch, around next ch work TR-GROUP – see explanation above *, repeat from *-* 15 times in total, work 2 ch, switch to beige and finish with 1 sl st in 3rd ch at beg of round (= 16 tr-groups with 2 ch between each). ROUND 3: 1 sl st around first ch-space, 3 ch (= 1 tr), 1 tr around same ch-space, 3 ch, 1 tr-group around same ch-space, * around next ch-space work 1 tr-group + 3 ch + 1 tr-group *, repeat from *-* 15 times in total and finish with 1 sl st in 3rd ch at beg of round. ROUND 4: 1 sl st around first ch-space, 4 ch (= 1 dc + 3 ch), 1 dc around same ch-space, * around next ch-space work 1 dc + 3 ch + 1 dc *, repeat from *-* 15 times in total and finish with 1 sl st in 1st ch at beg of round. ROUND 5: 1 sl st around first ch-space, 3 ch (= 1 tr), 1 tr + 4 ch + 1 tr-group around same ch-space, * around next ch-space work 1 tr-group + 4 ch + 1 tr-group *, repeat from *-* 15 times in total and finish with 1 sl st in 3rd ch at beg of round. ROUND 6: 1 sl st around first ch-space, 5 ch (= 1 dc + 4 ch), 1 dc around same ch-space, * around next ch-space work 1 dc + 4 ch + 1 dc *, repeat from *-* 15 times in total, switch to off white and finish with 1 sl st in 1st ch at beg of round. ROUND 7: Work sl sts until middle of first ch-space, 9 ch (= 1 dc + 8 ch), * (1 dc around next ch-space, 6 ch), repeat from (-) 3 times in total **, 1 dc around next ch-space, 8 ch *, repeat from *-* 4 times in total but finish last repetition after **. Switch to light beige and work 1 sl st in first ch at beg of round. ROUND 8: Work sl sts until middle of first ch-space, 4 ch (= 1 dtr), 1 dtr + 3 ch + 2 dtr around same ch-space (= corner), * 5 ch, 1 htr around next ch-space, 5 ch, 1 dc around next ch-space, 5 ch, 1 htr around next ch-space, 5 ch **, around next ch-space work 2 dtr + 3 ch + 2 dtr *, repeat from *-* 4 times in total but finish last repetition after **, finish with 1 sl st in 4th ch at beg of round. ROUND 9: Work 1 sl st in next tr and 1 sl st around ch-space in the corner, 4 ch (= 1 dtr), 1 dtr + 3 ch + 2 dtr around same ch-space (= corner), * 1 ch, then work 7 tr around each of the next 4 ch-spaces, 1 ch **, around next ch-space work 2 dtr + 3 ch + 2 dtr *, repeat from *-* 4 times in total but finish last repetition after **, finish with 1 sl st in 4th ch at beg of round. ROUND 10: Work 1 sl st in next tr and 1 sl st around ch-space in the corner, 4 ch (= 1 dtr), 1 dtr + 3 ch + 2 dtr around same ch-space (= corner), * (6 ch, 1 tr in 4th tr in first/next tr-group), repeat from (-) 4 times in total, 6 ch **, around next ch-space work 2 dtr + 3 ch + 2 dtr (= corner) *, repeat from *-* 4 times in total but finish last repetition after **, switch to off white and finish with 1 sl st in 4th ch at beg of round. ROUND 11: Work 1 sl st in next tr and 1 sl st around ch-space in the corner, 4 ch (= 1 dtr), 1 dtr + 3 ch + 2 dtr around same ch-space (= corner), * 1 ch, then work 7 tr around each of the next 5 ch-spaces, 1 ch **, around next ch-space work 2 dtr + 3 ch + 2 dtr (= corner) *, repeat from *-* 4 times in total but finish last repetition after **, finish with 1 sl st in 4th ch at beg of round. ROUND 12: Work 1 sl st in next tr and 1 sl st around ch-space in the corner, 4 ch (= 1 dtr), 1 dtr + 3 ch + 2 dtr around same ch-space (= corner), * 1 ch, 1 dtr around first ch, (1 ch, skip 1 tr, 1 dtr in next tr), repeat from (-) 17 times in total, 1 ch, 1 dtr around ch, 1 ch **, around next ch-space work 2 dtr + 3 ch + 2 dtr *, repeat from *-* 4 times but finish last repetition after **, finish with 1 sl st in 4th ch at beg of round. ROUND 13: Work 1 sl st in next tr and 1 sl st around ch-space in the corner, 3 ch (= 1 tr), 1 tr + 3 ch + 2 tr around same ch-space (= corner), * 1 ch, then work 1 tr around every ch and 1 tr in every tr until next corner (= 39 tr between corners), 1 ch **, around next ch-space work 2 tr + 3 ch + 2 tr (= corner) *, repeat from *-* 4 times in total but finish last repetition after **, finish with 1 sl st in 3rd ch at beg of round. ROUND 14: Work 1 sl st in next tr and 1 sl st around ch-space in the corner, 3 ch (= 1 tr), 1 tr + 3 ch + 2 tr around same ch-space (= corner), * 1 ch, 1 tr around first ch, (1 ch, skip 1 tr, 1 tr in next tr), repeat from (-) 19 times in total, 1 ch, 1 tr around ch, 1 ch **, around next ch-space work 2 tr + 3 ch + 2 tr *, repeat from *-* 4 times but finish last repetition after **, finish with 1 sl st in 3rd ch at beg of round. ROUND 15: Work 1 sl st in next tr and 1 sl st around ch-space in the corner, 3 ch (= 1 tr), 1 tr + 3 ch + 2 tr around same ch-space (= corner), * 1 ch, then work 1 tr around every ch and 1 tr in every tr until next corner (= 43 tr between corners), 1 ch **, around next ch-space work 2 tr + 3 ch + 2 tr (= corner) *, repeat from *-* 4 times in total but finish last repetition after **, finish with 1 sl st in 3rd ch at beg of round. Fasten off. Square measures approx. 40 x 40 cm. NOTE: If you want a bigger poncho repeat ROUND 14-15 until desired measurements. ASSEMBLY: Place squares as shown in chart. Place 2 squares on top of each other WS against WS, and crochet them tog with light beige as follows: Work 1 dc around ch-space in the corner on first square, 1 ch, 1 dc around ch-space in the corner on second square, * 2 ch, skip 2 tr on first square, 1 dc in next tr on first square, 2 ch, skip 2 tr on second square, 1 dc in next tr on second square *, repeat from *-* until next corner, finish with 2 ch before transition to next square. Fasten off. NECK EDGE: Work a finishing edge around the neck on hook size 5 mm with light beige as follows - READ CROCHET INFO: Work 2nd round in A.2 but mid front and mid back where there are ch-spaces work 1 tr around every ch-space with 1 ch between each. Work 3rd round in A.2 but mid front and mid back work the middle 3 tr tog as follows: Work 1 tr but wait with last pull through (= 2 loops on hook), work next tr but wait with last pull through (= 3 loops on hook), work next tr but on last pull through, pull yarn through all 4 loops on hook. Fasten off. EDGE AROUND THE BOTTOM OF PONCHO: Work a finishing edge around the bottom of poncho on hook size 5 mm as follows - READ COLOURS EDGE and CROCHET INFO: Beg with light beige and work pattern according to diagram A.2, i.e. work as follows: NOTE: To continue the edge into a nice tip as on squares it is important to continue inc mid front and mid back as before, i.e. around the middle ch-space mid front and mid back work 2 ch + 2 tr + 3 ch + 2 tr + 2 ch on every round the same way as on the squares. ROUND 1: Work 1 tr in every tr around the entire poncho but where 2 squares meet and where there are ch-spaces work 2 tr around every ch-space. ROUND 2: * 1 tr in first/next tr, 1 ch, skip 1 tr *, repeat from *-* the entire round but continue tip mid front and mid back as explained above. ROUND 3: Work 1 tr in every tr and 1 tr around every ch but continue tip mid front and mid back. Switch to off white. ROUND 4: 1 tr, 3 ch, 1 sl st in the first of the 3 ch, work 2 tr in same st (= 1 tr-group with picot), * 1 ch, skip 3 tr, in next tr work 1 tr, 3 ch, 1 sl st in the first of the 3 ch, work 2 tr in same tr *, repeat from *-* the entire round but make sure that it matches nicely with tip mid front and mid back. ROUND 5: * 6 ch, skip tr-group, 1 dc around next ch *, repeat from *-* the entire round. Fasten off. |
||||||||||||||||||||||||||||||||||||||||
Diagram explanations |
||||||||||||||||||||||||||||||||||||||||
|
||||||||||||||||||||||||||||||||||||||||
 |
||||||||||||||||||||||||||||||||||||||||
 |
||||||||||||||||||||||||||||||||||||||||
Have you finished this pattern?Tag your pictures with #dropspattern #midsummerjoyponcho or submit them to the #dropsfan gallery. Do you need help with this pattern?You'll find 13 tutorial videos, a Comments/Questions area and more by visiting the pattern on garnstudio.com. © 1982-2026 DROPS Design A/S. We reserve all rights. This document, including all its sub-sections, has copyrights. Read more about what you can do with our patterns at the bottom of each pattern on our site. |
||||||||||||||||||||||||||||||||||||||||


With over 40 years in knitting and crochet design, DROPS Design offers one of the most extensive collections of free patterns on the internet - translated to 17 languages. As of today we count 324 catalogues and 12267 patterns translated into English (UK/cm). 12267
We work hard to bring you the best knitting and crochet have to offer, inspiration and advice as well as great quality yarns at incredible prices! Would you like to use our patterns for other than personal use? You can read what you are allowed to do in the Copyright text at the bottom of all our patterns. Happy crafting!
Post a comment to pattern DROPS 167-14
We would love to hear what you have to say about this pattern!
If you want to leave a question, please make sure you select the correct category in the form below, to speed up the answering process. Required fields are marked *.