
Popular categories
Looking for a yarn?


Comments / Questions (178)
![]() Ulrike wrote:
Ulrike wrote:
Hallo, ich habe ein Problem bei den Raglanzunahmen in Gr.M. In der Anleitung heißt es, 24 M glatt rechts und wären nach den Zunahmen laut Anleitung bei 168. ich komme aber auf 170. Meine Rechnung: 23x2=46+24=170. Wo liegt mein Fehler? Oder liegt der Fehler in der Anleitung? Danke schon mal. Freundliche Grüße Ulrike
08.03.2023 - 10:45Ulrike answered:
Hallo nochmal. Ich habe meinen Fehler gefunden. 2 Maschen gehen ja weg wegen den Raglanärmeln. Liebe Grüße Ulrike
08.03.2023 - 10:58
![]() Karen Coates wrote:
Karen Coates wrote:
Worst pattern ever !!!! Restarted 4 times !!! My sister is an expert knitter and found this was the worst pattern ever !!!
29.01.2023 - 07:48
![]() Jennifer Winkler wrote:
Jennifer Winkler wrote:
I am working on the increases in the hood and was wondering if you can substitute make one right (or left) for the yarn overs? I am working on the XXXL for my mom and in the 20 garter stitches it says in the 2nd row to increase evenly 32 stitches, this would require two yarn over increases in a row, creating a hole no matter how you twist it. Thanks
22.09.2022 - 02:35DROPS Design answered:
Dear Mrs Winkler, you can for sure use your favorite technique to increase - this lesson explains how to increase evenly, this might help you too. Happy knitting!
22.09.2022 - 09:49
![]() Jan wrote:
Jan wrote:
Hello, Why do you not show the photo of the back of the garment? I think that the look of the back of a design is as important as the front. In this particular design I would love to know what the hood looks like from the back - perhaps you would include a photo in your reply. Best wishes, Jan
28.04.2022 - 21:29DROPS Design answered:
Dear Jan, we have sadly no pictures of the back piece and we don't have the jacket anymore. But you could maybe see the back piece on one of the several projects made by knitters and shown in Ravelry. Happy knitting!
29.04.2022 - 08:49
![]() Sandra Lowes wrote:
Sandra Lowes wrote:
Is there a email address where I could send in a picture to see if anyone there knows how to do this stitch
24.12.2021 - 02:04DROPS Design answered:
Dear Sandra, you could try our Facebook group, where you can add pictures and share them with other members to get help from them.
24.12.2021 - 18:37
![]() Embla wrote:
Embla wrote:
Hei. Jeg lurer på hvilken størrelse modellen på bildet har på seg? Og finnes det noen nærmere forklaring på hva de forskjellige størrelsene vil si? Jeg er ca lik på modellen på bildet, men jeg ønsker at jakken skal være litt mer romslig, så lurer veldig på hvilken størrelse jeg bør velge. På forhånd tusen takk for svar.
26.09.2021 - 09:56DROPS Design answered:
Hej Embla. Modellen på bilden har storlek S eller M på sig (vet dessvärre inte vilken av de). Längst ner på oppskriften har du en måleskiss med alla mål i cm på plagget. Jämför dessa med ett plagg du har för att se vilken storlek som passar. Mvh DROPS Design
27.09.2021 - 09:37
![]() Jasmin wrote:
Jasmin wrote:
Ich noch mal und zwar steht ja da das man 2M zunehmen soll, damit ein Bambusmusterrapport aufgeht. Wie nehme ich am besten diese 2M zu.?
04.02.2021 - 16:40DROPS Design answered:
Liebe Jasmin, die Raglanzunahmen werden gestrickt, wie unter RAGLANZUNAHMEN erklärt - die Zunahmben im Bambusmuster stricken Sie glatt rechts bis 2 Maschen zugenommen werden um das Bambusmuster zu stricken. Viel Spaß beim stricken!
05.02.2021 - 07:54
![]() Jasmin wrote:
Jasmin wrote:
Hallo, ich habe gleich zwei Fragen (Gr. S). Und zwar bei den verkürzten Reihen wird dort nur in Kreuz-Re gestrickt oder werden die ersten 30M im Bambusmuster gestrickt und beim PASSE habe ich am Anfang 112 machen und wenn ich dann am Anfang die erste Hin- und Rück-Reihe mit den Raglanzunahmen stricke und danach die 21x jede 2. R mit den Raglanzunahmen stricke komme ich nicht auf 288M sondern auf 293M und wollte Fragen ob ich dort etwas falsch verstanden habe. Vielen Dank im voraus.
04.02.2021 - 15:19DROPS Design answered:
Liebe Jasmin, dieses Video zeigt, wie man die verkürzten Reihen strickt - bei der Passe wird es insgesamt 22 Mal 8 Maschen zugenommen (= 1 x in jede Reihe + 21 Mal in jeder 2. Reihe) = 112 Maschen + (22x8)= 288 Maschen. Viel Spaß beim stricken!
04.02.2021 - 15:31
![]() Gaby wrote:
Gaby wrote:
How many balls of wool will I need to make a Size 8-10 uk size.
08.12.2020 - 22:33DROPS Design answered:
Dear Gaby, you will find the total amount of yarn required for each size under the header, eg in size S you need 1100 g DROPS Nepal/50 g a ball = 22 balls Nepal for a size S. To find out your size, measure a similar garment you have and like the shape and compare them to the measurements in chart. read more here. Happy knitting!
09.12.2020 - 07:09
![]() Esther Jarlov wrote:
Esther Jarlov wrote:
Hej, jeg er i tvivl om der skal være 2 kantmasker i bambusmønsteret hele arbejdet igennem eller om det kun skal være i hætten? Der står 2 kantm til færdigt mål, men det de uklart for mig, hvilket færdige mål, der er tale om
15.04.2020 - 21:45
|
|
Snow Princess#snowprincessjacket |
|
 |
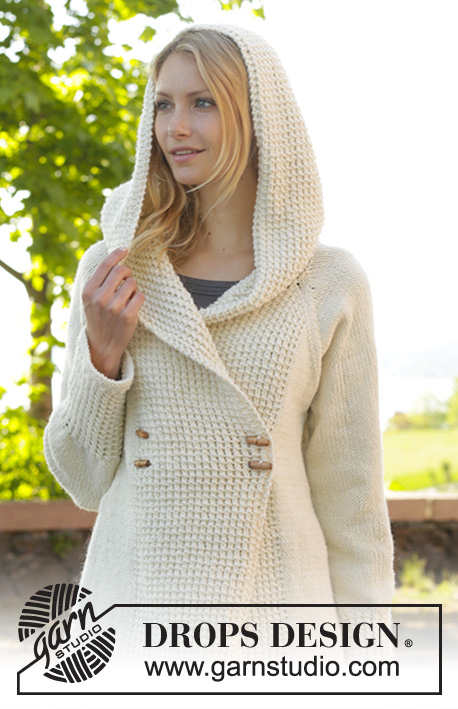 |
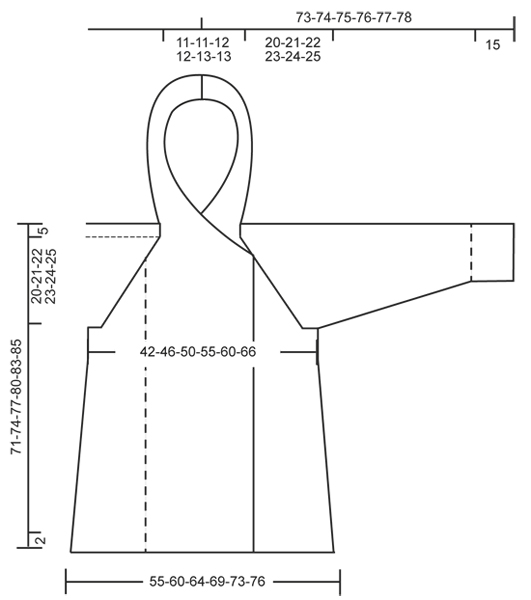
Knitted DROPS jacket with raglan, hood and bamboo pattern, worked top down in ”Nepal”. Size: S - XXXL.
DROPS 156-1 |
|
|
GARTER ST (back and forth on needle): K all rows. 1 ridge = 2 rows K. GARTER ST (in the round on double pointed needles): * K 1 round and P 1 round *, repeat from *-*. 1 ridge = 2 rounds. BAMBOO PATTERN (back and forth on needle): Row 1 (= RS): * 1 YO, K 2, pass YO over 2 K sts *, repeat from *-*. Row 2 (= WS): P all sts. Repeat rows 1 and 2. BAMBOO PATTERN (in the round on double pointed needles): Round 1: * 1 YO, K 2, pass YO over 2 K sts *, repeat from *-*. Round 2: K all sts. Repeat rounds 1 and 2. DECREASE TIP: Dec 1 st before marker as follows: Work until 2 sts remain before marker, slip 1 st as if to K, K 1, psso. Dec 1 st after marker as follows: K 2 tog. RAGLAN: Inc as follows at every marker: Work until 1 st remains before marker, 1 YO, K 2, 1 YO = 2 sts inc. Repeat at the remaining markers in piece = 8 sts inc on needle. On next row work YOs twisted (i.e. work in back loop of st instead of front) to avoid holes. ---------------------------------------------------------- JACKET: Worked back and forth, top down on circular needle/double pointed needles. HOOD: Cast on 116 sts in all sizes (incl 2 edge sts in GARTER ST – see explanation above, in each side of piece) on circular needle size 5 mm with Nepal. Work 1 ridge in garter st. Then work BAMBOO PATTERN back and forth – see explanation above, with 2 edge sts in garter st in each side (continue the 2 edge sts in garter st in each side until finished measurements). REMEMBER THE KNITTING TENSION! When piece measures 38 cm, work as follows from RS: Pattern as before over the first 30-32-36-40-44-48 sts, garter st over the next 56-52-44-36-28-20 sts AT THE SAME TIME dec 12-11-10-6-4-0 sts evenly, pattern over the remaining 30-32-36-40-44-48 sts = 104-105-106-110-112-116 sts. Continue back and forth until 3 ridges have been worked over the middle sts, AT THE SAME TIME on 2nd row from RS inc 4-8-14-19-25-32 sts evenly over sts in garter st, and on 3rd row from RS inc 4-7-13-18-25-31 sts evenly over sts in garter st = 112-120-133-147-162-179 sts. Now work an elevation in back of neck in garter st as follows from RS: Work until 30-32-36-40-44-48 sts remain, turn, work until 30-32-36-40-44-48 sts remain, turn, work until 40-42-46-50-55-58 sts remain, turn, work until 40-42-46-50-55-58 sts remain, turn, work until 50-52-56-60-65-68 sts remain, turn, work until 50-52-56-60-65-68 sts remain, turn, work until 55-57-61-65-70-73 sts remain, turn, work until 55-57-61-65-70-73 sts remain, turn and work the rest of row (pattern over the last 30-32-36-40-44-48 sts). YOKE: Now work pattern as before over the first 30-32-36-40-44-48 sts, 1 st in stocking st, insert 1st marker here, stocking st over the next 15 sts, insert 2nd marker here, stocking st over the next 20-24-29-35-42-51 sts, insert 3rd marker here, stocking st over the next 15 sts, insert 4th marker here, 1 st in stocking st, pattern as before over the remaining 30-32-36-40-44-48 sts. Now start inc for RAGLAN – see explanation above! Repeat inc every row 1-1-4-6-8-10 times (i.e. from RS and WS), and every row from RS 21-22-20-19-18-17 times = 288-304-325-347-370-395 sts. NOTE: Work the new inc sts on back piece and sleeves in stocking st, and work the first 8 new inc sts on front piece in bamboo pattern (i.e. inc 2 sts before there is enough sts to work bamboo pattern), then work the remaining inc sts in stocking st. Piece now measures 20-21-22-23-24-25 cm (measure from 1st row after edge in garter st at the back). Now work next row as follows: Work the first 52-55-60-65-70-75 sts, slip the next 61-63-65-67-69-71 sts on a stitch holder for sleeve, cast on 10 new sts under sleeve (insert a marker in the middle of the new sts), work the next 62-68-75-83-92-103 sts, slip the next 61-63-65-67-69-71 sts on a stitch holder for sleeve, cast on 10 new sts under sleeve (insert a marker in the middle of the new sts), work the remaining 52-55-60-65-70-75 sts. There are now 186-198-215-233-252-273 sts for body. NOW MEASURE PIECE FROM HERE! BODY: Continue back and forth with pattern as before. Work the new sts under sleeve in stocking st. When piece measures 4 cm from marker under sleeves, inc 1 st on each side of each marker as follows: Work until 1 st before first marker, 1 YO, 2 sts in stocking st, 1 YO, repeat at the other marker = 190-202-219-237-256-277 sts. Repeat inc every 3½-3½-3½-4-4½-6 cm 11-12-12-12-11-8 more times = 234-250-267-285-300-309 sts. When piece measures 46-48-50-52-54-55 cm from marker under sleeves, work 3 ridges. Loosely cast off. SLEEVE: Worked in the round on double pointed needles. Slip sts from stitch holder back on double pointed needles size 5 mm. Work 1 row from RS and cast on 10 new sts under sleeve (insert a marker in the middle of the new sts) = 71-73-75-77-79-81 sts. NOW MEASURE THE PIECE FROM HERE. When piece measures 4 cm, beg dec on each side of marker - READ DECREASE TIP. Repeat dec every 2-2-2-1½-1½-1½ cm 12-13-13-14-14-15 more times = 45-45-47-47-49-49 sts. When piece measures 32-32-32-32-31-31 cm, inc 3 sts evenly in all sizes = 48-48-50-50-52-52 sts. Now work BAMBOO PATTERN in the round on double pointed needles - see explanation above. When piece measures 47-47-47-47-48-48 cm, dec 4 sts in all sizes = 44-44-46-46-48-48 sts. Work 3 ridges in GARTER ST in the round on double pointed needles - see explanation above. Cast off. ASSEMBLY: Sew the holes under the sleeves. Sew tog hood st by st in cast-on edge. Sew on buttons on section with bamboo pattern on left front piece as follows: Sew 1 button approx. 2 cm in from edge and 43-45-47-49-51-53 cm from cast-off edge and 1 button 47-49-51-53-55-57 cm from cast-off edge. Repeat in the other side of section with bamboo pattern. Button through a hole in bamboo pattern. |
|
 |
|
Have you finished this pattern?Tag your pictures with #dropspattern #snowprincessjacket or submit them to the #dropsfan gallery. Do you need help with this pattern?You'll find 27 tutorial videos, a Comments/Questions area and more by visiting the pattern on garnstudio.com. © 1982-2026 DROPS Design A/S. We reserve all rights. This document, including all its sub-sections, has copyrights. Read more about what you can do with our patterns at the bottom of each pattern on our site. |
|


With over 40 years in knitting and crochet design, DROPS Design offers one of the most extensive collections of free patterns on the internet - translated to 17 languages. As of today we count 324 catalogues and 12267 patterns translated into English (UK/cm). 12267
We work hard to bring you the best knitting and crochet have to offer, inspiration and advice as well as great quality yarns at incredible prices! Would you like to use our patterns for other than personal use? You can read what you are allowed to do in the Copyright text at the bottom of all our patterns. Happy crafting!
Post a comment to pattern DROPS 156-1
We would love to hear what you have to say about this pattern!
If you want to leave a question, please make sure you select the correct category in the form below, to speed up the answering process. Required fields are marked *.