
Popular categories
Looking for a yarn?


Comments / Questions (178)
![]() Eila Sillman wrote:
Eila Sillman wrote:
Hej, håller på att sticka denna koftan, vill bara berätta att det är felskrivet på mönstret i ärmen. Först så skall där bli 69 maskar när man plockat upp dom 10. och när man minskat 12 gånger så stämmer det nog med 45 maskar kvar. (ökade 12 maskar i början på ärmen)så det blev ju fel på slutet. Och sen på slutet står det också att man har 20 maskar kvar. (jag håller på att sticka storlek S). Med vänlig hälsning Eila Sillman
19.09.2014 - 11:49
![]() Camilla wrote:
Camilla wrote:
Takk. Ser at oppskriften er endret siden jeg skrev den ut i august. Men nå skal det gå opp.
18.09.2014 - 13:19
![]() Camilla wrote:
Camilla wrote:
Takk. Ser at oppskriften er endret siden jeg skrev den ut i august. Men nå skal det gå opp.
18.09.2014 - 13:19
![]() Camilla wrote:
Camilla wrote:
Hei. Ser at flere har skrevet om at ikke alt stemmer når man begynner med bærestykket. Jeg strikker str m. Før bærestykket har jeg 128 m. Så skal jeg strikke 32+1+15+24+15+1+32=120 Hvor skal jeg gjøre av de siste 8 m? Håper på raskt svar siden jeg gleder meg til å begynne å bruke den fine jakken!
18.09.2014 - 10:08DROPS Design answered:
Hej Camilla. Ifølge opskriften skal du have 120 masker i str M når du starter på bærestykket. Se her ... jevnt fordelt over rille-m = 112-120-133-147-162-179 m! God fornøjelse!
18.09.2014 - 10:55
![]() Karita wrote:
Karita wrote:
Käännösvaiheessa lisäykset hupussa ovat vähentyneet. Oikeat luvut norjankielisen mallin mukaan ovat: 4-8-14-19-25-32 ja 4-7-13-18-25-31. Näin silmukkaluvuksi saadaan 112-120-133-147-162-179 ennen korotuksen alkua.
15.09.2014 - 13:10
![]() Kati wrote:
Kati wrote:
Myös koossa XL on ohjeeseen verrattuna juurikin tuo 8 silmukan heitto, kuten Marin kommentissa. Hupun lopussa koossa XL on 139s, mutta kaarrokkeen alussa olisi jopa 147s (40+1+15+35+15+1+40)?
14.09.2014 - 20:41
![]() Mari wrote:
Mari wrote:
Hupun lopussa silmukkaluku pienimmässä koossa on 120, mutta kaarrokkeen alussa silmukkaluku olisi vain 112 (30+1+15+20+15+1+30)?
12.09.2014 - 17:10
![]() Caron wrote:
Caron wrote:
Je ne comprends pas le passage pour la réhausse de l'encolure du dos. Quelqu'un pourrait m'éclairer???
09.09.2014 - 20:30DROPS Design answered:
Bonjour Mme Caron, la ré-hausse dos permet de tricoter plus de rangs sur les mailles du dos, on tricote ainsi quelques rangs raccourcis en laissant des mailles non tricotées à la fin de chaque rang de chaque côté. Bon tricot!
10.09.2014 - 08:48
![]() Karen wrote:
Karen wrote:
Bonjour, j'aimerais savoir si les toutes premières diminutions se répartissent sur les 84 premières mailles où sur la totalité des mailles ? merci
07.09.2014 - 22:24DROPS Design answered:
Bonjour Karen, à 38 cm, la capuche est terminée, on répartit des diminutions sur les mailles tricotées en jersey, on a 116 m, on tricote les 30-48 premières m (cf taille) en point fantaisie et les 56-20 m suivantes en jersey, en même temps, on répartit 12-4 (0 en taille XXXL) diminutions sur les mailles tricotées en jersey. À la fin de ce 1er rang, on doit avoir 104-116 m. Bon tricot!
08.09.2014 - 09:26
![]() Luciana wrote:
Luciana wrote:
Elegantissima
04.09.2014 - 01:55
|
|
Snow Princess#snowprincessjacket |
|
 |
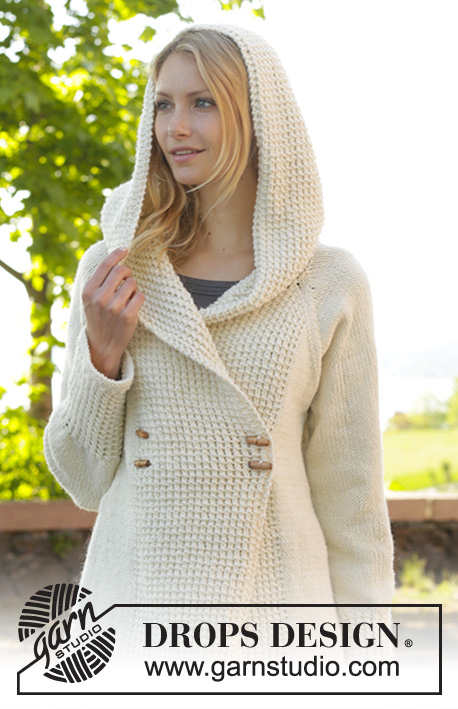 |
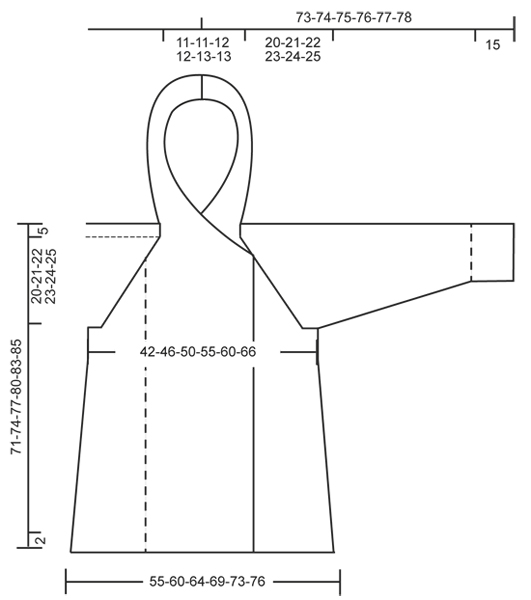
Knitted DROPS jacket with raglan, hood and bamboo pattern, worked top down in ”Nepal”. Size: S - XXXL.
DROPS 156-1 |
|
|
GARTER ST (back and forth on needle): K all rows. 1 ridge = 2 rows K. GARTER ST (in the round on double pointed needles): * K 1 round and P 1 round *, repeat from *-*. 1 ridge = 2 rounds. BAMBOO PATTERN (back and forth on needle): Row 1 (= RS): * 1 YO, K 2, pass YO over 2 K sts *, repeat from *-*. Row 2 (= WS): P all sts. Repeat rows 1 and 2. BAMBOO PATTERN (in the round on double pointed needles): Round 1: * 1 YO, K 2, pass YO over 2 K sts *, repeat from *-*. Round 2: K all sts. Repeat rounds 1 and 2. DECREASE TIP: Dec 1 st before marker as follows: Work until 2 sts remain before marker, slip 1 st as if to K, K 1, psso. Dec 1 st after marker as follows: K 2 tog. RAGLAN: Inc as follows at every marker: Work until 1 st remains before marker, 1 YO, K 2, 1 YO = 2 sts inc. Repeat at the remaining markers in piece = 8 sts inc on needle. On next row work YOs twisted (i.e. work in back loop of st instead of front) to avoid holes. ---------------------------------------------------------- JACKET: Worked back and forth, top down on circular needle/double pointed needles. HOOD: Cast on 116 sts in all sizes (incl 2 edge sts in GARTER ST – see explanation above, in each side of piece) on circular needle size 5 mm with Nepal. Work 1 ridge in garter st. Then work BAMBOO PATTERN back and forth – see explanation above, with 2 edge sts in garter st in each side (continue the 2 edge sts in garter st in each side until finished measurements). REMEMBER THE KNITTING TENSION! When piece measures 38 cm, work as follows from RS: Pattern as before over the first 30-32-36-40-44-48 sts, garter st over the next 56-52-44-36-28-20 sts AT THE SAME TIME dec 12-11-10-6-4-0 sts evenly, pattern over the remaining 30-32-36-40-44-48 sts = 104-105-106-110-112-116 sts. Continue back and forth until 3 ridges have been worked over the middle sts, AT THE SAME TIME on 2nd row from RS inc 4-8-14-19-25-32 sts evenly over sts in garter st, and on 3rd row from RS inc 4-7-13-18-25-31 sts evenly over sts in garter st = 112-120-133-147-162-179 sts. Now work an elevation in back of neck in garter st as follows from RS: Work until 30-32-36-40-44-48 sts remain, turn, work until 30-32-36-40-44-48 sts remain, turn, work until 40-42-46-50-55-58 sts remain, turn, work until 40-42-46-50-55-58 sts remain, turn, work until 50-52-56-60-65-68 sts remain, turn, work until 50-52-56-60-65-68 sts remain, turn, work until 55-57-61-65-70-73 sts remain, turn, work until 55-57-61-65-70-73 sts remain, turn and work the rest of row (pattern over the last 30-32-36-40-44-48 sts). YOKE: Now work pattern as before over the first 30-32-36-40-44-48 sts, 1 st in stocking st, insert 1st marker here, stocking st over the next 15 sts, insert 2nd marker here, stocking st over the next 20-24-29-35-42-51 sts, insert 3rd marker here, stocking st over the next 15 sts, insert 4th marker here, 1 st in stocking st, pattern as before over the remaining 30-32-36-40-44-48 sts. Now start inc for RAGLAN – see explanation above! Repeat inc every row 1-1-4-6-8-10 times (i.e. from RS and WS), and every row from RS 21-22-20-19-18-17 times = 288-304-325-347-370-395 sts. NOTE: Work the new inc sts on back piece and sleeves in stocking st, and work the first 8 new inc sts on front piece in bamboo pattern (i.e. inc 2 sts before there is enough sts to work bamboo pattern), then work the remaining inc sts in stocking st. Piece now measures 20-21-22-23-24-25 cm (measure from 1st row after edge in garter st at the back). Now work next row as follows: Work the first 52-55-60-65-70-75 sts, slip the next 61-63-65-67-69-71 sts on a stitch holder for sleeve, cast on 10 new sts under sleeve (insert a marker in the middle of the new sts), work the next 62-68-75-83-92-103 sts, slip the next 61-63-65-67-69-71 sts on a stitch holder for sleeve, cast on 10 new sts under sleeve (insert a marker in the middle of the new sts), work the remaining 52-55-60-65-70-75 sts. There are now 186-198-215-233-252-273 sts for body. NOW MEASURE PIECE FROM HERE! BODY: Continue back and forth with pattern as before. Work the new sts under sleeve in stocking st. When piece measures 4 cm from marker under sleeves, inc 1 st on each side of each marker as follows: Work until 1 st before first marker, 1 YO, 2 sts in stocking st, 1 YO, repeat at the other marker = 190-202-219-237-256-277 sts. Repeat inc every 3½-3½-3½-4-4½-6 cm 11-12-12-12-11-8 more times = 234-250-267-285-300-309 sts. When piece measures 46-48-50-52-54-55 cm from marker under sleeves, work 3 ridges. Loosely cast off. SLEEVE: Worked in the round on double pointed needles. Slip sts from stitch holder back on double pointed needles size 5 mm. Work 1 row from RS and cast on 10 new sts under sleeve (insert a marker in the middle of the new sts) = 71-73-75-77-79-81 sts. NOW MEASURE THE PIECE FROM HERE. When piece measures 4 cm, beg dec on each side of marker - READ DECREASE TIP. Repeat dec every 2-2-2-1½-1½-1½ cm 12-13-13-14-14-15 more times = 45-45-47-47-49-49 sts. When piece measures 32-32-32-32-31-31 cm, inc 3 sts evenly in all sizes = 48-48-50-50-52-52 sts. Now work BAMBOO PATTERN in the round on double pointed needles - see explanation above. When piece measures 47-47-47-47-48-48 cm, dec 4 sts in all sizes = 44-44-46-46-48-48 sts. Work 3 ridges in GARTER ST in the round on double pointed needles - see explanation above. Cast off. ASSEMBLY: Sew the holes under the sleeves. Sew tog hood st by st in cast-on edge. Sew on buttons on section with bamboo pattern on left front piece as follows: Sew 1 button approx. 2 cm in from edge and 43-45-47-49-51-53 cm from cast-off edge and 1 button 47-49-51-53-55-57 cm from cast-off edge. Repeat in the other side of section with bamboo pattern. Button through a hole in bamboo pattern. |
|
 |
|
Have you finished this pattern?Tag your pictures with #dropspattern #snowprincessjacket or submit them to the #dropsfan gallery. Do you need help with this pattern?You'll find 27 tutorial videos, a Comments/Questions area and more by visiting the pattern on garnstudio.com. © 1982-2026 DROPS Design A/S. We reserve all rights. This document, including all its sub-sections, has copyrights. Read more about what you can do with our patterns at the bottom of each pattern on our site. |
|


With over 40 years in knitting and crochet design, DROPS Design offers one of the most extensive collections of free patterns on the internet - translated to 17 languages. As of today we count 324 catalogues and 12267 patterns translated into English (UK/cm). 12267
We work hard to bring you the best knitting and crochet have to offer, inspiration and advice as well as great quality yarns at incredible prices! Would you like to use our patterns for other than personal use? You can read what you are allowed to do in the Copyright text at the bottom of all our patterns. Happy crafting!
Post a comment to pattern DROPS 156-1
We would love to hear what you have to say about this pattern!
If you want to leave a question, please make sure you select the correct category in the form below, to speed up the answering process. Required fields are marked *.