
Popular categories
Looking for a yarn?


Comments / Questions (119)
![]() Loredana wrote:
Loredana wrote:
Buongiorno! Volevo chiedere il vostro parere,vorrei lavorarlo con due fili di lace pero' non vorrei diventasse troppo pesante,inoltre cambierebbe di molto l'effetto finale? Soprattutto per quanto riguarda la parte in pizzo. Se fosse possibile che numero di ferri dovrei utilizzare? Grazie mille per la disponibilità' Loredana
20.04.2015 - 11:40DROPS Design answered:
Buongiorno Loredana, lavorando con 2 capi di Lace lo scialle perderebbe di leggerezza e ariosità. Per il n° di ferri dovrebbe lavorare con il 5 o 5,5 mm, tenendo conto però che in questo modo il campione non corrisponderà a quello indicato, quindi il risultato sarebbe diverso. Buon lavoro!!
20.04.2015 - 13:52
![]() Zsuzsa wrote:
Zsuzsa wrote:
Az a kerdesem hogy kezdő szemszamnak 63 szemet ir,akkor a középső szem hogy lehet 57? Köszónettel Zsuzsa
13.04.2015 - 16:24DROPS Design answered:
Kedves Zsuzsa, az 57 szem nem az jelenti, hogy a kendőnek van egy középső szeme, és annak a két oldalán 57-57 szem, hanem a kendőnek van egy középső, 57 szemből álló szakasza, ennek két oldalán kell szaporítani.
06.11.2016 - 14:43
![]() Birgit Högberg wrote:
Birgit Högberg wrote:
Drops 152-4. Sista mönstervarvet A4-A6 blir det 17 maskor i A5 rapporten. Ska det vara så. När man har gjort alla varven i A4-A6 slutar den med ett rätt varv, det finns inget avigt varv
06.04.2015 - 11:23DROPS Design answered:
Hej Birgit, Ja du har 17 m i A5 när du slutar diagrammet. Sedan stickar du ett varv från avitsiden enligt beskrivningen: "Efter sista varvet i diagrammet stickas det 1 v avigt från avigsidan innan det maskas av löst med rm från rätsidan." Lycka till!
15.05.2015 - 10:22
![]() Avlis wrote:
Avlis wrote:
Garderoobi, palun, mitte karderoobi.
01.04.2015 - 09:14
![]() Antonella wrote:
Antonella wrote:
Sto iniziando il pizzo ma se faccio il conto dei motivi da ripetere A1 - A3 e il numero delle Magli 341 non mi trovo non ho capito io o c è qualcosa che non va? Grazie
22.03.2015 - 20:46DROPS Design answered:
Buonasera Antonella. Le 341 m sono corrette: le lavora come segue: 1 m vivagno, diagramma A.1 (6 m), ripete 22 volte il diagramma A.2 (22 volte x 15 m= 330 m) , diagramma A.3 (3 m), 1 m vivagno. In tutto 1 + 6 + 330 + 3 + 1 = 341 m. Buon lavoro!
22.03.2015 - 21:17
![]() Anna Tampoia wrote:
Anna Tampoia wrote:
Mi approccio a iniziare lo scialle ma non ho ben capito una cosa,quando dice di aumentare ai lati delle 57 m centrali vuol dire a destra e sinistra dei 2 marcapunti Messi o ai due lati di ciascun marcapunto?e poi aumenti a inizio e fine di uno stesso ferro?
12.03.2015 - 23:31DROPS Design answered:
Buongiorno Anna. Deve aumentare: ad ogni ferro (quindi sia sul diritto del lavoro che sul rovescio) 1 m all’inizio e 1 m alla fine del ferro, all’interno della m vivagno. Ogni due ferri (quindi solo sul diritto del lavoro), aumenta 1 m prima delle 57 m centrali e 1 m dopo le 57 m centrali. Tra i due segni ci devono sempre essere 57 m. Ci riscriva se è ancora in difficoltà. Buon lavoro!
13.03.2015 - 09:20
![]() Ute wrote:
Ute wrote:
Meine Frage ist die gleiche wie die von Mary vorher, meine englischen Strick - Kenntnisse reichen nur nicht zur Übersetzung. Wie komme ich also von 3 Maschen (+1 Rand) in Reihe 6 auf 4 Maschen (+1 Rand) in Reihe 7? Das Muster sagt doch RM re re Umschl. 2 zusammen?
12.03.2015 - 15:05DROPS Design answered:
Liebe Ute, das Muster ist nicht ganz exakt abgedruckt, zumindest nicht die Einzelteile - was in R 7 bei A.1 1 M zu viel erscheint, ist bei A.3 1 in R 7 1 M zu wenig. Im Prinzip müsste die 6. R von A.2 um 1 M nach rechts versetzt erscheinen, dann wäre es deutlicher. Das macht aber alles nichts, weil Sie die Muster ja direkt nacheinander stricken. Sie können also einfach A.1 wie gezeigt stricken, schließen A.2 wie gezeigt an und wdh A.2 und enden wie gezeigt mit A.3. Im Zusammenhang sind die Muster stimmig. Gutes Gelingen!
12.03.2015 - 22:52Mary wrote:
Thanks for your response to my previous question. I am now working the chart. How is it that on A.1 row 6 there are 3 stitches, yet these same stitches when worked on row 7, become 4 stitches? As I read Row 7, it looks like K2, yo, sl 1 knit wise, K1, psso which requires 4 stitches, but row 6 only has 3 stitches.
26.01.2015 - 02:48DROPS Design answered:
Dear Mary, row 7 in A.1 will be worked over the first 4 sts, ie K2, YO, sl 1 as if to K, K1, psso, then repeat A.2 until 5 sts remain to work A.3 (+ edge st) and work A.3. Happy knitting!
26.01.2015 - 11:02Mary wrote:
Hi there - just curious about the instructions where, after you work A.1, A.2 and A.3 four times vertically, in total. Then the pattern states work diagrams A.4 to A.6 the same way. Does this mean that A.4 to A.6 is worked four times vertically as well? When I look at the model, it looks as if A.4 to A.6 may only be worked once. Thank you.
15.01.2015 - 20:36DROPS Design answered:
Dear Mary, after A.1 and A.3 you work A.4 - A.6 1 time in height as follows: 1 edge st, A.4 over the next 6 sts, repeat A.5 (=15 sts) until 4 sts remain, and finish with A.6 (= 3 sts), and 1 edge st. Happy knitting!
16.01.2015 - 09:45
![]() Fay wrote:
Fay wrote:
Liebes DROPS-Team, ich liebe Eure Muster und stricke leidenschaftlich gern, allerdings kann ich gar nicht so viel tragen wie ich verstricken könnte, darf ich denn Schals verkaufen, die ich nach Anleitungen von Euch aber ohne Eure Wolle gefertigt habe? Ich gehe sonst irgendwann in den fertigen Stücken unter, das wär doch auch schade!
01.12.2014 - 15:20DROPS Design answered:
Liebe Fay, die Konditionen für den Verkauf von Modellen können Sie auf unserer Homepage nachlesen. Wir bitten um Verständnis, dass wir einem Verkauf von Modellen, die nach unseren Anleitungen gefertigt sind, nur zustimmen, wenn mit unserer Wolle gearbeitet wird.
01.12.2014 - 16:08
|
|||||||||||||||||||
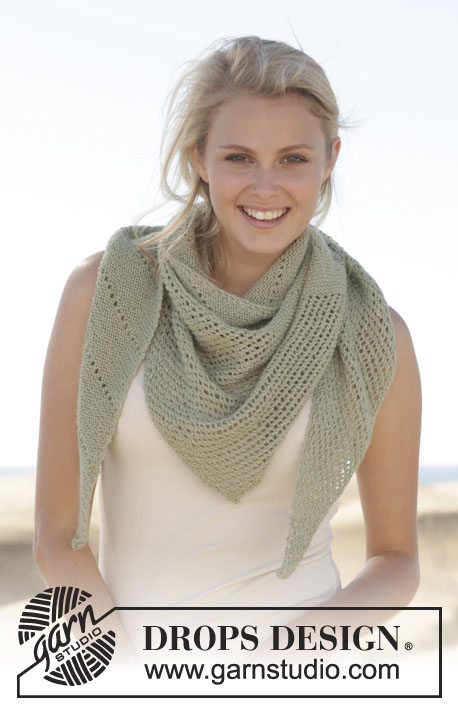
French Riviera#frenchrivierashawl |
|||||||||||||||||||
|
|
|||||||||||||||||||
Knitted DROPS shawl with lace pattern in ”Lace”.
DROPS 152-4 |
|||||||||||||||||||
|
KNITTING TENSION: This garment is to be soaked and blocked/stretched to size afterwards so the knitting tension is not that important. But to get a sense of whether you are working too loose/tight, work a test on needle size 3.5 mm in stocking st and get approx. 23 sts x 30 rows = 10 x 10 cm. GARTER ST (back and forth on needle): K all rows. 1 ridge = 2 rows K. PATTERN: See diagrams A.1 to A.6. The diagrams show all rows in pattern seen from RS. INCREASE TIP: Inc with YO, YO should not be twisted on next row but should make a hole in the piece. ---------------------------------------------------------- SHAWL: Worked back and forth on circular needle. Cast on 63 sts on circular needle size 3.5 mm with Lace, insert 2 markers in the piece on each side of the middle 57 sts. Continue in stocking st with 1 edge st in GARTER ST - READ EXPLANATION ABOVE in each side of piece - AT THE SAME TIME inc as follows - READ INCREASE TIP ABOVE: Inc 1 st in each side inside 1 edge st on every row and inc 1 st on each side of the middle 57 sts every other row. REMEMBER THE KNITTING TENSION! Continue like this until inc have been done 46 times in total on each side of the 57 sts and 92 times in each side = 339 sts on needle. NOTE! Adjust so that last row is from RS. On next row from WS inc 1 st inside edge st in each side = 341 sts. Piece now measures approx. 30 cm mid back. Then work PATTERN - READ EXPLANATION ABOVE! according to diagrams A.1 to A.3, beg from RS as follows: Work 1 edge st in garter st, A.1 (= 6 sts), A.2 until 4 sts remain on needle, then work diagram A.3 and finish with 1 edge st in garter st. Work diagram 4 times vertically in total. Then work diagrams A.4 to A.6 the same way. After last row in diagram P 1 row from WS before loosely casting off with K from RS. Cast off with a YO for every YO from last row in diagram to make the edge extra elastic and easy to stretch and shape. Piece measures approx. 50 cm vertically. BLOCKING: Place the shawl in lukewarm water until it is soaking wet. Carefully squeeze out the water from the shawl - do not twist. Then roll the shawl in a towel and squeeze to remove more water - the piece will now only be moist. Place the shawl on a carpet or mattress - carefully stretch it out to measurements. On this shawl tips can be made in the bottom edge by stretching a little extra where 2 K sts are (diagram A.5). Also stretch the edge st in each side at the bottom of edge, fasten pins in each tip and along the other edges. Leave shawl to dry. Repeat the process when the garment has been washed. |
|||||||||||||||||||
Diagram explanations |
|||||||||||||||||||
|
|||||||||||||||||||
 |
|||||||||||||||||||
Have you finished this pattern?Tag your pictures with #dropspattern #frenchrivierashawl or submit them to the #dropsfan gallery. Do you need help with this pattern?You'll find 19 tutorial videos, a Comments/Questions area and more by visiting the pattern on garnstudio.com. © 1982-2026 DROPS Design A/S. We reserve all rights. This document, including all its sub-sections, has copyrights. Read more about what you can do with our patterns at the bottom of each pattern on our site. |
|||||||||||||||||||


With over 40 years in knitting and crochet design, DROPS Design offers one of the most extensive collections of free patterns on the internet - translated to 17 languages. As of today we count 324 catalogues and 12267 patterns translated into English (UK/cm). 12267
We work hard to bring you the best knitting and crochet have to offer, inspiration and advice as well as great quality yarns at incredible prices! Would you like to use our patterns for other than personal use? You can read what you are allowed to do in the Copyright text at the bottom of all our patterns. Happy crafting!
Post a comment to pattern DROPS 152-4
We would love to hear what you have to say about this pattern!
If you want to leave a question, please make sure you select the correct category in the form below, to speed up the answering process. Required fields are marked *.