
Popular categories
Looking for a yarn?


Comments / Questions (266)
![]() Jana wrote:
Jana wrote:
Hallo nochmal. Ich brauch noch Hilfe bei der Vorderseite. Es sind ja 136 Maschen. Werden die verkürzten Reihen nur einmal in der kompletten Reihe gestrickt? Vielen Dank
22.10.2022 - 20:47DROPS Design answered:
Liebe Jana, die verkürzten Reihen werden nicht bei jeden Vorderteil gestrickt, ich finde 136 Maschen nur beim Rückenteil (die angeschlagene Maschenanzahl im S); misverstehe ich Ihre Frage? Bei den Vorderdteilen stricken Sie die verkürzten Reihen jedesmal Sie die 3. Reihe (Re. Vorderteil) / 2. Reihe (Li. Vorderteil) stricken (= 2 extra Reihen über die 26-30 Maschen der Blende). Viel Spaß beim stricken!
24.10.2022 - 08:27
![]() Liot wrote:
Liot wrote:
Concerne le col châle de la veste DROPS Extrat0-850 design: Modèle n° LI-014 Bonjour, à 5 cm du col il faut augmenter 1 m dans chacune des 14 sections envers centrales au niveau de l'encolure dos : qu'entendez-vous par sections et cela veut-il dire que les côtes sont décalées ou elles font 3 mailles au lieu de 2.... c'est mon premier col châle :) je vous remercie de bien m'expliquer comment procéder. Cordialement.
07.10.2022 - 08:22DROPS Design answered:
Bonjour Mme Liot, quand on tricote en côtes 2 m end/ 2 m env, 1 section en mailles envers correspond aux 2 m envers des côtes; autrement dit vous allez passer à 3 mailles envers dans les côtes au milieu du col pour que le retombé du col soit plus joli, mais continuer à tricoter en côtes 2 m end/ 2 m env de part et d'autre de ces (2 m end, 3 m env). Bon tricot!
07.10.2022 - 08:52
![]() DOLE wrote:
DOLE wrote:
Bonjour Modèle Rambling Man, rangs raccourcis, vous indiquez Tricoter 1 rang raccourci à chaque rang 3 de chacun des rapports du point fantaisie. Que signifie chacun des rapports. Est-ce à chaque fois q 'on recommence le diagramme A1.Merci de votre réponse
27.09.2022 - 13:40DROPS Design answered:
Bonjour Mme Dole, tricotez les rangs raccourcis à chaque fois que vous tricotez le rang 3 de A.1. Bon tricot!
27.09.2022 - 16:09
![]() Jana wrote:
Jana wrote:
Hallo. Ich hab Schwierigkeiten bei dem Muster A4. In der Hinreihe wird ja links, rechts gestrickt. In der Rückreihe links, rechts. In der dritten geht es weiter mit rechts, links und in der Rückreihe rechts, links. Ist das so richtig? Oder denke ich falsch?
16.09.2022 - 17:37DROPS Design answered:
Liebe Jana, bei den Rückreihen stricken Sie immer rechts über rechts und links über links - dieses Video zeigt, wie man dieses Muster strickt. Viel Spaß beim stricken!
11.10.2022 - 16:15
![]() Josie wrote:
Josie wrote:
Bonjour, je viens de passer ma commande, à la place de la LIMA, j'ai choisi Soft Tweed. J'ai calculé le métrage pour taille L et j'ai commandé 17 pelotes. Je suis inquiète quand à la réalisation de cette veste parcequ'il y a quand même 24 pages de questions ! Est-ce que je vais m'en sortir ? Si j'ai des difficultés je pourrai toujours regarder les réponses données. Merci
12.09.2022 - 23:31DROPS Design answered:
Bonjour Josie, il semble d'après le convertisseur que vous avez bien calculé, pensez à bien conserver la même tension que l'échantillon indiqué, lisez attentivement les explications et n'hésitez pas à poser votre question ici si besoin. Le nombre de questions est bien souvent également lié au succès d'un modèle :) mais si vous avez besoin d'aide, n'hésitez pas. Bon tricot!
13.09.2022 - 09:41
![]() Bob wrote:
Bob wrote:
Cap of sleeve instructions read ...then bind off at the beginning of every row each side 3 sts 1 time, 2 sts 2 times, and 1 st 1 time. So far I’m good- but It then.....? Then bind off 2 sts in each side until piece (50 cm). Does this mean both ends of every row, or beginning of every row. Please verify. Thank you.
30.05.2022 - 06:41DROPS Design answered:
Hi Bob, The final instructions are also for the beginning of every row. Happy knitting!
30.05.2022 - 06:53
![]() Jel Meurs wrote:
Jel Meurs wrote:
Ik kom niet uit met de mouw kop vind de beschrijving niet helemaal duidelijk kunt u mij helpen Zo lees ik het: afkanten 2 x 3 st Dan 2 x 2 st ,4 x 2 st Kant Dan in elke 2 st aan elke kan ( elke keer 2 st ) tot het werk 59 cm is Klopt dit Met vrienlijke groet Jel Meurs
26.04.2022 - 21:52DROPS Design answered:
Dag Jel,
Klopt helemaal zoals je het beschrijft; je kant eerst 2 maal 3 steken af aan elke kant, dan 2 maal 2 steken en nog eens 4 keer 1 steek. Daarna blijf je steeds aan het begin van elke naald 2 steken afkanten tot het werk 59 cm meet. Dan kan je weer 2 keer 3 staken af aan elke kant en tot slot kant je de steken af.
04.05.2022 - 08:33
![]() Katharina wrote:
Katharina wrote:
Guten Tag Ich hätte eine Frage zur Vorderseite bezüglich verkürzter Reihen: Muss ich jeweils jede 3. (oder 2.) Reihe verkürzen oder nur einmal im Rapport? Besten Dank für eine Rückmeldung.
20.04.2022 - 06:07DROPS Design answered:
Liebe Katharina, die verkürzten Reihen stricken Sie jedesmal Sie die 3. (oder die 2. ) Reihe in jedem Diagram stricken (die 3. oder 2. von den 24 Reihen). Viel Spaß beim stricken!
20.04.2022 - 07:25
![]() Marir wrote:
Marir wrote:
Hei, nok et spørsmål. Hvorfor strikkes det forkortet pinne på hver 2. pinne på venstre forstykke og hver 3. på høyre? Eller har jeg misforstått noe? Takk for hjelp!
29.01.2022 - 15:26DROPS Design answered:
Hej, du strikker forkortede pinde på samme måde, men starter på 2.p i mønsteret. God fornøjelse!
03.02.2022 - 14:21
![]() Marie wrote:
Marie wrote:
Hei, hvis man strikker knappehull på venstre forstykke, skal det også gjøres på retten? eller på vrangsiden? Samme teknikk? Takk for svar!
18.01.2022 - 12:34DROPS Design answered:
Hei Marie. Det kan gjøres på samme pinne (fra retten), samme teknikk. mvh DROPS Design
18.01.2022 - 14:14
|
||||||||||||||||
Rambling Man#ramblingmancardigan |
||||||||||||||||
 |
 |
|||||||||||||||
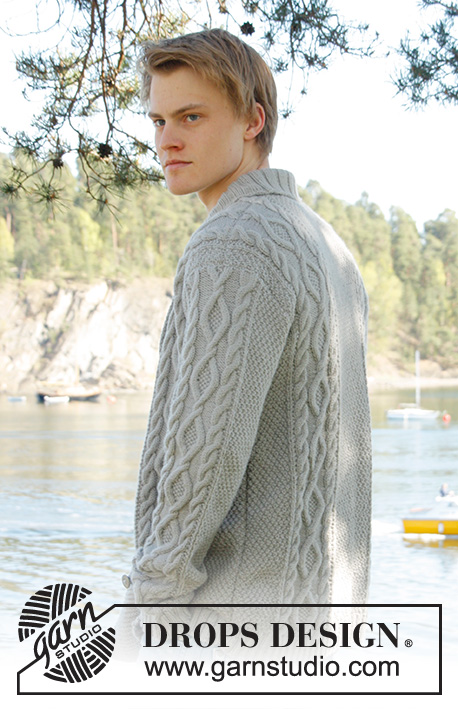
Men's knitted jacket in DROPS Lima, with cable pattern and shawl collar. Size: S - XXXL.
DROPS Extra 0-850 |
||||||||||||||||
|
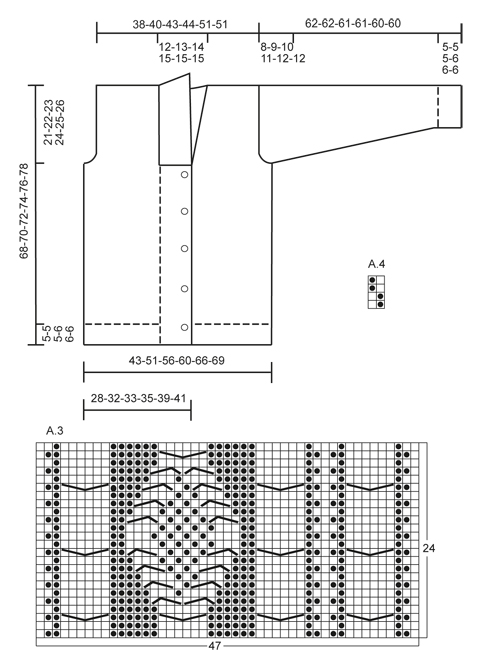
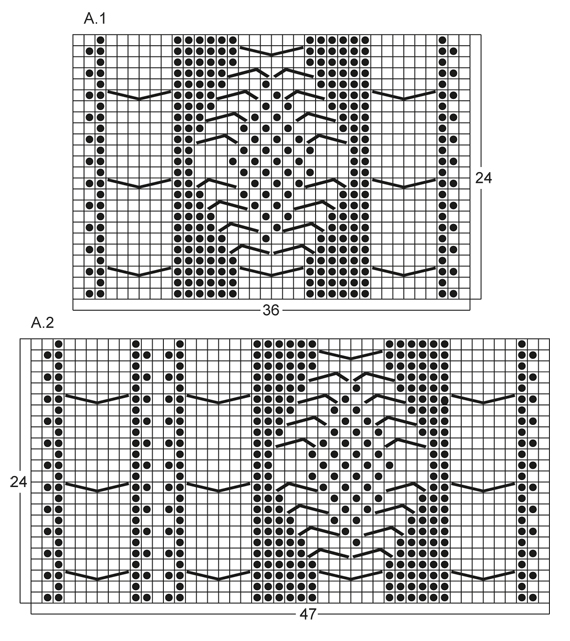
KNITTING TIPS: This design is written with button holes on right front edge, if you wish standard button holes for men, you can make the button holes on left front edge. GARTER ST (back and forth on needle): K all rows. NOTE: All edge sts are worked in garter st. PATTERN: See diagram A.1 to A.4, diagrams show all rows in 1 pattern repetition from RS. SHORT ROWS: RIGHT FRONT PIECE: Work 1 short row on row 3 of every pattern repetition vertically until finished measurements as follows: On 3rd row in pattern (= RS), work 26-26-26-26-30-30 band sts, turn and K back. Then work over all sts on row as before. LEFT FRONT PIECE: Work 1 short row on row 2 of every pattern repetition vertically until finished measurements as follows: On 2nd row in pattern (= WS), work 26-26-26-26-30-30 band sts, turn and K back. Then work over all sts on row as before. BUTTON HOLES: Cast off for 5 button holes from RS on right band. 1 BUTTON HOLE = cast off 7th and 8th st from mid front and cast on 2 new sts on next row over these sts. Cast off for button holes when piece measures: SIZE S: 14, 22, 30, 38 and 46 cm SIZE M: 15, 23, 31, 39 and 47 cm SIZE L: 16, 24, 32, 40 and 48 cm SIZE XL: 17, 25, 33, 41 and 49 cm SIZE XXL: 18, 26, 34, 42 and 50 cm SIZE XXXL: 19, 27, 35, 43 and 51 cm INCREASE TIP: Inc 1 st by making 1 YO, on next row work YO twisted (i.e. work in back loop of st instead front) to avoid holes. ---------------------------------------------------------- BACK PIECE: Worked back and forth on needle. Cast on 136-156-168-180-196-204 sts (incl 1 edge st in each side) on circular needle size 3.5 mm with Lima. Work rib as follows (1st row = RS): 1 edge st in GARTER ST - see explanation above, * K 2, P 2 *, repeat from *-*, finish with K 2 and 1 edge st in garter st. Continue to work like this until rib measures 5-5-5-6-6-6 cm. On last row from WS, P while AT THE SAME TIME dec 20-22-24-26-26-26 sts evenly = 116-134-144-154-170-178 sts. Then switch to needle size 4 mm and work next row from RS as follows: 1 edge st in garter st, 8-16-20-24-20-24 sts in A.4, work A.1 one time in size S - XL, work A.2 one time in size XXL and XXXL, 26-28-30-32-34-34 sts in A.4, then work A.1 one time in size S - XL, work A.3 one time in size XXL and XXXL, finish with 8-16-20-24-20-24 sts in A.4 and 1 edge st in garter st. REMEMBER THE KNITTING TENSION! Continue to work like this until piece measures 47-48-49-50-51-52 cm. Then cast off for armholes at the beg of every row in each side as follows: Cast off 3 sts 0-1-1-2-2-2 times, 2 sts 1-1-1-2-2-2 times, 1 st 4-7-9-8-4-8 times = 104-110-116-118-142-142 sts. Continue with pattern as before until piece measures 66-68-70-72-74-76 cm. Now cast off the middle 20-22-24-26-28-28 sts for neck and finish each part separately. Cast off 2 sts on next row from neck = 40-42-44-44-55-55 sts remain on shoulder. Continue with pattern as before. When piece measures 68-70-72-74-76-78 cm, loosely cast off sts with K over K and P over P. RIGHT FRONT PIECE: Worked back and forth on needle. Cast on 83-91-95-99-111-115 sts (incl 1 edge st in the side) on circular needle size 3.5 mm with Lima. Work rib as follows (1st row = RS): 26-26-26-26-30-30 sts in garter st (= band sts), * K 2, P 2 *, repeat from *-*, finish with 1 edge st in garter st. Continue with rib and band sts in garter st until rib measures 5-5-5-6-6-6 cm. On last row from WS, P over all sts in rib while AT THE SAME TIME dec 12-12-12-12-13-13 sts evenly (do not dec over band sts) = 71-79-83-87-98-102 sts. Then switch to needle size 4 mm and work next row from RS as follows: 26-26-26-26-30-30 band sts, work A.1 one time in size S - XL, work A.3 one time in size XXL and XXXL, 8-16-20-24-20-24 sts in A.4 and 1 edge in garter st. On next row from RS (= 3rd row in pattern) work SHORT ROWS - read explanation above. Continue with pattern and band sts at the front - while AT THE SAME TIME work 1 short row on 3rd row in every pattern repetition vertically until finished measurement. When piece measures 14-15-16-17-18-19 cm, cast off for BUTTON HOLES on right band - see explanation above! Continue to work until piece measures 47-48-49-50-51-52 cm. Then cast off at beg of next row from RS as follows: Cast off the first 25-25-25-25-29-29 sts, insert a marker (this marks where to beg the knit up for collar), work the rest of row. Then cast off for armhole on every row from WS as follows: 3 sts 0-1-1-2-2-2 times, 2 sts 1-1-1-2-2-2 times, 1 st 4-7-9-8-4-8 times = 40-42-44-44-55-55 sts remain on shoulder. Continue with pattern as before. When piece measures 68-70-72-74-76-78 cm, loosely cast off sts with K over K and P over P. LEFT FRONT PIECE: Cast on and work rib as on right front piece but reversed (i.e. * P 2, K 2 *, repeat from *-*) with 26-26-26-26-30-30 band sts in garter st. Continue to work until rib measures 5-5-5-6-6-6 cm. On last row from WS, P over all sts in rib while AT THE SAME TIME dec 12-12-12-12-13-13 sts evenly (do not dec over band sts) = 71-79-83-87-98-102 sts. Then switch to needle size 4 mm and work next row from RS as follows: 1 edge st in garter st, 8-16-20-24-20-24 sts in A.4, work A.1 one time in size S - XL, work A.2 one time in size XXL and XXXL, 26-26-26-26-30-30 band sts in garter st. On next row from WS (= 2nd row in pattern) work SHORT ROWS - read explanation above. Continue to work the same way as on right front piece but without button holes. SLEEVE: Worked back and forth on needle. Cast on 74-78-82-86-90-90 sts (incl 1 edge st in each side) on circular needle size 3.5 mm with Lima. Work rib as follows (1st row = RS): 1 edge st in garter st, * K 2, P 2 *, repeat from *-* and finish with 1 edge st in garter st. Continue to work like this until rib measures 5-5-5-6-6-6 cm. On last row from WS, P while AT THE SAME TIME dec 12-14-16-18-18-18 sts evenly = 62-64-66-68-72-72 sts. Then switch to needle size 4 mm and work next row from RS as follows: 1 edge st in garter st, 12-13-14-15-17-17 sts in A.4, work A.1 one time, 12-13-14-15-17-17 sts in A.4, finish with 1 edge st in garter st. AT THE SAME TIME when piece measures 6 cm, inc 1 st inside 1 edge st in each side - Read INCREASE TIP above. NOTE: Work the inc sts in A.4. Repeat inc every 3½-3-2½-2½-2½-2½ cm a total of 14-15-16-17-16-17 times = 90-94-98-102-104-106 sts. Continue until piece measures 54-53-51-50-48-48 cm (shorter measurements in the larger sizes because of longer sleeve cap and broader shoulder width), cast off at beg of every row in each side: 3 sts 1-1-1-2-2-2 times, 2 sts 1-1-2-2-2-2 times and 1 st 2-2-3-3-4-4 times. Then cast off 2 sts in each side until piece measures 61-61-60-60-59-59 cm, then cast off 3 sts 2 times in each side. When piece measures approx. 62-62-61-61-60-60 cm, loosely cast off sts with K over K and P over P. ASSEMBLY: Sew shoulder seams and sew in sleeves inside 1 edge st. Sew sleeve and side seams in one inside 1 edge st. Sew buttons on to left front piece, approx. 2½ cm from last K st in pattern. SHAWL COLLAR: Knit up sts from RS inside 1 edge st on circular needle size 3.5 mm. Start mid front at marker on right front piece as follows: Knit up approx. 60-70 sts up to shoulder, then 30-40 sts along the neck and 60-70 sts down along left front piece until marker = 150-180 sts. K 1 row from WS while AT THE SAME TIME adjusting no of sts to 144-148-156-164-172-180. Then work rib on next row from RS as follows: 1 sts in garter st, * K 2, P 2 *, repeat from *-* and finish with K 2 and 1 st in garter st. Continue like this until collar measures approx. 5-5-5-6-6-6 cm. Now inc 1 st in each of the middle 14-14-14-16-16-16 P-sections seen from RS (= back of neck) = 158-162-170-180-188-196 sts. Continue until collar measures approx. 12-12-12-12-14-14 cm, then loosely cast off with K over K and P over P. Fasten collar with stitches at the bottom in each side towards band from WS (so that the seam is not visible from RS) – sew edge to edge to avoid a chunky seam. |
||||||||||||||||
Diagram explanations |
||||||||||||||||
|
||||||||||||||||
 |
||||||||||||||||
 |
||||||||||||||||
Have you finished this pattern?Tag your pictures with #dropspattern #ramblingmancardigan or submit them to the #dropsfan gallery. Do you need help with this pattern?You'll find 23 tutorial videos, a Comments/Questions area and more by visiting the pattern on garnstudio.com. © 1982-2026 DROPS Design A/S. We reserve all rights. This document, including all its sub-sections, has copyrights. Read more about what you can do with our patterns at the bottom of each pattern on our site. |
||||||||||||||||


With over 40 years in knitting and crochet design, DROPS Design offers one of the most extensive collections of free patterns on the internet - translated to 17 languages. As of today we count 324 catalogues and 12245 patterns translated into English (UK/cm). 12245
We work hard to bring you the best knitting and crochet have to offer, inspiration and advice as well as great quality yarns at incredible prices! Would you like to use our patterns for other than personal use? You can read what you are allowed to do in the Copyright text at the bottom of all our patterns. Happy crafting!
Post a comment to pattern DROPS Extra 0-850
We would love to hear what you have to say about this pattern!
If you want to leave a question, please make sure you select the correct category in the form below, to speed up the answering process. Required fields are marked *.