
Popular categories
Looking for a yarn?


Comments / Questions (266)
![]() Mirjam wrote:
Mirjam wrote:
Hallo, als ik het patroon lees, zie ik staan bij de mouw, zet 78 steken op., bij maat M. Is dat niet veel te veel voor de boord van een mouw? En als dat zo is, hoe gaat t patroon dan verder?
18.12.2023 - 21:00DROPS Design answered:
Dag Mirjam,
Het aantal steken voor de manchet klopt wel. In het ontwerp is een wijde manchet verwerkt, dit kun je ook een beetje zien aan de foto. Als je dit niet mooi vindt, zou je ook minder steken op kunnen zetten en dan vlak na de manchet meerderen naar het juiste aantal steken.
20.12.2023 - 19:18
![]() Martine GIDON wrote:
Martine GIDON wrote:
Pour les rangs raccourcis, peut-on dire que pour 1 rang point mousse, nous avons 2 rangs point mousse dans la section des 26 mailles ? merci
07.11.2023 - 20:24DROPS Design answered:
Bonjour Mme Gidon, effectivement, au lieu de tricoter toutes les mailles du devant, quand on tricote le 3ème rang des diagrammes (cf réponse précédente), vous allez tricoter seulement les 26 mailles de la bordure devant, tourner et tricoter ces mailles à nouveau (devant droit, en commençant sur l'endroit, devant gauche, en commençant sur l'envers). Continuez ensuite comme avant et répétez ces rangs raccourcis quand vous recommencez les diagrammes en hauteur (- au 3ème rang des diagrammes). Si la bordure devant est encore trop longue, ajustez-en la fréquence. Bon tricot!
08.11.2023 - 08:02
![]() Martine GIDON wrote:
Martine GIDON wrote:
Bonjour, est-ce normal que les sections de 26 mailles des devants soient plus longues vers l'extérieur ? Merci
07.11.2023 - 14:26DROPS Design answered:
Bonjour Mme Gidon, grâce aux rangs raccourcis, les mailles de la bordure devant doivent être de la même hauteur que la partie point fantaisie des devants. Si votre tension point mousse est différente et fait apparaître cette partie plus longue, il peut être sage de tricoter ces rangs raccourcis moins souvent. Notez qu'ils ne se tricote qu'une fois par diagramme en hauteur (= à chaque fois que l'on tricote le 3ème rang des diagrammes, autrement dit, 1 x par diagramme en hauteur) Bon tricot!
08.11.2023 - 07:49
![]() Danielle wrote:
Danielle wrote:
In de verkorte toeren staat 'brei 1 keer verkorte toeren In 3e nld van elke patroonherhaling...' Is dit telkens in elke 3e nld van het volledige patroon (24nld), in nld 3, 11 en 19 of om de 3 nld?
05.08.2023 - 11:57DROPS Design answered:
Dag Danielle,
Dit doe ie inderdaad telkens in de 3e naald van elke patroonherhaling en niet om de 3 naalden.
08.08.2023 - 21:18
![]() Dobby wrote:
Dobby wrote:
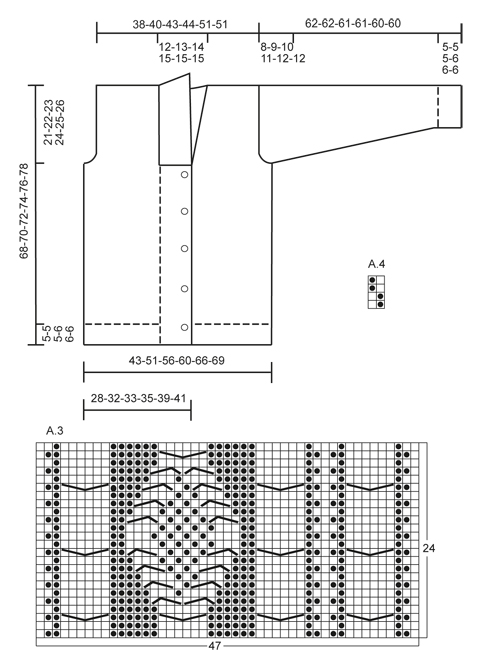
Hello! I think diagram A.4 is missing
25.07.2023 - 16:01DROPS Design answered:
Hi Dobby, diagram A.4 is very little. You will find it on the right side of the schematic drawing. Happy knitting!
25.07.2023 - 16:29
![]() Laurence Bourgeois wrote:
Laurence Bourgeois wrote:
Bonjour, je dois tricoter un rang raccourci à chaque 3 rang du point fantaisie . Au 3 eme rang du point fantaisie sur l’endroit . Donc si je comprends bien le prochain rang raccourci sera au. 6eme rang mais celui ci est sur l’envers . Je ne comprends pas les explications. Pouvez-vous m’aider svp Merci d’avance. Cordialement
15.02.2023 - 19:27
![]() Helle Rolsted wrote:
Helle Rolsted wrote:
I opskriften kan jeg ikke se diagrammet for A4? Med venlig hilsen Helle
08.01.2023 - 12:05DROPS Design answered:
Hej Helle, det ligger til højre for måleskitsen :)
10.01.2023 - 12:29
![]() Brandy Hellums wrote:
Brandy Hellums wrote:
I'm working the smallest size and have a question about the final dimensions. Using the back piece as an example: the written pattern says to work until the piece measures 68cm then bind off at the shoulder. the diagram says the piece should measure [5 (cuff)+ 68 (cuff to armhole) + 21 (armhole to shoulder)] = 94cm. Is that right? is blocking supposed to account for the 26cm difference? That seems like quite a stretch. That's 10 inches???
29.12.2022 - 15:43DROPS Design answered:
Dear Mrs Hellums, the jacket is 68 cm long from the shoulder down: 47 cm from bottom edge (including 5 cm ribbing edge) to armhole + 21 cm armhole. Happy knitting!
02.01.2023 - 12:53
![]() Jana wrote:
Jana wrote:
Hallo, nochmal eine Frage zum Armloch beim Rückenteil. Wird hier in jeder Hinreihe abgekettet? Viele Grüße Jana
14.12.2022 - 18:23DROPS Design answered:
Liebe Jana, die Maschen für die Armlöcher sollen am Anfang jeder Reihe abgekettet sein, so wird am Anfang jeder Hin- sowie Rückreihe gemeint, damit die Armlöcher symmetrisch sind. Viel Spaß beim stricken!
15.12.2022 - 08:35
![]() Jana wrote:
Jana wrote:
Hallo nochmal. Ich hatte mich leider falsch ausgedrückt. Bei der Vorderseite hab ich ja die Blendemaschen (kraus rechts, wenn ich das richtig verstanden hab). Dann das Bündchen. Die verkürzten Reihen arbeite ich in der 3. (2.) Runde bei den kraus rechts Maschen oder? VG Jana
24.10.2022 - 16:01DROPS Design answered:
Liebe Jana, die verkürtzen Reihen stricken Sie erst wenn Sie das Muster/die Diagramme mit den Zöpfen stricken, dh bei der 3. bzw 2. Reihe A.3/A.2. Viel Spaß beim stricken!
24.10.2022 - 16:32
|
||||||||||||||||
Rambling Man#ramblingmancardigan |
||||||||||||||||
 |
 |
|||||||||||||||
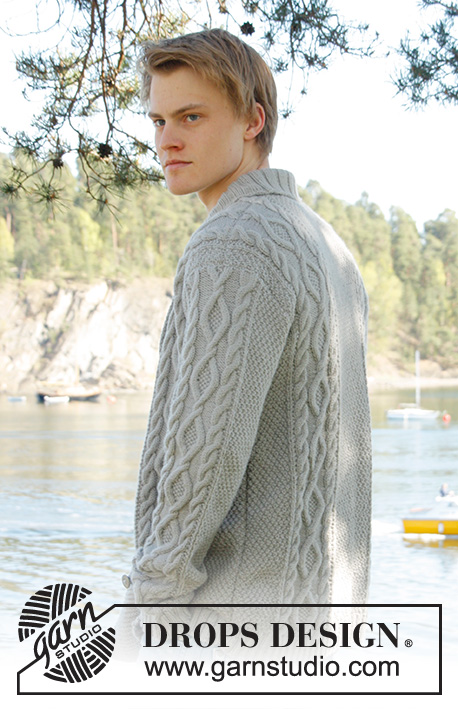
Men's knitted jacket in DROPS Lima, with cable pattern and shawl collar. Size: S - XXXL.
DROPS Extra 0-850 |
||||||||||||||||
|
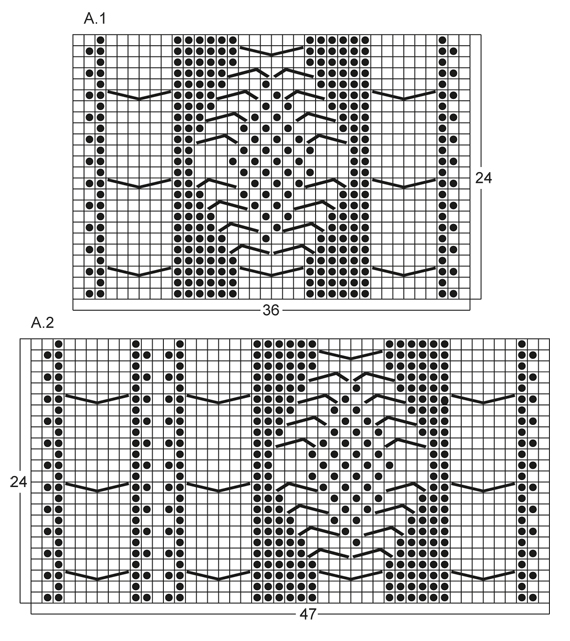
KNITTING TIPS: This design is written with button holes on right front edge, if you wish standard button holes for men, you can make the button holes on left front edge. GARTER ST (back and forth on needle): K all rows. NOTE: All edge sts are worked in garter st. PATTERN: See diagram A.1 to A.4, diagrams show all rows in 1 pattern repetition from RS. SHORT ROWS: RIGHT FRONT PIECE: Work 1 short row on row 3 of every pattern repetition vertically until finished measurements as follows: On 3rd row in pattern (= RS), work 26-26-26-26-30-30 band sts, turn and K back. Then work over all sts on row as before. LEFT FRONT PIECE: Work 1 short row on row 2 of every pattern repetition vertically until finished measurements as follows: On 2nd row in pattern (= WS), work 26-26-26-26-30-30 band sts, turn and K back. Then work over all sts on row as before. BUTTON HOLES: Cast off for 5 button holes from RS on right band. 1 BUTTON HOLE = cast off 7th and 8th st from mid front and cast on 2 new sts on next row over these sts. Cast off for button holes when piece measures: SIZE S: 14, 22, 30, 38 and 46 cm SIZE M: 15, 23, 31, 39 and 47 cm SIZE L: 16, 24, 32, 40 and 48 cm SIZE XL: 17, 25, 33, 41 and 49 cm SIZE XXL: 18, 26, 34, 42 and 50 cm SIZE XXXL: 19, 27, 35, 43 and 51 cm INCREASE TIP: Inc 1 st by making 1 YO, on next row work YO twisted (i.e. work in back loop of st instead front) to avoid holes. ---------------------------------------------------------- BACK PIECE: Worked back and forth on needle. Cast on 136-156-168-180-196-204 sts (incl 1 edge st in each side) on circular needle size 3.5 mm with Lima. Work rib as follows (1st row = RS): 1 edge st in GARTER ST - see explanation above, * K 2, P 2 *, repeat from *-*, finish with K 2 and 1 edge st in garter st. Continue to work like this until rib measures 5-5-5-6-6-6 cm. On last row from WS, P while AT THE SAME TIME dec 20-22-24-26-26-26 sts evenly = 116-134-144-154-170-178 sts. Then switch to needle size 4 mm and work next row from RS as follows: 1 edge st in garter st, 8-16-20-24-20-24 sts in A.4, work A.1 one time in size S - XL, work A.2 one time in size XXL and XXXL, 26-28-30-32-34-34 sts in A.4, then work A.1 one time in size S - XL, work A.3 one time in size XXL and XXXL, finish with 8-16-20-24-20-24 sts in A.4 and 1 edge st in garter st. REMEMBER THE KNITTING TENSION! Continue to work like this until piece measures 47-48-49-50-51-52 cm. Then cast off for armholes at the beg of every row in each side as follows: Cast off 3 sts 0-1-1-2-2-2 times, 2 sts 1-1-1-2-2-2 times, 1 st 4-7-9-8-4-8 times = 104-110-116-118-142-142 sts. Continue with pattern as before until piece measures 66-68-70-72-74-76 cm. Now cast off the middle 20-22-24-26-28-28 sts for neck and finish each part separately. Cast off 2 sts on next row from neck = 40-42-44-44-55-55 sts remain on shoulder. Continue with pattern as before. When piece measures 68-70-72-74-76-78 cm, loosely cast off sts with K over K and P over P. RIGHT FRONT PIECE: Worked back and forth on needle. Cast on 83-91-95-99-111-115 sts (incl 1 edge st in the side) on circular needle size 3.5 mm with Lima. Work rib as follows (1st row = RS): 26-26-26-26-30-30 sts in garter st (= band sts), * K 2, P 2 *, repeat from *-*, finish with 1 edge st in garter st. Continue with rib and band sts in garter st until rib measures 5-5-5-6-6-6 cm. On last row from WS, P over all sts in rib while AT THE SAME TIME dec 12-12-12-12-13-13 sts evenly (do not dec over band sts) = 71-79-83-87-98-102 sts. Then switch to needle size 4 mm and work next row from RS as follows: 26-26-26-26-30-30 band sts, work A.1 one time in size S - XL, work A.3 one time in size XXL and XXXL, 8-16-20-24-20-24 sts in A.4 and 1 edge in garter st. On next row from RS (= 3rd row in pattern) work SHORT ROWS - read explanation above. Continue with pattern and band sts at the front - while AT THE SAME TIME work 1 short row on 3rd row in every pattern repetition vertically until finished measurement. When piece measures 14-15-16-17-18-19 cm, cast off for BUTTON HOLES on right band - see explanation above! Continue to work until piece measures 47-48-49-50-51-52 cm. Then cast off at beg of next row from RS as follows: Cast off the first 25-25-25-25-29-29 sts, insert a marker (this marks where to beg the knit up for collar), work the rest of row. Then cast off for armhole on every row from WS as follows: 3 sts 0-1-1-2-2-2 times, 2 sts 1-1-1-2-2-2 times, 1 st 4-7-9-8-4-8 times = 40-42-44-44-55-55 sts remain on shoulder. Continue with pattern as before. When piece measures 68-70-72-74-76-78 cm, loosely cast off sts with K over K and P over P. LEFT FRONT PIECE: Cast on and work rib as on right front piece but reversed (i.e. * P 2, K 2 *, repeat from *-*) with 26-26-26-26-30-30 band sts in garter st. Continue to work until rib measures 5-5-5-6-6-6 cm. On last row from WS, P over all sts in rib while AT THE SAME TIME dec 12-12-12-12-13-13 sts evenly (do not dec over band sts) = 71-79-83-87-98-102 sts. Then switch to needle size 4 mm and work next row from RS as follows: 1 edge st in garter st, 8-16-20-24-20-24 sts in A.4, work A.1 one time in size S - XL, work A.2 one time in size XXL and XXXL, 26-26-26-26-30-30 band sts in garter st. On next row from WS (= 2nd row in pattern) work SHORT ROWS - read explanation above. Continue to work the same way as on right front piece but without button holes. SLEEVE: Worked back and forth on needle. Cast on 74-78-82-86-90-90 sts (incl 1 edge st in each side) on circular needle size 3.5 mm with Lima. Work rib as follows (1st row = RS): 1 edge st in garter st, * K 2, P 2 *, repeat from *-* and finish with 1 edge st in garter st. Continue to work like this until rib measures 5-5-5-6-6-6 cm. On last row from WS, P while AT THE SAME TIME dec 12-14-16-18-18-18 sts evenly = 62-64-66-68-72-72 sts. Then switch to needle size 4 mm and work next row from RS as follows: 1 edge st in garter st, 12-13-14-15-17-17 sts in A.4, work A.1 one time, 12-13-14-15-17-17 sts in A.4, finish with 1 edge st in garter st. AT THE SAME TIME when piece measures 6 cm, inc 1 st inside 1 edge st in each side - Read INCREASE TIP above. NOTE: Work the inc sts in A.4. Repeat inc every 3½-3-2½-2½-2½-2½ cm a total of 14-15-16-17-16-17 times = 90-94-98-102-104-106 sts. Continue until piece measures 54-53-51-50-48-48 cm (shorter measurements in the larger sizes because of longer sleeve cap and broader shoulder width), cast off at beg of every row in each side: 3 sts 1-1-1-2-2-2 times, 2 sts 1-1-2-2-2-2 times and 1 st 2-2-3-3-4-4 times. Then cast off 2 sts in each side until piece measures 61-61-60-60-59-59 cm, then cast off 3 sts 2 times in each side. When piece measures approx. 62-62-61-61-60-60 cm, loosely cast off sts with K over K and P over P. ASSEMBLY: Sew shoulder seams and sew in sleeves inside 1 edge st. Sew sleeve and side seams in one inside 1 edge st. Sew buttons on to left front piece, approx. 2½ cm from last K st in pattern. SHAWL COLLAR: Knit up sts from RS inside 1 edge st on circular needle size 3.5 mm. Start mid front at marker on right front piece as follows: Knit up approx. 60-70 sts up to shoulder, then 30-40 sts along the neck and 60-70 sts down along left front piece until marker = 150-180 sts. K 1 row from WS while AT THE SAME TIME adjusting no of sts to 144-148-156-164-172-180. Then work rib on next row from RS as follows: 1 sts in garter st, * K 2, P 2 *, repeat from *-* and finish with K 2 and 1 st in garter st. Continue like this until collar measures approx. 5-5-5-6-6-6 cm. Now inc 1 st in each of the middle 14-14-14-16-16-16 P-sections seen from RS (= back of neck) = 158-162-170-180-188-196 sts. Continue until collar measures approx. 12-12-12-12-14-14 cm, then loosely cast off with K over K and P over P. Fasten collar with stitches at the bottom in each side towards band from WS (so that the seam is not visible from RS) – sew edge to edge to avoid a chunky seam. |
||||||||||||||||
Diagram explanations |
||||||||||||||||
|
||||||||||||||||
 |
||||||||||||||||
 |
||||||||||||||||
Have you finished this pattern?Tag your pictures with #dropspattern #ramblingmancardigan or submit them to the #dropsfan gallery. Do you need help with this pattern?You'll find 23 tutorial videos, a Comments/Questions area and more by visiting the pattern on garnstudio.com. © 1982-2026 DROPS Design A/S. We reserve all rights. This document, including all its sub-sections, has copyrights. Read more about what you can do with our patterns at the bottom of each pattern on our site. |
||||||||||||||||


With over 40 years in knitting and crochet design, DROPS Design offers one of the most extensive collections of free patterns on the internet - translated to 17 languages. As of today we count 324 catalogues and 12245 patterns translated into English (UK/cm). 12245
We work hard to bring you the best knitting and crochet have to offer, inspiration and advice as well as great quality yarns at incredible prices! Would you like to use our patterns for other than personal use? You can read what you are allowed to do in the Copyright text at the bottom of all our patterns. Happy crafting!
Post a comment to pattern DROPS Extra 0-850
We would love to hear what you have to say about this pattern!
If you want to leave a question, please make sure you select the correct category in the form below, to speed up the answering process. Required fields are marked *.