
Popular categories
Looking for a yarn?


Comments / Questions (266)
![]() Sousa Adélaïde wrote:
Sousa Adélaïde wrote:
Bonjour, je tricote ce modèle en XXXL mais ne sais pas où placer les rangs raccourcis. Pour le devant droit, sur le diagramme A3, j'ai tricoté le 1er rang raccourci avant le rang 3 et le 2ème , au rang 5 ? Merci de votre aide.
03.01.2013 - 11:29DROPS Design answered:
Bonjour Madame Sousa, les rangs raccourcis se tricotent quand vous êtes au rang 3 (devant droit) du point fantaisie = sur l'endroit, vous tricotez 2 rangs sur les 30 m (en XXXL) de bordure devant seulement et continuez comme avant sur toutes les mailles, y compris celles du schéma. À chaque fois que vous devez tricoter le rang 3 du diagramme, vous tricotez 2 rangs sur les 30 m de bordure devant avant. Bon tricot!
03.01.2013 - 12:58
![]() Sharon wrote:
Sharon wrote:
My first DROPS pattern. Probably will have a few questions. First, for a gauge swatch, do I knit it in stockinette, or the design pattern of the sweater? If the design pattern, how do I choose which section?
03.01.2013 - 01:02DROPS Design answered:
Dear Sharon, you gauge should be 21 sts x 28 rows in stockinette st = 4" x 4 " with needles 6 (us size) or smaller / larger if necessary to get this gauge. Happy Knitting!
03.01.2013 - 09:15
![]() Tenain wrote:
Tenain wrote:
Bonjour, Je tricote ce modèle mais peut-être y a t il une erreur car je tricote une taille L donc 144 m. pour le dos après avoir effectué les côtes et diminutions,il y a toutes les tailles sauf L, comment dois-je effectué mes points fantaisie car si je vous lis il faut effectuer toutes les tailles à la suite mais cela ne correspond pas avec mon nombre de mailles. Merci par avance
30.12.2012 - 00:37DROPS Design answered:
Bonjour Madame Tenain, en taille L, vous allez tricoter ainsi : 1 m lis, 20 m de A4, A1 (=36 m), 30 m de A4, A1 (= 36 m), 20 m de A4 et 1 m lis = 144 m. Bon tricot !
02.01.2013 - 11:28
![]() Brotons wrote:
Brotons wrote:
Je viens de commencer mais le nombre de mailles à monter pour le dos me semble énorme(échantillon ok) faut il viser une taille en dessous ? merci pour votre aide
14.12.2012 - 14:01DROPS Design answered:
Bonjour Madame Brotons, le nombre de mailles diminue après les côtes, et ensuite on tricote en torsades, ce qui resserre l'ouvrage. Pour choisir la taille qui convient, reportez vous au schéma en bas de page. Ces mesures, en cm, sont fiables. Bon tricot !
14.12.2012 - 14:13
![]() Brotons wrote:
Brotons wrote:
Je viens de commencer mais le nombre de mailles à monter pour le dos me semble énorme(échantillon ok) faut il viser une taille en dessous ?
14.12.2012 - 13:48
![]() Knut Berg wrote:
Knut Berg wrote:
På h forst står det at man skal strikke forkortede p på hver 3. p i mønsteret. I forklaringen står det bare en forklaring fra r. På v forst skal man gjøre det på hver 2. p. Jeg tror det er en skrivefeil i forklaringen for h forst, hvis man skal gjøre det på hver 3. p vil man måtte gjøre det på vr også, og det skjønner jeg ikke hvordan man skal gjøre. Jeg går ut i fra at det skal stå hver 2. p. Jeg setter pris på svar og eventuelt en forklaring.
25.11.2012 - 11:13DROPS Design answered:
Du skal ikke strikke forkortede p på hver 3. p, men i den 3. p i hver mønsterrapport i høyden. Den kommer altid paa retten.
25.11.2012 - 16:38
![]() Lis Roi wrote:
Lis Roi wrote:
Hvad svarer størelse medium til i brystvidde. V.H. Lis
15.11.2012 - 11:39DROPS Design answered:
Du ser nederst i måleskitsen at en størrelse M svarer til 2x51=102 cm i brystvidde.
15.11.2012 - 12:09
![]() Kristin Fjeld Hansen wrote:
Kristin Fjeld Hansen wrote:
Får ikke den store fletten til å stemme med oppskrift. Blir bare en merkelig rar vridning som ikke ser ut som det skal i flg bilde. Noen der ute som har en løsning på dette?
27.10.2012 - 16:22DROPS Design answered:
Det er svaert at sige naar vi ikke kan se hvordan du strikker. Se evt vores Instruksjonsvideo vor at flette og se om du gör det korrekt. Eller tag ind til din butik og spörg om raad.
14.11.2012 - 09:10
![]() Lisbeth Caspersson wrote:
Lisbeth Caspersson wrote:
Man stickar inte knapphålen på höger framstycke på herrmodeller i sverige. På herrkläder sitter knapphålen på vänster framstycke. Jag fick repa upp ett helt framstycke innan jag upptäckte att det var fel. När jag väl stickade den rätt så blev den riktigt snygg och min man klär verkligen bra i den.
20.10.2012 - 08:36
![]() Pernille wrote:
Pernille wrote:
Garnforbruget stemmer ikke.. Jeg har strikket den i str M. Strikkefastheden passede, mem måtte ud efter 2 ekstra nøgler garn for at kunne strikke den færdig!
10.10.2012 - 21:47
|
||||||||||||||||
Rambling Man#ramblingmancardigan |
||||||||||||||||
 |
 |
|||||||||||||||
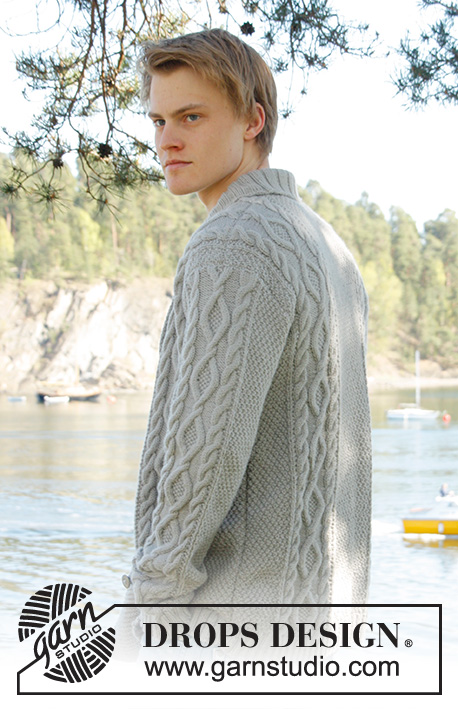
Men's knitted jacket in DROPS Lima, with cable pattern and shawl collar. Size: S - XXXL.
DROPS Extra 0-850 |
||||||||||||||||
|
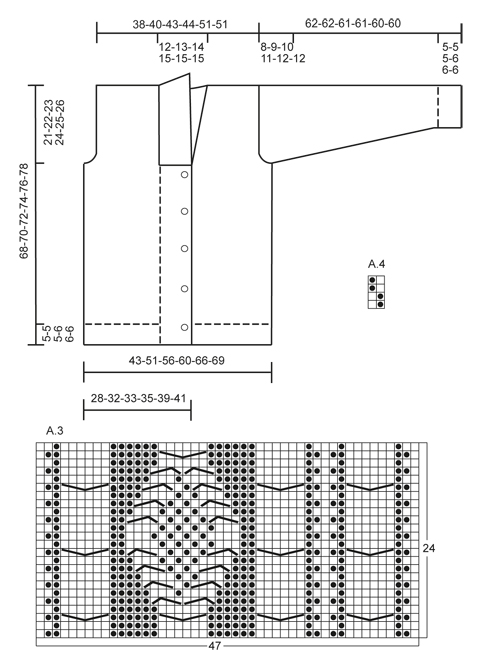
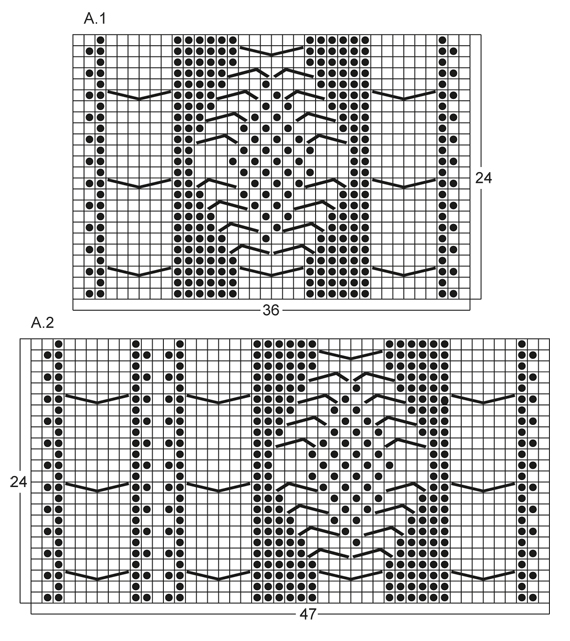
KNITTING TIPS: This design is written with button holes on right front edge, if you wish standard button holes for men, you can make the button holes on left front edge. GARTER ST (back and forth on needle): K all rows. NOTE: All edge sts are worked in garter st. PATTERN: See diagram A.1 to A.4, diagrams show all rows in 1 pattern repetition from RS. SHORT ROWS: RIGHT FRONT PIECE: Work 1 short row on row 3 of every pattern repetition vertically until finished measurements as follows: On 3rd row in pattern (= RS), work 26-26-26-26-30-30 band sts, turn and K back. Then work over all sts on row as before. LEFT FRONT PIECE: Work 1 short row on row 2 of every pattern repetition vertically until finished measurements as follows: On 2nd row in pattern (= WS), work 26-26-26-26-30-30 band sts, turn and K back. Then work over all sts on row as before. BUTTON HOLES: Cast off for 5 button holes from RS on right band. 1 BUTTON HOLE = cast off 7th and 8th st from mid front and cast on 2 new sts on next row over these sts. Cast off for button holes when piece measures: SIZE S: 14, 22, 30, 38 and 46 cm SIZE M: 15, 23, 31, 39 and 47 cm SIZE L: 16, 24, 32, 40 and 48 cm SIZE XL: 17, 25, 33, 41 and 49 cm SIZE XXL: 18, 26, 34, 42 and 50 cm SIZE XXXL: 19, 27, 35, 43 and 51 cm INCREASE TIP: Inc 1 st by making 1 YO, on next row work YO twisted (i.e. work in back loop of st instead front) to avoid holes. ---------------------------------------------------------- BACK PIECE: Worked back and forth on needle. Cast on 136-156-168-180-196-204 sts (incl 1 edge st in each side) on circular needle size 3.5 mm with Lima. Work rib as follows (1st row = RS): 1 edge st in GARTER ST - see explanation above, * K 2, P 2 *, repeat from *-*, finish with K 2 and 1 edge st in garter st. Continue to work like this until rib measures 5-5-5-6-6-6 cm. On last row from WS, P while AT THE SAME TIME dec 20-22-24-26-26-26 sts evenly = 116-134-144-154-170-178 sts. Then switch to needle size 4 mm and work next row from RS as follows: 1 edge st in garter st, 8-16-20-24-20-24 sts in A.4, work A.1 one time in size S - XL, work A.2 one time in size XXL and XXXL, 26-28-30-32-34-34 sts in A.4, then work A.1 one time in size S - XL, work A.3 one time in size XXL and XXXL, finish with 8-16-20-24-20-24 sts in A.4 and 1 edge st in garter st. REMEMBER THE KNITTING TENSION! Continue to work like this until piece measures 47-48-49-50-51-52 cm. Then cast off for armholes at the beg of every row in each side as follows: Cast off 3 sts 0-1-1-2-2-2 times, 2 sts 1-1-1-2-2-2 times, 1 st 4-7-9-8-4-8 times = 104-110-116-118-142-142 sts. Continue with pattern as before until piece measures 66-68-70-72-74-76 cm. Now cast off the middle 20-22-24-26-28-28 sts for neck and finish each part separately. Cast off 2 sts on next row from neck = 40-42-44-44-55-55 sts remain on shoulder. Continue with pattern as before. When piece measures 68-70-72-74-76-78 cm, loosely cast off sts with K over K and P over P. RIGHT FRONT PIECE: Worked back and forth on needle. Cast on 83-91-95-99-111-115 sts (incl 1 edge st in the side) on circular needle size 3.5 mm with Lima. Work rib as follows (1st row = RS): 26-26-26-26-30-30 sts in garter st (= band sts), * K 2, P 2 *, repeat from *-*, finish with 1 edge st in garter st. Continue with rib and band sts in garter st until rib measures 5-5-5-6-6-6 cm. On last row from WS, P over all sts in rib while AT THE SAME TIME dec 12-12-12-12-13-13 sts evenly (do not dec over band sts) = 71-79-83-87-98-102 sts. Then switch to needle size 4 mm and work next row from RS as follows: 26-26-26-26-30-30 band sts, work A.1 one time in size S - XL, work A.3 one time in size XXL and XXXL, 8-16-20-24-20-24 sts in A.4 and 1 edge in garter st. On next row from RS (= 3rd row in pattern) work SHORT ROWS - read explanation above. Continue with pattern and band sts at the front - while AT THE SAME TIME work 1 short row on 3rd row in every pattern repetition vertically until finished measurement. When piece measures 14-15-16-17-18-19 cm, cast off for BUTTON HOLES on right band - see explanation above! Continue to work until piece measures 47-48-49-50-51-52 cm. Then cast off at beg of next row from RS as follows: Cast off the first 25-25-25-25-29-29 sts, insert a marker (this marks where to beg the knit up for collar), work the rest of row. Then cast off for armhole on every row from WS as follows: 3 sts 0-1-1-2-2-2 times, 2 sts 1-1-1-2-2-2 times, 1 st 4-7-9-8-4-8 times = 40-42-44-44-55-55 sts remain on shoulder. Continue with pattern as before. When piece measures 68-70-72-74-76-78 cm, loosely cast off sts with K over K and P over P. LEFT FRONT PIECE: Cast on and work rib as on right front piece but reversed (i.e. * P 2, K 2 *, repeat from *-*) with 26-26-26-26-30-30 band sts in garter st. Continue to work until rib measures 5-5-5-6-6-6 cm. On last row from WS, P over all sts in rib while AT THE SAME TIME dec 12-12-12-12-13-13 sts evenly (do not dec over band sts) = 71-79-83-87-98-102 sts. Then switch to needle size 4 mm and work next row from RS as follows: 1 edge st in garter st, 8-16-20-24-20-24 sts in A.4, work A.1 one time in size S - XL, work A.2 one time in size XXL and XXXL, 26-26-26-26-30-30 band sts in garter st. On next row from WS (= 2nd row in pattern) work SHORT ROWS - read explanation above. Continue to work the same way as on right front piece but without button holes. SLEEVE: Worked back and forth on needle. Cast on 74-78-82-86-90-90 sts (incl 1 edge st in each side) on circular needle size 3.5 mm with Lima. Work rib as follows (1st row = RS): 1 edge st in garter st, * K 2, P 2 *, repeat from *-* and finish with 1 edge st in garter st. Continue to work like this until rib measures 5-5-5-6-6-6 cm. On last row from WS, P while AT THE SAME TIME dec 12-14-16-18-18-18 sts evenly = 62-64-66-68-72-72 sts. Then switch to needle size 4 mm and work next row from RS as follows: 1 edge st in garter st, 12-13-14-15-17-17 sts in A.4, work A.1 one time, 12-13-14-15-17-17 sts in A.4, finish with 1 edge st in garter st. AT THE SAME TIME when piece measures 6 cm, inc 1 st inside 1 edge st in each side - Read INCREASE TIP above. NOTE: Work the inc sts in A.4. Repeat inc every 3½-3-2½-2½-2½-2½ cm a total of 14-15-16-17-16-17 times = 90-94-98-102-104-106 sts. Continue until piece measures 54-53-51-50-48-48 cm (shorter measurements in the larger sizes because of longer sleeve cap and broader shoulder width), cast off at beg of every row in each side: 3 sts 1-1-1-2-2-2 times, 2 sts 1-1-2-2-2-2 times and 1 st 2-2-3-3-4-4 times. Then cast off 2 sts in each side until piece measures 61-61-60-60-59-59 cm, then cast off 3 sts 2 times in each side. When piece measures approx. 62-62-61-61-60-60 cm, loosely cast off sts with K over K and P over P. ASSEMBLY: Sew shoulder seams and sew in sleeves inside 1 edge st. Sew sleeve and side seams in one inside 1 edge st. Sew buttons on to left front piece, approx. 2½ cm from last K st in pattern. SHAWL COLLAR: Knit up sts from RS inside 1 edge st on circular needle size 3.5 mm. Start mid front at marker on right front piece as follows: Knit up approx. 60-70 sts up to shoulder, then 30-40 sts along the neck and 60-70 sts down along left front piece until marker = 150-180 sts. K 1 row from WS while AT THE SAME TIME adjusting no of sts to 144-148-156-164-172-180. Then work rib on next row from RS as follows: 1 sts in garter st, * K 2, P 2 *, repeat from *-* and finish with K 2 and 1 st in garter st. Continue like this until collar measures approx. 5-5-5-6-6-6 cm. Now inc 1 st in each of the middle 14-14-14-16-16-16 P-sections seen from RS (= back of neck) = 158-162-170-180-188-196 sts. Continue until collar measures approx. 12-12-12-12-14-14 cm, then loosely cast off with K over K and P over P. Fasten collar with stitches at the bottom in each side towards band from WS (so that the seam is not visible from RS) – sew edge to edge to avoid a chunky seam. |
||||||||||||||||
Diagram explanations |
||||||||||||||||
|
||||||||||||||||
 |
||||||||||||||||
 |
||||||||||||||||
Have you finished this pattern?Tag your pictures with #dropspattern #ramblingmancardigan or submit them to the #dropsfan gallery. Do you need help with this pattern?You'll find 23 tutorial videos, a Comments/Questions area and more by visiting the pattern on garnstudio.com. © 1982-2026 DROPS Design A/S. We reserve all rights. This document, including all its sub-sections, has copyrights. Read more about what you can do with our patterns at the bottom of each pattern on our site. |
||||||||||||||||


With over 40 years in knitting and crochet design, DROPS Design offers one of the most extensive collections of free patterns on the internet - translated to 17 languages. As of today we count 324 catalogues and 12245 patterns translated into English (UK/cm). 12245
We work hard to bring you the best knitting and crochet have to offer, inspiration and advice as well as great quality yarns at incredible prices! Would you like to use our patterns for other than personal use? You can read what you are allowed to do in the Copyright text at the bottom of all our patterns. Happy crafting!
Post a comment to pattern DROPS Extra 0-850
We would love to hear what you have to say about this pattern!
If you want to leave a question, please make sure you select the correct category in the form below, to speed up the answering process. Required fields are marked *.