
Popular categories
Looking for a yarn?


Comments / Questions (266)
![]() Ineke wrote:
Ineke wrote:
Verkorte toeren R-voorpand. Brei in de 3e nld in patroon (= goede kant) 26-26-26-26-30-30 voorbies st, keer het werk en brei terug. Is deze terugnaald dan de 4-e naald van het patroon?
13.04.2013 - 14:28
![]() Cathrine wrote:
Cathrine wrote:
Hei, fin jakke. Strikker den til min mann som nesten ikke kan vente til den blir ferdig :) Men siden dette er en herrejakke mener jeg at kneppingen bør være på venstre forstykke, da blir det herreknepping.
10.04.2013 - 19:59
![]() Doris Kubena Linder wrote:
Doris Kubena Linder wrote:
Sticka 1 förkortat varv på 3:e varvet i en mönsterrapport. Vad är en mönsterrapport?
22.03.2013 - 21:22DROPS Design answered:
En mönsterrapport börjar varje gång du börjar på samma mönster om du fex stickar en fläta på var 6:e varv består mönsterrapporten av 6 varv i höjden.
03.04.2013 - 10:36
![]() Britt Andersen wrote:
Britt Andersen wrote:
Det må være feil at ma skal strikke A-1 på rygg jeg tror det er A-2 da stemmer det med masker eller tar jeg feil?
05.03.2013 - 14:43DROPS Design answered:
Hvilken str strikker du da? Du skal strikke A.1 for str S-XL og A.2 for str XXL-XXXL. Hvis det ikke stemmer, saa hörer jeg gerne hvilken str det er saa jeg kan beregne det videre. Tak ;o)
07.03.2013 - 16:41
![]() Ana wrote:
Ana wrote:
Hi! I have a 21ptsx24rows sample. ¿Is it possible to make the jacket eventhough?
01.02.2013 - 01:42DROPS Design answered:
Dear Ana, if your tension is correct in width, just take care of the measurements in height and it should work, adjust if necessary to the pattern. Happy knitting!
08.05.2013 - 08:15
![]() Ana wrote:
Ana wrote:
Hola! La muestra de 10x10cm de la lana de la que dispongo me hace 21ptsx24vtas. ¿Cómo lo adapto?
31.01.2013 - 03:24
![]() Catherine wrote:
Catherine wrote:
Bonjour, je viens de finir le dos et j'ai commencé le devant gauche. Je ne comprend pas l'explication: "Tricoter 1 rang raccourcis à chaque rang 2 de chacun des rapports du point fantaisie" cela veut-il dire qu'il faut le faire tous les 2 rangs ou a chaque fois qu'un motif ou rapport ??(24 cm de haut) est terminé??. merci pour votre réponse qui, je l'espère sera rapide car mon fils attend son gilet avec impatience
27.01.2013 - 20:37DROPS Design answered:
Bonjour Catherine, les rangs raccourcis se tricotent à chaque fois que vous êtes sur le rang 2/3 (devant gauche/droit) du diagramme avec la torsade. Bon tricot !
28.01.2013 - 10:28
![]() Donaldina wrote:
Donaldina wrote:
The diamond pattern in the instructions does not look like the diamond pattern in the picture! How do I get the right instruction for it?
19.01.2013 - 05:17DROPS Design answered:
Dear Donaldina, diagram looks correct, do not forget that 1 square = 1 st x 1 row. Start to read pattern from right side towards left side = RS, rows 1,3,5 (with cables), etc... and for WS : from left side towards right side, starting with the corner at the bottom right. Happy knitting!
19.01.2013 - 15:20
![]() Sharon wrote:
Sharon wrote:
I want to make sure I knit the right size. In regard to your "finished measurements", and the bust size - If my husband has a 44 inch chest, would I choose the 44" size, or do I need to knit a larger size for ease?
11.01.2013 - 22:56DROPS Design answered:
Dear Sharon, 44 inc chest is finished measurement of the jackeet at bust, check on one of his jacket fitting him and compare to find the best matching size. Happy knitting!
16.01.2013 - 15:03
![]() Sharon wrote:
Sharon wrote:
On this pattern, on the Right Front Piece, after you make the switch to 4 mm needles,on a right side row, the next row mentioned in the pattern is also a right side row. Is the row inbetween just done with the charts as the first row was? Thank you for your help.
06.01.2013 - 02:04DROPS Design answered:
Dear Sharon, the row "inbetween" is a WS row, worked as before, following pattern and diagrams. Remember in diagrams 1 square = 1 st x 1 row, even rows from WS are shown. Happy knitting!
07.01.2013 - 09:30
|
||||||||||||||||
Rambling Man#ramblingmancardigan |
||||||||||||||||
 |
 |
|||||||||||||||
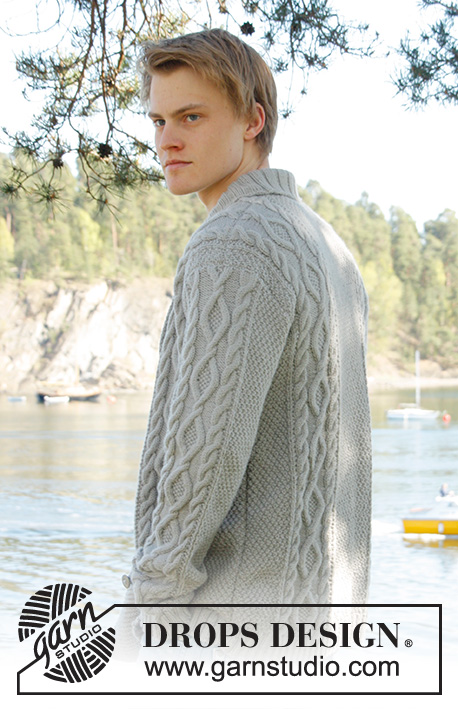
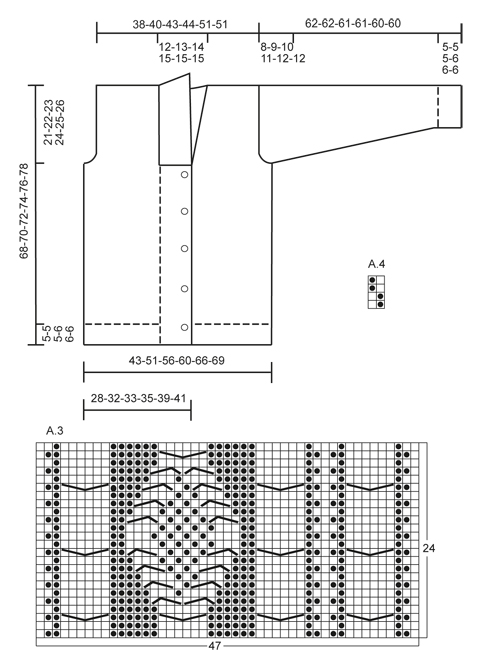
Men's knitted jacket in DROPS Lima, with cable pattern and shawl collar. Size: S - XXXL.
DROPS Extra 0-850 |
||||||||||||||||
|
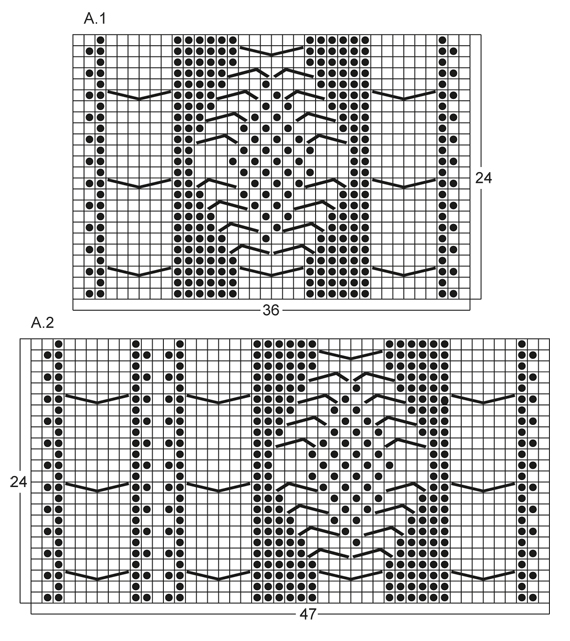
KNITTING TIPS: This design is written with button holes on right front edge, if you wish standard button holes for men, you can make the button holes on left front edge. GARTER ST (back and forth on needle): K all rows. NOTE: All edge sts are worked in garter st. PATTERN: See diagram A.1 to A.4, diagrams show all rows in 1 pattern repetition from RS. SHORT ROWS: RIGHT FRONT PIECE: Work 1 short row on row 3 of every pattern repetition vertically until finished measurements as follows: On 3rd row in pattern (= RS), work 26-26-26-26-30-30 band sts, turn and K back. Then work over all sts on row as before. LEFT FRONT PIECE: Work 1 short row on row 2 of every pattern repetition vertically until finished measurements as follows: On 2nd row in pattern (= WS), work 26-26-26-26-30-30 band sts, turn and K back. Then work over all sts on row as before. BUTTON HOLES: Cast off for 5 button holes from RS on right band. 1 BUTTON HOLE = cast off 7th and 8th st from mid front and cast on 2 new sts on next row over these sts. Cast off for button holes when piece measures: SIZE S: 14, 22, 30, 38 and 46 cm SIZE M: 15, 23, 31, 39 and 47 cm SIZE L: 16, 24, 32, 40 and 48 cm SIZE XL: 17, 25, 33, 41 and 49 cm SIZE XXL: 18, 26, 34, 42 and 50 cm SIZE XXXL: 19, 27, 35, 43 and 51 cm INCREASE TIP: Inc 1 st by making 1 YO, on next row work YO twisted (i.e. work in back loop of st instead front) to avoid holes. ---------------------------------------------------------- BACK PIECE: Worked back and forth on needle. Cast on 136-156-168-180-196-204 sts (incl 1 edge st in each side) on circular needle size 3.5 mm with Lima. Work rib as follows (1st row = RS): 1 edge st in GARTER ST - see explanation above, * K 2, P 2 *, repeat from *-*, finish with K 2 and 1 edge st in garter st. Continue to work like this until rib measures 5-5-5-6-6-6 cm. On last row from WS, P while AT THE SAME TIME dec 20-22-24-26-26-26 sts evenly = 116-134-144-154-170-178 sts. Then switch to needle size 4 mm and work next row from RS as follows: 1 edge st in garter st, 8-16-20-24-20-24 sts in A.4, work A.1 one time in size S - XL, work A.2 one time in size XXL and XXXL, 26-28-30-32-34-34 sts in A.4, then work A.1 one time in size S - XL, work A.3 one time in size XXL and XXXL, finish with 8-16-20-24-20-24 sts in A.4 and 1 edge st in garter st. REMEMBER THE KNITTING TENSION! Continue to work like this until piece measures 47-48-49-50-51-52 cm. Then cast off for armholes at the beg of every row in each side as follows: Cast off 3 sts 0-1-1-2-2-2 times, 2 sts 1-1-1-2-2-2 times, 1 st 4-7-9-8-4-8 times = 104-110-116-118-142-142 sts. Continue with pattern as before until piece measures 66-68-70-72-74-76 cm. Now cast off the middle 20-22-24-26-28-28 sts for neck and finish each part separately. Cast off 2 sts on next row from neck = 40-42-44-44-55-55 sts remain on shoulder. Continue with pattern as before. When piece measures 68-70-72-74-76-78 cm, loosely cast off sts with K over K and P over P. RIGHT FRONT PIECE: Worked back and forth on needle. Cast on 83-91-95-99-111-115 sts (incl 1 edge st in the side) on circular needle size 3.5 mm with Lima. Work rib as follows (1st row = RS): 26-26-26-26-30-30 sts in garter st (= band sts), * K 2, P 2 *, repeat from *-*, finish with 1 edge st in garter st. Continue with rib and band sts in garter st until rib measures 5-5-5-6-6-6 cm. On last row from WS, P over all sts in rib while AT THE SAME TIME dec 12-12-12-12-13-13 sts evenly (do not dec over band sts) = 71-79-83-87-98-102 sts. Then switch to needle size 4 mm and work next row from RS as follows: 26-26-26-26-30-30 band sts, work A.1 one time in size S - XL, work A.3 one time in size XXL and XXXL, 8-16-20-24-20-24 sts in A.4 and 1 edge in garter st. On next row from RS (= 3rd row in pattern) work SHORT ROWS - read explanation above. Continue with pattern and band sts at the front - while AT THE SAME TIME work 1 short row on 3rd row in every pattern repetition vertically until finished measurement. When piece measures 14-15-16-17-18-19 cm, cast off for BUTTON HOLES on right band - see explanation above! Continue to work until piece measures 47-48-49-50-51-52 cm. Then cast off at beg of next row from RS as follows: Cast off the first 25-25-25-25-29-29 sts, insert a marker (this marks where to beg the knit up for collar), work the rest of row. Then cast off for armhole on every row from WS as follows: 3 sts 0-1-1-2-2-2 times, 2 sts 1-1-1-2-2-2 times, 1 st 4-7-9-8-4-8 times = 40-42-44-44-55-55 sts remain on shoulder. Continue with pattern as before. When piece measures 68-70-72-74-76-78 cm, loosely cast off sts with K over K and P over P. LEFT FRONT PIECE: Cast on and work rib as on right front piece but reversed (i.e. * P 2, K 2 *, repeat from *-*) with 26-26-26-26-30-30 band sts in garter st. Continue to work until rib measures 5-5-5-6-6-6 cm. On last row from WS, P over all sts in rib while AT THE SAME TIME dec 12-12-12-12-13-13 sts evenly (do not dec over band sts) = 71-79-83-87-98-102 sts. Then switch to needle size 4 mm and work next row from RS as follows: 1 edge st in garter st, 8-16-20-24-20-24 sts in A.4, work A.1 one time in size S - XL, work A.2 one time in size XXL and XXXL, 26-26-26-26-30-30 band sts in garter st. On next row from WS (= 2nd row in pattern) work SHORT ROWS - read explanation above. Continue to work the same way as on right front piece but without button holes. SLEEVE: Worked back and forth on needle. Cast on 74-78-82-86-90-90 sts (incl 1 edge st in each side) on circular needle size 3.5 mm with Lima. Work rib as follows (1st row = RS): 1 edge st in garter st, * K 2, P 2 *, repeat from *-* and finish with 1 edge st in garter st. Continue to work like this until rib measures 5-5-5-6-6-6 cm. On last row from WS, P while AT THE SAME TIME dec 12-14-16-18-18-18 sts evenly = 62-64-66-68-72-72 sts. Then switch to needle size 4 mm and work next row from RS as follows: 1 edge st in garter st, 12-13-14-15-17-17 sts in A.4, work A.1 one time, 12-13-14-15-17-17 sts in A.4, finish with 1 edge st in garter st. AT THE SAME TIME when piece measures 6 cm, inc 1 st inside 1 edge st in each side - Read INCREASE TIP above. NOTE: Work the inc sts in A.4. Repeat inc every 3½-3-2½-2½-2½-2½ cm a total of 14-15-16-17-16-17 times = 90-94-98-102-104-106 sts. Continue until piece measures 54-53-51-50-48-48 cm (shorter measurements in the larger sizes because of longer sleeve cap and broader shoulder width), cast off at beg of every row in each side: 3 sts 1-1-1-2-2-2 times, 2 sts 1-1-2-2-2-2 times and 1 st 2-2-3-3-4-4 times. Then cast off 2 sts in each side until piece measures 61-61-60-60-59-59 cm, then cast off 3 sts 2 times in each side. When piece measures approx. 62-62-61-61-60-60 cm, loosely cast off sts with K over K and P over P. ASSEMBLY: Sew shoulder seams and sew in sleeves inside 1 edge st. Sew sleeve and side seams in one inside 1 edge st. Sew buttons on to left front piece, approx. 2½ cm from last K st in pattern. SHAWL COLLAR: Knit up sts from RS inside 1 edge st on circular needle size 3.5 mm. Start mid front at marker on right front piece as follows: Knit up approx. 60-70 sts up to shoulder, then 30-40 sts along the neck and 60-70 sts down along left front piece until marker = 150-180 sts. K 1 row from WS while AT THE SAME TIME adjusting no of sts to 144-148-156-164-172-180. Then work rib on next row from RS as follows: 1 sts in garter st, * K 2, P 2 *, repeat from *-* and finish with K 2 and 1 st in garter st. Continue like this until collar measures approx. 5-5-5-6-6-6 cm. Now inc 1 st in each of the middle 14-14-14-16-16-16 P-sections seen from RS (= back of neck) = 158-162-170-180-188-196 sts. Continue until collar measures approx. 12-12-12-12-14-14 cm, then loosely cast off with K over K and P over P. Fasten collar with stitches at the bottom in each side towards band from WS (so that the seam is not visible from RS) – sew edge to edge to avoid a chunky seam. |
||||||||||||||||
Diagram explanations |
||||||||||||||||
|
||||||||||||||||
 |
||||||||||||||||
 |
||||||||||||||||
Have you finished this pattern?Tag your pictures with #dropspattern #ramblingmancardigan or submit them to the #dropsfan gallery. Do you need help with this pattern?You'll find 23 tutorial videos, a Comments/Questions area and more by visiting the pattern on garnstudio.com. © 1982-2026 DROPS Design A/S. We reserve all rights. This document, including all its sub-sections, has copyrights. Read more about what you can do with our patterns at the bottom of each pattern on our site. |
||||||||||||||||


With over 40 years in knitting and crochet design, DROPS Design offers one of the most extensive collections of free patterns on the internet - translated to 17 languages. As of today we count 324 catalogues and 12245 patterns translated into English (UK/cm). 12245
We work hard to bring you the best knitting and crochet have to offer, inspiration and advice as well as great quality yarns at incredible prices! Would you like to use our patterns for other than personal use? You can read what you are allowed to do in the Copyright text at the bottom of all our patterns. Happy crafting!
Post a comment to pattern DROPS Extra 0-850
We would love to hear what you have to say about this pattern!
If you want to leave a question, please make sure you select the correct category in the form below, to speed up the answering process. Required fields are marked *.