
Popular categories
Looking for a yarn?


Comments / Questions (266)
![]() Gun Jadbäck wrote:
Gun Jadbäck wrote:
Räknas tex hela A2 som en mönsterrapport? Ska där stickas ett förkortat varv 8 ggr eller 1 gång?
12.06.2013 - 21:39Lena answered:
En gång så klart! Läs "Förkortat varv"
17.06.2013 - 20:31
![]() Ineke wrote:
Ineke wrote:
Vraag over kraag. Ik moet toch alleen de uiteinden vd kraag vastzetten aan de voorbies? Of moet de kraag op de rug ook worden vastgenaaid? Zie allerlaatste regel vd werkbeschrijving.
08.06.2013 - 19:22DROPS Design answered:
Je zet de kraag ook vast aan de rand van het achterpand: Zet de kraag vast aan de onderkant aan elke kant richting de voorbies aan de verkeerde kant (zorg dat de naad niet zichtbaar is aan de goede kant) – naai met de zijkanten tegen elkaar om een dikke naad te voorkomen.
10.06.2013 - 13:05
![]() Ineke wrote:
Ineke wrote:
Mouw:Na mindering voor maat L- 1x3,2x2,3x1 staat er: kant 2 st af aan elke kant tot het werk 60 cm is. Is dit dan 1 keer 2 steken of elke naald 2 st minderen tot 60 cm lengte?
02.06.2013 - 17:16DROPS Design answered:
Hoi Ineke. Je moet 2 st afkanten aan elke kant van het werk tot 60 cm lengte.
04.06.2013 - 15:56
![]() Diana wrote:
Diana wrote:
Hallo! Ich hätte eine Frage zu den Verkürzten Reihen beim Vorderteil. Diese sollen ja in jeder 3. Reihe des Musterrapports wiederholt werden. Welches Muster ist denn damit gemeint, A.1 oder A.4? Vielen Dank schon mal!
19.05.2013 - 16:07DROPS Design answered:
Liebe Diana, die verkürzten R werden am Kragen (Vorderteil) gestrickt. Dort wählen Sie je nach Grösse zwischen A.1 und A.2/A.3 – aber beide Diagramme sind 24 R hoch, es kommt also bezüglich der verkürzten R nicht darauf an.
21.05.2013 - 08:49
![]() Chambo wrote:
Chambo wrote:
Les boutonnieres sont a gauche les explications du col ne sont pas tres net Tres beau modele merçi
11.05.2013 - 16:19
![]() Ineke wrote:
Ineke wrote:
Vraag over verkorte toeren voorpanden. Is het iedere 2 of 3 naald van het patroon of alleen 1x de 2 of 3e naald per patroon en herhaling van patroon?
05.05.2013 - 17:33DROPS Design answered:
Er staat letterlijk in het patroon: RECHTER VOORPAND: Brei 1 keer verkorte toeren elke derde nld in elke patroonherhaling in de hoogte ... en LINKER VOORPAND: Brei 1 keer verkorte toeren elke tweede nld in elke patroonherhaling in de hoogte. Dwz, je breit de beschrijving voor verkorte toeren in de 3e nld (= RECHTER voorpand) van het patroon en herhaalt als je weer bij de 3e nld staat. En zo voort.
06.05.2013 - 15:26
![]() Ineke wrote:
Ineke wrote:
Voorpand. Na 5 cm boordst is de lengte van het gebreide in rib.steek al 1 cm korter dan het gebreide in boordsteek. Ik heb daarom op de rib.steken 4 verkorte toeren extra gebreid. Klopt het patroon dan niet? Mijn proeflapje kwam precies overeen met het voorbeeld.
05.05.2013 - 11:29DROPS Design answered:
Is de ribsteeek een kantsteek? Ik zou dan de kantsteek wat losser breien om te voorkomen dat de rand te strak wordt.
06.05.2013 - 15:32
![]() Reverberi wrote:
Reverberi wrote:
Attention !! vous présentez un modèle "homme" avec les explications boutonnières côté " femme" !! Est-ce volontaire ? Cordialement
14.04.2013 - 22:37
![]() Ineke wrote:
Ineke wrote:
Hallo Rita, Bedankt voor je uitleg,ik zal dit vest zeker gaan breien. Zelf denk ik aan de kwaliteit Karisma,omdat dit garen in de wasmachine kan. Met die handwas zit je met zo'n zwaar nat "schaap" :-)
13.04.2013 - 17:55
![]() Rita wrote:
Rita wrote:
Dag Ineke, deze rij verkorte toer tel je niet mee als toer,deze toer dient enkel omdat de boord niet tegen zou trekken omdat hij in ribbels gebreid is en je dus meer toeren nodig hebt. Heb dit vest ook gebreid maar met 2 rijen knopen i.p.v. 1 dit valt mooier omdat de wol tamelijk zwaar is, het einresultaat is prachtig,valt zeer mooi.
13.04.2013 - 16:46
|
||||||||||||||||
Rambling Man#ramblingmancardigan |
||||||||||||||||
 |
 |
|||||||||||||||
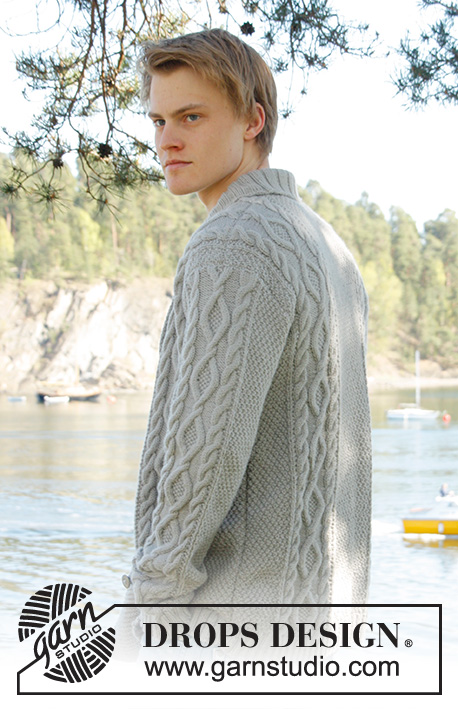
Men's knitted jacket in DROPS Lima, with cable pattern and shawl collar. Size: S - XXXL.
DROPS Extra 0-850 |
||||||||||||||||
|
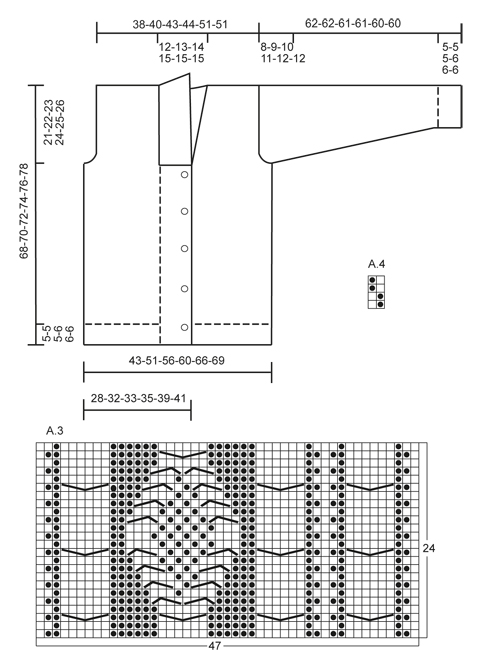
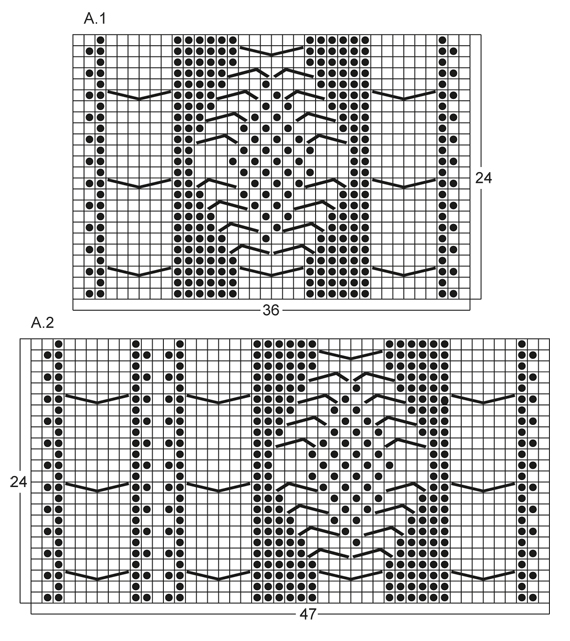
KNITTING TIPS: This design is written with button holes on right front edge, if you wish standard button holes for men, you can make the button holes on left front edge. GARTER ST (back and forth on needle): K all rows. NOTE: All edge sts are worked in garter st. PATTERN: See diagram A.1 to A.4, diagrams show all rows in 1 pattern repetition from RS. SHORT ROWS: RIGHT FRONT PIECE: Work 1 short row on row 3 of every pattern repetition vertically until finished measurements as follows: On 3rd row in pattern (= RS), work 26-26-26-26-30-30 band sts, turn and K back. Then work over all sts on row as before. LEFT FRONT PIECE: Work 1 short row on row 2 of every pattern repetition vertically until finished measurements as follows: On 2nd row in pattern (= WS), work 26-26-26-26-30-30 band sts, turn and K back. Then work over all sts on row as before. BUTTON HOLES: Cast off for 5 button holes from RS on right band. 1 BUTTON HOLE = cast off 7th and 8th st from mid front and cast on 2 new sts on next row over these sts. Cast off for button holes when piece measures: SIZE S: 14, 22, 30, 38 and 46 cm SIZE M: 15, 23, 31, 39 and 47 cm SIZE L: 16, 24, 32, 40 and 48 cm SIZE XL: 17, 25, 33, 41 and 49 cm SIZE XXL: 18, 26, 34, 42 and 50 cm SIZE XXXL: 19, 27, 35, 43 and 51 cm INCREASE TIP: Inc 1 st by making 1 YO, on next row work YO twisted (i.e. work in back loop of st instead front) to avoid holes. ---------------------------------------------------------- BACK PIECE: Worked back and forth on needle. Cast on 136-156-168-180-196-204 sts (incl 1 edge st in each side) on circular needle size 3.5 mm with Lima. Work rib as follows (1st row = RS): 1 edge st in GARTER ST - see explanation above, * K 2, P 2 *, repeat from *-*, finish with K 2 and 1 edge st in garter st. Continue to work like this until rib measures 5-5-5-6-6-6 cm. On last row from WS, P while AT THE SAME TIME dec 20-22-24-26-26-26 sts evenly = 116-134-144-154-170-178 sts. Then switch to needle size 4 mm and work next row from RS as follows: 1 edge st in garter st, 8-16-20-24-20-24 sts in A.4, work A.1 one time in size S - XL, work A.2 one time in size XXL and XXXL, 26-28-30-32-34-34 sts in A.4, then work A.1 one time in size S - XL, work A.3 one time in size XXL and XXXL, finish with 8-16-20-24-20-24 sts in A.4 and 1 edge st in garter st. REMEMBER THE KNITTING TENSION! Continue to work like this until piece measures 47-48-49-50-51-52 cm. Then cast off for armholes at the beg of every row in each side as follows: Cast off 3 sts 0-1-1-2-2-2 times, 2 sts 1-1-1-2-2-2 times, 1 st 4-7-9-8-4-8 times = 104-110-116-118-142-142 sts. Continue with pattern as before until piece measures 66-68-70-72-74-76 cm. Now cast off the middle 20-22-24-26-28-28 sts for neck and finish each part separately. Cast off 2 sts on next row from neck = 40-42-44-44-55-55 sts remain on shoulder. Continue with pattern as before. When piece measures 68-70-72-74-76-78 cm, loosely cast off sts with K over K and P over P. RIGHT FRONT PIECE: Worked back and forth on needle. Cast on 83-91-95-99-111-115 sts (incl 1 edge st in the side) on circular needle size 3.5 mm with Lima. Work rib as follows (1st row = RS): 26-26-26-26-30-30 sts in garter st (= band sts), * K 2, P 2 *, repeat from *-*, finish with 1 edge st in garter st. Continue with rib and band sts in garter st until rib measures 5-5-5-6-6-6 cm. On last row from WS, P over all sts in rib while AT THE SAME TIME dec 12-12-12-12-13-13 sts evenly (do not dec over band sts) = 71-79-83-87-98-102 sts. Then switch to needle size 4 mm and work next row from RS as follows: 26-26-26-26-30-30 band sts, work A.1 one time in size S - XL, work A.3 one time in size XXL and XXXL, 8-16-20-24-20-24 sts in A.4 and 1 edge in garter st. On next row from RS (= 3rd row in pattern) work SHORT ROWS - read explanation above. Continue with pattern and band sts at the front - while AT THE SAME TIME work 1 short row on 3rd row in every pattern repetition vertically until finished measurement. When piece measures 14-15-16-17-18-19 cm, cast off for BUTTON HOLES on right band - see explanation above! Continue to work until piece measures 47-48-49-50-51-52 cm. Then cast off at beg of next row from RS as follows: Cast off the first 25-25-25-25-29-29 sts, insert a marker (this marks where to beg the knit up for collar), work the rest of row. Then cast off for armhole on every row from WS as follows: 3 sts 0-1-1-2-2-2 times, 2 sts 1-1-1-2-2-2 times, 1 st 4-7-9-8-4-8 times = 40-42-44-44-55-55 sts remain on shoulder. Continue with pattern as before. When piece measures 68-70-72-74-76-78 cm, loosely cast off sts with K over K and P over P. LEFT FRONT PIECE: Cast on and work rib as on right front piece but reversed (i.e. * P 2, K 2 *, repeat from *-*) with 26-26-26-26-30-30 band sts in garter st. Continue to work until rib measures 5-5-5-6-6-6 cm. On last row from WS, P over all sts in rib while AT THE SAME TIME dec 12-12-12-12-13-13 sts evenly (do not dec over band sts) = 71-79-83-87-98-102 sts. Then switch to needle size 4 mm and work next row from RS as follows: 1 edge st in garter st, 8-16-20-24-20-24 sts in A.4, work A.1 one time in size S - XL, work A.2 one time in size XXL and XXXL, 26-26-26-26-30-30 band sts in garter st. On next row from WS (= 2nd row in pattern) work SHORT ROWS - read explanation above. Continue to work the same way as on right front piece but without button holes. SLEEVE: Worked back and forth on needle. Cast on 74-78-82-86-90-90 sts (incl 1 edge st in each side) on circular needle size 3.5 mm with Lima. Work rib as follows (1st row = RS): 1 edge st in garter st, * K 2, P 2 *, repeat from *-* and finish with 1 edge st in garter st. Continue to work like this until rib measures 5-5-5-6-6-6 cm. On last row from WS, P while AT THE SAME TIME dec 12-14-16-18-18-18 sts evenly = 62-64-66-68-72-72 sts. Then switch to needle size 4 mm and work next row from RS as follows: 1 edge st in garter st, 12-13-14-15-17-17 sts in A.4, work A.1 one time, 12-13-14-15-17-17 sts in A.4, finish with 1 edge st in garter st. AT THE SAME TIME when piece measures 6 cm, inc 1 st inside 1 edge st in each side - Read INCREASE TIP above. NOTE: Work the inc sts in A.4. Repeat inc every 3½-3-2½-2½-2½-2½ cm a total of 14-15-16-17-16-17 times = 90-94-98-102-104-106 sts. Continue until piece measures 54-53-51-50-48-48 cm (shorter measurements in the larger sizes because of longer sleeve cap and broader shoulder width), cast off at beg of every row in each side: 3 sts 1-1-1-2-2-2 times, 2 sts 1-1-2-2-2-2 times and 1 st 2-2-3-3-4-4 times. Then cast off 2 sts in each side until piece measures 61-61-60-60-59-59 cm, then cast off 3 sts 2 times in each side. When piece measures approx. 62-62-61-61-60-60 cm, loosely cast off sts with K over K and P over P. ASSEMBLY: Sew shoulder seams and sew in sleeves inside 1 edge st. Sew sleeve and side seams in one inside 1 edge st. Sew buttons on to left front piece, approx. 2½ cm from last K st in pattern. SHAWL COLLAR: Knit up sts from RS inside 1 edge st on circular needle size 3.5 mm. Start mid front at marker on right front piece as follows: Knit up approx. 60-70 sts up to shoulder, then 30-40 sts along the neck and 60-70 sts down along left front piece until marker = 150-180 sts. K 1 row from WS while AT THE SAME TIME adjusting no of sts to 144-148-156-164-172-180. Then work rib on next row from RS as follows: 1 sts in garter st, * K 2, P 2 *, repeat from *-* and finish with K 2 and 1 st in garter st. Continue like this until collar measures approx. 5-5-5-6-6-6 cm. Now inc 1 st in each of the middle 14-14-14-16-16-16 P-sections seen from RS (= back of neck) = 158-162-170-180-188-196 sts. Continue until collar measures approx. 12-12-12-12-14-14 cm, then loosely cast off with K over K and P over P. Fasten collar with stitches at the bottom in each side towards band from WS (so that the seam is not visible from RS) – sew edge to edge to avoid a chunky seam. |
||||||||||||||||
Diagram explanations |
||||||||||||||||
|
||||||||||||||||
 |
||||||||||||||||
 |
||||||||||||||||
Have you finished this pattern?Tag your pictures with #dropspattern #ramblingmancardigan or submit them to the #dropsfan gallery. Do you need help with this pattern?You'll find 23 tutorial videos, a Comments/Questions area and more by visiting the pattern on garnstudio.com. © 1982-2026 DROPS Design A/S. We reserve all rights. This document, including all its sub-sections, has copyrights. Read more about what you can do with our patterns at the bottom of each pattern on our site. |
||||||||||||||||


With over 40 years in knitting and crochet design, DROPS Design offers one of the most extensive collections of free patterns on the internet - translated to 17 languages. As of today we count 324 catalogues and 12245 patterns translated into English (UK/cm). 12245
We work hard to bring you the best knitting and crochet have to offer, inspiration and advice as well as great quality yarns at incredible prices! Would you like to use our patterns for other than personal use? You can read what you are allowed to do in the Copyright text at the bottom of all our patterns. Happy crafting!
Post a comment to pattern DROPS Extra 0-850
We would love to hear what you have to say about this pattern!
If you want to leave a question, please make sure you select the correct category in the form below, to speed up the answering process. Required fields are marked *.