
Popular categories
Looking for a yarn?


Comments / Questions (266)
![]() Carla wrote:
Carla wrote:
Vorrei avere ulteriori spiegazioni sul ferro accorciato utilizzato sul bordo davanti nel modello. Dopo il 3° ferro ogni quanto devo ripeterlo? ogni tre ferri per tutto il diagramma o solo all'inizio del diagramma? ringrazio anticipatamente per la risposta.Carla Radice
25.03.2014 - 17:03DROPS Design answered:
Buonasera Carla. Lavora i ferri accorciati solo quando deve lavorare il ferro 3 del davanti destro (ferro 2 per il davanti sinistro) ogni volta che ripete il diagramma. Buon lavoro!
25.03.2014 - 22:41
![]() Corrie Van Dijken wrote:
Corrie Van Dijken wrote:
Inmiddels gevonden! niet verder gekeken dan mijn neus lang is.
09.02.2014 - 08:19
![]() Corrie Van Dijken wrote:
Corrie Van Dijken wrote:
In patroonbeschrijving wordt gesproken over A.4. Waar vind ik dat? Welke steek moet ik gebruiken? hartelijke groeten
09.02.2014 - 07:09DROPS Design answered:
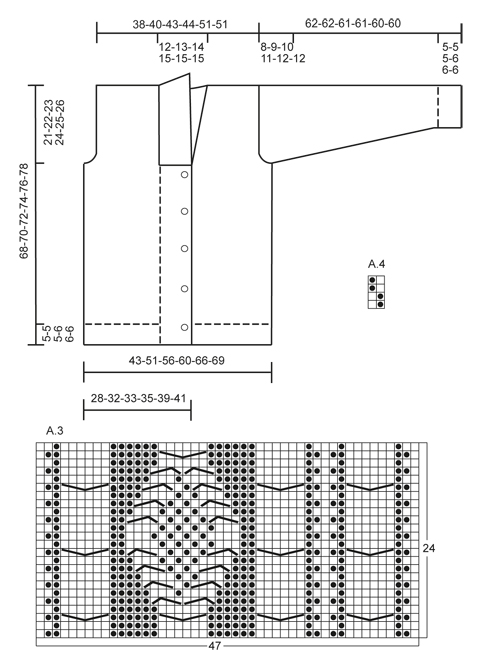
Hoi Corrie, die vind je net onder de maattekening (rechtsonder). Het is een kleine teltekening over maar 2 st / 4 nld
12.02.2014 - 13:42
![]() Eline Ensing wrote:
Eline Ensing wrote:
Ik heb een vraag over de verkorte toeren in het voorpand. Er staat dat in de vragen & antwoorden hieronder dat dit elke 3e naald moet gebeuren voor het rechtervoorpand, en elke 2e naald voor het linkervoorpand. Betekent dit dat de voorbies van het rechtervoorpand dan uiteindelijk uit veel meer toeren bestaat dan de voorbies van het linkervoorpand? Ik hoor het graag, alvast bedankt!
02.02.2014 - 13:23DROPS Design answered:
Hoi Eline. Ja, de beschrijving was niet helemaal goed. Het moet in elke 3e nld van de patroonherhaling zijn. We hebben de tekst aangepast.
19.02.2014 - 16:39Roza wrote:
Bonjour je viens de finir le gilet, j'ai un souci: les bande en point mousse des devants droit et gauche ont une forme évasée et non rectiligne, ce qui fait que, quand je boutonne j'ai une espèce de V inversé aux cotés arrondis formé par les 2 devant tout en bas du gilet (j'espère que j'arrive à me faire comprendre :p ) est-ce le model qui est ainsi fait? ou bien je me suis trompée pour les rangs raccourcis :( et je n'ai aucune envie de défaire :'( ...merci
21.01.2014 - 14:38DROPS Design answered:
Bonjour Roza, les rangs raccourcis sont faits pour compenser la différence de hauteur entre le point mousse (bordures des devants) et le point des devants et du dos. N'hésitez pas à montrer votre ouvrage (même en photo par mail) à votre magasin, il saura probablement vous conseiller. Bon tricot!
21.01.2014 - 15:15
![]() Lois wrote:
Lois wrote:
I'm having trouble figuring out how to do the binding off for the sleeve. What does " at beg of every row in each side" mean?
21.01.2014 - 05:22DROPS Design answered:
Dear Lois, it means you bind off sts for sleeve cap at the beg of every row starting from RS as well as starting from WS. Happy knitting!
21.01.2014 - 09:15
![]() Elisabeth Michelsen wrote:
Elisabeth Michelsen wrote:
Jeg har strikket bakstykket på denne flotte jakken og det gikk fint. Nå holder jeg på med forstykket, men lurer på om jeg gjør noe feil for den delen med stolpemasker blir mye "tettere" enn resten, altså kortere enn resten av forstykket. Stemmer det at en mønsterrapport er 24 masker og at kun den 3. omgangen skal være forkortet?
06.01.2014 - 21:43DROPS Design answered:
Hei Elisabeth. Riller er altid taettere end glattstrik. Derfor skal du ogsaa strikke de forkortede pinde. Du starter fra den 3. pind og gentager herefter i hver 3. pind - ikke kun één gang (den 3. pind i mönstret).
10.01.2014 - 09:41
![]() Yvonne Engels wrote:
Yvonne Engels wrote:
Ik mis patroon A4, terwijl daar al in de eerste naald na de boord naar verwezen wordt.
21.12.2013 - 19:05DROPS Design answered:
Hoi Yvonne. De teltekening A.4 staat rechtsonder de maattekening voor het vest.
22.12.2013 - 14:25
![]() Sabine Wetzke wrote:
Sabine Wetzke wrote:
Guten Morgen, ich habe gestern mit diesem Mpdell angefangen und bin direkt über die Anzahl der anzuschlagenden Maschen für das Rückteil gestolpert: Bei mir ergeben 156 Maschen in 2r 2l ca 66 cm Länge, was für Grösse M viel zu viel ist. Die Maschenprobe hat gestimmt. Wenn ich rein rechnerisch 21Maschen auf 10 cm habe, dann sind 156 M ca 75 cm! Selbst durch die Rippen zieht sich das Strickstück nicht um über 20 cm zusammen. Können Sie mir weiterhelfen? MfG Sabine Wetzke
18.12.2013 - 09:52DROPS Design answered:
Liebe Sabine, wir stricken oft die Bündchen mit grösserer Maschenzahl, damit sie gleich breit sind wie der Hauptteil später. Es werden nach dem Bündchen 20-22-24-26-26-26 M. abgenommen. Wenn Ihnen das nicht gefällt, können Sie selbstverständlich gleich mit der geringeren Maschenzahl ebginnen.
18.12.2013 - 12:12
![]() Carina Wernersson wrote:
Carina Wernersson wrote:
Sjalkragen: står att man ska ta upp 150 - 180 m, sedan minska så man får 156 m i stl L, men hur ska det göras? Sedan undrar jag om det menas att man ska öka i de mittersta 14m mitt bak?
20.11.2013 - 18:53DROPS Design answered:
Om du måste minska stickar du ihop 2 m jämt fördelat så du har 156 m. Ja du ökar i de mittersta aviga partierna mitt bak enligt beskrivningen.
27.11.2013 - 10:09
|
||||||||||||||||
Rambling Man#ramblingmancardigan |
||||||||||||||||
 |
 |
|||||||||||||||
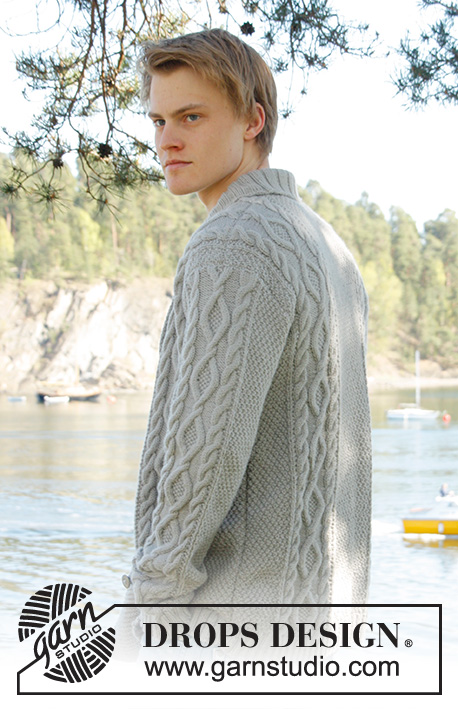
Men's knitted jacket in DROPS Lima, with cable pattern and shawl collar. Size: S - XXXL.
DROPS Extra 0-850 |
||||||||||||||||
|
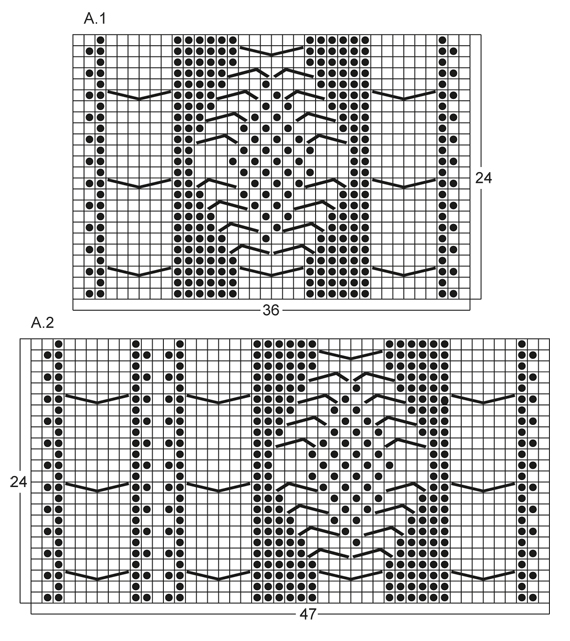
KNITTING TIPS: This design is written with button holes on right front edge, if you wish standard button holes for men, you can make the button holes on left front edge. GARTER ST (back and forth on needle): K all rows. NOTE: All edge sts are worked in garter st. PATTERN: See diagram A.1 to A.4, diagrams show all rows in 1 pattern repetition from RS. SHORT ROWS: RIGHT FRONT PIECE: Work 1 short row on row 3 of every pattern repetition vertically until finished measurements as follows: On 3rd row in pattern (= RS), work 26-26-26-26-30-30 band sts, turn and K back. Then work over all sts on row as before. LEFT FRONT PIECE: Work 1 short row on row 2 of every pattern repetition vertically until finished measurements as follows: On 2nd row in pattern (= WS), work 26-26-26-26-30-30 band sts, turn and K back. Then work over all sts on row as before. BUTTON HOLES: Cast off for 5 button holes from RS on right band. 1 BUTTON HOLE = cast off 7th and 8th st from mid front and cast on 2 new sts on next row over these sts. Cast off for button holes when piece measures: SIZE S: 14, 22, 30, 38 and 46 cm SIZE M: 15, 23, 31, 39 and 47 cm SIZE L: 16, 24, 32, 40 and 48 cm SIZE XL: 17, 25, 33, 41 and 49 cm SIZE XXL: 18, 26, 34, 42 and 50 cm SIZE XXXL: 19, 27, 35, 43 and 51 cm INCREASE TIP: Inc 1 st by making 1 YO, on next row work YO twisted (i.e. work in back loop of st instead front) to avoid holes. ---------------------------------------------------------- BACK PIECE: Worked back and forth on needle. Cast on 136-156-168-180-196-204 sts (incl 1 edge st in each side) on circular needle size 3.5 mm with Lima. Work rib as follows (1st row = RS): 1 edge st in GARTER ST - see explanation above, * K 2, P 2 *, repeat from *-*, finish with K 2 and 1 edge st in garter st. Continue to work like this until rib measures 5-5-5-6-6-6 cm. On last row from WS, P while AT THE SAME TIME dec 20-22-24-26-26-26 sts evenly = 116-134-144-154-170-178 sts. Then switch to needle size 4 mm and work next row from RS as follows: 1 edge st in garter st, 8-16-20-24-20-24 sts in A.4, work A.1 one time in size S - XL, work A.2 one time in size XXL and XXXL, 26-28-30-32-34-34 sts in A.4, then work A.1 one time in size S - XL, work A.3 one time in size XXL and XXXL, finish with 8-16-20-24-20-24 sts in A.4 and 1 edge st in garter st. REMEMBER THE KNITTING TENSION! Continue to work like this until piece measures 47-48-49-50-51-52 cm. Then cast off for armholes at the beg of every row in each side as follows: Cast off 3 sts 0-1-1-2-2-2 times, 2 sts 1-1-1-2-2-2 times, 1 st 4-7-9-8-4-8 times = 104-110-116-118-142-142 sts. Continue with pattern as before until piece measures 66-68-70-72-74-76 cm. Now cast off the middle 20-22-24-26-28-28 sts for neck and finish each part separately. Cast off 2 sts on next row from neck = 40-42-44-44-55-55 sts remain on shoulder. Continue with pattern as before. When piece measures 68-70-72-74-76-78 cm, loosely cast off sts with K over K and P over P. RIGHT FRONT PIECE: Worked back and forth on needle. Cast on 83-91-95-99-111-115 sts (incl 1 edge st in the side) on circular needle size 3.5 mm with Lima. Work rib as follows (1st row = RS): 26-26-26-26-30-30 sts in garter st (= band sts), * K 2, P 2 *, repeat from *-*, finish with 1 edge st in garter st. Continue with rib and band sts in garter st until rib measures 5-5-5-6-6-6 cm. On last row from WS, P over all sts in rib while AT THE SAME TIME dec 12-12-12-12-13-13 sts evenly (do not dec over band sts) = 71-79-83-87-98-102 sts. Then switch to needle size 4 mm and work next row from RS as follows: 26-26-26-26-30-30 band sts, work A.1 one time in size S - XL, work A.3 one time in size XXL and XXXL, 8-16-20-24-20-24 sts in A.4 and 1 edge in garter st. On next row from RS (= 3rd row in pattern) work SHORT ROWS - read explanation above. Continue with pattern and band sts at the front - while AT THE SAME TIME work 1 short row on 3rd row in every pattern repetition vertically until finished measurement. When piece measures 14-15-16-17-18-19 cm, cast off for BUTTON HOLES on right band - see explanation above! Continue to work until piece measures 47-48-49-50-51-52 cm. Then cast off at beg of next row from RS as follows: Cast off the first 25-25-25-25-29-29 sts, insert a marker (this marks where to beg the knit up for collar), work the rest of row. Then cast off for armhole on every row from WS as follows: 3 sts 0-1-1-2-2-2 times, 2 sts 1-1-1-2-2-2 times, 1 st 4-7-9-8-4-8 times = 40-42-44-44-55-55 sts remain on shoulder. Continue with pattern as before. When piece measures 68-70-72-74-76-78 cm, loosely cast off sts with K over K and P over P. LEFT FRONT PIECE: Cast on and work rib as on right front piece but reversed (i.e. * P 2, K 2 *, repeat from *-*) with 26-26-26-26-30-30 band sts in garter st. Continue to work until rib measures 5-5-5-6-6-6 cm. On last row from WS, P over all sts in rib while AT THE SAME TIME dec 12-12-12-12-13-13 sts evenly (do not dec over band sts) = 71-79-83-87-98-102 sts. Then switch to needle size 4 mm and work next row from RS as follows: 1 edge st in garter st, 8-16-20-24-20-24 sts in A.4, work A.1 one time in size S - XL, work A.2 one time in size XXL and XXXL, 26-26-26-26-30-30 band sts in garter st. On next row from WS (= 2nd row in pattern) work SHORT ROWS - read explanation above. Continue to work the same way as on right front piece but without button holes. SLEEVE: Worked back and forth on needle. Cast on 74-78-82-86-90-90 sts (incl 1 edge st in each side) on circular needle size 3.5 mm with Lima. Work rib as follows (1st row = RS): 1 edge st in garter st, * K 2, P 2 *, repeat from *-* and finish with 1 edge st in garter st. Continue to work like this until rib measures 5-5-5-6-6-6 cm. On last row from WS, P while AT THE SAME TIME dec 12-14-16-18-18-18 sts evenly = 62-64-66-68-72-72 sts. Then switch to needle size 4 mm and work next row from RS as follows: 1 edge st in garter st, 12-13-14-15-17-17 sts in A.4, work A.1 one time, 12-13-14-15-17-17 sts in A.4, finish with 1 edge st in garter st. AT THE SAME TIME when piece measures 6 cm, inc 1 st inside 1 edge st in each side - Read INCREASE TIP above. NOTE: Work the inc sts in A.4. Repeat inc every 3½-3-2½-2½-2½-2½ cm a total of 14-15-16-17-16-17 times = 90-94-98-102-104-106 sts. Continue until piece measures 54-53-51-50-48-48 cm (shorter measurements in the larger sizes because of longer sleeve cap and broader shoulder width), cast off at beg of every row in each side: 3 sts 1-1-1-2-2-2 times, 2 sts 1-1-2-2-2-2 times and 1 st 2-2-3-3-4-4 times. Then cast off 2 sts in each side until piece measures 61-61-60-60-59-59 cm, then cast off 3 sts 2 times in each side. When piece measures approx. 62-62-61-61-60-60 cm, loosely cast off sts with K over K and P over P. ASSEMBLY: Sew shoulder seams and sew in sleeves inside 1 edge st. Sew sleeve and side seams in one inside 1 edge st. Sew buttons on to left front piece, approx. 2½ cm from last K st in pattern. SHAWL COLLAR: Knit up sts from RS inside 1 edge st on circular needle size 3.5 mm. Start mid front at marker on right front piece as follows: Knit up approx. 60-70 sts up to shoulder, then 30-40 sts along the neck and 60-70 sts down along left front piece until marker = 150-180 sts. K 1 row from WS while AT THE SAME TIME adjusting no of sts to 144-148-156-164-172-180. Then work rib on next row from RS as follows: 1 sts in garter st, * K 2, P 2 *, repeat from *-* and finish with K 2 and 1 st in garter st. Continue like this until collar measures approx. 5-5-5-6-6-6 cm. Now inc 1 st in each of the middle 14-14-14-16-16-16 P-sections seen from RS (= back of neck) = 158-162-170-180-188-196 sts. Continue until collar measures approx. 12-12-12-12-14-14 cm, then loosely cast off with K over K and P over P. Fasten collar with stitches at the bottom in each side towards band from WS (so that the seam is not visible from RS) – sew edge to edge to avoid a chunky seam. |
||||||||||||||||
Diagram explanations |
||||||||||||||||
|
||||||||||||||||
 |
||||||||||||||||
 |
||||||||||||||||
Have you finished this pattern?Tag your pictures with #dropspattern #ramblingmancardigan or submit them to the #dropsfan gallery. Do you need help with this pattern?You'll find 23 tutorial videos, a Comments/Questions area and more by visiting the pattern on garnstudio.com. © 1982-2026 DROPS Design A/S. We reserve all rights. This document, including all its sub-sections, has copyrights. Read more about what you can do with our patterns at the bottom of each pattern on our site. |
||||||||||||||||


With over 40 years in knitting and crochet design, DROPS Design offers one of the most extensive collections of free patterns on the internet - translated to 17 languages. As of today we count 324 catalogues and 12245 patterns translated into English (UK/cm). 12245
We work hard to bring you the best knitting and crochet have to offer, inspiration and advice as well as great quality yarns at incredible prices! Would you like to use our patterns for other than personal use? You can read what you are allowed to do in the Copyright text at the bottom of all our patterns. Happy crafting!
Post a comment to pattern DROPS Extra 0-850
We would love to hear what you have to say about this pattern!
If you want to leave a question, please make sure you select the correct category in the form below, to speed up the answering process. Required fields are marked *.