
Popular categories
Looking for a yarn?


Comments / Questions (266)
![]() Monika Stavgar wrote:
Monika Stavgar wrote:
Melding til Berit Sandven: Du har jo strikket denne etter hva jeg skjønner. Jeg forstår ikke kragen. Jeg skal legge opp 14 ekstra masker bak i nakken, men da blir det jo ikke 2 r. og 2 vr. lenger. Kan du forklare hvordan du har gjort det?
27.04.2015 - 16:08DROPS Design answered:
Hei Monika. Se mit svar herunder til dit spörgsmaal.
29.04.2015 - 14:10
![]() Monika Stavgar wrote:
Monika Stavgar wrote:
Skal begynne på kragen. Der står det legg opp 14 m. i vrangfeltet bak i nakken. Jeg har bare 9 vrangfelt i nakken. Skal det da strikkes 3 vr. og 2 rette resten av kragen?
27.04.2015 - 12:34DROPS Design answered:
Hei Monika. Der staar du skal öke 1 m i hver av de midterste 14 vr-partiene set fra retten. Du teller altsaa 7 vr-partier ud fra midten af nakken og öker her 1 m i hver (dvs, du har her 3 vr i hver i stedet for 2)
29.04.2015 - 14:09
![]() Berit Sandven wrote:
Berit Sandven wrote:
Hei! Denne jakken har jeg strikket tre stykker av. Begynner på den fjerde snart. Den sitter som et skudd og vekker positiv oppmerksomhet,
28.03.2015 - 11:21
![]() Rita wrote:
Rita wrote:
Het patroon is juist,door een groter aantal steken op de boord valt dit patroon mooier.Heb dit zelf ook gebreid en valt perfect.
02.02.2015 - 16:21
![]() Petra Van Gelder wrote:
Petra Van Gelder wrote:
In Patroon Drops Extra 0-850 staat volgens mij een fout want het boord wordt met meer steken opgezet en dan minderen naar het bovenpand en dat terwijl dit volgens mij andersom behoort te zijn
02.02.2015 - 16:02
![]() Jonathan Brien wrote:
Jonathan Brien wrote:
J'ai une petite question concernant le rang racourcis/diagramme du patron: si je comprends bien en comptant les rangs du diagramme ce rang 1 rang 2 rang racourcit rang 3 rang 4 rang racourcit et ainsi de suite les???
16.01.2015 - 17:17DROPS Design answered:
Bonjour Mr Brien, c'est exact, à chaque fois que vous tricotez le rang 3 de A.1, vous tricotez 2 rangs sur les mailles de la bordure seulement (devant droit). Terminez A.1 en hauteur, et, quand vous tricotez A.1 la 2e fois, vous tricotez à nouveau 2 rangs sur les mailles de bordure devant au 3e rang de A.1 et ainsi de suite. Bon tricot!
19.01.2015 - 09:47
![]() Graz wrote:
Graz wrote:
Bonjour, encore merci pour votre réponse. Je parlais de l'emmanchure du devant droit c'est écrit: Rabattre ensuite pour l'emmanchure tous les rangs sur l'envers : 0-1-1-2-2-2 fois 3 m, 1-1-1-2-2-2 fois 2 m et 4-7-9-8-4-8 fois 1 m = il reste 40-42-44-44-55-55 m pour l'épaule. Pourquoi "tous les rangs"? si ce n'est juste qu'un seul rang envers?
12.01.2015 - 19:18DROPS Design answered:
Bonjour Mme Graz, on rabat pour l'emmanchure du devant droit tous les rangs sur l'envers, au début de chaque rang : 0-1-1-2-2-2 fois 3 m, 1-1-1-2-2-2 fois 2 m et 4-7-9-8-4-8 fois 1 m (= tous les 2 rangs, mais sur l'envers). Bon tricot!
13.01.2015 - 09:11Karen King wrote:
In the last round of the rib when I decrease 26 stiches do I do all perl stiches? Or do I fallow the rib patern?Thank you for your help. I love this patern but I can not make it look right. I have even tryed diferant yarns.
12.01.2015 - 16:17DROPS Design answered:
Dear Mrs King, remember you can also get tips & advices from your DROPS store. Happy knitting!
12.01.2015 - 18:25Karen King wrote:
In the last round of the rib when I decrease 26 stiches do I do all perl stiches? Or so I fallow the rib patern?Thank you for your help.
12.01.2015 - 16:04DROPS Design answered:
Dear Mrs King, after ribbing you purl 1 row from WS at the same time dec 26 sts evenly. Happy knitting!
12.01.2015 - 18:24
![]() Graz wrote:
Graz wrote:
Bonjour, désolée de vous poser autant de question. Je n'ai jamais tricoté de veste. Pour l'emmanchure. Est-ce que c'est 1m x3 , 1m x 2 et 7 m x1 sur le même rang envers ou bien 1m sur 3 rang, 1m sur deux rangs et 7 m sur 7 rangs? Je ne sais pas si c'est assez clair...Mais il me semble que si je fais la premiere version, je ne pourrais pas tricoter la même chose sur toutes les rangs envers.
12.01.2015 - 15:01DROPS Design answered:
Bonjour Mme Graz, pour les emmanchures du dos, on rabat au début de chaque rang de chaque côté (= sur l'endroit et sur l'envers) en taille M : 1 fois 3 m (6 m rabattues au total = 3 m de chaque côté), puis 1 fois 2 m, puis 7 fois 1 m (toujours au début de chaque rang de chaque côté), quand toutes les mailles sont rabattues, il reste 110 m, on a donc rabattu 24 m au total, 12 de chaque côté). Bon tricot!
12.01.2015 - 18:32
|
||||||||||||||||
Rambling Man#ramblingmancardigan |
||||||||||||||||
 |
 |
|||||||||||||||
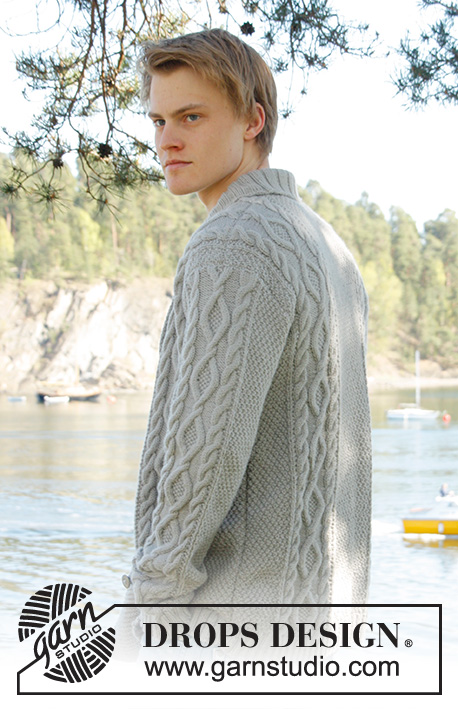
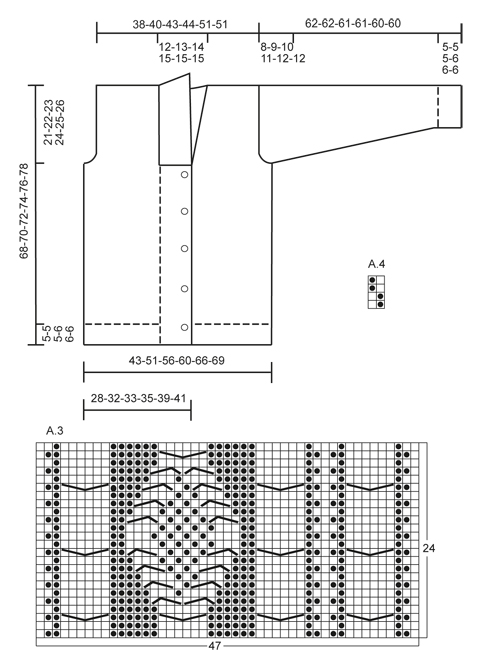
Men's knitted jacket in DROPS Lima, with cable pattern and shawl collar. Size: S - XXXL.
DROPS Extra 0-850 |
||||||||||||||||
|
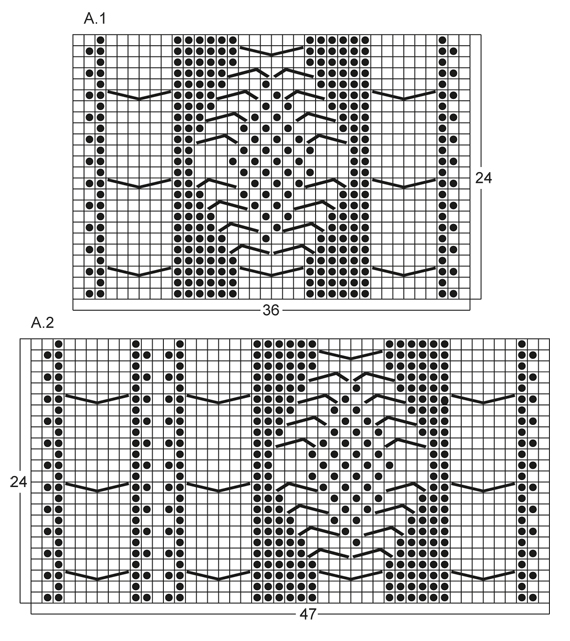
KNITTING TIPS: This design is written with button holes on right front edge, if you wish standard button holes for men, you can make the button holes on left front edge. GARTER ST (back and forth on needle): K all rows. NOTE: All edge sts are worked in garter st. PATTERN: See diagram A.1 to A.4, diagrams show all rows in 1 pattern repetition from RS. SHORT ROWS: RIGHT FRONT PIECE: Work 1 short row on row 3 of every pattern repetition vertically until finished measurements as follows: On 3rd row in pattern (= RS), work 26-26-26-26-30-30 band sts, turn and K back. Then work over all sts on row as before. LEFT FRONT PIECE: Work 1 short row on row 2 of every pattern repetition vertically until finished measurements as follows: On 2nd row in pattern (= WS), work 26-26-26-26-30-30 band sts, turn and K back. Then work over all sts on row as before. BUTTON HOLES: Cast off for 5 button holes from RS on right band. 1 BUTTON HOLE = cast off 7th and 8th st from mid front and cast on 2 new sts on next row over these sts. Cast off for button holes when piece measures: SIZE S: 14, 22, 30, 38 and 46 cm SIZE M: 15, 23, 31, 39 and 47 cm SIZE L: 16, 24, 32, 40 and 48 cm SIZE XL: 17, 25, 33, 41 and 49 cm SIZE XXL: 18, 26, 34, 42 and 50 cm SIZE XXXL: 19, 27, 35, 43 and 51 cm INCREASE TIP: Inc 1 st by making 1 YO, on next row work YO twisted (i.e. work in back loop of st instead front) to avoid holes. ---------------------------------------------------------- BACK PIECE: Worked back and forth on needle. Cast on 136-156-168-180-196-204 sts (incl 1 edge st in each side) on circular needle size 3.5 mm with Lima. Work rib as follows (1st row = RS): 1 edge st in GARTER ST - see explanation above, * K 2, P 2 *, repeat from *-*, finish with K 2 and 1 edge st in garter st. Continue to work like this until rib measures 5-5-5-6-6-6 cm. On last row from WS, P while AT THE SAME TIME dec 20-22-24-26-26-26 sts evenly = 116-134-144-154-170-178 sts. Then switch to needle size 4 mm and work next row from RS as follows: 1 edge st in garter st, 8-16-20-24-20-24 sts in A.4, work A.1 one time in size S - XL, work A.2 one time in size XXL and XXXL, 26-28-30-32-34-34 sts in A.4, then work A.1 one time in size S - XL, work A.3 one time in size XXL and XXXL, finish with 8-16-20-24-20-24 sts in A.4 and 1 edge st in garter st. REMEMBER THE KNITTING TENSION! Continue to work like this until piece measures 47-48-49-50-51-52 cm. Then cast off for armholes at the beg of every row in each side as follows: Cast off 3 sts 0-1-1-2-2-2 times, 2 sts 1-1-1-2-2-2 times, 1 st 4-7-9-8-4-8 times = 104-110-116-118-142-142 sts. Continue with pattern as before until piece measures 66-68-70-72-74-76 cm. Now cast off the middle 20-22-24-26-28-28 sts for neck and finish each part separately. Cast off 2 sts on next row from neck = 40-42-44-44-55-55 sts remain on shoulder. Continue with pattern as before. When piece measures 68-70-72-74-76-78 cm, loosely cast off sts with K over K and P over P. RIGHT FRONT PIECE: Worked back and forth on needle. Cast on 83-91-95-99-111-115 sts (incl 1 edge st in the side) on circular needle size 3.5 mm with Lima. Work rib as follows (1st row = RS): 26-26-26-26-30-30 sts in garter st (= band sts), * K 2, P 2 *, repeat from *-*, finish with 1 edge st in garter st. Continue with rib and band sts in garter st until rib measures 5-5-5-6-6-6 cm. On last row from WS, P over all sts in rib while AT THE SAME TIME dec 12-12-12-12-13-13 sts evenly (do not dec over band sts) = 71-79-83-87-98-102 sts. Then switch to needle size 4 mm and work next row from RS as follows: 26-26-26-26-30-30 band sts, work A.1 one time in size S - XL, work A.3 one time in size XXL and XXXL, 8-16-20-24-20-24 sts in A.4 and 1 edge in garter st. On next row from RS (= 3rd row in pattern) work SHORT ROWS - read explanation above. Continue with pattern and band sts at the front - while AT THE SAME TIME work 1 short row on 3rd row in every pattern repetition vertically until finished measurement. When piece measures 14-15-16-17-18-19 cm, cast off for BUTTON HOLES on right band - see explanation above! Continue to work until piece measures 47-48-49-50-51-52 cm. Then cast off at beg of next row from RS as follows: Cast off the first 25-25-25-25-29-29 sts, insert a marker (this marks where to beg the knit up for collar), work the rest of row. Then cast off for armhole on every row from WS as follows: 3 sts 0-1-1-2-2-2 times, 2 sts 1-1-1-2-2-2 times, 1 st 4-7-9-8-4-8 times = 40-42-44-44-55-55 sts remain on shoulder. Continue with pattern as before. When piece measures 68-70-72-74-76-78 cm, loosely cast off sts with K over K and P over P. LEFT FRONT PIECE: Cast on and work rib as on right front piece but reversed (i.e. * P 2, K 2 *, repeat from *-*) with 26-26-26-26-30-30 band sts in garter st. Continue to work until rib measures 5-5-5-6-6-6 cm. On last row from WS, P over all sts in rib while AT THE SAME TIME dec 12-12-12-12-13-13 sts evenly (do not dec over band sts) = 71-79-83-87-98-102 sts. Then switch to needle size 4 mm and work next row from RS as follows: 1 edge st in garter st, 8-16-20-24-20-24 sts in A.4, work A.1 one time in size S - XL, work A.2 one time in size XXL and XXXL, 26-26-26-26-30-30 band sts in garter st. On next row from WS (= 2nd row in pattern) work SHORT ROWS - read explanation above. Continue to work the same way as on right front piece but without button holes. SLEEVE: Worked back and forth on needle. Cast on 74-78-82-86-90-90 sts (incl 1 edge st in each side) on circular needle size 3.5 mm with Lima. Work rib as follows (1st row = RS): 1 edge st in garter st, * K 2, P 2 *, repeat from *-* and finish with 1 edge st in garter st. Continue to work like this until rib measures 5-5-5-6-6-6 cm. On last row from WS, P while AT THE SAME TIME dec 12-14-16-18-18-18 sts evenly = 62-64-66-68-72-72 sts. Then switch to needle size 4 mm and work next row from RS as follows: 1 edge st in garter st, 12-13-14-15-17-17 sts in A.4, work A.1 one time, 12-13-14-15-17-17 sts in A.4, finish with 1 edge st in garter st. AT THE SAME TIME when piece measures 6 cm, inc 1 st inside 1 edge st in each side - Read INCREASE TIP above. NOTE: Work the inc sts in A.4. Repeat inc every 3½-3-2½-2½-2½-2½ cm a total of 14-15-16-17-16-17 times = 90-94-98-102-104-106 sts. Continue until piece measures 54-53-51-50-48-48 cm (shorter measurements in the larger sizes because of longer sleeve cap and broader shoulder width), cast off at beg of every row in each side: 3 sts 1-1-1-2-2-2 times, 2 sts 1-1-2-2-2-2 times and 1 st 2-2-3-3-4-4 times. Then cast off 2 sts in each side until piece measures 61-61-60-60-59-59 cm, then cast off 3 sts 2 times in each side. When piece measures approx. 62-62-61-61-60-60 cm, loosely cast off sts with K over K and P over P. ASSEMBLY: Sew shoulder seams and sew in sleeves inside 1 edge st. Sew sleeve and side seams in one inside 1 edge st. Sew buttons on to left front piece, approx. 2½ cm from last K st in pattern. SHAWL COLLAR: Knit up sts from RS inside 1 edge st on circular needle size 3.5 mm. Start mid front at marker on right front piece as follows: Knit up approx. 60-70 sts up to shoulder, then 30-40 sts along the neck and 60-70 sts down along left front piece until marker = 150-180 sts. K 1 row from WS while AT THE SAME TIME adjusting no of sts to 144-148-156-164-172-180. Then work rib on next row from RS as follows: 1 sts in garter st, * K 2, P 2 *, repeat from *-* and finish with K 2 and 1 st in garter st. Continue like this until collar measures approx. 5-5-5-6-6-6 cm. Now inc 1 st in each of the middle 14-14-14-16-16-16 P-sections seen from RS (= back of neck) = 158-162-170-180-188-196 sts. Continue until collar measures approx. 12-12-12-12-14-14 cm, then loosely cast off with K over K and P over P. Fasten collar with stitches at the bottom in each side towards band from WS (so that the seam is not visible from RS) – sew edge to edge to avoid a chunky seam. |
||||||||||||||||
Diagram explanations |
||||||||||||||||
|
||||||||||||||||
 |
||||||||||||||||
 |
||||||||||||||||
Have you finished this pattern?Tag your pictures with #dropspattern #ramblingmancardigan or submit them to the #dropsfan gallery. Do you need help with this pattern?You'll find 23 tutorial videos, a Comments/Questions area and more by visiting the pattern on garnstudio.com. © 1982-2026 DROPS Design A/S. We reserve all rights. This document, including all its sub-sections, has copyrights. Read more about what you can do with our patterns at the bottom of each pattern on our site. |
||||||||||||||||


With over 40 years in knitting and crochet design, DROPS Design offers one of the most extensive collections of free patterns on the internet - translated to 17 languages. As of today we count 324 catalogues and 12245 patterns translated into English (UK/cm). 12245
We work hard to bring you the best knitting and crochet have to offer, inspiration and advice as well as great quality yarns at incredible prices! Would you like to use our patterns for other than personal use? You can read what you are allowed to do in the Copyright text at the bottom of all our patterns. Happy crafting!
Post a comment to pattern DROPS Extra 0-850
We would love to hear what you have to say about this pattern!
If you want to leave a question, please make sure you select the correct category in the form below, to speed up the answering process. Required fields are marked *.