
Popular categories
Looking for a yarn?


Comments / Questions (266)
![]() Anja Van De Wetering wrote:
Anja Van De Wetering wrote:
Ben met de kraag bezig en kom dan de zin: Meerder nu 1 st en elke van de middelste 14 av-delen gezien aan de goede kant tegen. Wat betekend 14 av-delen?
23.09.2016 - 09:31DROPS Design answered:
Hoi Anja. Je breit de kraag met 2 r, 2 av. 2 av = 1 av-deel. Je meerdert in de middelste 14 av-delen van de kraag.
27.09.2016 - 16:16
![]() Anja Van De Wetering wrote:
Anja Van De Wetering wrote:
Ik vind 86 steken opzetten voor de mouw heel veel, de mouw is ook ontzettend ruim. Klopt dit wel?
12.09.2016 - 15:51DROPS Design answered:
Hoi Anja. Ja, dit klopt wel. Boordsteek trekt zich veel meer samen dan bijvoorbeeld tricotsteek. Je mindert ook na de boordsteek na 68 st, met de juiste stekenverhouding geeft dat een omtrek van ca. 32 cm + dat het patroon ook een beetje meer zal samentrekken dan bij alleen tricotsteek.
13.09.2016 - 10:21Christine Lindop wrote:
I'm beginning the front and notice that the garter stitch section pulls up tighter than the rib section, so that there will be a visible difference in the level of the lower edge of the garment. Looking at some of the jackets people have made you can see this. Will I be able to block this out and even up the front edge? Thanks for your help.
24.07.2016 - 22:11DROPS Design answered:
Dear Mrs Lindop, to avoid front band sts from contracting, you will work some short rows on the front band sts in garter st only - see under front pieces + "Short rows" at the beg of the pattern. Happy knitting!
25.07.2016 - 10:11
![]() Janne Alne wrote:
Janne Alne wrote:
Blir det ikke ulikt når en skal strikke en forkortet pinne på hver 3 omgang på høyre forstykket og hver 2 omgang på venstre forstykket
24.02.2016 - 20:21DROPS Design answered:
Hej, Der strikkes forkortede pinde i hver mønsterrapport, det vil sige lige mange på højre og venstre, men i den ene side bliver det på 3.p og i den anden side bliver det på 2.p i rapporten. God fornøjelse!
25.02.2016 - 15:12
![]() Rochelle Derreberry wrote:
Rochelle Derreberry wrote:
I am making XXL. On chart 2 the number 24 is on left. Does that mean I follow the row left to right or do I just do the same as the other charts - right to left?
22.02.2016 - 18:08DROPS Design answered:
Dear Mrs Derreberry, each diagram is worked over 24 rows, they are all worked the same way: 1 square= 1 st x 1 row, read more here. Happy knitting!
23.02.2016 - 08:45Mabel wrote:
Hola soy de argentina y no puedo encontrar la pestaña de vídeo para ver el tutorial, me pueden indicar como verlo por favor? Se puede ver en you tube? Gracias!
06.02.2016 - 01:41DROPS Design answered:
Hola Mabel, la pestaña de video esta pegada a la de material, en la parte de arriba donde indica las lanas y agujas que se han de usar. Si pinchando la pestaña no te deja ver los vídeos puede deberse a que no tienes actualizada la versión de adobe flash player.
07.02.2016 - 20:47
![]() Telle Roselyne wrote:
Telle Roselyne wrote:
Bonsoir, Qu'appelez vous section pour les augmentations du col. Merci d'avance.
07.01.2016 - 22:58DROPS Design answered:
Bonjour Mme Telle, il s'agit des mailles envers des côtess, on tricote en côtes 2/2, mais on va augmenter 1 m dans les 2 m env des côtes qui se situent au niveau de l'encolure dos, vous aurez ainsi, vu sur l'endroit: côtes 2 m end/2 m env, puis côtes 2 m end/3 m env et enfin des côtes 2 m end/2 m env. Bon tricot!
08.01.2016 - 09:08
![]() Birgitta Björke'n wrote:
Birgitta Björke'n wrote:
Just finished this cardigan and it turned out very nice, BUT i knitted a small size SMALL and used 1000g, not 900g ! Blev just klar med denna, den blev jättesnygg, men jag stickade en liten Small ( 6cm kortare) och det gick ändå åt 1000g och inte 900g som beskrivningen anger
15.12.2015 - 22:44
![]() Silvia wrote:
Silvia wrote:
Liebes Drops Team, ich stricke gerade den rechten Vorderteil. Stricke die verkürzten Reihen wie in der Anleitung beschrieben. Habe derzeit 27 cm gestrickt. Ist es richtig das sich die Blende nun ein klein wenig durch die verkürzten Reihen wellt?
13.12.2015 - 20:16DROPS Design answered:
Eigentlich sollen die verkürzten R verhindern, dass die Blende zu kurz wird, denn kraus rechts ist in der Höhe immer etwas kürzer als z.B. glatt rechts oder das Muster. Haben Sie die verkürzten R denn nur in der 3. R eines Muster-Rapports gestrickt oder in jeder 3. R? Sie stricken die verkürzten R immer nur in der 3. Muster-R. Ansonsten haben Sie zu viele verkürzte R und die Blende wird höher als der Rest und wellt sich.
20.12.2015 - 10:58
![]() Shari Santos wrote:
Shari Santos wrote:
In the U.S., you normally order yarn by the yard. Does this pattern really call for 1150 grams - over 20 skeins for the XL? Thank you.
01.11.2015 - 05:10DROPS Design answered:
Dear Mrs Santos, DROPS Lima= 50g (1,8 oz) a ball, in size XL: 1150/50= 23 balls. Remember you can also get help from your DROPS store. Happy knitting!
02.11.2015 - 08:13
|
||||||||||||||||
Rambling Man#ramblingmancardigan |
||||||||||||||||
 |
 |
|||||||||||||||
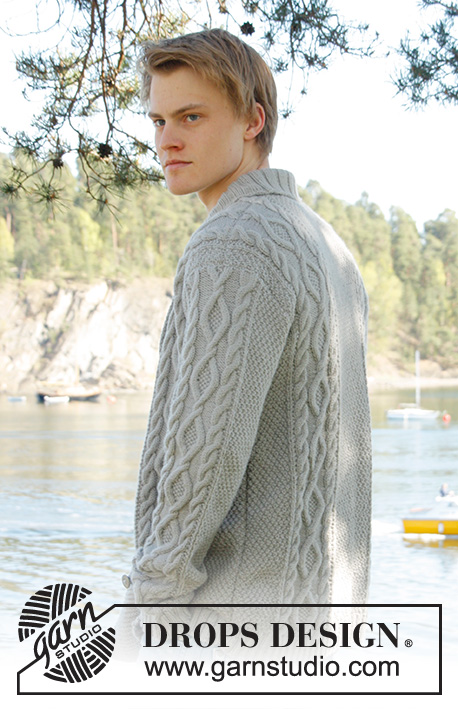
Men's knitted jacket in DROPS Lima, with cable pattern and shawl collar. Size: S - XXXL.
DROPS Extra 0-850 |
||||||||||||||||
|
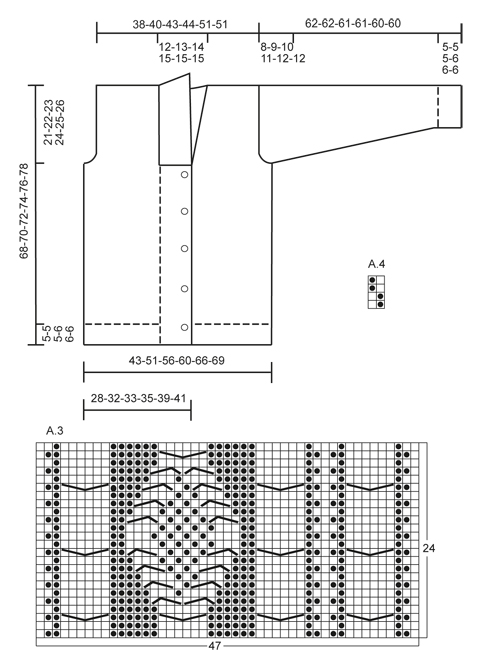
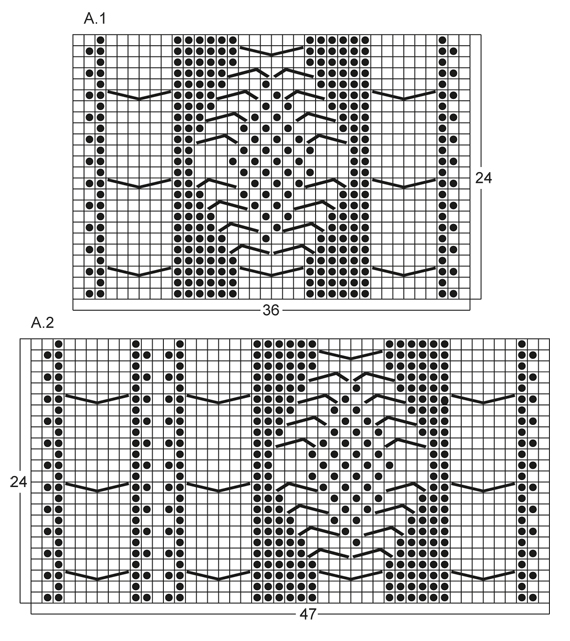
KNITTING TIPS: This design is written with button holes on right front edge, if you wish standard button holes for men, you can make the button holes on left front edge. GARTER ST (back and forth on needle): K all rows. NOTE: All edge sts are worked in garter st. PATTERN: See diagram A.1 to A.4, diagrams show all rows in 1 pattern repetition from RS. SHORT ROWS: RIGHT FRONT PIECE: Work 1 short row on row 3 of every pattern repetition vertically until finished measurements as follows: On 3rd row in pattern (= RS), work 26-26-26-26-30-30 band sts, turn and K back. Then work over all sts on row as before. LEFT FRONT PIECE: Work 1 short row on row 2 of every pattern repetition vertically until finished measurements as follows: On 2nd row in pattern (= WS), work 26-26-26-26-30-30 band sts, turn and K back. Then work over all sts on row as before. BUTTON HOLES: Cast off for 5 button holes from RS on right band. 1 BUTTON HOLE = cast off 7th and 8th st from mid front and cast on 2 new sts on next row over these sts. Cast off for button holes when piece measures: SIZE S: 14, 22, 30, 38 and 46 cm SIZE M: 15, 23, 31, 39 and 47 cm SIZE L: 16, 24, 32, 40 and 48 cm SIZE XL: 17, 25, 33, 41 and 49 cm SIZE XXL: 18, 26, 34, 42 and 50 cm SIZE XXXL: 19, 27, 35, 43 and 51 cm INCREASE TIP: Inc 1 st by making 1 YO, on next row work YO twisted (i.e. work in back loop of st instead front) to avoid holes. ---------------------------------------------------------- BACK PIECE: Worked back and forth on needle. Cast on 136-156-168-180-196-204 sts (incl 1 edge st in each side) on circular needle size 3.5 mm with Lima. Work rib as follows (1st row = RS): 1 edge st in GARTER ST - see explanation above, * K 2, P 2 *, repeat from *-*, finish with K 2 and 1 edge st in garter st. Continue to work like this until rib measures 5-5-5-6-6-6 cm. On last row from WS, P while AT THE SAME TIME dec 20-22-24-26-26-26 sts evenly = 116-134-144-154-170-178 sts. Then switch to needle size 4 mm and work next row from RS as follows: 1 edge st in garter st, 8-16-20-24-20-24 sts in A.4, work A.1 one time in size S - XL, work A.2 one time in size XXL and XXXL, 26-28-30-32-34-34 sts in A.4, then work A.1 one time in size S - XL, work A.3 one time in size XXL and XXXL, finish with 8-16-20-24-20-24 sts in A.4 and 1 edge st in garter st. REMEMBER THE KNITTING TENSION! Continue to work like this until piece measures 47-48-49-50-51-52 cm. Then cast off for armholes at the beg of every row in each side as follows: Cast off 3 sts 0-1-1-2-2-2 times, 2 sts 1-1-1-2-2-2 times, 1 st 4-7-9-8-4-8 times = 104-110-116-118-142-142 sts. Continue with pattern as before until piece measures 66-68-70-72-74-76 cm. Now cast off the middle 20-22-24-26-28-28 sts for neck and finish each part separately. Cast off 2 sts on next row from neck = 40-42-44-44-55-55 sts remain on shoulder. Continue with pattern as before. When piece measures 68-70-72-74-76-78 cm, loosely cast off sts with K over K and P over P. RIGHT FRONT PIECE: Worked back and forth on needle. Cast on 83-91-95-99-111-115 sts (incl 1 edge st in the side) on circular needle size 3.5 mm with Lima. Work rib as follows (1st row = RS): 26-26-26-26-30-30 sts in garter st (= band sts), * K 2, P 2 *, repeat from *-*, finish with 1 edge st in garter st. Continue with rib and band sts in garter st until rib measures 5-5-5-6-6-6 cm. On last row from WS, P over all sts in rib while AT THE SAME TIME dec 12-12-12-12-13-13 sts evenly (do not dec over band sts) = 71-79-83-87-98-102 sts. Then switch to needle size 4 mm and work next row from RS as follows: 26-26-26-26-30-30 band sts, work A.1 one time in size S - XL, work A.3 one time in size XXL and XXXL, 8-16-20-24-20-24 sts in A.4 and 1 edge in garter st. On next row from RS (= 3rd row in pattern) work SHORT ROWS - read explanation above. Continue with pattern and band sts at the front - while AT THE SAME TIME work 1 short row on 3rd row in every pattern repetition vertically until finished measurement. When piece measures 14-15-16-17-18-19 cm, cast off for BUTTON HOLES on right band - see explanation above! Continue to work until piece measures 47-48-49-50-51-52 cm. Then cast off at beg of next row from RS as follows: Cast off the first 25-25-25-25-29-29 sts, insert a marker (this marks where to beg the knit up for collar), work the rest of row. Then cast off for armhole on every row from WS as follows: 3 sts 0-1-1-2-2-2 times, 2 sts 1-1-1-2-2-2 times, 1 st 4-7-9-8-4-8 times = 40-42-44-44-55-55 sts remain on shoulder. Continue with pattern as before. When piece measures 68-70-72-74-76-78 cm, loosely cast off sts with K over K and P over P. LEFT FRONT PIECE: Cast on and work rib as on right front piece but reversed (i.e. * P 2, K 2 *, repeat from *-*) with 26-26-26-26-30-30 band sts in garter st. Continue to work until rib measures 5-5-5-6-6-6 cm. On last row from WS, P over all sts in rib while AT THE SAME TIME dec 12-12-12-12-13-13 sts evenly (do not dec over band sts) = 71-79-83-87-98-102 sts. Then switch to needle size 4 mm and work next row from RS as follows: 1 edge st in garter st, 8-16-20-24-20-24 sts in A.4, work A.1 one time in size S - XL, work A.2 one time in size XXL and XXXL, 26-26-26-26-30-30 band sts in garter st. On next row from WS (= 2nd row in pattern) work SHORT ROWS - read explanation above. Continue to work the same way as on right front piece but without button holes. SLEEVE: Worked back and forth on needle. Cast on 74-78-82-86-90-90 sts (incl 1 edge st in each side) on circular needle size 3.5 mm with Lima. Work rib as follows (1st row = RS): 1 edge st in garter st, * K 2, P 2 *, repeat from *-* and finish with 1 edge st in garter st. Continue to work like this until rib measures 5-5-5-6-6-6 cm. On last row from WS, P while AT THE SAME TIME dec 12-14-16-18-18-18 sts evenly = 62-64-66-68-72-72 sts. Then switch to needle size 4 mm and work next row from RS as follows: 1 edge st in garter st, 12-13-14-15-17-17 sts in A.4, work A.1 one time, 12-13-14-15-17-17 sts in A.4, finish with 1 edge st in garter st. AT THE SAME TIME when piece measures 6 cm, inc 1 st inside 1 edge st in each side - Read INCREASE TIP above. NOTE: Work the inc sts in A.4. Repeat inc every 3½-3-2½-2½-2½-2½ cm a total of 14-15-16-17-16-17 times = 90-94-98-102-104-106 sts. Continue until piece measures 54-53-51-50-48-48 cm (shorter measurements in the larger sizes because of longer sleeve cap and broader shoulder width), cast off at beg of every row in each side: 3 sts 1-1-1-2-2-2 times, 2 sts 1-1-2-2-2-2 times and 1 st 2-2-3-3-4-4 times. Then cast off 2 sts in each side until piece measures 61-61-60-60-59-59 cm, then cast off 3 sts 2 times in each side. When piece measures approx. 62-62-61-61-60-60 cm, loosely cast off sts with K over K and P over P. ASSEMBLY: Sew shoulder seams and sew in sleeves inside 1 edge st. Sew sleeve and side seams in one inside 1 edge st. Sew buttons on to left front piece, approx. 2½ cm from last K st in pattern. SHAWL COLLAR: Knit up sts from RS inside 1 edge st on circular needle size 3.5 mm. Start mid front at marker on right front piece as follows: Knit up approx. 60-70 sts up to shoulder, then 30-40 sts along the neck and 60-70 sts down along left front piece until marker = 150-180 sts. K 1 row from WS while AT THE SAME TIME adjusting no of sts to 144-148-156-164-172-180. Then work rib on next row from RS as follows: 1 sts in garter st, * K 2, P 2 *, repeat from *-* and finish with K 2 and 1 st in garter st. Continue like this until collar measures approx. 5-5-5-6-6-6 cm. Now inc 1 st in each of the middle 14-14-14-16-16-16 P-sections seen from RS (= back of neck) = 158-162-170-180-188-196 sts. Continue until collar measures approx. 12-12-12-12-14-14 cm, then loosely cast off with K over K and P over P. Fasten collar with stitches at the bottom in each side towards band from WS (so that the seam is not visible from RS) – sew edge to edge to avoid a chunky seam. |
||||||||||||||||
Diagram explanations |
||||||||||||||||
|
||||||||||||||||
 |
||||||||||||||||
 |
||||||||||||||||
Have you finished this pattern?Tag your pictures with #dropspattern #ramblingmancardigan or submit them to the #dropsfan gallery. Do you need help with this pattern?You'll find 23 tutorial videos, a Comments/Questions area and more by visiting the pattern on garnstudio.com. © 1982-2026 DROPS Design A/S. We reserve all rights. This document, including all its sub-sections, has copyrights. Read more about what you can do with our patterns at the bottom of each pattern on our site. |
||||||||||||||||


With over 40 years in knitting and crochet design, DROPS Design offers one of the most extensive collections of free patterns on the internet - translated to 17 languages. As of today we count 324 catalogues and 12245 patterns translated into English (UK/cm). 12245
We work hard to bring you the best knitting and crochet have to offer, inspiration and advice as well as great quality yarns at incredible prices! Would you like to use our patterns for other than personal use? You can read what you are allowed to do in the Copyright text at the bottom of all our patterns. Happy crafting!
Post a comment to pattern DROPS Extra 0-850
We would love to hear what you have to say about this pattern!
If you want to leave a question, please make sure you select the correct category in the form below, to speed up the answering process. Required fields are marked *.