Comments / Questions (262)
![]() Shirley wrote:
Shirley wrote:
In the direction you reference A4 there is no chart for A4 please help
19.05.2017 - 12:58DROPS Design answered:
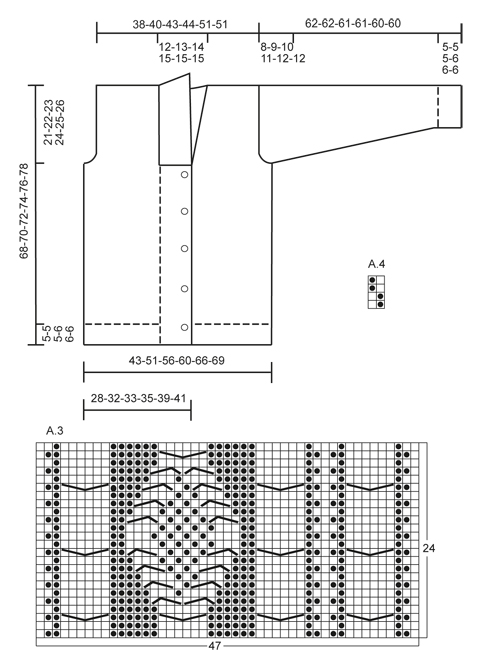
Hi Shirley. You can see the cart for A.4 under the sleeve and over the big chart A.3. Happy Knitting!
19.05.2017 - 13:12
![]() Christiane Klenke wrote:
Christiane Klenke wrote:
Der Einwand von Leacoco vom 22.9.2014 bezügl. des Knopflochs ist sehr wohl berechtigt, denn in der Zeichnung mit den Maßangaben befindet sich das Knopfloch bei ca. 5 cm am Ende des Bündchens, natürlich von unten gerechnet. Demzufolge müßten die Abstände geändert werden. Auf dem Foto sieht es allerdings eher aus, wie im Text beschrieben. Trotzdem sehr schönes Modell.
25.04.2017 - 02:44DROPS Design answered:
Liebe Frau Klenke, die Knopflöcher werden wie beschrieben bearbeitet: 1. Knofploch wenn die Arbeit 14-19 cm misst, und die letzte wenn die Arbeit 46-51 cm misst. Die Blendemaschen werden 1 cm nach dem letzten Knopfloch (= 47-52 cm) abgekettet. Viel Spaß beim stricken!
25.04.2017 - 08:24
![]() Soizik wrote:
Soizik wrote:
Bonjour Merci de votre commentaire c'est ce que j ai fait mais c'est quand même beaucoup trop grand peut etre dois faire en taille S au lieu de XL
20.04.2017 - 13:51
![]() Soizik wrote:
Soizik wrote:
J ai fait mon echantillon qui correspond bien au votre donc je commence une manche mais 86 mailles c est beaucoup trop Je suis perdue...
19.04.2017 - 22:44DROPS Design answered:
Bonjour Soisik, vous montez 86 m, mais vous tricotez en côtes 2/2, ce qui va resserrer l'ouvrage, vous diminuerez ensuite 18 m pour qu'il n'en reste plus que 68. Bon tricot!
20.04.2017 - 10:26
![]() Soizik wrote:
Soizik wrote:
Superbe modèle je m'y mets
17.04.2017 - 10:41Molly McFadden wrote:
OK...so for every 3rd row (1,2,3,4,5,6,7, etc.) regarding the front panels of this sweater. I did row 3 and now I do row 7, right? We knit 26 stitches, turn slip a stitch onto the needle and knit back to the beginning and knit again the 26 stitches before we continue the row in the pattern on row 7? In this way we are adding a row on this portion of the front? Do we do anything with the stitch when we turn and slip it onto the needle? I am so confused..but love the patterns.
06.03.2017 - 21:32DROPS Design answered:
Dear Mrs Fadden, the short rows have to be worked every time you will work row 3 in diagram: work diagram 1 time in height as shown, at the same time on row 3, work short rows. When diagram has been worked 1 time in height, you have worked the short rows 1 time. Repeat diagram in height while working short rows on row 3. Happy knitting!
07.03.2017 - 08:41
![]() Mary Spence wrote:
Mary Spence wrote:
In the final stages of the super pattern - doing the shawl collar. Wheat is meant by this: 'Now inc 1 st in each of the middle 14-14-14-16-16-16 P-sections seen from RS (= back of neck)' - does it mean to increase 1st in the middle of the purl stitches on the back section of the collar? If so this loses the K2 P2 pattern. Or am I being really dense?!
03.03.2017 - 18:21DROPS Design answered:
Dear Mrs Spence, that's correct, you have to inc 1 st in every P section on the middle back for neck = you will have then P3 over the middle 14-16 P sections and P2 in all other P-sections seen from RS. Happy knitting!
06.03.2017 - 08:34
![]() Aloyse De Roy wrote:
Aloyse De Roy wrote:
Met veel plezier ben ik het patroon rambling man aan het breien. Ben nu bij het afkanten van de Armsgaten van het achterpand en lees dat ik aan elke kant moet afkanten. Betekent dit dat ik zowel aan de goede als aan de verkeerde kant moet afkanten en als dat zo is, hoe doe ik dat dan?
15.02.2017 - 10:32DROPS Design answered:
Hoi Aloyse. Je kant af aan elke kant, dus zowel aan de goede als op de verkeerde kant. Bijvoorbeeld: 3 st 1 keer: begin aan de goede kant en kant de eerste 3 st af, brei de nld uit, keer (verkeerde kant) en begin deze nld met afkanten van 3 st aan de verkeerde kant. Enzovoort.
22.02.2017 - 14:32
![]() Sissel wrote:
Sissel wrote:
Hei igjen, den miderste på siden mellom det to flettene som går samme vei. Du har der knappen er også enkel flette også kommer en bord med rette og vrangen masker inni. Mvh Sissel
06.02.2017 - 16:58DROPS Design answered:
Hej Sissel. Det nemmeste vil vaere at du siger hvilket tegn og hvilket diagram det er du har problemer med. Der burde ikke vaere fejl i diagrammet, men maaske kan jeg pröve at forklare hvordan du strikker.
09.02.2017 - 14:40
![]() Sissel wrote:
Sissel wrote:
Hei, Du misforstår, det er ikke flettene jeg har problemer med, dem er jo lette, det er den ved siden av, kan du sende meg en epost så skal jeg sende deg et bilde så skjønner dere lettere hva jeg mener:-)
06.02.2017 - 14:56DROPS Design answered:
Hej Sissel. Jeg vil desvaerre ikke udveksle private mailadresser. Saa maa du beskrive hvor i opskriften du er praecis og jeg skal forsöge at hjaelpe dig.
06.02.2017 - 15:17
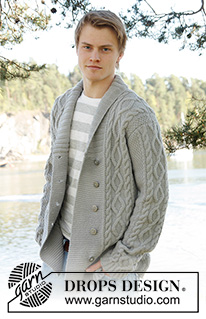
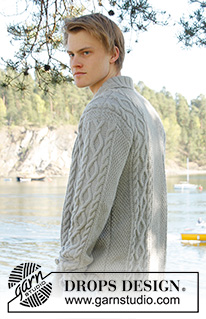
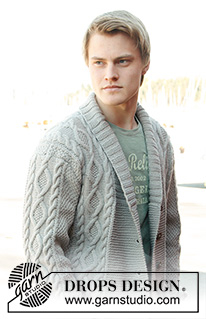
Rambling Man#ramblingmancardigan |
||||||||||||||||
 |
 |
|||||||||||||||
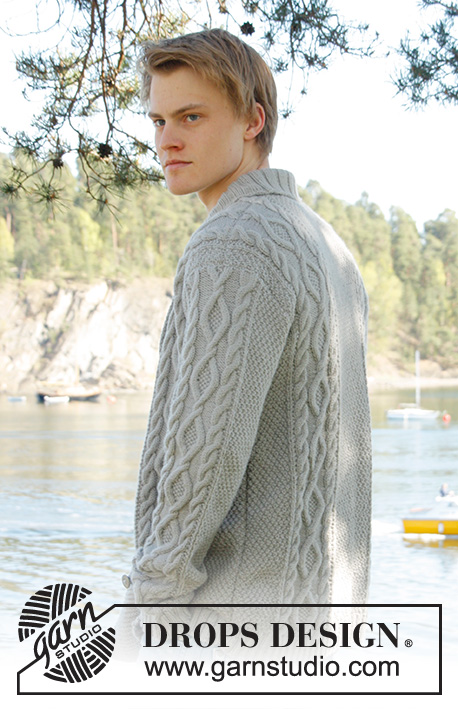
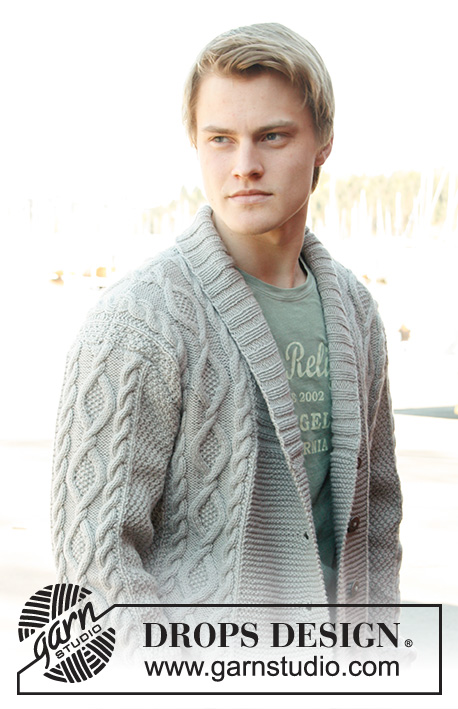
Men's knitted jacket in DROPS Lima, with cable pattern and shawl collar. Size: S - XXXL.
DROPS Extra 0-850 |
||||||||||||||||
|
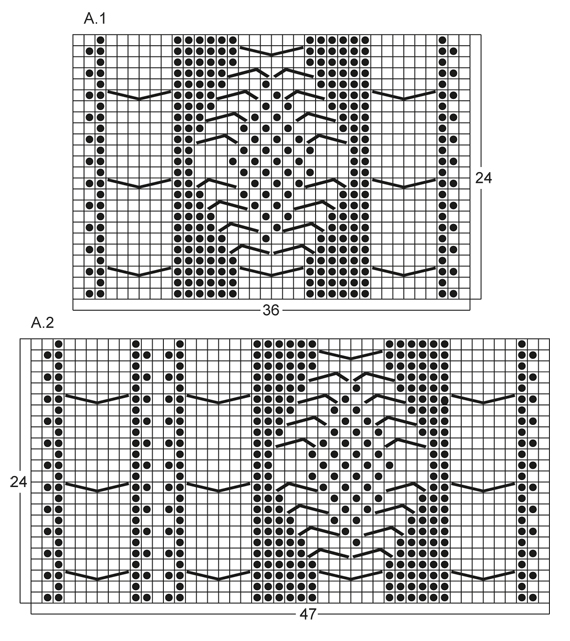
KNITTING TIPS: This design is written with button holes on right front edge, if you wish standard button holes for men, you can make the button holes on left front edge. GARTER ST (back and forth on needle): K all rows. NOTE: All edge sts are worked in garter st. PATTERN: See diagram A.1 to A.4, diagrams show all rows in 1 pattern repetition from RS. SHORT ROWS: RIGHT FRONT PIECE: Work 1 short row on row 3 of every pattern repetition vertically until finished measurements as follows: On 3rd row in pattern (= RS), work 26-26-26-26-30-30 band sts, turn and K back. Then work over all sts on row as before. LEFT FRONT PIECE: Work 1 short row on row 2 of every pattern repetition vertically until finished measurements as follows: On 2nd row in pattern (= WS), work 26-26-26-26-30-30 band sts, turn and K back. Then work over all sts on row as before. BUTTON HOLES: Cast off for 5 button holes from RS on right band. 1 BUTTON HOLE = cast off 7th and 8th st from mid front and cast on 2 new sts on next row over these sts. Cast off for button holes when piece measures: SIZE S: 14, 22, 30, 38 and 46 cm SIZE M: 15, 23, 31, 39 and 47 cm SIZE L: 16, 24, 32, 40 and 48 cm SIZE XL: 17, 25, 33, 41 and 49 cm SIZE XXL: 18, 26, 34, 42 and 50 cm SIZE XXXL: 19, 27, 35, 43 and 51 cm INCREASE TIP: Inc 1 st by making 1 YO, on next row work YO twisted (i.e. work in back loop of st instead front) to avoid holes. ---------------------------------------------------------- BACK PIECE: Worked back and forth on needle. Cast on 136-156-168-180-196-204 sts (incl 1 edge st in each side) on circular needle size 3.5 mm with Lima. Work rib as follows (1st row = RS): 1 edge st in GARTER ST - see explanation above, * K 2, P 2 *, repeat from *-*, finish with K 2 and 1 edge st in garter st. Continue to work like this until rib measures 5-5-5-6-6-6 cm. On last row from WS, P while AT THE SAME TIME dec 20-22-24-26-26-26 sts evenly = 116-134-144-154-170-178 sts. Then switch to needle size 4 mm and work next row from RS as follows: 1 edge st in garter st, 8-16-20-24-20-24 sts in A.4, work A.1 one time in size S - XL, work A.2 one time in size XXL and XXXL, 26-28-30-32-34-34 sts in A.4, then work A.1 one time in size S - XL, work A.3 one time in size XXL and XXXL, finish with 8-16-20-24-20-24 sts in A.4 and 1 edge st in garter st. REMEMBER THE KNITTING TENSION! Continue to work like this until piece measures 47-48-49-50-51-52 cm. Then cast off for armholes at the beg of every row in each side as follows: Cast off 3 sts 0-1-1-2-2-2 times, 2 sts 1-1-1-2-2-2 times, 1 st 4-7-9-8-4-8 times = 104-110-116-118-142-142 sts. Continue with pattern as before until piece measures 66-68-70-72-74-76 cm. Now cast off the middle 20-22-24-26-28-28 sts for neck and finish each part separately. Cast off 2 sts on next row from neck = 40-42-44-44-55-55 sts remain on shoulder. Continue with pattern as before. When piece measures 68-70-72-74-76-78 cm, loosely cast off sts with K over K and P over P. RIGHT FRONT PIECE: Worked back and forth on needle. Cast on 83-91-95-99-111-115 sts (incl 1 edge st in the side) on circular needle size 3.5 mm with Lima. Work rib as follows (1st row = RS): 26-26-26-26-30-30 sts in garter st (= band sts), * K 2, P 2 *, repeat from *-*, finish with 1 edge st in garter st. Continue with rib and band sts in garter st until rib measures 5-5-5-6-6-6 cm. On last row from WS, P over all sts in rib while AT THE SAME TIME dec 12-12-12-12-13-13 sts evenly (do not dec over band sts) = 71-79-83-87-98-102 sts. Then switch to needle size 4 mm and work next row from RS as follows: 26-26-26-26-30-30 band sts, work A.1 one time in size S - XL, work A.3 one time in size XXL and XXXL, 8-16-20-24-20-24 sts in A.4 and 1 edge in garter st. On next row from RS (= 3rd row in pattern) work SHORT ROWS - read explanation above. Continue with pattern and band sts at the front - while AT THE SAME TIME work 1 short row on 3rd row in every pattern repetition vertically until finished measurement. When piece measures 14-15-16-17-18-19 cm, cast off for BUTTON HOLES on right band - see explanation above! Continue to work until piece measures 47-48-49-50-51-52 cm. Then cast off at beg of next row from RS as follows: Cast off the first 25-25-25-25-29-29 sts, insert a marker (this marks where to beg the knit up for collar), work the rest of row. Then cast off for armhole on every row from WS as follows: 3 sts 0-1-1-2-2-2 times, 2 sts 1-1-1-2-2-2 times, 1 st 4-7-9-8-4-8 times = 40-42-44-44-55-55 sts remain on shoulder. Continue with pattern as before. When piece measures 68-70-72-74-76-78 cm, loosely cast off sts with K over K and P over P. LEFT FRONT PIECE: Cast on and work rib as on right front piece but reversed (i.e. * P 2, K 2 *, repeat from *-*) with 26-26-26-26-30-30 band sts in garter st. Continue to work until rib measures 5-5-5-6-6-6 cm. On last row from WS, P over all sts in rib while AT THE SAME TIME dec 12-12-12-12-13-13 sts evenly (do not dec over band sts) = 71-79-83-87-98-102 sts. Then switch to needle size 4 mm and work next row from RS as follows: 1 edge st in garter st, 8-16-20-24-20-24 sts in A.4, work A.1 one time in size S - XL, work A.2 one time in size XXL and XXXL, 26-26-26-26-30-30 band sts in garter st. On next row from WS (= 2nd row in pattern) work SHORT ROWS - read explanation above. Continue to work the same way as on right front piece but without button holes. SLEEVE: Worked back and forth on needle. Cast on 74-78-82-86-90-90 sts (incl 1 edge st in each side) on circular needle size 3.5 mm with Lima. Work rib as follows (1st row = RS): 1 edge st in garter st, * K 2, P 2 *, repeat from *-* and finish with 1 edge st in garter st. Continue to work like this until rib measures 5-5-5-6-6-6 cm. On last row from WS, P while AT THE SAME TIME dec 12-14-16-18-18-18 sts evenly = 62-64-66-68-72-72 sts. Then switch to needle size 4 mm and work next row from RS as follows: 1 edge st in garter st, 12-13-14-15-17-17 sts in A.4, work A.1 one time, 12-13-14-15-17-17 sts in A.4, finish with 1 edge st in garter st. AT THE SAME TIME when piece measures 6 cm, inc 1 st inside 1 edge st in each side - Read INCREASE TIP above. NOTE: Work the inc sts in A.4. Repeat inc every 3½-3-2½-2½-2½-2½ cm a total of 14-15-16-17-16-17 times = 90-94-98-102-104-106 sts. Continue until piece measures 54-53-51-50-48-48 cm (shorter measurements in the larger sizes because of longer sleeve cap and broader shoulder width), cast off at beg of every row in each side: 3 sts 1-1-1-2-2-2 times, 2 sts 1-1-2-2-2-2 times and 1 st 2-2-3-3-4-4 times. Then cast off 2 sts in each side until piece measures 61-61-60-60-59-59 cm, then cast off 3 sts 2 times in each side. When piece measures approx. 62-62-61-61-60-60 cm, loosely cast off sts with K over K and P over P. ASSEMBLY: Sew shoulder seams and sew in sleeves inside 1 edge st. Sew sleeve and side seams in one inside 1 edge st. Sew buttons on to left front piece, approx. 2½ cm from last K st in pattern. SHAWL COLLAR: Knit up sts from RS inside 1 edge st on circular needle size 3.5 mm. Start mid front at marker on right front piece as follows: Knit up approx. 60-70 sts up to shoulder, then 30-40 sts along the neck and 60-70 sts down along left front piece until marker = 150-180 sts. K 1 row from WS while AT THE SAME TIME adjusting no of sts to 144-148-156-164-172-180. Then work rib on next row from RS as follows: 1 sts in garter st, * K 2, P 2 *, repeat from *-* and finish with K 2 and 1 st in garter st. Continue like this until collar measures approx. 5-5-5-6-6-6 cm. Now inc 1 st in each of the middle 14-14-14-16-16-16 P-sections seen from RS (= back of neck) = 158-162-170-180-188-196 sts. Continue until collar measures approx. 12-12-12-12-14-14 cm, then loosely cast off with K over K and P over P. Fasten collar with stitches at the bottom in each side towards band from WS (so that the seam is not visible from RS) – sew edge to edge to avoid a chunky seam. |
||||||||||||||||
Diagram explanations |
||||||||||||||||
|
||||||||||||||||
 |
||||||||||||||||
 |
||||||||||||||||
Have you finished this pattern?Tag your pictures with #dropspattern #ramblingmancardigan or submit them to the #dropsfan gallery. Do you need help with this pattern?You'll find 23 tutorial videos, a Comments/Questions area and more by visiting the pattern on garnstudio.com. © 1982-2025 DROPS Design A/S. We reserve all rights. This document, including all its sub-sections, has copyrights. Read more about what you can do with our patterns at the bottom of each pattern on our site. |
||||||||||||||||






Post a comment to pattern DROPS Extra 0-850
We would love to hear what you have to say about this pattern!
If you want to leave a question, please make sure you select the correct category in the form below, to speed up the answering process. Required fields are marked *.