
Popular categories
Looking for a yarn?


Comments / Questions (72)
My wrote:
Äntligen! En sån här vill jag sticka!!!!
21.06.2006 - 10:11
![]() ida wahlgren wrote:
ida wahlgren wrote:
guud vad läcker den bara måste vara med.
20.06.2006 - 11:08
![]() susan wrote:
susan wrote:
Rædselsfuld
19.06.2006 - 10:08hanne wrote:
selvfølgelig skal denne trøje med ,den er jo anderledes
18.06.2006 - 19:15Alexandra wrote:
JA, JA och ÅTER JA! Jag tycker mig se ett spännande diagonalt stickat framstyccke....?
18.06.2006 - 08:32
![]() katarina wrote:
katarina wrote:
Vidunderlig model. Den er unik og skal absolut med! Det er godt med noget nyt og anderledes!
17.06.2006 - 14:05
![]() nete wrote:
nete wrote:
flot stor frakke med nyt snit
17.06.2006 - 13:39Anna wrote:
Underbar modell....måste ha!
15.06.2006 - 15:49hanne wrote:
denne trøje er lige mig, ville strikke den nu hvis jeg havde opskriften. den ser dejlig varm og "hyggelig " ud
15.06.2006 - 14:38
![]() Malou wrote:
Malou wrote:
Väldigt snygg o tuff, men jag saknar fickor även på de andra jack/tröjorna fickor kan ju göras på många sätt o är otroligt praktiskt, de kan dessutom vara en extra dekoration.
14.06.2006 - 11:14
|
|
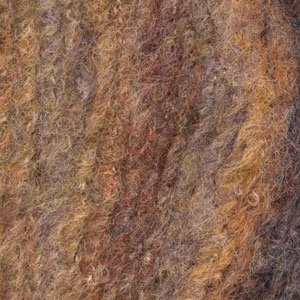
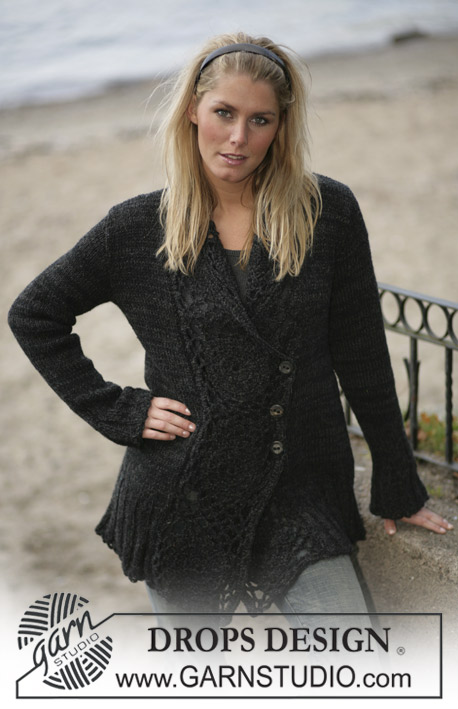
Grey Moon Jacket#greymoonjacket |
|
|
|
|
DROPS Long jacket with ¾ sleeves
DROPS 96-12 |
|
|
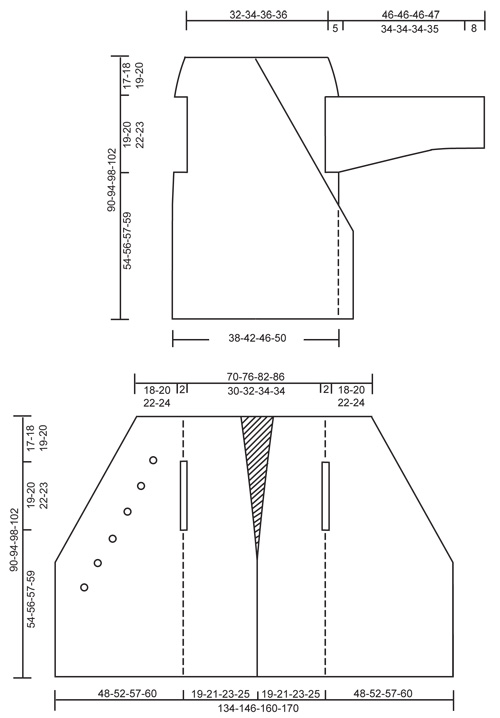
Knitting tension: 12 sts x 17 rows on needle size 8mm in stocking stitch = 10 x 10 cm Garter sts (back and forth on needle): knit all rows. Increasing tips: Inc inside 1 edge st on front piece and inside 2 edge sts on back piece. Inc by making a yo and knit into back of yo on the returning row (to avoid making a hole). Knit inc sts in stocking sts. Measurements tips: Because of the weight of the yarn, make all measurements whilst the pieces are hanging. Left front + back piece: Because of the number of sts the jacket is knitted back and forth on circular needles. The jacket is knitted from top down. Loosely cast on 35-38-41-43 sts on needle size 8 mm with Highlander and knit 4 rows garter sts (1st row = RS). At the same time insert a marking thread after the first 19-21-23-25 sts on left front (= 16-17-18-18 sts left on row towards back piece) - let the marking thread follow the piece as you progress. Read all of the following section before continuing! Continue in stocking sts, but with the 1st st on the right side of piece (= mid front) and the first 2 sts on the left side of piece (= mid back) in garter sts. Inc for sloping front: At the same time after the 4 rows in garter sts inc towards mid front on every 3rd row a total of 29-31-34-35 times – see Increasing tips. Inc mid back: At the same time when piece measures 17-13-11-8 cm – see Measurement tips – inc 1 st mid back on every 17-13-11-8 cm a total of 3-4-5-7 times – see Increasing tips. Armhole: At the same time when piece measures 17-18-19-20 cm cast off 1 st on both sides of the marking thread and continue knitting each piece separately – continue inc. as described above. When front piece and back piece measures 36-38-41-43 cm put all sts back on the same needle and cast on 2 new sts over the 2 sts cast off for armhole. Continue with inc as before. After all inc are complete = 67-73-80-85 sts on needle. When piece measures approx 89-93-97-101 cm (or desired length) – see Measurement tips – knit 1 row from the WS and cast off. Right front + back piece: Cast on and knit as left front + back piece, but mirrored. Sleeve: Knitted back and forth on circular needle. Cast on 28-30-32-34 sts (incl 1 edge st each side) on needle size 8 mm with Highlander. Knit 4 rows garter sts and continue in stocking sts. When sleeve measures 8 cm inc 1 st each side on every 6-6-5-5 cm a total of 6-6-7-7 times = 40-42-46-48 sts. When sleeve measures 43-43-43-44 cm dec for sleeve cap on every other row: 3 sts 2 times. Cast off remaining sts when sleeve measures approx 46-46-46-47 cm. Assembly: Sew left and right back pieces tog mid back – sew in the outer loop of the outermost st ( = 4 garter sts mid back). Sew sleeve seams inside 1 edge st and sew in sleeves. Crochet border: Crochet a border along the whole opening of the jacket and round the sleeve edges with crochet hook size 7 and Highlander as follows: 1 dc in first st, *2 ch, skip approx 2 - 2.5 cm, 1 dc in next st*, repeat from *-* and finish with 2 ch and 1 sl st in first dc from beginning of round – make sure the border is even and neither wavy nor too tight. Buttons: Sew on buttons on left front piece. Place the top button in line with the upper edge of the armhole approx 9-10-11-12 cm from the armhole towards mid front. Place the remaining buttons parallel with the sloping front edge – see measurement chart. There should be approx 7 to 10 cm between each button. Use the ch-loops in the crochet border as buttonholes. Crochet a buttonhole loop (approx 5-6 ch) and place this on the inside of the right front piece and sew on a button at the top of the left front edge to keep the jacket in place – try on the jacket for placing of the buttonhole loop and button. |
|
 |
|
Have you finished this pattern?Tag your pictures with #dropspattern #greymoonjacket or submit them to the #dropsfan gallery. Do you need help with this pattern?You'll find 22 tutorial videos, a Comments/Questions area and more by visiting the pattern on garnstudio.com. © 1982-2026 DROPS Design A/S. We reserve all rights. This document, including all its sub-sections, has copyrights. Read more about what you can do with our patterns at the bottom of each pattern on our site. |


With over 40 years in knitting and crochet design, DROPS Design offers one of the most extensive collections of free patterns on the internet - translated to 17 languages. As of today we count 324 catalogues and 12252 patterns translated into English (UK/cm). 12252
We work hard to bring you the best knitting and crochet have to offer, inspiration and advice as well as great quality yarns at incredible prices! Would you like to use our patterns for other than personal use? You can read what you are allowed to do in the Copyright text at the bottom of all our patterns. Happy crafting!
Post a comment to pattern DROPS 96-12
We would love to hear what you have to say about this pattern!
If you want to leave a question, please make sure you select the correct category in the form below, to speed up the answering process. Required fields are marked *.