
Popular categories
Looking for a yarn?


Comments / Questions (87)
![]() Magdo Ducharme wrote:
Magdo Ducharme wrote:
Pourquoi on a plus les patrons en français ? Merci
12.04.2024 - 23:24DROPS Design answered:
Bonjour, voici le patron en français:https://www.garnstudio.com/pattern.php?id=11431&cid=8 Le bouton pour changer la langue se trouve à côté du bouton imprimer, juste avant les explications. Bon tricot!
14.04.2024 - 22:44
![]() Maud wrote:
Maud wrote:
Hallo mensen van Garn, mijn wol komt vandaag en ik ben alvast bezig het patroon uit te schrijven voor mezelf. Klopt het dat na die 6x raglan meerderen, de meerderingen van de hals, voorpand + achterpand en de mouwen in de zelfde toer zitten? En dat de volgende toer recht alleen voorpand en achterpand meerderen? Alvast bedankt voor het beantwoorden.
11.04.2024 - 10:16DROPS Design answered:
Dag Maud,
Na die 6 keer meerderen om de naald, meerder je minder vaak op de mouwen, namelijk iedere 4e naald, terwijl je op de panden iedere 2e naald blijft meerderen. Ik weet zo niet uit mijn hoofd. Voor de hals blijf je met een interval van om de 4 naalden meerderen. Ik weet niet uit mijn hoofd hoe dit precies samenvalt met de meerderingen voor de raglan, maar als je het uittekent op b.v. ruitjespapier, dan zie je het wel.
11.04.2024 - 20:38
![]() Erika wrote:
Erika wrote:
Tack snälla för svar! Då borde jag få till det med ökningarna. Men vilka markörer är fram- och bakstycke respektive ärm? Jag förstår inte vilken markör jag ska öka på vid fram- och bakstycke. Tack igen!
11.03.2024 - 14:48DROPS Design answered:
Hei Erika. 1. Merke: Mellom 1.forstykket og 1.erme (øk på forstykket før 1.merke, øk på erme etter 1.merke). 2. Merke: Mellom 1. erme og bakstykket (øk på ermet før 2.merke, øk til bakstykket etter 2.merke). 3. Merke: Mellom bakstykket og 2. erme (øk på bakstykket før 3.merke, øk til erme etter 3.merke). 4. Merke: Mellom 2. merke og 2. forstykket (øk til erme før 4. merke, økt til 2. forstykket etter 4.merke). mvh DROPS Design
18.03.2024 - 13:24
![]() Erika Bengtsson wrote:
Erika Bengtsson wrote:
Hej igen! Jag stickar storlek M. Jag har stickat enligt beskrivning och ökat totalt 18 ggr, men har fått för många maskor. Jag är alltså i slutstycket på Raglan. Jag förstår inte varför jag har fått för många maskor. I raglan, när det endast ska ökad på två markörer, har jag ökat de två mittersta markörerna men jag är osäker på om det är rätt. Tack på förhand!
07.03.2024 - 17:40DROPS Design answered:
Hei Erika. Etter at du har økt 6 ganger til raglan både på for/bakstykket og ermene, har du nå startet å kun øke på hver 4. omgang på ermene? I str. M har du 82 masker. På ermene, for og bakstykket øker du totalt 6 ganger på hver 2. pinne = 48 økte masker. Fortsetter økningene til raglan, men nå økes det på hver 2.pinne (for/bakstykk) og på ermene på hver 4.pinne. Øk slik totalt 22 ganger på for/bakstykket (= 88 økte masker) og 11 ganger på ermene (=44 økte masker). Deretter økes det 1 gang til på for/bakstykket (=4 masker). Til V-hals øker du totalt 11 masker på hvert forstykke. = 82+48+88+44+4+22 = 288 masker. mvh DROPS Design
11.03.2024 - 13:14
![]() Erika wrote:
Erika wrote:
Hej! 1. Vilka markörer är fram- och bakstycke respektive ärm? Jag förstår inte vilken markör jag ska öka på vid fram- och bakstycke. 2. När det står ”öka på detta sätt totalt 18-22… gånger”, menas det då samtliga ökningar på raglan (alltså inkluderat de 6 första ökningarna)?
03.03.2024 - 22:15DROPS Design answered:
Hej Erika, skriv hvilken størrelse du strikker og hvor du er i opskriften, så skal vi prøve at hjælpe dig :)
07.03.2024 - 15:03
![]() Nina wrote:
Nina wrote:
Hallo, ich verstehe folgendes nicht: in der Beschreibung steht für Größe XXL Raglanzunahme insgesamt 30x Vorder/Rücken (15x Ärmel), dann Größe XXL weitere 5x Vorder/Rücken (Ärmel beendet). Dann steht im aber nächsten Absatz für alle Größen insgesamt wurden nun 41x Vorder/Rücken und 21 Ärmel zugenomme. Aber laut den beiden Absätzen davor bin ich für Vorder/Rücken bei 30+5 und bei den Ärmeln bei 15. Wir passt das zusammen? Danke
02.03.2024 - 10:13DROPS Design answered:
Liebe Nina, es wird zuerst 8 Maschen (Vorder, Rückenteil + Ärmel) 6 Mal in jeder 2. Reihe zugenommen, dann 30 Mal in jeder 2. Reihe (Vorder + Rückenteil) /gleichzeitig 15 Mal in jeder 4. Reihe (nur Ärmel) + 1 Mal in jeder 2. Reihe (nur Vorder + Rückenteil) = 6+30+1=37 Mal insgesamt für Vorder/Rückenteil und 6+15=21 Mal bei den Ärmeln. Viel Spaß beim Stricken!
04.03.2024 - 07:37
![]() Andrea wrote:
Andrea wrote:
Hallo, ich verstehe diesen Teil der Anleitung nicht, denn die Raglanschrägen sind doch immer zwischen den Vorderteilen und Ärmeln und dem Rückenteil und Ärmeln. Wo genau soll ich nur in jeder 4. Reihe zunehmen? "Dann die Raglanzunahmen wie zuvor weiterstricken, aber nun bei jedem 2. Mal, wenn zugenommen wird, nur an den Vorderteilen/am Rückenteil zunehmen (4 Maschen zugenommen). ..." Danke
27.02.2024 - 23:06DROPS Design answered:
Liebe Andrea, die Raglanschrägungen sind zwar zwischen den Teilen, die Zunahmen gehören aber jeweils zum Vorderteil/Rückenteil oder zu den Ärmeln. Wenn Sie die Markierungsfäden setzen, sind die ersten 9 M das eine Vorderteil, die nächsten 20 M sind der eine Ärmel usw. Wenn Sie nun zunehmen, nehmen Sie zuerst vor dem Markierungsfaden zu, d.h. diese Zunahme ist am Vorderteil. Dann nehmen Sie nach der Markierung zu, diese Zunahme ist am Ärmel, die nächste Zunahme vor der nächsten Markierung liegt ebenfalls am Ärmel, dann folgt das Rückenteil usw. Wenn Sie nur am Vorderteil/Rückenteil zunehmen, lassen Sie die Zunahmen an den Ärmeln weg. Gutes Gelingen!
28.02.2024 - 08:43
![]() Monique ZIMMERMANN wrote:
Monique ZIMMERMANN wrote:
A la toute fin de l’ouvrage vous dites qu’il faut assembler les 2 bordures entre elles au milieu dos et les coudre le long de l'encolure, quelle méthode d’assemblage conseillez vous ? Avez vous une vidéo pour ce genre d’assemblage ?
13.02.2024 - 23:04DROPS Design answered:
Bonjour Mme Zimmermann, nous n'avons pas de vidéos spéciales pour cette couture, mais vous pouvez vous inspirer de celle-ci, dans la mesure où vous allez coudre le côté du col le long de l'encolure dos. Bon assemblage!
14.02.2024 - 13:12
![]() Birute Anne Vileisis wrote:
Birute Anne Vileisis wrote:
I bought 12 skeins of Drops Air yarn and am eager to start pattern 244-8 but I am puzzled by the instructions. For V-NECK it states "increase for the neck inside the bands" but if I would increase "inside" 11 times, the bands would be 17 stitches wide! Or, do you mean increase just beyond the bands? What is the exact function of the bands? Are they the eventual collar or side edging of the front of the cardigan?
13.02.2024 - 20:20DROPS Design answered:
Dear Birute Anne, It means, that you increase nest to the band's stitches, in other words, let's say, the band is 11 stitches, then at the beginning of the row, you knit 11 stitches, increase, them knit until you have 11 stitches left of the row, increase and then knit the band's 11 stitches. I hope that helps. Happy Knitting!
14.02.2024 - 02:30
![]() Francesca wrote:
Francesca wrote:
Salve. Gli aumenti per il collo a v (aumenti all'interno dei bordi), nel ferro di ritorno si lavorano a dritto ritorto o a maglia rasata? Grazie.
07.02.2024 - 22:40DROPS Design answered:
Buonasera Francesca, deve lavorarlo a ritorto come indicato. Buon lavoro!
25.02.2024 - 22:21
|
|
No Nonsense Cardigan#nononsensecardigan |
|
 |
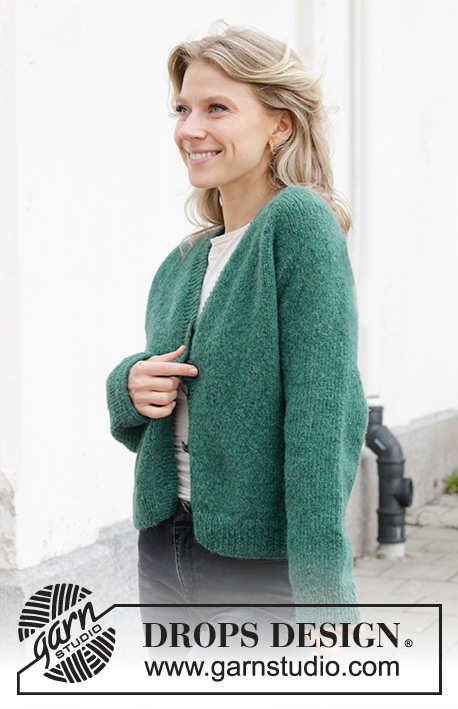 |
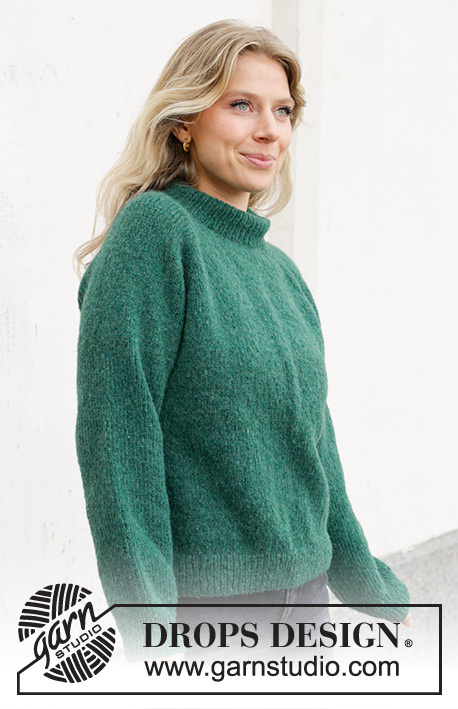
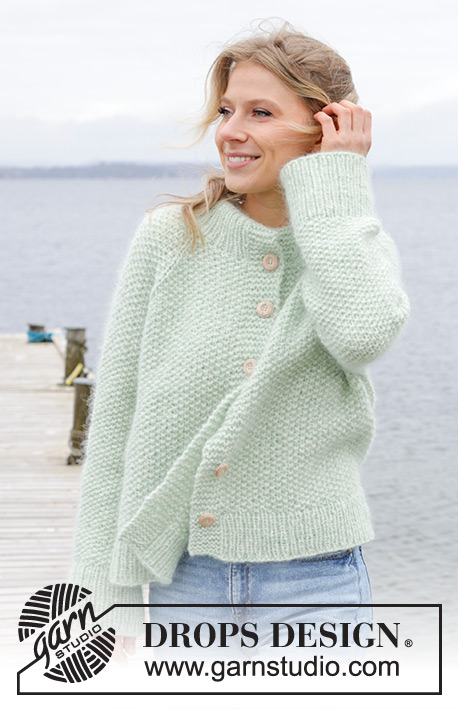
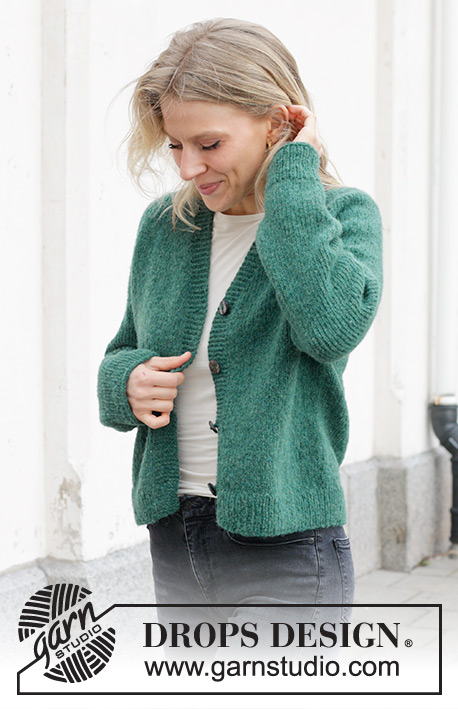
Knitted jacket in DROPS Air. The piece is worked top down with raglan and V-neck. Sizes S - XXXL.
DROPS 244-8 |
|
|
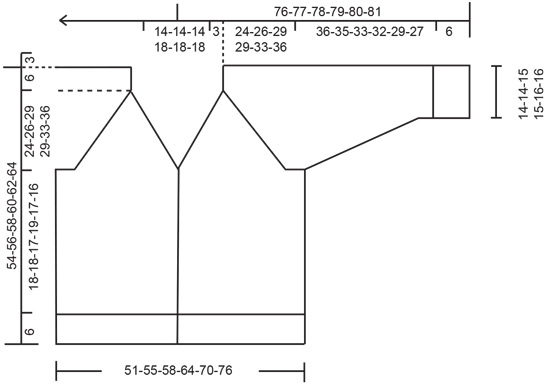
------------------------------------------------------- EXPLANATIONS FOR THE PATTERN: ------------------------------------------------------- GARTER STITCH (worked back and forth): Knit all rows. 1 ridge = knit 2 rows. RAGLAN: Increase 1 stitch before/after 2 stitches in each transition between the body and sleeves; the marker-thread sits between these 2 stitches. Increase 1 stitch by making 1 yarn over which is worked twisted on the next row/round to avoid a hole. The new stitches are then worked in stocking stitch. BUTTONHOLES: Work buttonholes on the right band (when the garment is worn). Work from the right side when there are 4 stitches left on the row as follows: Make 1 yarn over, knit 2 together and knit 2. On the next row (wrong side), knit the yarn over to leave a hole. The first buttonhole is worked 1 cm after the last increase for the V-neck, then the other 3 buttonholes with approx. 7-8-8½-7½-8-9 cm between each one. DECREASE TIP (for sleeves): Start 3 stitches before the marker-thread, knit 2 together, knit 2 (marker-thread sits between these 2 stitches), slip 1 stitch knit-wise, knit 1 and pass the slipped stitch over the knitted stitch (2 stitches decreased). ------------------------------------------------------- START THE PIECE HERE: ------------------------------------------------------- JACKET – SHORT OVERVIEW OF THE PIECE: Piece is worked back and forth, top down. Start by working 2 loose bands in garter stitch. Stitches are cast on between the 2 bands for the shoulders and back neck and the yoke continued back and forth with circular needle from mid-front. Stitches are increased for raglan and the V-neck. The yoke is divided for the body and sleeves and the body continued back and forth with circular needle. The sleeves are worked in the round with short circular needle/double pointed needles. RIGHT BAND (when the garment is worn): Cast on 7 stitches with circular needle size 5 mm and DROPS Air. Work GARTER STITCH – read description above, until the band measures 17-17-17-19-19-19 cm, finishing after a row from the wrong side. Lay the piece to one side. LEFT BAND: Cast on 7 stitches with circular needle size 5 mm and DROPS Air. Work garter stitch until the band measures 17-17-17-19-19-19 cm, finishing after a row from the right side. Do not cut the strand. Cast on 68-68-68-74-74-74 stitches at the end of this row, then knit the right band stitches = 82-82-82-88-88-88 stitches. Work 1 row with garter stitch over each band and purling the cast-on stitches. Insert 4 marker-threads (used when increasing for RAGLAN – read explanation above), without working the stitches and inserting them between 2 stitches as follows: Count 9 stitches, insert marker-thread 1, count 20 stitches, insert marker-thread 2, count 24-24-24-30-30-30 stitches, insert marker-thread 3, count 20 stitches, insert marker-thread 4, there are 9 stitches left on the row. YOKE: REMEMBER THE KNITTING TENSION! Continue back and forth with stocking stitch and garter stitch over each band. At the same time increase for the V-neck and raglan as described below. Read the next 2 sections before continuing. Start mid-front, from the right side. V-NECK: Increase for the neck inside the bands every 4th row 11-11-11-14-14-14 times by making 1 yarn over, which is worked twisted on the next row to avoid a hole. 1 cm after the last increase for the neck begin working the BUTTONHOLES – read description above. RAGLAN: Increase on each side of 2 stocking stitches in each transition between the front/back pieces and the sleeves every 2nd row (each row from the right side = 8 increased stitches) 6 times – read description above. Continue to increase for raglan every 2nd round but every 2nd increase is only on the front/back pieces (4 increased stitches), i.e., increase on the front/back pieces every 2nd row (each row from the right side) and on the sleeves every 4th row (every 2nd row from the right side). Increase like this 18-22-26-26-30-30 times on the body (9-11-13-13-15-15 times on the sleeves). SIZES S, M, XL, XXL and XXXL (the increases in size L are finished): Continue with stocking stitch and increase for raglan but now only increase on the body every 2nd row (the sleeve increases are finished) 2-1-1-1-5 times. ALL SIZES: You have increased a total of 26-29-32-32-37-41 times on the body and 15-17-19-19-21-21 times on the sleeves. After the last increase there are 268-288-308-324-348-364 stitches. Continue with stocking stitch and the bands in garter stitch until the yoke measures 24-26-29-29-33-36 cm, measured mid-back. Divide for the body and sleeves as follows: Work the first 46-49-52-56-60-64 stitches (front piece), place the next 50-54-58-58-62-62 stitches on a thread for the sleeve, cast on 10-10-10-12-14-16 stitches (in side under sleeve), work 76-82-88-96-104-112 stitches (back piece), place the next 50-54-58-58-62-62 stitches on a thread for the sleeve, cast on 10-10-10-12-14-16 stitches (in side under sleeve), work the last 46-49-52-56-60-64 stitches (front piece). BODY: = 188-200-212-232-252-272 stitches. Continue with stocking stitch and the bands in garter stitch for a further 18-18-17-19-17-16 cm. Knit 1 row from the right side and increase 19-21-21-23-25-27 stitches evenly spaced (do not increase over the bands) = 207-221-233-255-277-299 stitches. Change to circular needle size 4 mm and work as follows from the wrong side: 7 band stitches in garter stitch, * purl 1, knit 1 *, work from *-* until there are 8 stitches left, purl 1 and 7 band stitches in garter stitch. Continue this rib for 6 cm. Cast off. The jacket measures approx. 54-56-58-60-62-64 cm from the shoulder. SLEEVES: Place the 50-54-58-58-62-62 stitches from the thread on the one side of the piece on short circular needle/double pointed needles size 5 mm and knit up 1 stitch in each of the 10-10-10-12-14-16 stitches cast on under the sleeve = 60-64-68-70-76-78 stitches. Insert a marker-thread in the middle of the new stitches under the sleeve. Work stocking stitch in the round. When the sleeve measures 4 cm, decrease 2 stitches under the sleeve – read DECREASE TIP. Decrease like this every 5-3½-2½-2½-2-1½ cm a total of 6-8-9-10-11-11 times = 48-48-50-50-54-56 stitches. Continue working until the sleeve measures 36-35-33-32-29-27 cm from the division. Knit 1 round and increase 8-8-10-10-10-12 stitches evenly spaced = 56-56-60-60-64-68 stitches. Change to double pointed needles size 4 mm and work rib (knit 1, purl 1) for 6 cm. Cast off. The sleeve measures approx. 42-41-39-38-35-33 cm from the division. Work the other sleeve in the same way. ASSEMBLY: Sew the buttons onto the left band. Sew together the 2 loose bands mid-back and sew them to the neckline. |
|
|
|
Have you finished this pattern?Tag your pictures with #dropspattern #nononsensecardigan or submit them to the #dropsfan gallery. Do you need help with this pattern?You'll find 28 tutorial videos, a Comments/Questions area and more by visiting the pattern on garnstudio.com. © 1982-2025 DROPS Design A/S. We reserve all rights. This document, including all its sub-sections, has copyrights. Read more about what you can do with our patterns at the bottom of each pattern on our site. |
|


With over 40 years in knitting and crochet design, DROPS Design offers one of the most extensive collections of free patterns on the internet - translated to 17 languages. As of today we count 314 catalogues and 11820 patterns translated into English (UK/cm). 11820
We work hard to bring you the best knitting and crochet have to offer, inspiration and advice as well as great quality yarns at incredible prices! Would you like to use our patterns for other than personal use? You can read what you are allowed to do in the Copyright text at the bottom of all our patterns. Happy crafting!
Post a comment to pattern DROPS 244-8
We would love to hear what you have to say about this pattern!
If you want to leave a question, please make sure you select the correct category in the form below, to speed up the answering process. Required fields are marked *.