
Popular categories
Looking for a yarn?


Comments / Questions (87)
![]() MARILENA SCHMITT wrote:
MARILENA SCHMITT wrote:
Bonjour, j'aimerais tricoter ce modèle en Baby Merino mix 20 qui est conseillé en aiguilles n°3. Faut-il doubler le fil ? Puisque ce modèle se tricoter en N°5...
09.11.2024 - 16:34DROPS Design answered:
Bonjour Mme Schmitt, tout à fait, il vous faudra tricoter avec 2 fils Baby Merino pour avoir la même tension qu'avec 1 seul fil Air. Vérifiez la quantité nécessaire avec 2 fils Baby Merino grâce au convertisseur. Bon tricot!
11.11.2024 - 08:37
![]() Paulina wrote:
Paulina wrote:
Chciałabym zrobić ten sweter na włóczce Big Merino zamiast Air, jak liczyć potrzebną do zamówienia gramaturę? Widzę, że w takiej samej wadze motka Air jest dwa razy dłuższy i zastanawiam się, czy wobec tego zamówić dwa razy więcej Big Merino, niż podane we wzorze? Czy tak to działa? Będę wdzięczna za podpowiedź!
30.10.2024 - 10:27DROPS Design answered:
Witaj Paulino, tak jest, np. na rozmiar S potrzeba 400 g włóczki Air albo 800 g włóczki Big Merino. Pozdrawiamy!
30.10.2024 - 14:02
![]() Miriam wrote:
Miriam wrote:
Ik snap niet veel van uw beschrijving. Moet ik eerst 2 x 17 cm geribbelde voorbies breien? En waar blijven die dan? De hals is volgens de foto ook in ribbelsteek. Die zie ik niet terug in uw beschrijving. Tot nu toe lukte me het goed om jullie beschrijving te snappen, maar deze snap ik echt niet. Zou u me kunnen helpen met een iets meer uitgebreide beschrijving Alvast bedankt.
25.10.2024 - 09:03
![]() Susanne Frebel wrote:
Susanne Frebel wrote:
Strickt man erst die Passe, dann den VAusschnitt und macht dann die Raglanzunahmen? Oder passiert das alles gleichzeitig?
14.10.2024 - 17:42DROPS Design answered:
Liebe Frau Frebel, man strickt zuerst die beiden Blende dann strickt man die beiden zusammen mit neuen Maschen dazwischen dann strickt man die Passe gleichzeitig wird man für V-Ausschnitt und Raglan zunehmen. Viel Spaß beim Stricken!
15.10.2024 - 09:32
![]() Magda Bernaerts wrote:
Magda Bernaerts wrote:
U zegt dat voor de pas je elke tweede naald voor en na elke markeerdraad moet meerderen en dan nog eens gelijktijdig voor de V-hals maar als ik twee steken voor de markeerdraad voor de raglan meerder waar meerder ik dan voor de V-hals?
11.10.2024 - 13:11DROPS Design answered:
Dag Magda,
Voor de hals meerder je op iedere 4e naald, vlak naast de biezen door 1 omslag te maken.
12.10.2024 - 09:03
![]() Catherine Léger wrote:
Catherine Léger wrote:
Bonjour Pour les manches vous avez oublié de préciser le nombre de centimètres entre chaque diminution. Il est impossible de faire pour la taille xl 19 centimètres pour la hauteur du corps. Il faut rajouter 10 centimètres sinon le pull arrive au nombril ! Merci pour tout vos modèles gratuits même si parfois les explications ne sont pas toujours claires mais on y arrive avec de la patience !
01.10.2024 - 22:21DROPS Design answered:
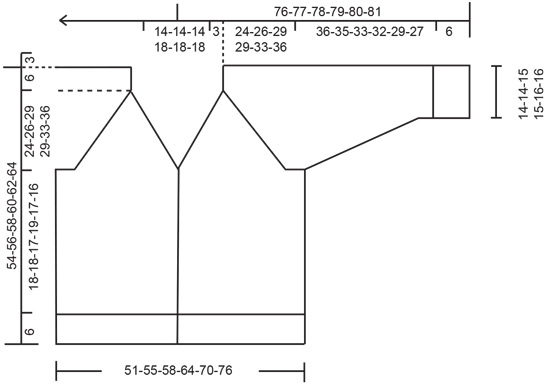
Bonjour Mme Léger, en taille XL, on diminue pour les manches 10 fois tous les 2,5 cm. Le bas du gilet doit bien mesurer 19 cm + les 6 cm de côtes (25 cm au total) + l'empiècement (29 cm) + 6 cm d'épaule = 60 cm de hauteur totale, conformément aux mesures indiquées dans le schéma. Bon tricot!
02.10.2024 - 09:08
![]() Wenche Søgaard wrote:
Wenche Søgaard wrote:
På diagrammet ser det ut for meg som det står i str. L : 29 cm fra der fellingen begynner og ned til armhulen og 17 cm fra armhulen og ned til vrangborden selv om den siste avstanden ser mye lenger ut på tegningen?
11.09.2024 - 11:38DROPS Design answered:
Hei Wenche. Husk at dette kun er en generell målskisse som visere målene på plagget, ikke hvordan plagget proposjonalt vil bli. Om du forholder deg til målene og overholder strikkefastheten vil plagget bli riktig. mvh DROPS Design
16.09.2024 - 08:12
![]() Wenche Søgaard wrote:
Wenche Søgaard wrote:
Siden spørsmålet jeg sendte først var synlig på denne siden men så forsvant prøver jeg igjen. Hvordan kan det stemme at de løse stolpene i størrelse L bare skal være 17 cm (34 cm til sammen) når det er lagt opp 68 masker mellom stolpene det de skal sys fast og strikkefastheten stemmer, 17 masker = 10 cm?
09.09.2024 - 12:08DROPS Design answered:
Hei Wevhe. Se vårt svar på ditt forrige spørsmål :) mvh DROPS Design
09.09.2024 - 13:46
![]() Wenche Søgaard wrote:
Wenche Søgaard wrote:
Hvordan kan det stemme at stolpene i str L skal være bare 17 cm (dvs. 34 til sammen) når de skal festes til nakken? Mellom stolpene er det jo lagt opp 68 masker. Strikkefastheten stemmer, 17 masker = 10 cm.
09.09.2024 - 11:48DROPS Design answered:
Hei Wenche. Når du skal feste stolpene (17+17 cm i riller = meget tøyelig) til halsen som er på 68 masker / 40 cm i glattstrikk, må du strekke litt i stolpen slik at det passer til halskanten ved sammensyingen. Stolpen vil da trekke halskanten noe sammen og vil da legge seg pent rundt nakken ved bruk. mvh DROPS Design
09.09.2024 - 13:44
![]() BryanZex wrote:
BryanZex wrote:
Scale up your account and get MORE! Regardless of your budget, we possess an amazing proffer for you! Deposit any amount up to $400 and get a BONUS of 100-120% of your deposit amount! Neck if you don't hold a overweight amount, you can even spread your entrust and enjoy more mirth while playing! Examine it absolute any longer and start playing with leftover funds in your account! Your winnings are waiting respecting you! https://shorturl.at/V1G8d
05.09.2024 - 01:41
|
|
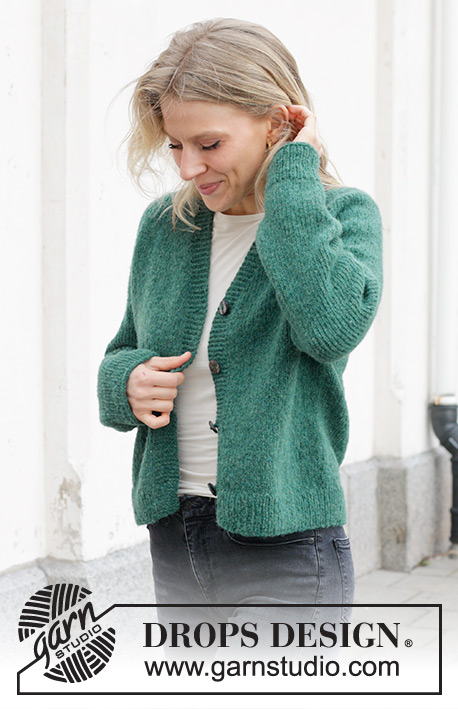
No Nonsense Cardigan#nononsensecardigan |
|
 |
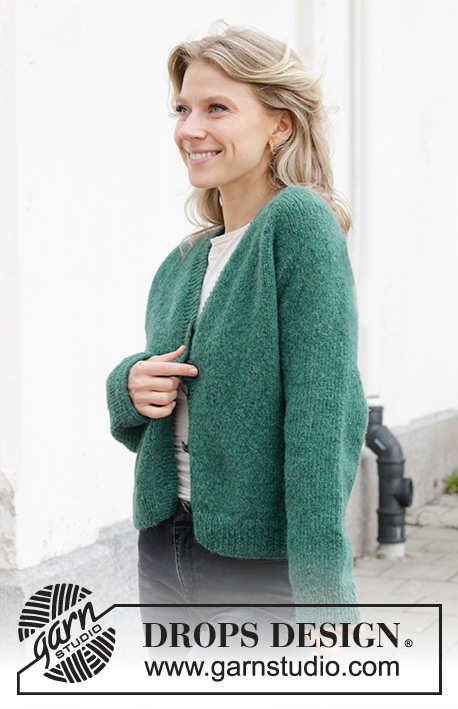 |
Knitted jacket in DROPS Air. The piece is worked top down with raglan and V-neck. Sizes S - XXXL.
DROPS 244-8 |
|
|
------------------------------------------------------- EXPLANATIONS FOR THE PATTERN: ------------------------------------------------------- GARTER STITCH (worked back and forth): Knit all rows. 1 ridge = knit 2 rows. RAGLAN: Increase 1 stitch before/after 2 stitches in each transition between the body and sleeves; the marker-thread sits between these 2 stitches. Increase 1 stitch by making 1 yarn over which is worked twisted on the next row/round to avoid a hole. The new stitches are then worked in stocking stitch. BUTTONHOLES: Work buttonholes on the right band (when the garment is worn). Work from the right side when there are 4 stitches left on the row as follows: Make 1 yarn over, knit 2 together and knit 2. On the next row (wrong side), knit the yarn over to leave a hole. The first buttonhole is worked 1 cm after the last increase for the V-neck, then the other 3 buttonholes with approx. 7-8-8½-7½-8-9 cm between each one. DECREASE TIP (for sleeves): Start 3 stitches before the marker-thread, knit 2 together, knit 2 (marker-thread sits between these 2 stitches), slip 1 stitch knit-wise, knit 1 and pass the slipped stitch over the knitted stitch (2 stitches decreased). ------------------------------------------------------- START THE PIECE HERE: ------------------------------------------------------- JACKET – SHORT OVERVIEW OF THE PIECE: Piece is worked back and forth, top down. Start by working 2 loose bands in garter stitch. Stitches are cast on between the 2 bands for the shoulders and back neck and the yoke continued back and forth with circular needle from mid-front. Stitches are increased for raglan and the V-neck. The yoke is divided for the body and sleeves and the body continued back and forth with circular needle. The sleeves are worked in the round with short circular needle/double pointed needles. RIGHT BAND (when the garment is worn): Cast on 7 stitches with circular needle size 5 mm and DROPS Air. Work GARTER STITCH – read description above, until the band measures 17-17-17-19-19-19 cm, finishing after a row from the wrong side. Lay the piece to one side. LEFT BAND: Cast on 7 stitches with circular needle size 5 mm and DROPS Air. Work garter stitch until the band measures 17-17-17-19-19-19 cm, finishing after a row from the right side. Do not cut the strand. Cast on 68-68-68-74-74-74 stitches at the end of this row, then knit the right band stitches = 82-82-82-88-88-88 stitches. Work 1 row with garter stitch over each band and purling the cast-on stitches. Insert 4 marker-threads (used when increasing for RAGLAN – read explanation above), without working the stitches and inserting them between 2 stitches as follows: Count 9 stitches, insert marker-thread 1, count 20 stitches, insert marker-thread 2, count 24-24-24-30-30-30 stitches, insert marker-thread 3, count 20 stitches, insert marker-thread 4, there are 9 stitches left on the row. YOKE: REMEMBER THE KNITTING TENSION! Continue back and forth with stocking stitch and garter stitch over each band. At the same time increase for the V-neck and raglan as described below. Read the next 2 sections before continuing. Start mid-front, from the right side. V-NECK: Increase for the neck inside the bands every 4th row 11-11-11-14-14-14 times by making 1 yarn over, which is worked twisted on the next row to avoid a hole. 1 cm after the last increase for the neck begin working the BUTTONHOLES – read description above. RAGLAN: Increase on each side of 2 stocking stitches in each transition between the front/back pieces and the sleeves every 2nd row (each row from the right side = 8 increased stitches) 6 times – read description above. Continue to increase for raglan every 2nd round but every 2nd increase is only on the front/back pieces (4 increased stitches), i.e., increase on the front/back pieces every 2nd row (each row from the right side) and on the sleeves every 4th row (every 2nd row from the right side). Increase like this 18-22-26-26-30-30 times on the body (9-11-13-13-15-15 times on the sleeves). SIZES S, M, XL, XXL and XXXL (the increases in size L are finished): Continue with stocking stitch and increase for raglan but now only increase on the body every 2nd row (the sleeve increases are finished) 2-1-1-1-5 times. ALL SIZES: You have increased a total of 26-29-32-32-37-41 times on the body and 15-17-19-19-21-21 times on the sleeves. After the last increase there are 268-288-308-324-348-364 stitches. Continue with stocking stitch and the bands in garter stitch until the yoke measures 24-26-29-29-33-36 cm, measured mid-back. Divide for the body and sleeves as follows: Work the first 46-49-52-56-60-64 stitches (front piece), place the next 50-54-58-58-62-62 stitches on a thread for the sleeve, cast on 10-10-10-12-14-16 stitches (in side under sleeve), work 76-82-88-96-104-112 stitches (back piece), place the next 50-54-58-58-62-62 stitches on a thread for the sleeve, cast on 10-10-10-12-14-16 stitches (in side under sleeve), work the last 46-49-52-56-60-64 stitches (front piece). BODY: = 188-200-212-232-252-272 stitches. Continue with stocking stitch and the bands in garter stitch for a further 18-18-17-19-17-16 cm. Knit 1 row from the right side and increase 19-21-21-23-25-27 stitches evenly spaced (do not increase over the bands) = 207-221-233-255-277-299 stitches. Change to circular needle size 4 mm and work as follows from the wrong side: 7 band stitches in garter stitch, * purl 1, knit 1 *, work from *-* until there are 8 stitches left, purl 1 and 7 band stitches in garter stitch. Continue this rib for 6 cm. Cast off. The jacket measures approx. 54-56-58-60-62-64 cm from the shoulder. SLEEVES: Place the 50-54-58-58-62-62 stitches from the thread on the one side of the piece on short circular needle/double pointed needles size 5 mm and knit up 1 stitch in each of the 10-10-10-12-14-16 stitches cast on under the sleeve = 60-64-68-70-76-78 stitches. Insert a marker-thread in the middle of the new stitches under the sleeve. Work stocking stitch in the round. When the sleeve measures 4 cm, decrease 2 stitches under the sleeve – read DECREASE TIP. Decrease like this every 5-3½-2½-2½-2-1½ cm a total of 6-8-9-10-11-11 times = 48-48-50-50-54-56 stitches. Continue working until the sleeve measures 36-35-33-32-29-27 cm from the division. Knit 1 round and increase 8-8-10-10-10-12 stitches evenly spaced = 56-56-60-60-64-68 stitches. Change to double pointed needles size 4 mm and work rib (knit 1, purl 1) for 6 cm. Cast off. The sleeve measures approx. 42-41-39-38-35-33 cm from the division. Work the other sleeve in the same way. ASSEMBLY: Sew the buttons onto the left band. Sew together the 2 loose bands mid-back and sew them to the neckline. |
|
|
|
Have you finished this pattern?Tag your pictures with #dropspattern #nononsensecardigan or submit them to the #dropsfan gallery. Do you need help with this pattern?You'll find 28 tutorial videos, a Comments/Questions area and more by visiting the pattern on garnstudio.com. © 1982-2025 DROPS Design A/S. We reserve all rights. This document, including all its sub-sections, has copyrights. Read more about what you can do with our patterns at the bottom of each pattern on our site. |
|


With over 40 years in knitting and crochet design, DROPS Design offers one of the most extensive collections of free patterns on the internet - translated to 17 languages. As of today we count 314 catalogues and 11820 patterns translated into English (UK/cm). 11820
We work hard to bring you the best knitting and crochet have to offer, inspiration and advice as well as great quality yarns at incredible prices! Would you like to use our patterns for other than personal use? You can read what you are allowed to do in the Copyright text at the bottom of all our patterns. Happy crafting!
Post a comment to pattern DROPS 244-8
We would love to hear what you have to say about this pattern!
If you want to leave a question, please make sure you select the correct category in the form below, to speed up the answering process. Required fields are marked *.