
Looking for a yarn?


Comments / Questions (33)
![]() Duanenor wrote:
Duanenor wrote:
Elderly women remain getting frisky in the bed room, showing off what they've got. Their husbands are from the picture, so they're looking for some like. These Nude Granny Pictures can keep up with females half their age, as well as younger! It's like intercourse keeps them feeling youthful. They're not afraid to go after younger guys a
21.07.2024 - 05:29
![]() Sabine Kaminski wrote:
Sabine Kaminski wrote:
Hallo, ich habe eine weitere Anmerkung: ich stricke die Größe L und habe vom 1. Knäul natur noch 11 g übrig, es hätten 50 g völlig gereicht. Bitte korrigieren Sie die Anleitung dahingehend. Die beschriebene Bündchenlösung hat mir übrhaupt nicht gefallen, ich habe einfach das Bündchen wie gewohnt weitergestrickt mit der dünneren Nadel, alles wunderbar geworden. Liebe Grüße S. Kaminski
02.07.2024 - 14:20
![]() Sabine Kaminski wrote:
Sabine Kaminski wrote:
Guten Tag, ich verstehe nicht, warum vor den Bündchen Maschen zugenommen werden sollen. Üblicher Weise hat das Bündchen weniger Maschen als Ärmel oder Rumpf. Aber ich lasse mich gerne belehren. Liebe Grüße Sabine Kaminski
20.06.2024 - 13:52DROPS Design answered:
Liebe Frau Kaminski, hier will man nicht, daß das Bündchen die untere Kante zusammenzieht, so wird man vor dem Bündchen zunehmen, da man mehr Maschen für Bündchen mit den kleineren Nadeln als für Glattrechts mit den grösseren Nadeln braucht. Viel Spaß beim Stricken!
20.06.2024 - 15:14
![]() Fabienne wrote:
Fabienne wrote:
Merci pour votre réponse qui m'a beaucoup aidée.
31.01.2024 - 20:05
![]() Fabienne wrote:
Fabienne wrote:
Bonsoir, je suis un peu ennuyé avec l'explication suivante : quand la manche mesure 3-3-3-2-2-2 cm, diminuer 2 mailles sous la manche . dois je calculer la mesure des 3 cm avant de commencer A4 et A5 ou une fois A5 terminé ? dites moi si ma question est pertinente. Merci beaucoup fabienne
30.01.2024 - 21:37DROPS Design answered:
Bonjour Fabienne, mesurez ces 2 ou 3 cm à partir du moment où vous avez repris les mailles pour tricoter la manche. Bon tricot!
31.01.2024 - 08:41
![]() Ingrid Schröer wrote:
Ingrid Schröer wrote:
Hallo liebes Drops Team, ich bin jetzt soweit, das ich A.2 das zweite mal stricke und habe noch 42 gr. Von dem grünem zur Verfügung. Ich habe noch nicht einmal die Halsblende mit dem grünem begonnen. L.G. Maschenprobe passt und ich stricke Gr. L
04.01.2024 - 20:35Ingrid Schröer answered:
Oh, ich hatte absolut ein Denkfehler… mit dem grünem Garn komme ich locker hin. Habe 50gr und 100 gr. Vertauscht. Absolut mein Fehler. Sorry 🤦♀️
04.01.2024 - 21:11
![]() Anita Madsen wrote:
Anita Madsen wrote:
Der er en fejl i dame modellen Den er ikke lang nok i ryg og forstyk der står 2 cm fra deling den skal være 32 for at den passer
17.12.2023 - 13:05
![]() Fabienne GAWINOWSKI wrote:
Fabienne GAWINOWSKI wrote:
Bonsoir, je suis au dos/devant du modèle, cependant je ne peux pas commencer mon tour ainsi :Commencer le tour sur un des côtés – au milieu des 8 mailles montées sous la manche, et continuer le jacquard de l’empiècement – si je veux aller au milieu des 8 mailles , je dois donc finir les mailles que j'ai encore sur mon aiguille ? je ne sais pas si je suis bien claire ..... merci à vous
24.11.2023 - 20:17DROPS Design answered:
Bonjour Mme Gawinowski, tout à fait, vous pouvez terminer le tour jusqu'au milieu sous la 1ère manche, ou bien si vous êtes en plein jacquard, coupez le fil et commencez désormais les tours sous la manche pour éviter un décalage du motif. Bon tricot!
27.11.2023 - 07:54
![]() Fabienne GAWINOWSKI wrote:
Fabienne GAWINOWSKI wrote:
Bonjour, je tricote le diagramme A2, je vois qu'enseigne il y a le A3 puis à nouveau le A2, je reprends donc le même motif déjà tricoté en A2 avec bien sur les données de celui ci ? J'espère que je m'explique assez clairement, je suis désolée. Merci
19.11.2023 - 14:59DROPS Design answered:
Bonjour Mme Gawinowski, tout à fait, vous tricotez une 2ème fois les sapins (A.2) après les Père Noël (A.3), mais comme vous avez entretemps augmenté le nombre de mailles, vous aurez davantage de sapins la 2ème fois. Bon tricot!
20.11.2023 - 10:50
![]() Fabienne wrote:
Fabienne wrote:
Bonjour, dans le modèle j'arrive au jacquard A1, il est dit " tricotez 23 fois A1 ", dois je refaire les augmentations à chaque fois ? merci beaucoup . fabienne
14.11.2023 - 20:42DROPS Design answered:
Bonjour Fabienne, vous tricotez sans doute la taille L, et vous avez 184 mailles sur votre aiguille, donc suffisamment pour tricoter 23 motifs de A.1 (23x8=184); au tour avec la flèche, augmentez 56 mailles à intervalles réguliers (cf cette leçon 15.11.2023 - 08:09
|
||||||||||||||||||||||
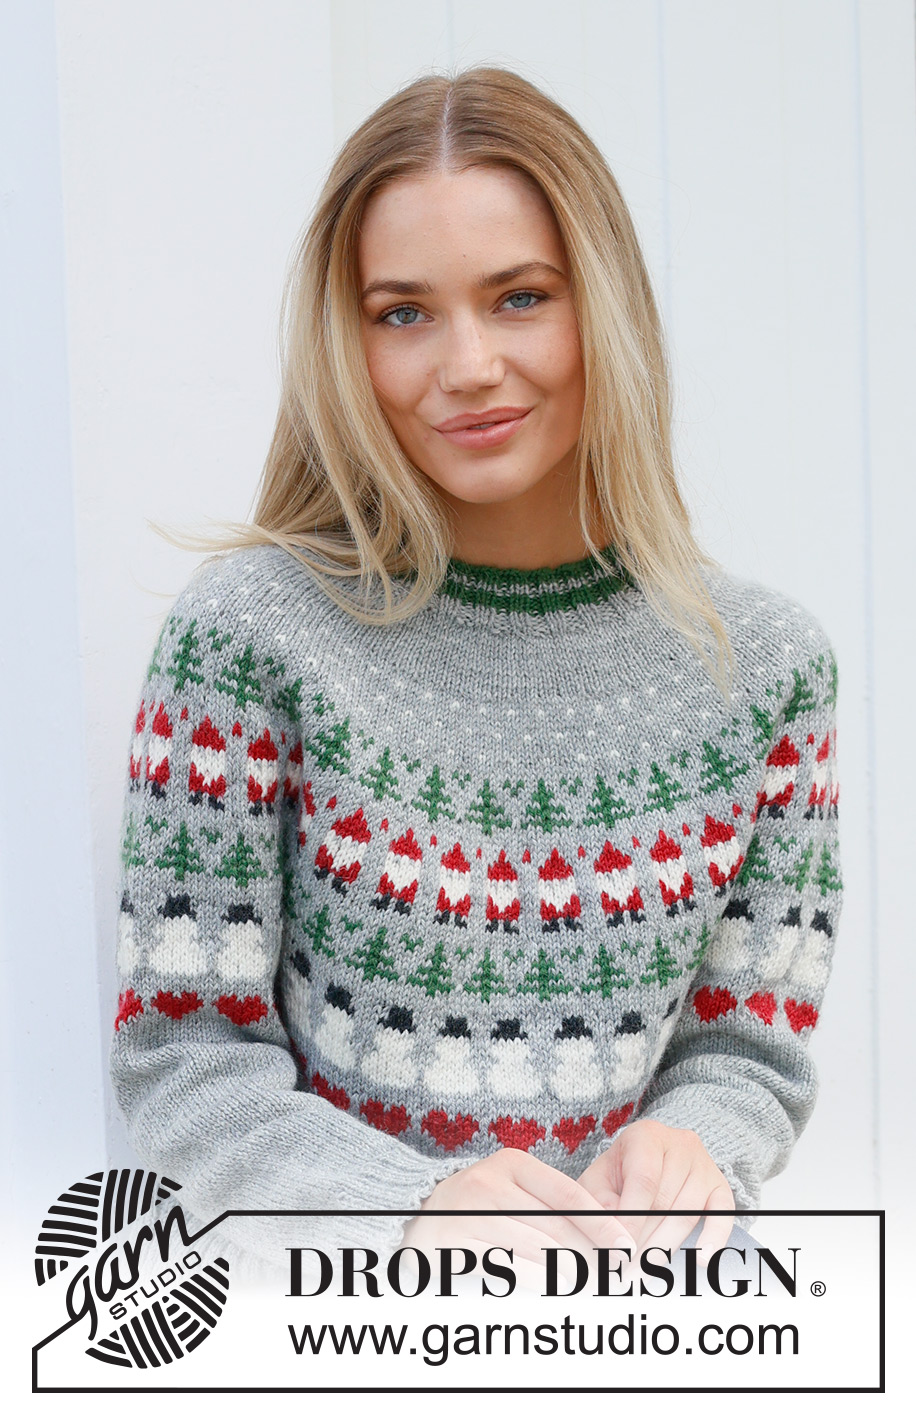
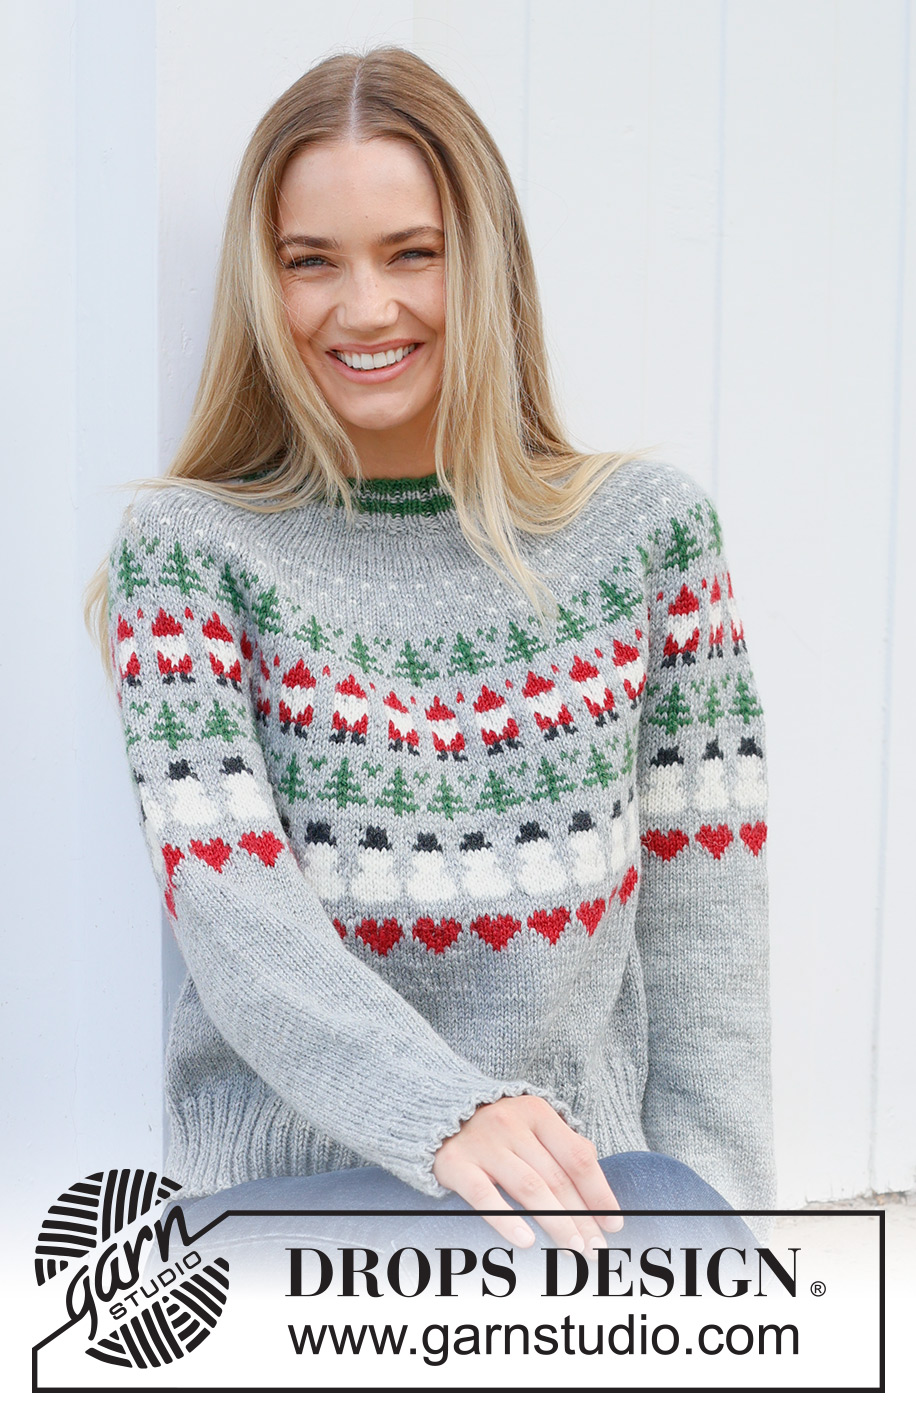
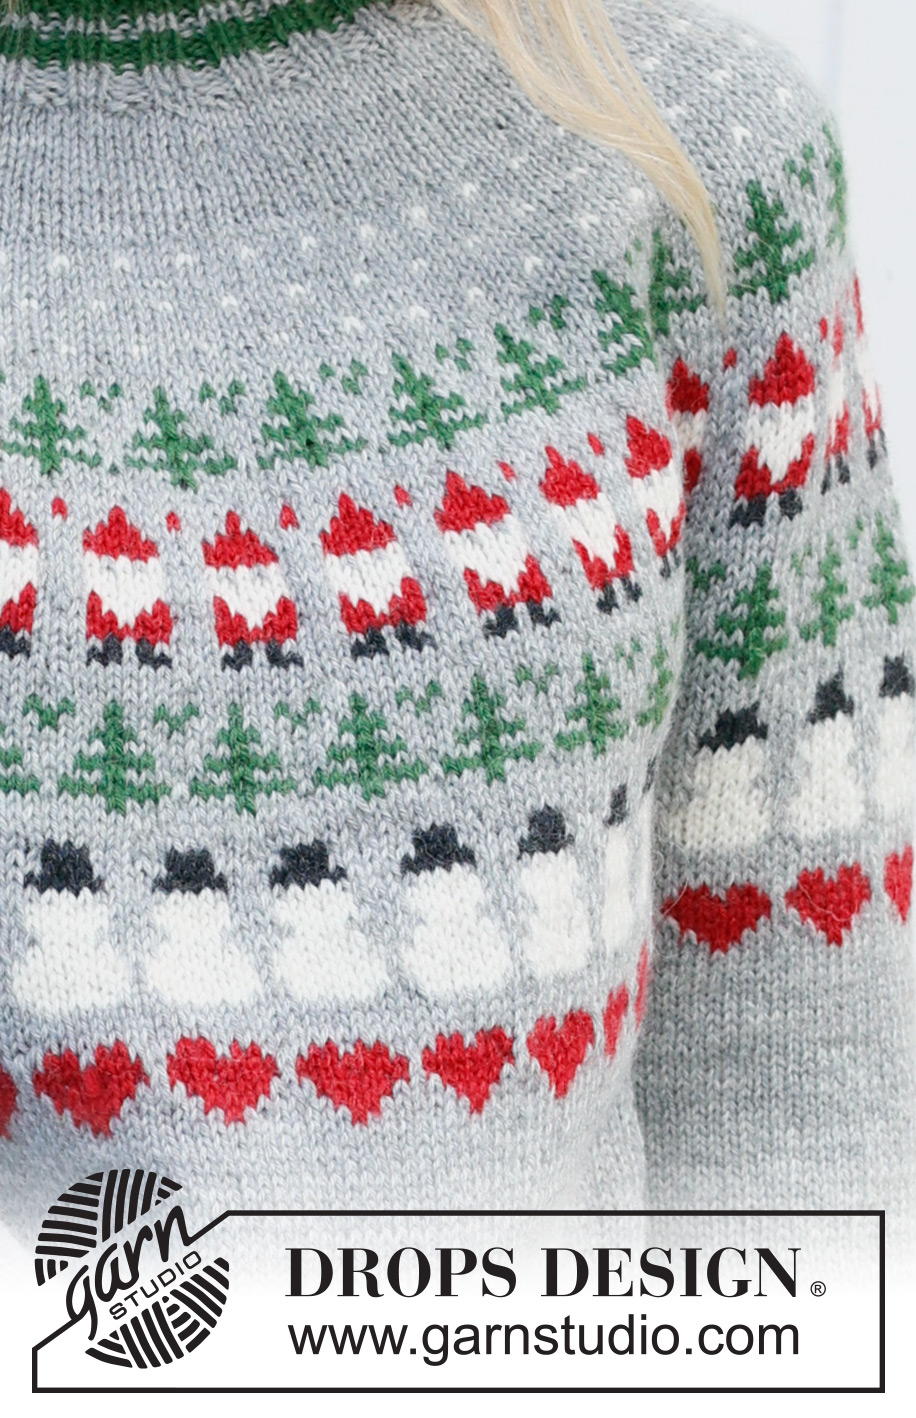
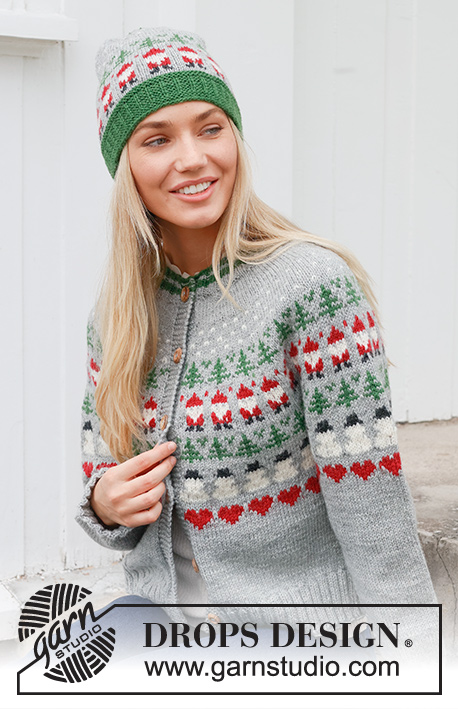
Christmas Time Sweater#christmastimesweater |
||||||||||||||||||||||
 |
 |
|||||||||||||||||||||
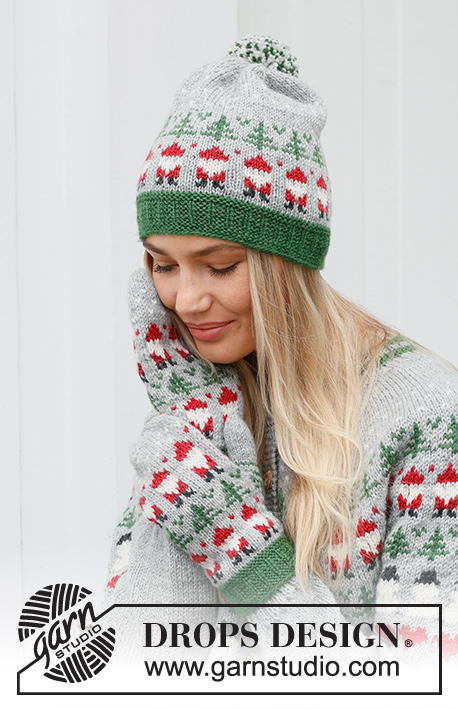
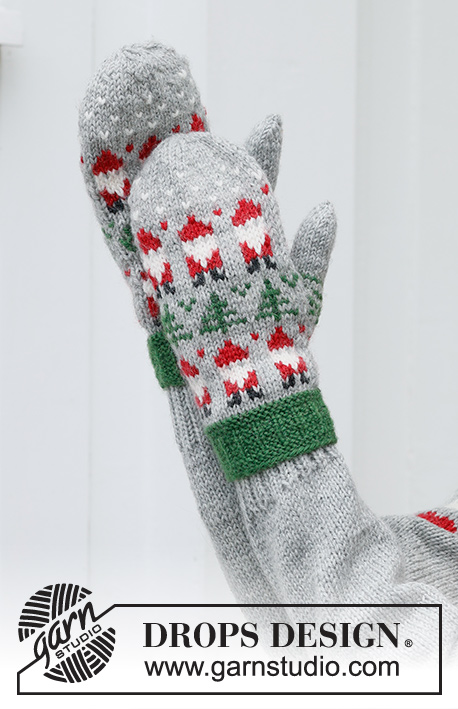
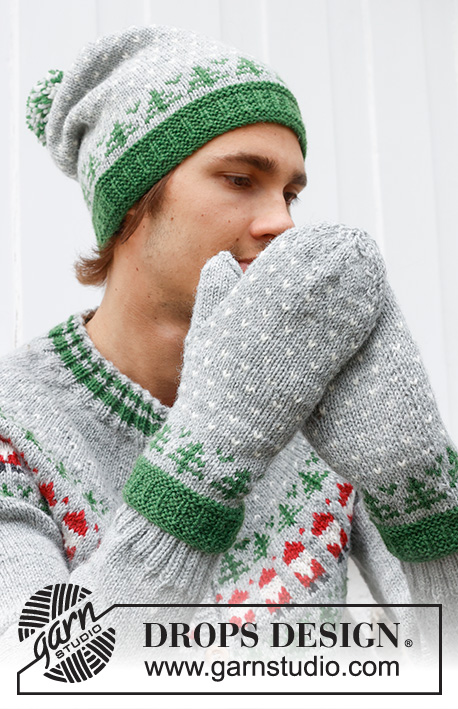
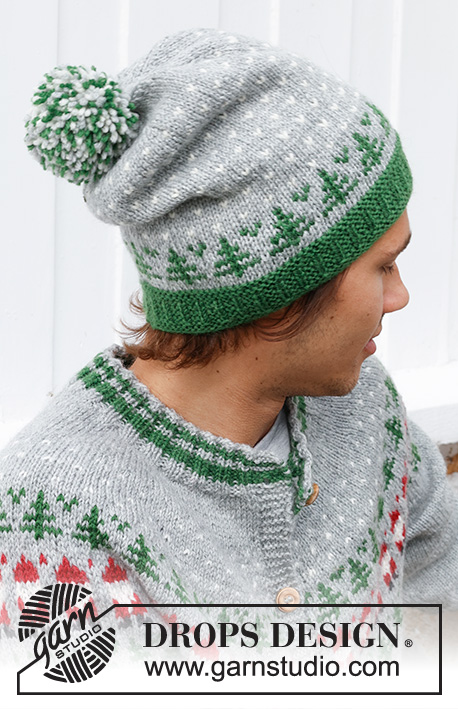
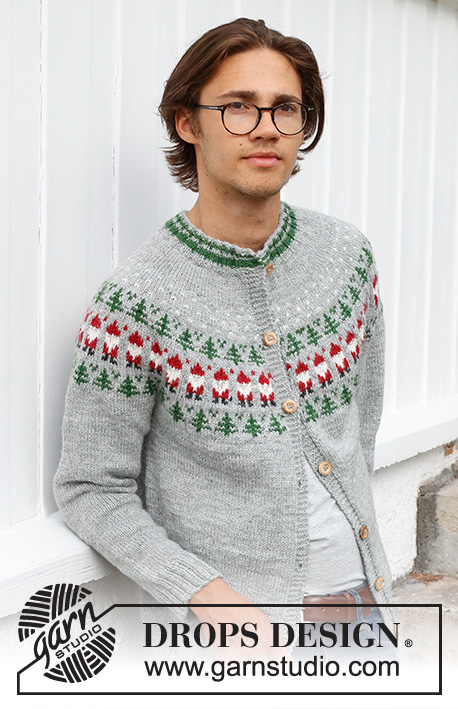
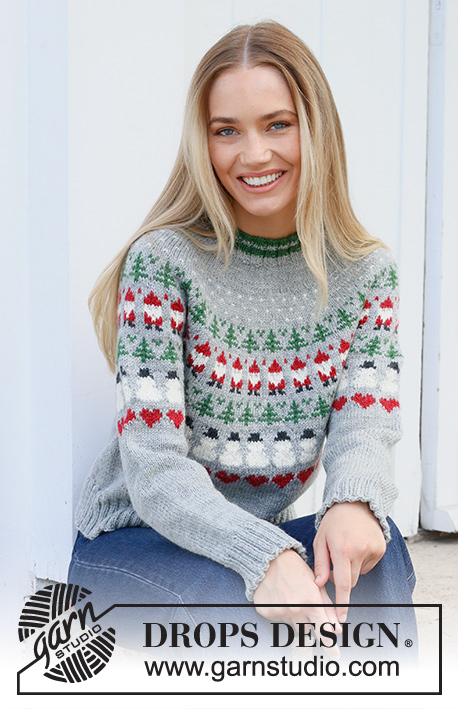
Knitted jumper in DROPS Karisma. The piece is worked top down, with round yoke and coloured pattern of Santa, Christmas tree, snowman and heart. Sizes S - XXXL. Theme: Christmas.
DROPS 235-39 |
||||||||||||||||||||||
|
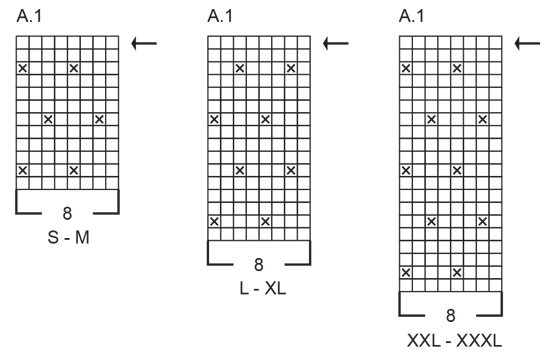
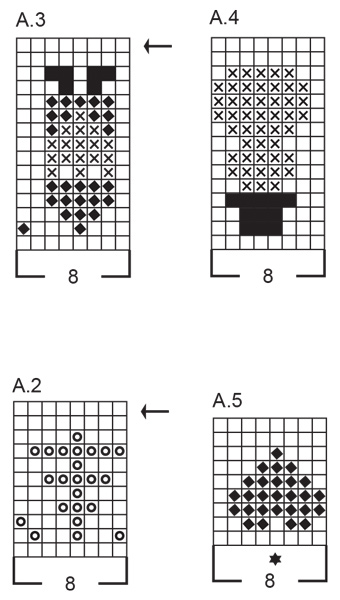
------------------------------------------------------- EXPLANATIONS FOR THE PATTERN: ------------------------------------------------------- PATTERN: See diagrams A.1 to A.5. Choose diagram for your size (applies to A.1). The patterns are worked in stocking stitch KNITTING TIP-1: To avoid the knitting tension losing its elasticity when working pattern it is important that the strands at the back are not tight. Use a size larger needle when working pattern if the piece becomes tight. KNITTING TIP-2: If you want more pattern on body and sleeves continue with the diagrams in your desired order but remember this will affect the yarn amounts. On the sleeves, position the motif mid-top of the sleeve and count out from there where to start the diagram under the sleeve. INCREASE TIP (evenly spaced): Increase 1 stitch by making 1 yarn over, which is worked twisted on the next round to avoid a hole. DECREASE TIP (for sleeves): Decrease 1 stitch on either side of the marker-stitch as follows: Work until there are 2 stitches left before the marker, knit 2 together with colour light grey, knit the stitch with marker with colour light grey and knit 2 twisted together with colour light grey (2 stitches decreased). ------------------------------------------------------- START THE PIECE HERE: ------------------------------------------------------- JUMPER – SHORT OVERVIEW OF THE PIECE: The neck and yoke are worked in the round with circular needle, from mid back and top down. The yoke is divided for body and sleeves and the body is continued in the round with circular needle. The sleeves are worked with short circular needle/double pointed needles. NECK: Cast on 104-108-112-120-124-128 stitches with short circular needle size 3 mm and colour forest green DROPS Karisma. Knit 1 round, then work rib (knit 2, purl 2) and stripes as follows: 2 rounds with colour forest green, 2 rounds with colour light grey, 4 rounds with colour forest green then continue the rib with colour light grey until the neck measures 4 cm. Knit 1 round with colour light grey and increase 26-27-28-34-40-42 stitches evenly spaced – read INCREASE TIP = 130-135-140-154-164-170 stitches. Insert 1 marker mid-front – the yoke is measured from this marker! YOKE: Change to circular needle size 4 mm. Work stocking stitch with colour light grey. REMEMBER THE KNITTING TENSION! When the yoke measures 4-4-5-5-6-7 cm from the marker, increase 38-41-44-46-52-54 stitches evenly spaced – remember INCREASE TIP = 168-176-184-200-216-224 stitches. Now work pattern and continue to increase as described below – read KNITTING TIP-1 and PATTERN in explanations above. A.1: Work A.1, 21-22-23-25-27-28 times on the round. AT THE SAME TIME on the round marked with an arrow increase 48-48-56-56-64-72 stitches evenly spaced = 216-224-240-256-280-296 stitches. A.2: When A.1 is finished in your size, work A.2, 27-28-30-32-35-37 times on the round. AT THE SAME TIME on the round marked with an arrow increase 40-48-48-56-64-64 stitches evenly spaced = 256-272-288-312-344-360 stitches. A.3: When A.2 is finished, work A.3, 32-34-36-39-43-45 times on the round. AT THE SAME TIME on the round marked with an arrow increase 32-40-48-48-48-56 stitches evenly spaced = 288-312-336-360-392-416 stitches. A.2: When A.3 is finished, work A.2 again 36-39-42-45-49-52 times on the round. AT THE SAME TIME on the round marked with an arrow increase 16-16-24-40-40-48 stitches evenly spaced = 304-328-360-400-432-464 stitches. A.4: When A.2 is finished, work A.4, 38-41-45-50-54-58 times on the round. Continue the pattern – at the same time divide for the sleeves and body as described below. DIVIDE FOR SLEEVES AND BODY: Work until the yoke measures 22-24-25-27-29-31 cm from the marker. The increases are finished but not the pattern, which you continue on the body and sleeves. On the next round divide as follows: Work 46-50-54-60-66-72 stitches as before (half back piece), place the next 60-64-72-80-84-88 stitches on a thread for the sleeve, cast on 8 stitches with colour light grey (in side under sleeve), work 92-100-108-120-132-144 stitches as before (front piece), place the next 60-64-72-80-84-88 stitches on a thread for the sleeve, cast on 8 stitches with colour light grey (in side under sleeve), work the last 46-50-54-60-66-72 stitches as before (half back piece). Cut the strand. Body and sleeves are finished separately. The piece is now measured from here! BODY: = 200-216-232-256-280-304 stitches. Start the round on one side – in the middle of the 8 cast-on stitches and continue the pattern from the yoke – repeats (A.4) will not fit under the sleeves so work them as far as they fit then finish with light grey under each sleeve. When A.4 is finished, work A.5, 25-27-29-32-35-38 times on the round. When A.5 is finished continue with stocking stitch and colour light grey – read KNITTING TIP-2. Work until the body measures 21-21-22-22-22-22 cm from the division. Knit 1 round and increase 40-40-44-52-56-60 stitches evenly spaced = 240-256-276-308-336-364 stitches. Change to circular needle size 3 mm and work rib (knit 2, purl 2) for 7 cm. Cast off slightly loosely. The jumper measures approx. 54-56-58-60-62-64 cm from the shoulder down. SLEEVES: Place the 60-64-72-80-84-88 stitches from the thread on the one side of the piece on short circular needle/double pointed needles size 4 mm and knit up 1 stitch in each of the new stitches cast on under the sleeve using colour light grey = 68-72-80-88-92-96 stitches. Insert a marker in the 5th of the 8 new stitches under the sleeve (mid-under sleeve) and a marker in the 35th-37th-41st-45th-47th-49th stitch (mid-top of sleeve). Start at the first marker and continue the pattern from the yoke. The repeats of A.4 will not fit under the sleeve, so work the remaining stitches with colour light grey. When A.4 is finished, work A.5 – count out from mid-top where the pattern should start under the sleeve – the marker-stitch should match the mid-stitch marked on the diagram. When A.5 is finished continue with colour light grey and stocking stitch – read KNITTING TIP-2. AT THE SAME TIME, when the sleeve measures 3-3-3-2-2-2 cm, decrease 2 stitches under the sleeve – read DECREASE TIP. Decrease like this every 4½-4-2½-2-1½-1½ cm a total of 7-8-11-14-15-16 times = 54-56-58-60-62-64 stitches. Continue working until the sleeve measures 34-33-32-30-29-28 cm from the division (or to desired length. There is approx. 7 cm left). Knit 1 round and increase 10-8-10-12-10-12 stitches evenly spaced = 64-64-68-72-72-76 stitches. Change to double pointed needles size 3 mm and work rib (knit 2, purl 2) for 7 cm. Loosely cast off. The sleeve measures approx. 41-40-39-37-36-35 cm from the division. Work the other sleeve in the same way. |
||||||||||||||||||||||
Diagram explanations |
||||||||||||||||||||||
|
||||||||||||||||||||||
 |
||||||||||||||||||||||
 |
||||||||||||||||||||||
 |
||||||||||||||||||||||
Have you finished this pattern?Tag your pictures with #dropspattern #christmastimesweater or submit them to the #dropsfan gallery. Do you need help with this pattern?You'll find 28 tutorial videos, a Comments/Questions area and more by visiting the pattern on garnstudio.com. © 1982-2025 DROPS Design A/S. We reserve all rights. This document, including all its sub-sections, has copyrights. Read more about what you can do with our patterns at the bottom of each pattern on our site. |
||||||||||||||||||||||


With over 40 years in knitting and crochet design, DROPS Design offers one of the most extensive collections of free patterns on the internet - translated to 17 languages. As of today we count 320 catalogues and 12092 patterns translated into English (UK/cm). 12092
We work hard to bring you the best knitting and crochet have to offer, inspiration and advice as well as great quality yarns at incredible prices! Would you like to use our patterns for other than personal use? You can read what you are allowed to do in the Copyright text at the bottom of all our patterns. Happy crafting!
Post a comment to pattern DROPS 235-39
We would love to hear what you have to say about this pattern!
If you want to leave a question, please make sure you select the correct category in the form below, to speed up the answering process. Required fields are marked *.