
Popular categories
Looking for a yarn?


Comments / Questions (97)
![]() Thea wrote:
Thea wrote:
I am confused. The pattern says to knit the neck back and forth but in the video to "How to work a double neck together" they are knitting in the round? Which is the correct way?
26.06.2023 - 00:44DROPS Design answered:
Hi Thea, When you are working a jumper, the neck is worked in the round is. On a jacket/cardigan the neck is worked back and forth. Happy knitting!
26.06.2023 - 06:48
![]() Catherine Wilkinson wrote:
Catherine Wilkinson wrote:
Hello, can you please tell me what size the model is wearing the following pattern, I'm trying to work out if should knit a small or medium. And I'm looking forward to working with DROPS Air! DROPS 236-33 DROPS Design: Pattern ai-404 Yarn group C or A + A
09.05.2023 - 11:39DROPS Design answered:
Dear Mrs Wilkinson, our models wear most of the time either a size S or a size M; to find out which size you should choose, measure a similar garment you have and like the shape and compare these to the measurements in chart - read more here. Happy knitting!
09.05.2023 - 16:20
![]() Diderica wrote:
Diderica wrote:
De boordsteek voor de hals is 2 av,1r aan de goede kant. Moet ik dan aan de verkeerde kant 2r-1av?
01.05.2023 - 20:47DROPS Design answered:
Dag Diderica,
Ja, klopt. Op de verkeerde kant brei je die andersom (dus recht aan de goede kant is averecht aan de verkeerde kant en averecht aan de goede kant is recht aan de verkeerde kant).
03.05.2023 - 10:03
![]() Calozet Nadia wrote:
Calozet Nadia wrote:
Bonjour merci beaucoup pour ce joli modèle. Je ne sais pas comment attacher la bande de boutonnière au col doublé. Merci beaucoup
29.04.2023 - 10:16
![]() Anna H wrote:
Anna H wrote:
I love the customer service. I submitted a question at 9 pm eastern time and had a response when I woke up at 6 am. The video link was exactly what I needed. Thank you.
21.03.2023 - 20:00
![]() Anna H wrote:
Anna H wrote:
I am making pattern 236-33 and I don’t understand how to add the front bands. Is there a video? If no, I need very detailed instructions. I have never worked a band like this before.
21.03.2023 - 01:47DROPS Design answered:
Dear Anna H, sure there is, find the one for double knitted band with buttonholes here and the one for the double knitted band without buttonholes here. Happy knitting!
21.03.2023 - 10:47
![]() Line Villeneuve wrote:
Line Villeneuve wrote:
Puis-je avoir la largeur de la bordure du devant gauche et droit svp? J'ai changé de fil et je la trouve pas très large. Merci de votre collaboration
08.02.2023 - 18:46DROPS Design answered:
Bonjour Mme Villeneuve, la tension traditionnelle de DROPS Air avec des aiguilles 5 est de 17 m = 10 cm, les 6 mailles de la bordure devant feront ainsi environ 3.5 cm (on ne tricote que 6 mailles sur l'endroit et 6 mailles sur l'envers - cf la vidéo de la bordure sans boutonnières. Bon tricot!
09.02.2023 - 09:50
![]() Anneke Van Der Tang wrote:
Anneke Van Der Tang wrote:
Ik heb een vraag over dit vest ik ben namelijk aan het boord van het lijf ,dan kom ik tegen dat ik moet meerderen voordat je aan het boord begint . Klopt dat wel ik vind het zo raar dat dit boven het boord moet. Ik wacht uw antwoord af . Bij voorbaat dank
03.02.2023 - 14:34DROPS Design answered:
Dag Anneke,
Ja, dat klopt. Je meerdert voordat je aan de boord begint. 'Vroeger' werd er vaak veel geminderd en dan de boord gebreid om echt een samentrekkend effect in de boord te maken. Bij dit patroon is het juist de bedoeling om het samentrekkende effect te voorkomen. Vandaar dat er gemeerderd moet worden.
12.02.2023 - 18:33
![]() Michaela wrote:
Michaela wrote:
Ich stricke mit der Drops Air den Foggy autumn Cardigan. Bei einer Länge von 65 cm misst die Länge der Blende nur 53cm obwohl nach Anleitung gestrickt sogar mit einer halben NS dicker. Kann man das durch Waschen und Spannen ausgleichen oder was mache ich falsch?
01.02.2023 - 11:08DROPS Design answered:
Liebe Michaela, haben Sie 1 Masche in jeder Reihe am Vorderteil aufgefasst? (und nicht wie oft 2/3 Maschen aus 3/4 Reihen auffassen) So sollen Sie die gleiche Höhe bekommen. Vielleicht kann Ihnen dieses Video helfen. Viel Spaß beim stricken!
01.02.2023 - 14:21
![]() Laur wrote:
Laur wrote:
Bonjour, je me permets de vous signaler une erreur dans le nombre de maille pour mettre les marqueurs au début de l'empiecement devant taille M
22.01.2023 - 14:06DROPS Design answered:
Bonjour Laur, le nombre de mailles en M est bien juste, notez que chaque marqueur doit être inséré dans une maille et non entre 2 mailles, ainsi vous aurez: 16+1+14+1+32+1+14+1+16=96 mailles. Bon tricot!
23.01.2023 - 10:35
|
|
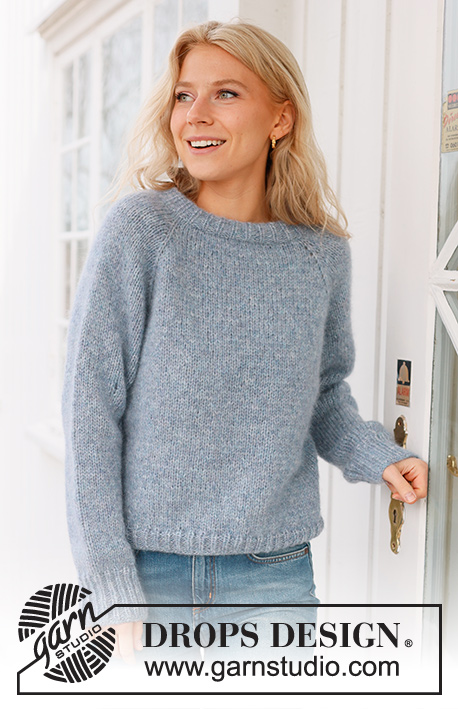
Foggy Autumn Cardigan#foggyautumncardigan |
|
 |
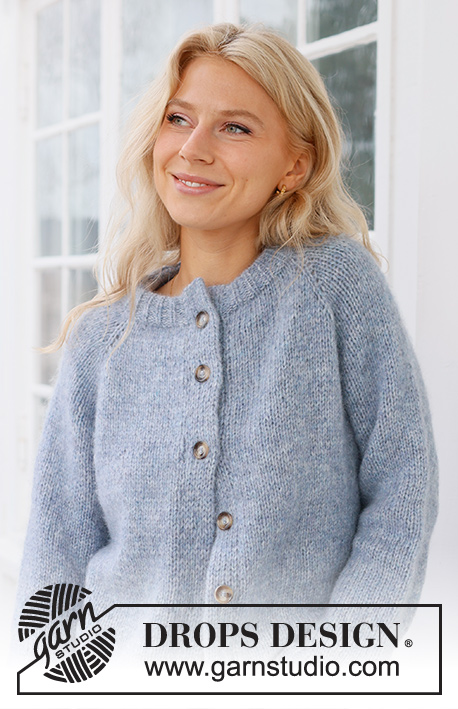 |
Knitted jacket in DROPS Air. The piece is worked top down, with raglan and double bands. Sizes S - XXXL.
DROPS 236-33 |
|
|
------------------------------------------------------- EXPLANATIONS FOR THE PATTERN: ------------------------------------------------------- RIDGE/GARTER STITCH (worked back and forth): Knit all rows. 1 ridge = knit 2 rows. RAGLAN: All increases are worked from the right side! Increase to raglan on each side of each marker-stitch as follows: Work to the marker-stitch, 1 yarn over, knit the marker-stitch, 1 yarn over (= 8 stitches increased). On the next row (wrong side) work the yarn overs as follows: BEFORE marker-stitch: Purl the yarn over twisted. AFTER marker-stitch: Slip the yarn over onto the right needle as if to knit, place it back onto the left needle the other way round (twisted), purl the yarn over. DECREASE TIP (sleeves): Decrease 1 stitch on either side of the marker as follows: Work until there are 3 stitches left before the marker, knit 2 together, knit 2 (marker sits between these 2 stitches), slip 1 stitch as if to knit, knit 1 and pass the slipped stitch over the knitted stitch (2 stitches decreased). BUTTONHOLES: The buttonholes are worked on the right band: Work the first 6 stitches, turn and work the same stitches back, turn and work these 6 stitches again. Cut the strand. Work 4 rows over the remaining 6 band stitches (first row from the right side) and knit together the last stitch from the right side and the stitch on the edge of the jacket. On the last row from the right side work all the band stitches as before. Work the buttonholes when the band measures: S: 4, 13, 22, 31, 40 and 48 cm. M: 4, 14, 23, 33, 41 and 50 cm. L: 4, 14, 24, 34, 43 and 52 cm. XL: 6, 16, 26, 36, 45 and 54 cm. XXL: 4, 13, 22, 31, 40, 48 and 56 cm. XXXL: 5, 14, 23, 32, 41, 50 and 58 cm. ------------------------------------------------------- START THE PIECE HERE: ------------------------------------------------------- JACKET – SHORT OVERVIEW OF THE PIECE. The neck and yoke are worked back and forth with circular needle, top down. The yoke is divided for body and sleeves and the body continued back and forth with circular needle. The sleeves are worked in the round with double pointed needles. DOUBLE NECK: Cast on 79-82-88-91-94-97 stitches with DROPS Air using 2 circular needles, sizes 4 and 5.5 mm, held together. Pull out the needle size 5.5 mm and work with circular needle size 4 mm (doing this gives you an elastic cast-on edge). Purl 1 row from the wrong side. Work rib from the right side as follows: 1 edge stitch in GARTER STITCH – read description above, * purl 2, knit 1 *, work from *-* until there are 3 stitches left, purl 2, 1 edge stitch in garter stitch. When the rib measures 9 cm, fold the neck double to the inside. On the next row, knit from right side, at the same time work every 2nd stitch together with every 2nd stitch from the cast-on edge. Change to circular needle size 5.5 mm. Insert 1 marker inside the 1 edge stitch; the yoke is measured from this marker! YOKE: Purl 1 row from the wrong side and increase 13-14-16-9-10-13 stitches evenly spaced = 92-96-104-100-104-110 stitches. Insert 4 markers (without working the stitches) as follows: Count 15-16-18-17-18-19 stitches (front piece), insert 1 marker in the next stitch, count 14 stitches (sleeve), insert 1 marker in the next stitch, count 30-32-36-34-36-40 stitches (back piece), insert 1 marker in the next stitch, count 14 stitches (sleeve), insert 1 marker in the next stitch, there are 15-16-18-17-18-19 stitches after the last marker-stitch (front piece). Continue with stocking stitch and 1 edge stitch in garter stitch on each side. On the next row from the right side increase 1 stitch on each side of each marker-stitch – read RAGLAN above. Increase like this, each row from the right side, a total of 17-19-20-24-26-27 times = 228-248-264-292-312-326 stitches. REMEMBER THE KNITTING TENSION! Continue with stocking stitch and 1 edge stitch in garter stitch on each side until the yoke measures 20-22-24-25-27-29 cm. Now divide for the body and sleeves as follows: Work 34-37-39-43-47-49 stitches, place the next 46-50-54-60-62-64 stitches on a thread for the sleeve, cast on 8-8-10-10-12-12 stitches under the sleeve, work 68-74-78-86-94-99 stitches, place the next 46-50-54-60-62-64 stitches on a thread for the sleeve, cast on 8-8-10-10-12-12 stitches under the sleeve, work the last 34-37-39-43-47-50 stitches. BODY: = 152-164-176-192-212-222 stitches. Continue with stocking stitch and 1 edge stitch in garter stitch on each side for a further 24-24-24-25-25-25 cm. Now increase 14-14-17-19-20-22 stitches evenly on the next row from the right side = 166-178-193-211-232-244 stitches. Change to circular needle size 4 mm. Work rib from the wrong side as follows: 1 edge stitch in garter stitch, * knit 2, purl 1 *, work from *-* until there are 3 stitches left, knit 2 and 1 edge stitch in garter stitch. Continue this rib for 4 cm. Cast off. The jacket measures approx. 52-54-56-58-60-62 cm, from the shoulder down. SLEEVES: Place the 46-50-54-60-62-64 stitches from the thread on the one side of the piece on double pointed needles size 5.5 mm and knit up 1 stitch in each of the 8-8-10-10-12-12 stitches cast on under the sleeve = 54-58-64-70-74-76 stitches. Insert a marker in the middle of the new stitches under the sleeve. Work stocking stitch in the round for 2 cm. Now decrease 2 stitches under the sleeve – read DECREASE TIP. Decrease like this every 4½-4-3-2-2-1½ cm a total of 7-8-10-13-14-14 times = 40-42-44-44-46-48 stitches. When the sleeve measures 34-33-31-31-29-28 cm from the division, increase 5-6-7-7-5-6 stitches evenly spaced = 45-48-51-51-51-54 stitches. Change to double pointed needles size 4 mm and work rib (purl 2, knit 1) for 8 cm. Cast off. The sleeve measures approx. 42-41-39-39-37-36 cm from the division. Work the other sleeve in the same way. RIGHT BAND: The band is worked bottom up. Wind out a 90 to 120 cm yarn-end and use it to knit up stitches along the front piece (this means you can continue working without cutting the strand afterwards): Start at the bottom and knit up 1 stitch in each row, inside the 1 edge stitch, with circular needle size 5 mm and DROPS Air. Work from the end of the needle, where the wool-ball is = bottom of the front piece. Cast on 12 stitches from the wrong side, extending the band outwards. Work back and forth over these 12 stitches and work the band together with the front piece as follows: ROW 1 (right side): Slip the first stitch onto the right needle as if to purl, keeping the strand at the front, * knit 1, slip 1 stitch onto the right needle as if to purl, keeping the strand in front *, work from *-* until there is 1 stitch left on the band, slip the last stitch onto the right needle as if to knit, keeping the strand at the back, knit the next stitch and pass the slipped stitch over the knitted stitch, turn. ROW 2 (wrong side): * Slip the first/next stitch onto the right needle as if to purl, keeping the strand in front, knit 1 *, work from *-* over all 12 band-stitches, turn. Repeat rows 1 and 2. Remember the BUTTONHOLES – read description above. When all the stitches on the front piece are worked together with the band, knit all stitches together 2 and 2, then cast off. LEFT BAND: The band is worked bottom up. Start at the top and knit up 1 stitch down the front piece in each row, working inside the 1 edge stitch, with circular needle size 5 mm and DROPS Air. Cast on 12 stitches at the bottom, extending the band outwards. Work back and forth over these 12 stitches and work the band together with the front piece as follows: ROW 1 (wrong side): Knit 1, * slip 1 stitch onto the right needle as if to purl, keeping the strand in front, knit 1 *, work from *-* until there is 1 stitch left on the band, slip the next 2 stitches onto the right needle as if to purl together, keeping the strand in front, turn. ROW 2 (right side): Knit 2 together, * slip 1 stitch onto the right needle as if to purl, keeping the strand in front, knit 1 *, work from *-* until there is 1 stitch left, slip the last stitch onto the right needle as if to purl, keeping the strand in front, turn. Repeat rows 1 and 2. When all the stitches on the front piece are worked together with the band, work together as follows from the right side: Slip 1 stitch onto the right needle as if to knit, knit 1, pass the slipped stitch over, cast off. ASSEMBLY: Sew the buttons onto the left band. |
|

|
|
Have you finished this pattern?Tag your pictures with #dropspattern #foggyautumncardigan or submit them to the #dropsfan gallery. Do you need help with this pattern?You'll find 35 tutorial videos, a Comments/Questions area and more by visiting the pattern on garnstudio.com. © 1982-2025 DROPS Design A/S. We reserve all rights. This document, including all its sub-sections, has copyrights. Read more about what you can do with our patterns at the bottom of each pattern on our site. |
|


With over 40 years in knitting and crochet design, DROPS Design offers one of the most extensive collections of free patterns on the internet - translated to 17 languages. As of today we count 314 catalogues and 11821 patterns translated into English (UK/cm). 11821
We work hard to bring you the best knitting and crochet have to offer, inspiration and advice as well as great quality yarns at incredible prices! Would you like to use our patterns for other than personal use? You can read what you are allowed to do in the Copyright text at the bottom of all our patterns. Happy crafting!
Post a comment to pattern DROPS 236-33
We would love to hear what you have to say about this pattern!
If you want to leave a question, please make sure you select the correct category in the form below, to speed up the answering process. Required fields are marked *.