
Popular categories
Looking for a yarn?


Comments / Questions (97)
![]() Andrea wrote:
Andrea wrote:
Guten Tag, ich habe die Jacke mit Airy von Lana Grossa gestrickt, ähnlich von der Beschaffenheit wie DROPS Air, ein Lieblingsstück. Die Jacke hat zu Anfang wunderbar gepasst, hat sich aber nach mehrmaligem Tragen am Hals sehr geweitet. Nun traue ich mich nicht , das Bündchen abzutrennen und neu anzu- stricken, da ja von oben nach unten gearbeitet. Welche Möglichkeiten gibt es sonst noch ? Vielen Dank für eine Antwort Andrea
13.03.2025 - 16:19DROPS Design answered:
Liebe Andrea, vielleicht können Sie diese Technik versuchen? Viel Spaß beim Stricken!
14.03.2025 - 07:12
![]() Astrid wrote:
Astrid wrote:
Ik heb het aantal steken van het lijf vergeleken van dit vest vergeleken met die van de trui en snap niet dat het aantal steken hetzelfde is. Bij het vest komt dan nog de bies voor de knopen en dat zou betekenen dat het vest uiteindelijk breder is dan de trui. Klopt dat?
01.03.2025 - 15:05DROPS Design answered:
Dag Astrid,
Het vest wordt dan inderdaad ietsje breder door de bies.
02.03.2025 - 10:07
![]() Mia Ehrengren wrote:
Mia Ehrengren wrote:
Jag stickar storlek xl, på oket står att jag ska öka 9 maskor jämnt fördelat, färre maskor än vad ex storlek L gör. Totala antalet maskor i XL är också mindre än storlek L, stämmer det?
21.02.2025 - 15:42DROPS Design answered:
Hei Mia. Det er bare i begynnelsen på bærestykket. Når du er ferdig med raglanøkningene har str. XL 292 masker, men str. L har 264 masker og str. XXL har 312 masker. mvh DROPS Design
24.02.2025 - 11:51
![]() Julie Dreger wrote:
Julie Dreger wrote:
I’m having trouble understanding how to knit the bands. i picked up the stitches on the side of the cardigan and now i need to add 12 stitches on the bottom on the wrong side but not sure how to do that . also is there a video on knitting those 12 stitches? i don’t understand how to slip a stitch purl wise with yarn left in front then knit?
21.02.2025 - 04:54
![]() Katja Van Berkel wrote:
Katja Van Berkel wrote:
Hallo, Ik heb mijn vest bijna klaar, maar snap helemaal niets van de tekst bij de biezen. Is er misschien een filmpje? Of betere uitleg? Hartelijk groet
04.02.2025 - 11:29DROPS Design answered:
Dag Katja,
Bij de lijst van video's (bovenaan naast de foto is een link naar de video's) die bij het patroon staan, staat ook een video over hoe je een dubbele bies maakt. Hopelijk helpt dit je verder.
05.02.2025 - 19:58
![]() Julie wrote:
Julie wrote:
Super modèle, facile à exécuter
31.01.2025 - 13:14
![]() Karin Stillerud wrote:
Karin Stillerud wrote:
Jag har stickat denna i kombinationen Kid silk och Merino extra fine. Har blocjat genom att blöta koftan en kort stund, rullat in i handuk och tryckt ut vattnet. La in i tvättpåse och centrifugerade. La sedan plant och torkade. Den har blivit uttänjd och alltför stor. Vad kan jag göra för att få den tillbaja i rätt form?
30.01.2025 - 19:27DROPS Design answered:
Hej Karin, Du skal undgå at trække i maskerne. Det som trækker mest i maskerne er når du ruller den ind i handuken. Låt den centrifugera direkt og læg den til tørre plant i de rigtige mått.
12.02.2025 - 07:43
![]() Lara wrote:
Lara wrote:
Scusate, sono una principiante, vorrei capire come unire i due lembi del collo per farlo doppio. Grazie mille.
17.01.2025 - 23:05DROPS Design answered:
Buonasera Lara, deve lavorare le maglie del collo insieme alle maglie del bordo di avvio, 1 maglia sì e 1 no. Buon lavoro!
19.01.2025 - 15:09
![]() Hannah Göthberg wrote:
Hannah Göthberg wrote:
RÄTSTICKNING (stickas fram och tillbaka): Alla varv stickas räta. Betyder det att jag stickar räta på rätsidan och avigt på avigsidan? Stickar jag räta även på avigsidan blir det ju typ randigt? Jag fick ett svar av er som jag inte förstod överhuvudtaget.
07.01.2025 - 17:52DROPS Design answered:
Hej Hannah. Det betyder att du ska sticka räta maskor på rätsidan och räta maskor på avigsidan (det kommer se randigt ut). Det är bara kantmaskan som stickas på detta sätt (se i beskrivningen), resten av tröjan stickas i slätstickning och resår. Mvh DROPS Design
09.01.2025 - 14:49
![]() Hannah Göthberg wrote:
Hannah Göthberg wrote:
RÄTSTICKNING (stickas fram och tillbaka): Alla varv stickas räta. Betyder det att jag stickar räta på rätsidan och avigt på avigsidan? Stickar jag räta även på avigsidan blir det ju typ randigt?
06.01.2025 - 00:02DROPS Design answered:
Hei Hannah. Det betyr at du skal strikke rett fra rätsidan og rett fra avigsidan. Men husk, det er kun den ene kantmasken i hver side som skal strikkes slik. mvh DROPS Design
07.01.2025 - 15:51
|
|
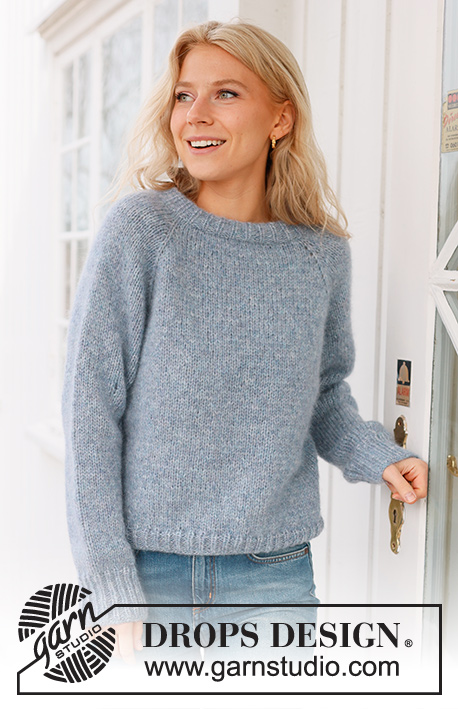
Foggy Autumn Cardigan#foggyautumncardigan |
|
 |
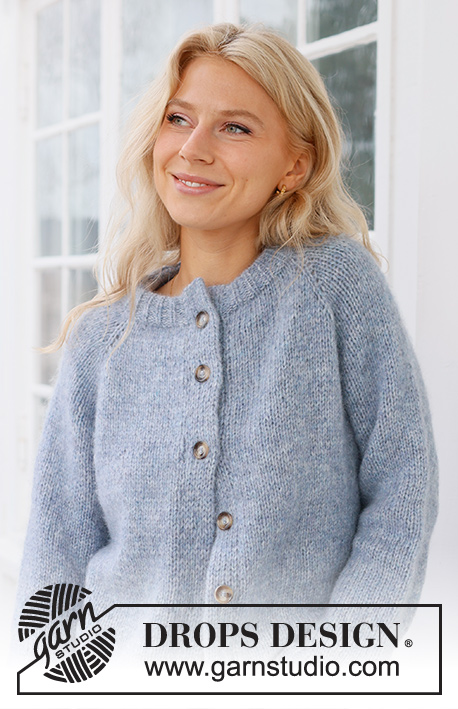 |
Knitted jacket in DROPS Air. The piece is worked top down, with raglan and double bands. Sizes S - XXXL.
DROPS 236-33 |
|
|
------------------------------------------------------- EXPLANATIONS FOR THE PATTERN: ------------------------------------------------------- RIDGE/GARTER STITCH (worked back and forth): Knit all rows. 1 ridge = knit 2 rows. RAGLAN: All increases are worked from the right side! Increase to raglan on each side of each marker-stitch as follows: Work to the marker-stitch, 1 yarn over, knit the marker-stitch, 1 yarn over (= 8 stitches increased). On the next row (wrong side) work the yarn overs as follows: BEFORE marker-stitch: Purl the yarn over twisted. AFTER marker-stitch: Slip the yarn over onto the right needle as if to knit, place it back onto the left needle the other way round (twisted), purl the yarn over. DECREASE TIP (sleeves): Decrease 1 stitch on either side of the marker as follows: Work until there are 3 stitches left before the marker, knit 2 together, knit 2 (marker sits between these 2 stitches), slip 1 stitch as if to knit, knit 1 and pass the slipped stitch over the knitted stitch (2 stitches decreased). BUTTONHOLES: The buttonholes are worked on the right band: Work the first 6 stitches, turn and work the same stitches back, turn and work these 6 stitches again. Cut the strand. Work 4 rows over the remaining 6 band stitches (first row from the right side) and knit together the last stitch from the right side and the stitch on the edge of the jacket. On the last row from the right side work all the band stitches as before. Work the buttonholes when the band measures: S: 4, 13, 22, 31, 40 and 48 cm. M: 4, 14, 23, 33, 41 and 50 cm. L: 4, 14, 24, 34, 43 and 52 cm. XL: 6, 16, 26, 36, 45 and 54 cm. XXL: 4, 13, 22, 31, 40, 48 and 56 cm. XXXL: 5, 14, 23, 32, 41, 50 and 58 cm. ------------------------------------------------------- START THE PIECE HERE: ------------------------------------------------------- JACKET – SHORT OVERVIEW OF THE PIECE. The neck and yoke are worked back and forth with circular needle, top down. The yoke is divided for body and sleeves and the body continued back and forth with circular needle. The sleeves are worked in the round with double pointed needles. DOUBLE NECK: Cast on 79-82-88-91-94-97 stitches with DROPS Air using 2 circular needles, sizes 4 and 5.5 mm, held together. Pull out the needle size 5.5 mm and work with circular needle size 4 mm (doing this gives you an elastic cast-on edge). Purl 1 row from the wrong side. Work rib from the right side as follows: 1 edge stitch in GARTER STITCH – read description above, * purl 2, knit 1 *, work from *-* until there are 3 stitches left, purl 2, 1 edge stitch in garter stitch. When the rib measures 9 cm, fold the neck double to the inside. On the next row, knit from right side, at the same time work every 2nd stitch together with every 2nd stitch from the cast-on edge. Change to circular needle size 5.5 mm. Insert 1 marker inside the 1 edge stitch; the yoke is measured from this marker! YOKE: Purl 1 row from the wrong side and increase 13-14-16-9-10-13 stitches evenly spaced = 92-96-104-100-104-110 stitches. Insert 4 markers (without working the stitches) as follows: Count 15-16-18-17-18-19 stitches (front piece), insert 1 marker in the next stitch, count 14 stitches (sleeve), insert 1 marker in the next stitch, count 30-32-36-34-36-40 stitches (back piece), insert 1 marker in the next stitch, count 14 stitches (sleeve), insert 1 marker in the next stitch, there are 15-16-18-17-18-19 stitches after the last marker-stitch (front piece). Continue with stocking stitch and 1 edge stitch in garter stitch on each side. On the next row from the right side increase 1 stitch on each side of each marker-stitch – read RAGLAN above. Increase like this, each row from the right side, a total of 17-19-20-24-26-27 times = 228-248-264-292-312-326 stitches. REMEMBER THE KNITTING TENSION! Continue with stocking stitch and 1 edge stitch in garter stitch on each side until the yoke measures 20-22-24-25-27-29 cm. Now divide for the body and sleeves as follows: Work 34-37-39-43-47-49 stitches, place the next 46-50-54-60-62-64 stitches on a thread for the sleeve, cast on 8-8-10-10-12-12 stitches under the sleeve, work 68-74-78-86-94-99 stitches, place the next 46-50-54-60-62-64 stitches on a thread for the sleeve, cast on 8-8-10-10-12-12 stitches under the sleeve, work the last 34-37-39-43-47-50 stitches. BODY: = 152-164-176-192-212-222 stitches. Continue with stocking stitch and 1 edge stitch in garter stitch on each side for a further 24-24-24-25-25-25 cm. Now increase 14-14-17-19-20-22 stitches evenly on the next row from the right side = 166-178-193-211-232-244 stitches. Change to circular needle size 4 mm. Work rib from the wrong side as follows: 1 edge stitch in garter stitch, * knit 2, purl 1 *, work from *-* until there are 3 stitches left, knit 2 and 1 edge stitch in garter stitch. Continue this rib for 4 cm. Cast off. The jacket measures approx. 52-54-56-58-60-62 cm, from the shoulder down. SLEEVES: Place the 46-50-54-60-62-64 stitches from the thread on the one side of the piece on double pointed needles size 5.5 mm and knit up 1 stitch in each of the 8-8-10-10-12-12 stitches cast on under the sleeve = 54-58-64-70-74-76 stitches. Insert a marker in the middle of the new stitches under the sleeve. Work stocking stitch in the round for 2 cm. Now decrease 2 stitches under the sleeve – read DECREASE TIP. Decrease like this every 4½-4-3-2-2-1½ cm a total of 7-8-10-13-14-14 times = 40-42-44-44-46-48 stitches. When the sleeve measures 34-33-31-31-29-28 cm from the division, increase 5-6-7-7-5-6 stitches evenly spaced = 45-48-51-51-51-54 stitches. Change to double pointed needles size 4 mm and work rib (purl 2, knit 1) for 8 cm. Cast off. The sleeve measures approx. 42-41-39-39-37-36 cm from the division. Work the other sleeve in the same way. RIGHT BAND: The band is worked bottom up. Wind out a 90 to 120 cm yarn-end and use it to knit up stitches along the front piece (this means you can continue working without cutting the strand afterwards): Start at the bottom and knit up 1 stitch in each row, inside the 1 edge stitch, with circular needle size 5 mm and DROPS Air. Work from the end of the needle, where the wool-ball is = bottom of the front piece. Cast on 12 stitches from the wrong side, extending the band outwards. Work back and forth over these 12 stitches and work the band together with the front piece as follows: ROW 1 (right side): Slip the first stitch onto the right needle as if to purl, keeping the strand at the front, * knit 1, slip 1 stitch onto the right needle as if to purl, keeping the strand in front *, work from *-* until there is 1 stitch left on the band, slip the last stitch onto the right needle as if to knit, keeping the strand at the back, knit the next stitch and pass the slipped stitch over the knitted stitch, turn. ROW 2 (wrong side): * Slip the first/next stitch onto the right needle as if to purl, keeping the strand in front, knit 1 *, work from *-* over all 12 band-stitches, turn. Repeat rows 1 and 2. Remember the BUTTONHOLES – read description above. When all the stitches on the front piece are worked together with the band, knit all stitches together 2 and 2, then cast off. LEFT BAND: The band is worked bottom up. Start at the top and knit up 1 stitch down the front piece in each row, working inside the 1 edge stitch, with circular needle size 5 mm and DROPS Air. Cast on 12 stitches at the bottom, extending the band outwards. Work back and forth over these 12 stitches and work the band together with the front piece as follows: ROW 1 (wrong side): Knit 1, * slip 1 stitch onto the right needle as if to purl, keeping the strand in front, knit 1 *, work from *-* until there is 1 stitch left on the band, slip the next 2 stitches onto the right needle as if to purl together, keeping the strand in front, turn. ROW 2 (right side): Knit 2 together, * slip 1 stitch onto the right needle as if to purl, keeping the strand in front, knit 1 *, work from *-* until there is 1 stitch left, slip the last stitch onto the right needle as if to purl, keeping the strand in front, turn. Repeat rows 1 and 2. When all the stitches on the front piece are worked together with the band, work together as follows from the right side: Slip 1 stitch onto the right needle as if to knit, knit 1, pass the slipped stitch over, cast off. ASSEMBLY: Sew the buttons onto the left band. |
|

|
|
Have you finished this pattern?Tag your pictures with #dropspattern #foggyautumncardigan or submit them to the #dropsfan gallery. Do you need help with this pattern?You'll find 35 tutorial videos, a Comments/Questions area and more by visiting the pattern on garnstudio.com. © 1982-2025 DROPS Design A/S. We reserve all rights. This document, including all its sub-sections, has copyrights. Read more about what you can do with our patterns at the bottom of each pattern on our site. |
|


With over 40 years in knitting and crochet design, DROPS Design offers one of the most extensive collections of free patterns on the internet - translated to 17 languages. As of today we count 314 catalogues and 11821 patterns translated into English (UK/cm). 11821
We work hard to bring you the best knitting and crochet have to offer, inspiration and advice as well as great quality yarns at incredible prices! Would you like to use our patterns for other than personal use? You can read what you are allowed to do in the Copyright text at the bottom of all our patterns. Happy crafting!
Post a comment to pattern DROPS 236-33
We would love to hear what you have to say about this pattern!
If you want to leave a question, please make sure you select the correct category in the form below, to speed up the answering process. Required fields are marked *.