
Popular categories
Looking for a yarn?


Comments / Questions (16)
![]() Andriana Papantoniou wrote:
Andriana Papantoniou wrote:
I need help! I am working this pattern size 11/12. For the sleeve, I have the initial 18sts of saddle shoulder. Plus 8sts + 8sts from saddle shoulder increases. Plus 5sts + 5sts from body-sleeve increases. Totaly 44sts. How can I place 52sts on thread for the sleeve? And the body separated sts are more than supposed! Do we give all the increased sts from yoke increases to the sleeve? Thank you for support in advance. Andriana.0
10.11.2024 - 19:01DROPS Design answered:
Dear Andriana, at the yoke increases you move the markers so the previous stitches increased for the sleeves and the saddle shoulders are now included in the body sections. Even though you have 44 stitches for each sleeve after the increases, you still take some of the body stitches from the previous sleeve increases to get to 52, to obtain the desired shaping. When dividing the piece for body and sleeves you can ignore the new marker placings, since they have been displaced from the original sleeve/body transitions and were only necessary for the yoke increases. Happy knitting!
10.11.2024 - 23:05
![]() Marianna Sheehan wrote:
Marianna Sheehan wrote:
Yoke Increases - I placing the 4 markers at the outermost stitch of the front and the back with 34 stitches for the sleeve. Since there is a left and a right front as well as a back I need to place 6 markers to have markers at the outermost stitch of the front and the back. I have looked at your referenced video but that does not tell me where to place my markers. If I leave my markers where they are as I finish the sleeve increases they all appear to be in the proper place. What am I missin
01.11.2024 - 03:32DROPS Design answered:
Dear Mrs Sheehan, you just need 4 markers, place the first marker in the last stitch on left front piece, the 2nd marker in the first stitch on back piece (there should be 34 sts for the left sleeve between both stitches with each a marker); then insert the 3rd marker in the last stitch on back piece and the 4th marker in the first stitch of front piece (there should be 34 sts for right sleeve between both stitches with each a marker). Happy knitting!
01.11.2024 - 09:54
![]() Anette Törnkvist wrote:
Anette Törnkvist wrote:
Jag förstår inte okökningen på tiny cloud cardigan hur jag ska flytta markörerna
18.10.2024 - 12:31DROPS Design answered:
Hei Anette. Ta en titt på hjelpevideoene (Hur man ökar maskor till ärmarna på sadelaxel & Hur man ökar till oket på ett plagg med sadelaxel), hvordan man strikker en sadelskulder og hvordan man flytter markørene. Du finner vidoene ved å klikke på Videor til høyre eller under bildet. mvh DROPS Design
23.10.2024 - 09:08
![]() Marianna Sheehan wrote:
Marianna Sheehan wrote:
I’m sorry to ask again but when do I knit and purl as it states in the instructions for the double neck.? You have explained I should knit the double neck in a garter stitch to create a ridge. I can’t do both and the picture shows knit and purl for the neck. I’m totally lost/confused. Thanks
16.07.2024 - 01:30DROPS Design answered:
Hi Marianna, only edge stitches (first and last stitch in each row) are worked in garter stitch (knit in all rows), all the remaining stitches are worked in simple rib - knit 1, purl 1. See the photo. Happy knitting!
16.07.2024 - 09:54
![]() Tove wrote:
Tove wrote:
Hej, jag får inte ihop hur ärmen bara ska bestå av 34 maskor efter ärmökningen då plagget ska bestå av 34 maskor. Verkar vara något fel i maskantalet som anges i beskrivningen under okökning. ”Det är nu 34-34-32-32-34-34 maskor mellan maskorna med markör i på varje ärm.”
15.07.2024 - 22:30DROPS Design answered:
Hej Tove. Innan du börjar sticka där det står OKÖKNING så har du 193 maskor totalt (i minsta storleken). Du flyttar sedan markörerna så att du har 34 maskor på varje ärm mellan markörerna. Vi har flera videor som visar sadelaxel som nog kan vara till hjälp, du hittar de på video-sidan genom att söka på sadelaxel. Mvh DROPS design
17.07.2024 - 12:58
![]() Marianna Sheehan wrote:
Marianna Sheehan wrote:
One row in and I’m already lost. The neck edge refers me to,the ridge/garter stitch reference which says to knit all rows. The double neck says knit purl which appears on the sweater. I assume when I go to the wrong side it then is knit purl? Do I just do one knit at the start of each row to create the ridge? Isn’t the ridge just a knit stitch, or am I missing something. Help. Anxious to start this.
13.07.2024 - 00:51DROPS Design answered:
Dear Marianna, after you knitted the first row (with purl stitches), you should knit the edge stitches on both side with garter stitch: Happy Stitching!
16.07.2024 - 00:50
![]() Sandra Clements wrote:
Sandra Clements wrote:
Hi, the markers numbered 1-4 on the knit side , do I reverse on the purl side and start with marker 4-1? Thank you
24.05.2024 - 03:28DROPS Design answered:
Hi Sandra, Yes, any increases by the markers from the wrong side are worked from marker 4 and back to marker 1. Happy knitting!
24.05.2024 - 06:33
![]() Margit wrote:
Margit wrote:
Püüan teha kõige suuremat varianti ja paraku ei tule silmuste arvutamine välja. Loon 99 silmust (ei lisa juurde 10 silmust, sest saan aru, et need on juba 99 silmuse sisse arvestatud?). Kasvatan 22 silmust ja kokku on 121 silmust. Passe jaoks pean jagama silmused 24+18+37+18+30, aga see on kokku 127 silmust. Kust need 6 silmust juurde tulid? Kui ma looks alguses 99 silmust + nööpaugu 10 silmust, siis ei tule ka 127 silmust vaid 131 silmust. Kas siin on viga?
03.07.2023 - 15:29DROPS Design answered:
Tere Margit! Mõlemal hõlmal peab olema ühepalju silmuseid. Viga parandatud, tänan teatamast! Alati võib kontrollida numbrite õigust norrakeelsest originaaljuhendist. Head kudumist!
29.07.2023 - 21:34
![]() Annika wrote:
Annika wrote:
Vad blir skillnaden om alla sadelökningar görs från rätsidan? Inga ökningar på det aviga varvet alltså. Mycket enklare och vad jag kan se blir det samma resultat?
28.04.2023 - 20:07DROPS Design answered:
Hei Annika. Det skal økes på hver pinne og da må det økes både fra retten og fra vrangen. Økes det bare fra retten, økes det bare på hver 2. pinne og du får for få masker. mvh DROPS Design
02.05.2023 - 10:01
![]() Wendy Burt wrote:
Wendy Burt wrote:
In yoke increases I don’t understand where I place markers
24.04.2022 - 21:56DROPS Design answered:
Dear Wendy, the following video may help you understand how to place the markers: https://www.garnstudio.com/video.php?id=1581&lang=en Happy knitting!
24.04.2022 - 22:38
|
|||||||||||||
Tiny Cloud Cardigan#tinycloudcardigan |
|||||||||||||
 |
 |
||||||||||||
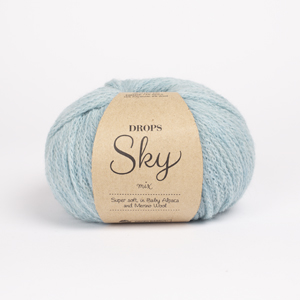
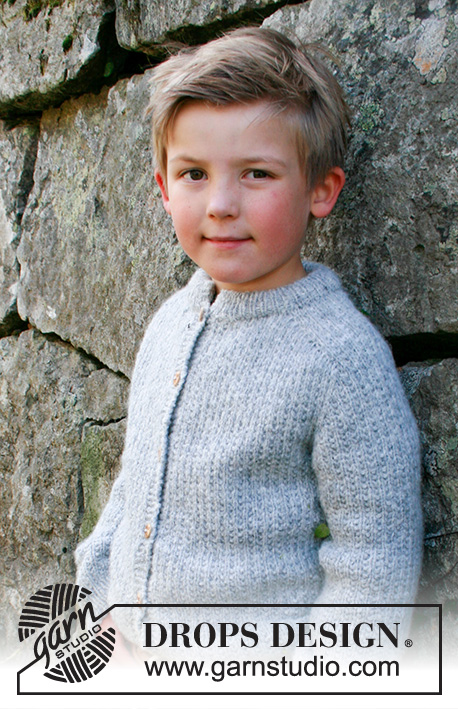
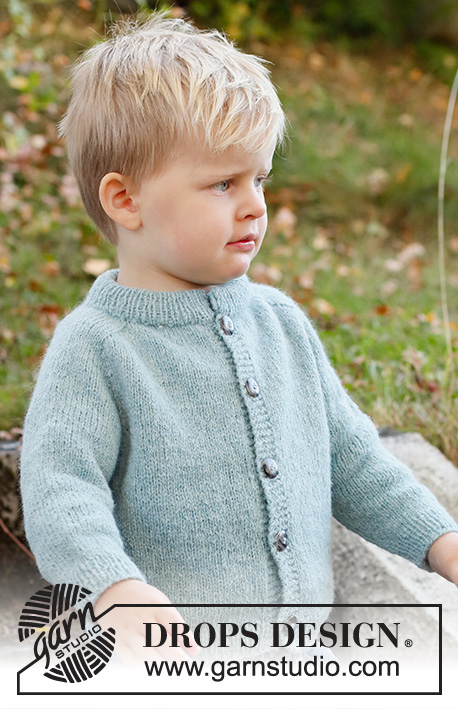
Knitted jacket for children in DROPS Sky. The piece is worked top down with double neck and saddle shoulders. Sizes 3 – 14 years.
DROPS Children 40-13 |
|||||||||||||
|
------------------------------------------------------- EXPLANATIONS FOR THE PATTERN: ------------------------------------------------------- RIDGE/GARTER STITCH (worked back and forth): Knit all rows. 1 ridge in height = Knit 2 rows. INCREASE TIP-1 (evenly spaced): To work out how to increase evenly, count the total number of stitches on the needle (e.g. 87 stitches) minus bands (e.g. 10 stitches) and divide the remaining stitches by the number of increases to be made (e.g. 18) = 4.3. In this example, increase by making 1 yarn over after approx. each 4th stitch. Do not increase on bands. On the next row work the yarn overs twisted to avoid holes. INCREASE TIP-2 (for saddle shoulders, sleeves and yoke from the RIGHT SIDE): BEFORE MARKER: The new stitch twists to the right. Use the left needle to pick up the strand between 2 stitches from the previous row, pick up the back strand and knit in the front loop. AFTER MARKER: The new stitch twists to the left. Use the left needle to pick up the strand between 2 stitches from the previous row, pick up the front strand and knit in the back loop. INCREASE TIP-3 (for saddle shoulders from the WRONG SIDE): BEFORE MARKER: The new stitch twists to the right. Use the left needle to pick up the strand between 2 stitches from the previous row, pick up the front strand and purl in the back loop. AFTER MARKER: The new stitch twists to the left. Use the left needle to pick up the strand between 2 stitches from the previous row, pick up the back strand and purl in the front loop. DECREASE TIP (for sleeves): Start 3 stitches before the marker thread, knit 2 together, knit 2 (marker thread sits between these 2 stitches), slip 1 stitch as if to knit, knit 1 and pass the slipped stitch over the knitted stitch (2 stitches decreased). BUTTONHOLES: Work buttonholes on the right band (when the garment is worn). Work from the right side when there are 3 stitches left on the row as follows: Make 1 yarn over, knit 2 together and knit 1. On the next row (wrong side), knit the yarn over to leave a hole. The first buttonhole is worked when the neck is finished (in the transition between the neck and the yoke). The other 4-5-5-6-6-6 buttonholes are worked with approx. 7-7-7½-7-7-7½ cm between each one. CASTING-OFF TIP: To avoid the cast-off edge being tight you can cast off with a larger size needle. If the edge is still tight, make 1 yarn over after approx. each 6th stitch at the same time as casting off; the yarn overs are cast off as normal stitches. ------------------------------------------------------- START THE PIECE HERE: ------------------------------------------------------- JACKET – SHORT OVERVIEW OF THE PIECE: The neck and yoke are worked back and forth with circular needle, from mid-front and top down. Stitches are increased for the saddle shoulders, then for the sleeves and finally for the yoke. The yoke is divided for the body and sleeves and the body continued back and forth. The sleeves are worked in the round with double pointed needles, top down. DOUBLE NECK: Cast on 87-89-91-93-95-99 stitches (including 5 band stitches on each side towards mid-front) with circular needle size 3 mm and Sky. Purl 1 row (= wrong side). The next row is worked as follows from the right side: 1 edge stitch in GARTER STITCH – READ DESCRIPTION ABOVE, * knit 1, purl 1 *, work from *-* until there are 2 stitches left, knit 1 and finish with 1 edge stitch in garter stitch. Continue this rib for 7 cm. When the rib is finished, knit 1 row from the right side where you increase 18-20-22-24-22-22 stitches evenly spaced – read INCREASE TIP-1 and remember the BUTTONHOLE on the right band – read description above = 105-109-113-117-117-121 stitches. The neck is later folded double and will measure approx. 3 cm. Purl 1 row from the wrong side (yarn overs purled twisted and the 5 outermost stitches on each side are knitted = bands). Continue the yoke as described below. YOKE: Change to circular needle size 4 mm. Insert 1 marker after the band at the beginning of the row. The yoke is measured from this marker! In addition insert 4 other markers, without working the stitches, as follows – each marker is inserted between 2 stitches, is used when increasing for the saddle shoulders and should have a different colour to the marker on the neck. Marker 1: Start mid-front, count 22-23-23-23-23-24 stitches (= front piece), insert the marker before the next stitch. Marker 2: Count 14-14-16-18-18-18 stitches from marker 1 (= shoulder), insert the marker before the next stitch. Marker 3: Count 33-35-35-35-35-37 stitches from marker 2 (= back piece), insert the marker before the next stitch. Marker 4: Count 14-14-16-18-18-18 stitches from marker 3 (= shoulder), insert the marker before the next stitch. There are 22-23-23-23-23-24 stitches left on the row after marker 4 (= front piece). Allow these 4 markers to follow your work onwards. SADDLE-SHOULDER INCREASES: Read the whole section before continuing! Work stocking stitch with 5 band stitches in garter stitch on each side towards mid-front. AT THE SAME TIME, on the first row from the right side, increase 4 stitches for the shoulders as follows: Increase BEFORE markers 1 and 3 and AFTER markers 2 and 4 – read INCREASE TIP-2. You are only increasing on the front and back pieces, the number of shoulder stitches remains the same. On the next row from the wrong side, increase 4 stitches for the shoulders as follows: Increase BEFORE markers 4 and 2 and AFTER markers 3 and 1 – read INCREASE TIP-3. You are now increasing EVERY row (differently on the right and wrong side so the stitches lie neatly). Increase like this every row (both from the right and wrong side) a total of 12-14-16-20-22-26 times = 153-165-177-197-205-225 stitches – the increased stitches are worked in stocking stitch. REMEMBER THE KNITTING TENSION! After the last increase the piece measures approx. 4-5-6-7-8-9 cm from the marker on the neck. Now increase for the sleeves as follows. SLEEVE INCREASES: Continue with stocking stitch and 5 band stitches in garter stitch on each side. AT THE SAME TIME on the next row from the right side, increase 4 stitches for the sleeves as follows: Increase AFTER markers 1 and 3 and BEFORE markers 2 and 4 – remember INCREASE TIP-2. You increase only on the sleeves and the number of stitches on the front and back pieces remains the same. The new stitches are worked in stocking stitch. Increase like this every 2nd row (each row from the right side) a total of 10-10-8-7-8-8 times = 193-205-209-225-237-257 stitches. The piece measures approx. 11-12-12-12-14-15 cm from the marker on the neck. Now increase for the yoke as described below. YOKE INCREASES: Move the 4 markers from the sleeve increases so that each of the 4 markers is placed in the outermost stitch on each side of front and back piece. There are now 34-34-32-32-34-34 stitches between stitches with a marker for each sleeve. On the next row from the right side increase 8 stitches, increasing both before and after all 4 marker-stitches – remember INCREASE TIP-2. You are now increasing on the front/back pieces and on the sleeves; the increased stitches are worked in stocking stitch. Increase like this every 2nd row a total of 5-5-6-5-5-4 times = 233-245-257-265-277-289 stitches When all the increases are finished, the piece measures approx. 15-16-16-16-17-18 cm from the marker on the neck. Continue working, without further increases, until the piece measures 15-16-16-17-18-19 cm from the marker on the neck. Now divide the yoke for the body and sleeves as follows: Work the first 38-40-42-44-46-48 stitches as before (front piece), place the next 46-48-50-50-52-54 stitches on 1 thread for the sleeve, cast on 6-6-6-8-8-8 new stitches (= in side under sleeve), work the next 65-69-73-77-81-85 stitches (= back piece), place the next 46-48-50-50-52-54 stitches on 1 thread for the sleeve, cast on 6-6-6-8-8-8 new stitches (= in side under sleeve), work the last 38-40-42-44-46-48 stitches (= front piece). The body and sleeves are finished separately. THE PIECE IS NOW MEASURED FROM HERE. BODY: = 153-161-169-181-189-197 stitches. Continue working stocking stitch back and forth, with 5 band stitches in garter stitch on each side until the piece measures 15-18-21-24-25-26 cm from the division. There is approx. 3 cm left to finished length; try the jacket on and work to desired length. Change to circular needle size 3 mm and work as follows from the right side: 5 band stitches in garter stitch, *knit 1, purl 1* until there are 6 stitches left on the row, knit 1 and finish with 5 band stitches in garter stitch. Work this rib for 3 cm. Cast off with garter stitch over garter stitch, knit over knit and purl over purl – read CASTING-OFF TIP! The jacket measures approx. 36-40-44-48-50-52 cm from the shoulder down. SLEEVES: Place the 46-48-50-50-52-54 stitches from the thread on the one side of the piece on double pointed needles size 4 mm and knit up 1 stitch in each of the 6-6-6-8-8-8 stitches cast on under the sleeve = 52-54-56-58-60-62 stitches. Insert a marker thread in the middle of the 6-6-6-8-8-8 new stitches under the sleeve. Start at the marker thread and work stocking stitch in the round. When the sleeve measures 2-2-3-3-3-3 cm from the division, decrease 2 stitches mid-under the sleeve – read DECREASE TIP. Decrease like this every 2½-2½-3-3-4-4 cm a total of 7-8-8-9-9-10 times = 38-38-40-40-42-42 stitches. Continue working without further decreases until the sleeve measures 21-25-30-34-38-43 cm from the division. There is approx. 3 cm left to finished length; try the jacket on and work to desired length. Change to double pointed needles size 3 mm and work rib (knit 1, purl 1) for 3 cm. Cast off with knit over knit and purl over purl – remember CASTING-OFF TIP! The sleeve measures approx. 24-28-33-37-41-45 cm from the division. Work the other sleeve in the same way. ASSEMBLY: Fold the neck double to the wrong side and sew down. To avoid the neck being tight and rolling outwards, it is important the seam is elastic. Sew together the openings at the top of the bands, with small stitches. Sew the buttons onto the left band. |
|||||||||||||
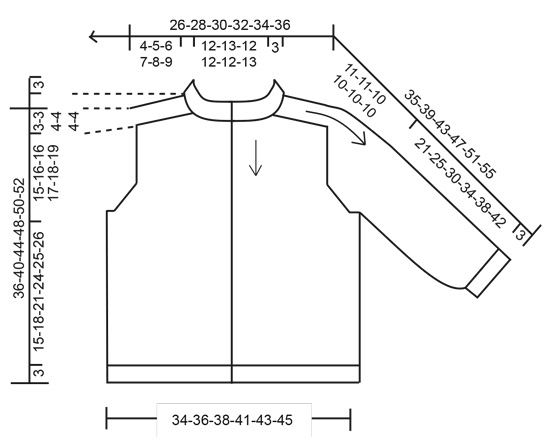
Diagram explanations |
|||||||||||||
|
|||||||||||||
|
|||||||||||||

|
|||||||||||||
Have you finished this pattern?Tag your pictures with #dropspattern #tinycloudcardigan or submit them to the #dropsfan gallery. Do you need help with this pattern?You'll find 34 tutorial videos, a Comments/Questions area and more by visiting the pattern on garnstudio.com. © 1982-2025 DROPS Design A/S. We reserve all rights. This document, including all its sub-sections, has copyrights. Read more about what you can do with our patterns at the bottom of each pattern on our site. |
|||||||||||||


With over 40 years in knitting and crochet design, DROPS Design offers one of the most extensive collections of free patterns on the internet - translated to 17 languages. As of today we count 314 catalogues and 11820 patterns translated into English (UK/cm). 11820
We work hard to bring you the best knitting and crochet have to offer, inspiration and advice as well as great quality yarns at incredible prices! Would you like to use our patterns for other than personal use? You can read what you are allowed to do in the Copyright text at the bottom of all our patterns. Happy crafting!
Post a comment to pattern DROPS Children 40-13
We would love to hear what you have to say about this pattern!
If you want to leave a question, please make sure you select the correct category in the form below, to speed up the answering process. Required fields are marked *.