
Popular categories
Looking for a yarn?


|
|||||||||||||
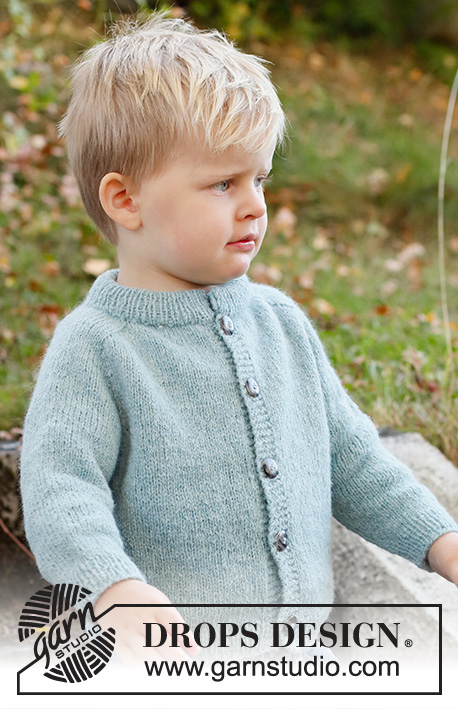
Tiny Cloud Cardigan |
|||||||||||||
 |
 |
||||||||||||
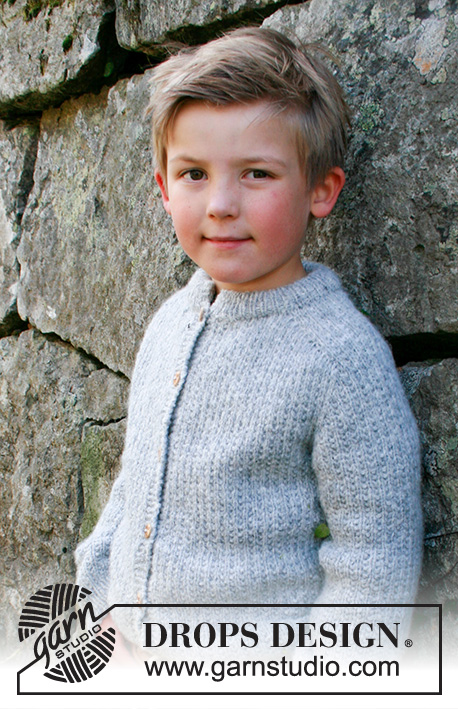
Knitted jacket for children in DROPS Sky. The piece is worked top down with double neck and saddle shoulders. Sizes 3 – 14 years.
DROPS Children 40-13 |
|||||||||||||
|
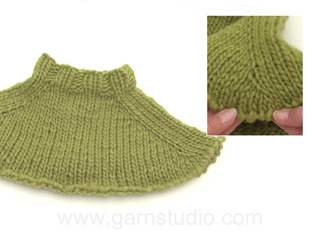
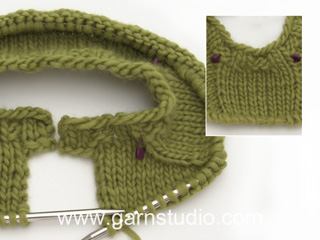
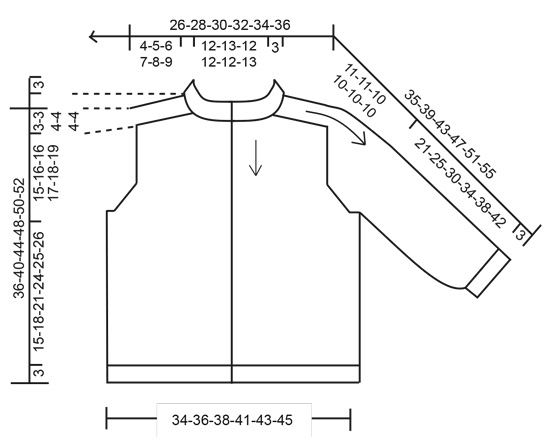
------------------------------------------------------- EXPLANATIONS FOR THE PATTERN: ------------------------------------------------------- RIDGE/GARTER STITCH (worked back and forth): Knit all rows. 1 ridge in height = Knit 2 rows. INCREASE TIP-1 (evenly spaced): To work out how to increase evenly, count the total number of stitches on the needle (e.g. 87 stitches) minus bands (e.g. 10 stitches) and divide the remaining stitches by the number of increases to be made (e.g. 18) = 4.3. In this example, increase by making 1 yarn over after approx. each 4th stitch. Do not increase on bands. On the next row work the yarn overs twisted to avoid holes. INCREASE TIP-2 (for saddle shoulders, sleeves and yoke from the RIGHT SIDE): BEFORE MARKER: The new stitch twists to the right. Use the left needle to pick up the strand between 2 stitches from the previous row, pick up the back strand and knit in the front loop. AFTER MARKER: The new stitch twists to the left. Use the left needle to pick up the strand between 2 stitches from the previous row, pick up the front strand and knit in the back loop. INCREASE TIP-3 (for saddle shoulders from the WRONG SIDE): BEFORE MARKER: The new stitch twists to the right. Use the left needle to pick up the strand between 2 stitches from the previous row, pick up the front strand and purl in the back loop. AFTER MARKER: The new stitch twists to the left. Use the left needle to pick up the strand between 2 stitches from the previous row, pick up the back strand and purl in the front loop. DECREASE TIP (for sleeves): Start 3 stitches before the marker thread, knit 2 together, knit 2 (marker thread sits between these 2 stitches), slip 1 stitch as if to knit, knit 1 and pass the slipped stitch over the knitted stitch (2 stitches decreased). BUTTONHOLES: Work buttonholes on the right band (when the garment is worn). Work from the right side when there are 3 stitches left on the row as follows: Make 1 yarn over, knit 2 together and knit 1. On the next row (wrong side), knit the yarn over to leave a hole. The first buttonhole is worked when the neck is finished (in the transition between the neck and the yoke). The other 4-5-5-6-6-6 buttonholes are worked with approx. 7-7-7½-7-7-7½ cm between each one. CASTING-OFF TIP: To avoid the cast-off edge being tight you can cast off with a larger size needle. If the edge is still tight, make 1 yarn over after approx. each 6th stitch at the same time as casting off; the yarn overs are cast off as normal stitches. ------------------------------------------------------- START THE PIECE HERE: ------------------------------------------------------- JACKET – SHORT OVERVIEW OF THE PIECE: The neck and yoke are worked back and forth with circular needle, from mid-front and top down. Stitches are increased for the saddle shoulders, then for the sleeves and finally for the yoke. The yoke is divided for the body and sleeves and the body continued back and forth. The sleeves are worked in the round with double pointed needles, top down. DOUBLE NECK: Cast on 87-89-91-93-95-99 stitches (including 5 band stitches on each side towards mid-front) with circular needle size 3 mm and Sky. Purl 1 row (= wrong side). The next row is worked as follows from the right side: 1 edge stitch in GARTER STITCH – READ DESCRIPTION ABOVE, * knit 1, purl 1 *, work from *-* until there are 2 stitches left, knit 1 and finish with 1 edge stitch in garter stitch. Continue this rib for 7 cm. When the rib is finished, knit 1 row from the right side where you increase 18-20-22-24-22-22 stitches evenly spaced – read INCREASE TIP-1 and remember the BUTTONHOLE on the right band – read description above = 105-109-113-117-117-121 stitches. The neck is later folded double and will measure approx. 3 cm. Purl 1 row from the wrong side (yarn overs purled twisted and the 5 outermost stitches on each side are knitted = bands). Continue the yoke as described below. YOKE: Change to circular needle size 4 mm. Insert 1 marker after the band at the beginning of the row. The yoke is measured from this marker! In addition insert 4 other markers, without working the stitches, as follows – each marker is inserted between 2 stitches, is used when increasing for the saddle shoulders and should have a different colour to the marker on the neck. Marker 1: Start mid-front, count 22-23-23-23-23-24 stitches (= front piece), insert the marker before the next stitch. Marker 2: Count 14-14-16-18-18-18 stitches from marker 1 (= shoulder), insert the marker before the next stitch. Marker 3: Count 33-35-35-35-35-37 stitches from marker 2 (= back piece), insert the marker before the next stitch. Marker 4: Count 14-14-16-18-18-18 stitches from marker 3 (= shoulder), insert the marker before the next stitch. There are 22-23-23-23-23-24 stitches left on the row after marker 4 (= front piece). Allow these 4 markers to follow your work onwards. SADDLE-SHOULDER INCREASES: Read the whole section before continuing! Work stocking stitch with 5 band stitches in garter stitch on each side towards mid-front. AT THE SAME TIME, on the first row from the right side, increase 4 stitches for the shoulders as follows: Increase BEFORE markers 1 and 3 and AFTER markers 2 and 4 – read INCREASE TIP-2. You are only increasing on the front and back pieces, the number of shoulder stitches remains the same. On the next row from the wrong side, increase 4 stitches for the shoulders as follows: Increase BEFORE markers 4 and 2 and AFTER markers 3 and 1 – read INCREASE TIP-3. You are now increasing EVERY row (differently on the right and wrong side so the stitches lie neatly). Increase like this every row (both from the right and wrong side) a total of 12-14-16-20-22-26 times = 153-165-177-197-205-225 stitches – the increased stitches are worked in stocking stitch. REMEMBER THE KNITTING TENSION! After the last increase the piece measures approx. 4-5-6-7-8-9 cm from the marker on the neck. Now increase for the sleeves as follows. SLEEVE INCREASES: Continue with stocking stitch and 5 band stitches in garter stitch on each side. AT THE SAME TIME on the next row from the right side, increase 4 stitches for the sleeves as follows: Increase AFTER markers 1 and 3 and BEFORE markers 2 and 4 – remember INCREASE TIP-2. You increase only on the sleeves and the number of stitches on the front and back pieces remains the same. The new stitches are worked in stocking stitch. Increase like this every 2nd row (each row from the right side) a total of 10-10-8-7-8-8 times = 193-205-209-225-237-257 stitches. The piece measures approx. 11-12-12-12-14-15 cm from the marker on the neck. Now increase for the yoke as described below. YOKE INCREASES: Move the 4 markers from the sleeve increases so that each of the 4 markers is placed in the outermost stitch on each side of front and back piece. There are now 34-34-32-32-34-34 stitches between stitches with a marker for each sleeve. On the next row from the right side increase 8 stitches, increasing both before and after all 4 marker-stitches – remember INCREASE TIP-2. You are now increasing on the front/back pieces and on the sleeves; the increased stitches are worked in stocking stitch. Increase like this every 2nd row a total of 5-5-6-5-5-4 times = 233-245-257-265-277-289 stitches When all the increases are finished, the piece measures approx. 15-16-16-16-17-18 cm from the marker on the neck. Continue working, without further increases, until the piece measures 15-16-16-17-18-19 cm from the marker on the neck. Now divide the yoke for the body and sleeves as follows: Work the first 38-40-42-44-46-48 stitches as before (front piece), place the next 46-48-50-50-52-54 stitches on 1 thread for the sleeve, cast on 6-6-6-8-8-8 new stitches (= in side under sleeve), work the next 65-69-73-77-81-85 stitches (= back piece), place the next 46-48-50-50-52-54 stitches on 1 thread for the sleeve, cast on 6-6-6-8-8-8 new stitches (= in side under sleeve), work the last 38-40-42-44-46-48 stitches (= front piece). The body and sleeves are finished separately. THE PIECE IS NOW MEASURED FROM HERE. BODY: = 153-161-169-181-189-197 stitches. Continue working stocking stitch back and forth, with 5 band stitches in garter stitch on each side until the piece measures 15-18-21-24-25-26 cm from the division. There is approx. 3 cm left to finished length; try the jacket on and work to desired length. Change to circular needle size 3 mm and work as follows from the right side: 5 band stitches in garter stitch, *knit 1, purl 1* until there are 6 stitches left on the row, knit 1 and finish with 5 band stitches in garter stitch. Work this rib for 3 cm. Cast off with garter stitch over garter stitch, knit over knit and purl over purl – read CASTING-OFF TIP! The jacket measures approx. 36-40-44-48-50-52 cm from the shoulder down. SLEEVES: Place the 46-48-50-50-52-54 stitches from the thread on the one side of the piece on double pointed needles size 4 mm and knit up 1 stitch in each of the 6-6-6-8-8-8 stitches cast on under the sleeve = 52-54-56-58-60-62 stitches. Insert a marker thread in the middle of the 6-6-6-8-8-8 new stitches under the sleeve. Start at the marker thread and work stocking stitch in the round. When the sleeve measures 2-2-3-3-3-3 cm from the division, decrease 2 stitches mid-under the sleeve – read DECREASE TIP. Decrease like this every 2½-2½-3-3-4-4 cm a total of 7-8-8-9-9-10 times = 38-38-40-40-42-42 stitches. Continue working without further decreases until the sleeve measures 21-25-30-34-38-43 cm from the division. There is approx. 3 cm left to finished length; try the jacket on and work to desired length. Change to double pointed needles size 3 mm and work rib (knit 1, purl 1) for 3 cm. Cast off with knit over knit and purl over purl – remember CASTING-OFF TIP! The sleeve measures approx. 24-28-33-37-41-45 cm from the division. Work the other sleeve in the same way. ASSEMBLY: Fold the neck double to the wrong side and sew down. To avoid the neck being tight and rolling outwards, it is important the seam is elastic. Sew together the openings at the top of the bands, with small stitches. Sew the buttons onto the left band. |
|||||||||||||
Diagram explanations |
|||||||||||||
|
|||||||||||||
|
|||||||||||||

|
|||||||||||||
|
Have you made this or any other of our designs? Tag your pictures in social media with #dropsdesign so we can see them! Do you need help with this pattern?You'll find tutorial videos, a Comments/Questions area and more by visiting the pattern on garnstudio.com. © 1982-2024 DROPS Design A/S. We reserve all rights. This document, including all its sub-sections, has copyrights. Read more about what you can do with our patterns at the bottom of each pattern on our site. |
|||||||||||||


With over 40 years in knitting and crochet design, DROPS Design offers one of the most extensive collections of free patterns on the internet - translated to 17 languages. As of today we count 304 catalogues and 11422 patterns - 11422 of which are translated into English (UK/cm).
We work hard to bring you the best knitting and crochet have to offer, inspiration and advice as well as great quality yarns at incredible prices! Would you like to use our patterns for other than personal use? You can read what you are allowed to do in the Copyright text at the bottom of all our patterns. Happy crafting!
Comments / Questions (9)
Püüan teha kõige suuremat varianti ja paraku ei tule silmuste arvutamine välja. Loon 99 silmust (ei lisa juurde 10 silmust, sest saan aru, et need on juba 99 silmuse sisse arvestatud?). Kasvatan 22 silmust ja kokku on 121 silmust. Passe jaoks pean jagama silmused 24+18+37+18+30, aga see on kokku 127 silmust. Kust need 6 silmust juurde tulid? Kui ma looks alguses 99 silmust + nööpaugu 10 silmust, siis ei tule ka 127 silmust vaid 131 silmust. Kas siin on viga?
03.07.2023 - 15:29DROPS Design answered:
Tere Margit! Mõlemal hõlmal peab olema ühepalju silmuseid. Viga parandatud, tänan teatamast! Alati võib kontrollida numbrite õigust norrakeelsest originaaljuhendist. Head kudumist!
29.07.2023 - 21:34Vad blir skillnaden om alla sadelökningar görs från rätsidan? Inga ökningar på det aviga varvet alltså. Mycket enklare och vad jag kan se blir det samma resultat?
28.04.2023 - 20:07DROPS Design answered:
Hei Annika. Det skal økes på hver pinne og da må det økes både fra retten og fra vrangen. Økes det bare fra retten, økes det bare på hver 2. pinne og du får for få masker. mvh DROPS Design
02.05.2023 - 10:01In yoke increases I don’t understand where I place markers
24.04.2022 - 21:56DROPS Design answered:
Dear Wendy, the following video may help you understand how to place the markers: https://www.garnstudio.com/video.php?id=1581&lang=en Happy knitting!
24.04.2022 - 22:38Stuck on yoke increase, I don’t understand where I’m to move markers. Thanks in advance for help.
24.04.2022 - 21:53DROPS Design answered:
Dear Wendy, please see answer above.
24.04.2022 - 22:38Kaarrokkeen lisäyksessä: miten nuo merkkien paikat muuttuvat? Nythän nuo merkit ovat hihan kohdassa.
23.04.2022 - 17:20Bonjour, Pour les épaules, il est marqué "Augmenter ainsi 12-14-16-20-22-26 fois au total tous les rangs" Au départ j'ai 14 mailles, et si j'augmente 14 fois (4 mailles endroit et 4 mailles envers) je ne peux pas avoir 34 mailles ... J'ai l'impression que je ne comprend pas les augmentations des épaules "Augmenter AVANT les marqueurs-1 et -3 et APRÈS les marqueurs 2 et 4 " "Au rang suivant sur l'envers, AVANT les marqueurs- 4 et 2 et APRÈS les marqueurs 3 et 1"
15.01.2022 - 11:38DROPS Design answered:
Bonjour Mme Forst, les augmentations pour les épaules/manches marteau augmentent le nombre de mailles des devants et du dos, pas celui des épaules/manches; autrement dit, vous augmentez (sur l'endroit) avant le marqueur-1 = devant gauche; après le marqueur -2 et avant le marqueur-3 = dos et après le marqueur-4 = devant droit; les mailles entre les marqueurs 1-2 et 3-3 sont les 14 m des épaules qui ne vont pas augmenter. Cette vidéo pourra peut-être vous aider à visualiser? Bon tricot!
17.01.2022 - 08:13Tengo que agregar 6 puntos en la manga, habrá una abertura sin coser?
14.01.2022 - 23:42DROPS Design answered:
Hola Fernanda, no tienes que montar puntos, sino que recoger puntos en los puntos del cuerpo montados bajo la manga. Por lo tanto, no quedará una abertura.
16.01.2022 - 21:31Bonjour, Je tricote le "Tiny Cloud Cardigan" taille 5/6 ans. Au paragraphe AUGMENTATIONS EMPIÈCEMENT: "Décaler les 4 marqueurs pour que chacun de ces 4 marqueurs soit dans la première et la dernière maille du devant/du dos. On a maintenant 34-34-32-32-34-34 mailles pour chaque manche entre les mailles avec les marqueurs." Question, ou dois je décaler les marqueurs, puisque à ce moment la j'ai 44 mailles pour chaque manche. Merci de votre aide Cordialement
14.01.2022 - 14:39DROPS Design answered:
Bonjour Mme Forst, vous n'êtes pas censée avoir autant de mailles, vous devriez en avoir seulement 34: les 14 mailles des épaules + les augmentations des manches (soit 2 x 5 mailles = 34 m au total). Vous placez ensuite les marqueurs: dans la dernière maille du devant gauche, dans la 1ère et la dernière maille du dos et dans la 1ère maille du devant droit. Bon tricot!
14.01.2022 - 16:49No modelo Tiny Cloud Cardigan, as 6 malhas colocadas na manga não precisa costurar, ficará uma abertura embaixo do braço?
13.01.2022 - 15:42