
Popularne kategorie
Szukasz włóczki?


Komentarze / Pytania (24)
![]() Conni Jørgensen napisała::
Conni Jørgensen napisała::
Hvorfor står der i opskriften “ der er rettelser- klink her” - men linket virker ikke.
02.08.2024 - 22:43Odpowiedź DROPS Design :
Hej Conni, Jo når du klikker på linket ser du at vi har skrevet at det er 1 kantmaske retstrik i hver side :)
06.08.2024 - 14:01
![]() Ruth napisała::
Ruth napisała::
Hallo, wenn ich den Rand kraus rechts stricke, rollt er sich ein. Was kann ich gegen das Einrollen tun? // Hi there, I am doing a garter stitch at the end of each row. The cardigan now rolls itself inwards at the end of each row. What can I do about it? Thanks, best, Ruth
09.12.2023 - 09:41Odpowiedź DROPS Design :
Liebe Ruth, danach werden Sie die Maschen für die Blende auffsassen, dann wird der Rand nicht mehr rollen. Viel Spaß beim stricken!
11.12.2023 - 10:02
![]() Jane Milton napisała::
Jane Milton napisała::
I'm knitting thin in the smallest size. After the yoke A1 pattern, and I have begun the body, the instructions say to knit 3cm then do the increases. Then it says to increase every 7cm three times. in my counting, this means that there would be 3+21 cm, a total of 24 cms. However, the instructions say to continue after the last increase until piece measures 19cm. I'm confused as that is a 5cm difference! Can you please clarify the instructions for me?
17.02.2023 - 23:08Odpowiedź DROPS Design :
Dear Jane, you increase for the first time when the piece measures 3 cm and every 7 cm 2 more times (so you have increased 3 times in total; 138 + 12 (= 4 increases 3 times) = 150 sts. So, after the increases, the piece will measure 3+7+7= 17 cm. That is, you will have to work 2 cm more after the last increase. Happy knitting!
19.02.2023 - 22:22
![]() Poonam Kirpal napisała::
Poonam Kirpal napisała::
How much should be the length of the bodice after A1 pattern for adults say Height 5 ft 3 inches
06.06.2022 - 12:23Odpowiedź DROPS Design :
Dear Poonam, we don't make custom patterns. You can check a similar pattern for adults here: https://www.garnstudio.com/pattern.php?id=7107&cid=19. Happy knitting!
06.06.2022 - 13:33
![]() Marie napisała::
Marie napisała::
Placer 1 marqueur de chaque côté, au milieu des 6 nouvelles m montées. Continuer en jersey avec 1 m point mousse de chaque côté. À 3 cm, augmenter 1 m de chaque côté des marqueurs (= 4 augmentations). je ne comprends pas pour les marqueurs et augm, doit on poser un marq, 3mailles,un marqueur,3 mailles ,1marqueurs,les augmentations se font au mileu des 6 m? Merci pour votre aide
26.01.2022 - 17:07Odpowiedź DROPS Design :
Bonjour Marie, cette leçon montre comment tricoter un pull de haut en bas; et notamment à partir de la photo 17 comment reprendre les manches, monter les mailles sous la manche (18A) et diminuer (21, 22) au milieu sous la manche (cf cette vidéo). Bon tricot!
26.01.2022 - 17:19
![]() Marianne Plaskett napisała::
Marianne Plaskett napisała::
I can see the rows where I have to increase the number of stitches but there is no instruction on how many stitches need to be increased. I have read the pattern several times and cannot find the details about increasing.
19.02.2021 - 13:20Odpowiedź DROPS Design :
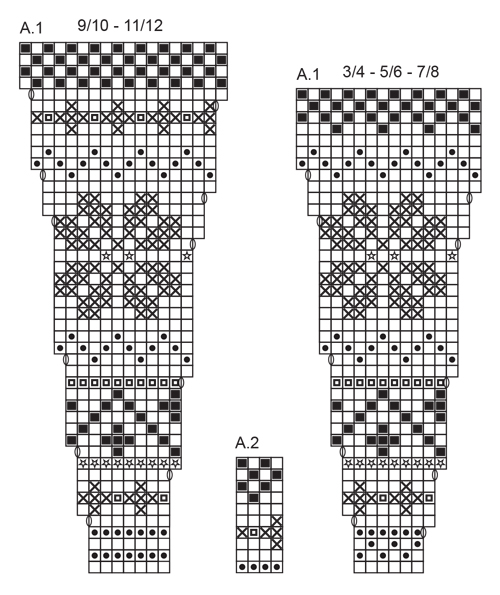
Dear Mrs Plasket, when working diagram A.1, the increases are drawn in the diagram (with the last symbole = a yarn over made either at the beg or at the end of a repeat). This means you just have to work the diagram appropriate to the size increasing as the diagram is showing. Hope this helps. Happy knitting!
19.02.2021 - 15:09
![]() Berit Forsberg Tripkou napisała::
Berit Forsberg Tripkou napisała::
I can not print the whole diagram for DROPS Children 27-5. It is just coming the first 11 rows, That is making the whole knitting a little bit complex. It is not easy to read the pattern if I take a photo from the picture at the computer,,, So can you tell me what is wrong. I have tried 2 times to print the whole diagram...
31.10.2020 - 20:05Odpowiedź DROPS Design :
Dear Mrs Forsberg Tripkou, we could print this pattern succesfully (in Swedisch and in English) - remember to check that some previous settings weren't savec and do not allow you to print all pages. Happy knitting!
02.11.2020 - 08:07
![]() Mary napisała::
Mary napisała::
I’m on row 12 in A1 size 7/8 the pattern does not work for me if I finish the previous row with the last two stitches being the first stitch in diagram and a garter stitch. Any tips as to what I’m doing wrong?
12.02.2020 - 12:54Odpowiedź DROPS Design :
Dear Mary, do you have 10 sts in each A.1 (= 1 edge st, 15 x 10 sts (A.1), 1st st in A.1, 1 edge st = 153 sts on needle)? 12th row should be a WS row, this means you work: 1 edge st, 1st st in A.1 (= P with off-white), then repeat A.1 (= P1 with beige, P2 with off white, P3 with beige, P2 with off white, P1 with beige, P1 with off white) , 1 edge st in garter st. Hope this can help you. Happy knitting!
12.02.2020 - 14:38
![]() Götze Sigrid napisała::
Götze Sigrid napisała::
Könnte ich die Wolle bei Ihnen kaufen für diesen Pulli in Gr. 104. Gleiche Farbe wie angegeben.
13.11.2019 - 12:58Odpowiedź DROPS Design :
Liebe Frau Götze, hier finden Sie einen DROPS Laden in Deutschlang, wo Sie die Wolle finden können. Viel Spaß beim stricken!
13.11.2019 - 13:59
![]() Evelyn napisała::
Evelyn napisała::
I am trying to knit this pattern, however, I don’t understand the first parts of starting the chart. IE; knit 1 edge stitch, A1 chart.....(finish with a knit first stitch from chart and 1 edge stitch. I have tried and the second row doesn’t work.
06.04.2019 - 05:40Odpowiedź DROPS Design :
Dear Evelyn, for the jacket from RS work: 1 edge st in garter stitch, then repeat A.1 (reading diagram from the bottom corner on the right side towards the left) until 2 stitches remain, work now the first stich in A.1 (the stitch on the right side) and finish with 1 edge stitch. From WS work the first stitch in A.1 (the one on the right side), then repeat A.1 reading from the left towards the right. Learn more about reading diagrams here. Happy knitting!
08.04.2019 - 09:13
|
||||||||||||||||||||||
Prairie Fairy#prairiefairycardigan |
||||||||||||||||||||||
 |
 |
|||||||||||||||||||||
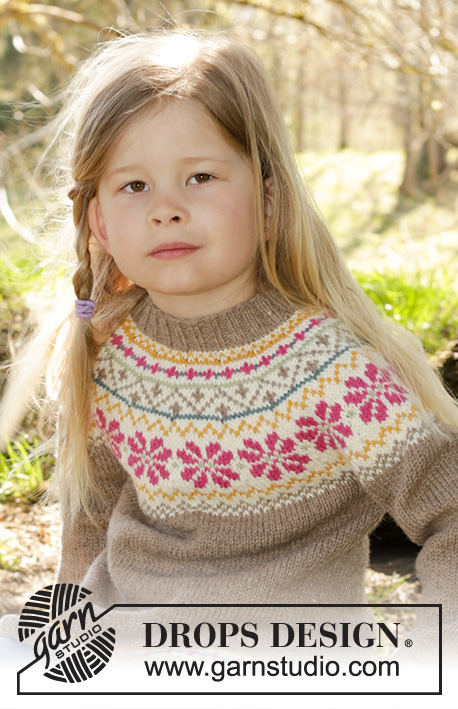
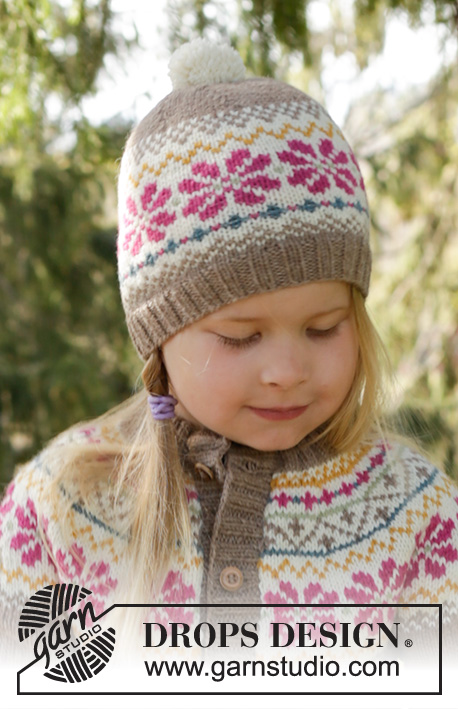
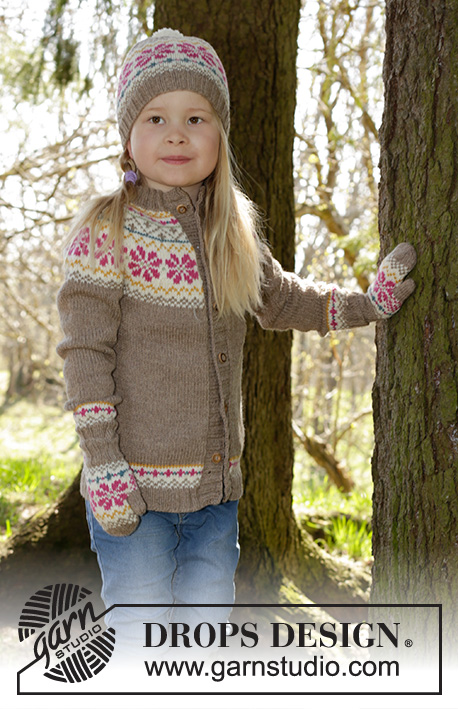
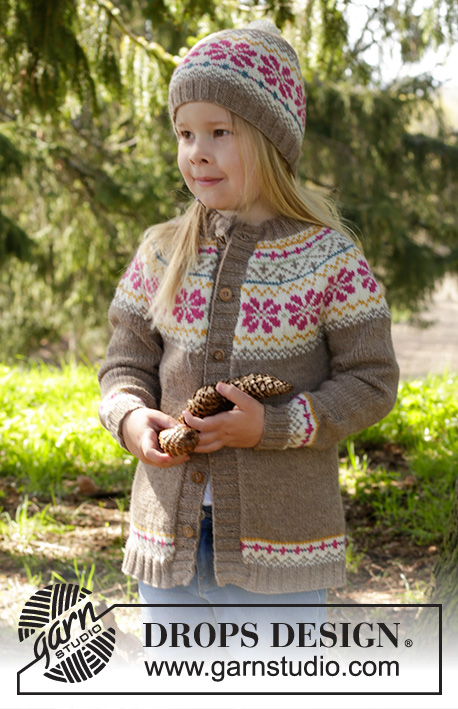
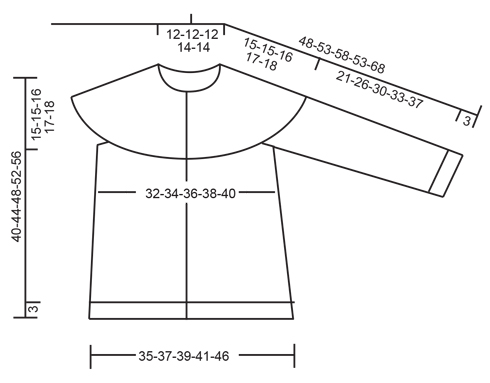
Sweterek rozpinany na drutach, z zaokrąglonym karczkiem i żakardem norweskim, z włóczki DROPS Lima. Od 3 do 12 lat.
DROPS Children 27-5 |
||||||||||||||||||||||
|
ŚCIEG FRANCUSKI (w tę i z powrotem): Przer. wszystkie rzędy na prawo. 1 „ściągacz” francuski = 2 rz. na prawo. ŻAKARD: Patrz schematy A.1 i A.2. Schematy są przerabiane dżersejem. Patrz schemat właściwy dla rozmiaru. WSKAZÓWKA: Aby robótka nie była zbyt ścisła, kiedy przerabiamy żakard, należy pamiętać, aby nie zaciskać nitek na lewej stronie robótki. Jeżeli mimo to żakard jest zbyt ścisły, użyć drutów o większym rozmiarze. -------------------------------------------------------- SWETER: Przerabiany z góry na dół, w tę i z powrotem na drutach z żyłką. KARCZEK: Na krótkie druty z żyłką nr 3 nabrać 84-88-92-96-100 o. kolorem beż. Przer. 1 o. ściegiem francuskim - patrz powyżej, 2 o.p., *2 o.l., 2 o.p.*, powt. od *-* i zakończyć przerabiając 1 o. ściegiem francuskim. Przer. ściągaczem tak samo przez 3-3-4-4-5 cm (= dekolt). Dalej przer. na krótkich drutach z żyłką nr 4 i przer. 1 rz. na prawo, W TYM SAMYM CZASIE dopasować liczbę o. do 81-87-93-101-108. Umieścić 1 marker za 40-43-46-50-54 o. = środek tyłu. Dalej przer. podwyższenie na dekolt tyłu dżersejem następująco: przer. 8 o.p. za markerem, obrócić, zacisnąć nitkę i przer. 16 o.l. w rzędzie powrotnym, obrócić, zacisnąć nitkę i przer. 24 o.p., obrócić, dalej przer. o 8 o. więcej za każdym razem przed obróceniem robótki, aż zostaną przerobione 24-24-32-32-40 o. z każdej strony markera na środku tyłu, obrócić i przer. pozostałe o. na prawo. Przer. 1 rz. na lewo. Dalej przer. następująco: 1 o. brzeg. ściegiem francuskim, schemat A.1 (= 13-14-15-14-15 razy na szerokość), zakończyć przerabiając 1-sze o. schematu i 1 o. brzeg. ściegiem francuskim - patrz schemat właściwy dla rozmiaru. PATRZ WSKAZÓWKA! ZACHOWAĆ TAKIE SAME NAPRĘŻENIE NICI JAK W PRZYPADKU PRÓBKI! Gdy jest taka potrzeba zmienić druty na dłuższe. Po przerobieniu schematu A.1 jest 211-227-243-255-273 o. Przer. 0-1-2-0-1 cm kolorem beż. Dł. robótki wynosi teraz ok. 15-16-17-17-18 cm po środku przodu (mierzyć bez ściągacza dekoltu). Dalej przer. dżersejem kolorem beż. Przer. najpierw 1 rz., W TYM SAMYM CZASIE równomiernie dodać 3-3-3-11-9 o. = 214-230-246-266-282 o. Przer. kolejny rząd następująco: przer. 32-34-36-38-40 o. (= przód), zdjąć 44-48-52-58-62 nast. o. na drut pomocniczy na rękaw (nie przer. ich wcześniej), nabrać 6 o., przer. 62-66-70-74-78 o. (= tył), zdjąć 44-48-52-58-62 nast. o. na drut pomocniczy na rękaw (nie przer. ich wcześniej), nabrać 6 o., przer. 32-34-36-38-40 o. (= przód). TYŁ & PRZODY: = 138-146-154-162-170 o. OD TEGO MOMENTU MIERZYĆ STĄD! Umieścić 1 marker z każdej strony, na środku 6 nowych nabranych o. Dalej przer. dżersejem z 1 o. brzeg. ściegiem francuskim z każdej strony. Po przerobieniu 3 cm dodać 1 o. z każdej strony markerów (= 4 dodane o.). Dodawać w sumie 3 razy co 7-9-10-12-13 cm = 150-158-166-174-182 o. Dalej przer. aż dł. robótki wynosi 19-23-26-29-32 cm. Dalej przer. schemat A.2 z 1 o. brzeg. z każdej strony. Dalej przer. na drutach z żyłką nr 3 i przer. 1 rz. na prawo na prawej stronie robótki, W TYM SAMYM CZASIE równomiernie dodać 14 o. = 164-172-180-188-196 o. Dalej przer. 1 rz. na lewej stronie robótki i dalej przer. następująco: 1 o. ściegiem francuskim, 2 o.p., *2 o.l., 2 o.p. *, powt. od *-* i zakończyć przerabiając 1 o. ściegiem francuskim. Przer. ściągaczem przez 3 cm. Zamknąć o. tak jak schodzą z drutu. RĘKAWY: Wziąć z powrotem o. z jednego drutu pomocniczego na druty pończosznicze nr 4 i nabrać 6 o. na środku pod rękawem (umieścić 1 marker na środku tych o.) = 50-54-58-64-68 o. OD TEGO MOMENTU MIERZYĆ STĄD! Przer. na okrągło, dżersejem, kolorem beż. Gdy dł. rękawa wynosi 2 cm zamknąć 1 o. z każdej strony markera. Powt. zamykanie o. w sumie 5-7-7-10-10 razy co 4½-3½-4-3-3½ cm = 40-40-44-44-48 o. Gdy dł. rękawa wynosi 18-23-27-30-34 cm przer. schemat A.2. Dalej przer. na drutach pończoszniczych nr 3 i przer. ściągaczem 2 o.p./2 o.l. przez 3 cm. Zamknąć o. tak jak schodzą z drutu. Przer. tak samo ponad oczkami z drugiego drutu pomocniczego. OBSZYCIE PRZODÓW: Na drutach z żyłką 3, kolorem beż, nabrać 84-118 o. w odl. 1 o. od brzegu, wzdłuż prawej strony prawego przodu. Przer. 1 rz. na lewo na lewej stronie robótki, W TYM SAMYM CZASIE równomiernie dodać o., aby dopasować ich liczbę do 102-110-118-130-142. Przer. kolejny rząd na prawej stronie robótki następująco: 2 o. ściegiem francuskim, *2 o.p., 2 o.l.*, powt. od *-* aż zostaje 4 o. i zakończyć przerabiając 2 o.p. i 2 o. ściegiem francuskim. Dalej przer. ściągaczem tak samo. W TYM SAMYM CZASIE po przerobieniu 1 cm zacząć wykonywanie 6-6-7-7-7 dziurek na guziki (w regularnych odstępach). 1 dziurka = przer. 2 o. razem i wykonać 1 narzut (zamykać 2 o.l., widok na prawej stronie robótki, rezultat będzie lepszy). Górna dziurka na guzik powinna znajdować się w odl. ok. 1 cm od brzegu, a dolna w odl. ok. 8-8-10-10-10 cm od brzegu. Gdy wys. brzegu wynosi 3 cm zamknąć o. tak jak schodzą z drutu. Powt. wzdłuż lewego przodu, tylko nie wykonywać dziurek na guziki. WYKOŃCZENIE: Zszyć otwory pod rękawami. Przyszyć guziki na obszyciu lewego przodu. |
||||||||||||||||||||||
Objaśnienia do schematu |
||||||||||||||||||||||
|
||||||||||||||||||||||
 |
||||||||||||||||||||||
 |
||||||||||||||||||||||
Skończyłaś ten wzór?Otaguj swoje zdjęcia #dropspattern #prairiefairycardigan lub prześlij je do #dropsfan gallery. Potrzebujesz pomocy w związku z tym wzorem?Zobacz 32 instrukcje video, sekcję Komentarze/Pytania i jeszcze więcej, wchodząc na stronę wzoru na garnstudio.com © 1982-2026 DROPS Design A/S. Wszelkie prawa zastrzeżone. Ten dokument, w całości, jest chroniony prawem. Zobacz co możesz robić z naszymi wzorami na dole każdego wzoru na naszej stronie. |
||||||||||||||||||||||


Posiadając 40 lat doświadczenia w projektowaniu wzorów na druty i szydełko, DROPS Design oferuje jedną z największych kolekcji bezpłatnych wzorów w internecie – przetłumaczonych na 17 języków. Obecnie jest dostępnych 324 katalogów i 12290 wzorów w języku polskim.
Dokładamy wszelkich starań, aby oferować Wam druty i szydełka, inspiracje, fachowe porady oraz doskonałej jakości włóczki w najlepszych cenach! Zamierzasz wykorzystać nasze wzory inaczej niż tylko do osobistego użytku? Przeczytaj jakie masz prawa w Copyright, który znajdziesz na końcu każdego wzoru. Miłej pracy!
Dodaj komentarz do modelu DROPS Children 27-5
Chcielibyśmy się dowiedzieć co masz do powiedzenia o tym wzorze!
Jeśli chcesz zadać pytanie i szybko uzyskać odpowiedź, upewnij się, że została wybrana właściwa kategoria w formularzu poniżej. Pola obowiązkowe są oznaczone *.