
Popularne kategorie
Szukasz włóczki?


Komentarze / Pytania (24)
![]() Lise napisała::
Lise napisała::
Je suis dans le modèle 170-12 ,dans la séquence A5 et cela fait trois fois que je détricote le troisième rang. Je comprends qu’il ne faut pas faire les augmentations,mais dans A4, A6 et A7 il y a des mailles glissé et des mailles tricoter ensemble. Donc ma question est les augmentations ont les fait plus mais les diminutions elles oui?
07.06.2018 - 12:00Odpowiedź DROPS Design :
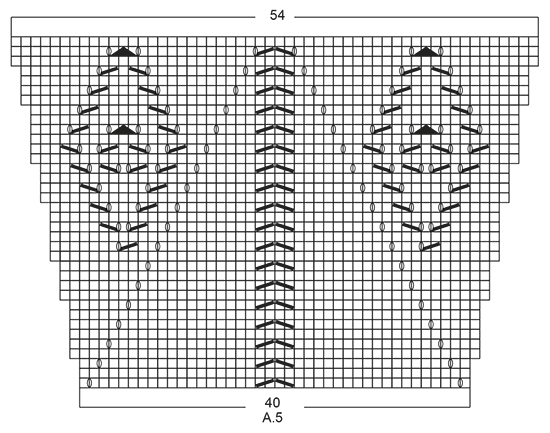
Bonjour Lise, tricotez les diagrammes comme indiqué: 3 m point mousse, A.4 (= 3 m), *A.5 (= 40 m), A.6 (= 5 m) *, répétez de *-* encore 4 fois, terminez par A.5, A.7 (= 3 m) et 3 m point mousse. Les augmentations vont se faire dans A.4, A.6 et A.7 mais sont reportées au rang suivant sur les diagrammes A.5. Veillez à toujours bien tricoter A.4 et A.7 sur les mêmes 3 mailles et A.6 sur les mêmes 5 mailles (= pour que les jours soient bien alignés). Bon tricot!
07.06.2018 - 13:26
![]() Lorraine napisała::
Lorraine napisała::
Autre question 170-12 je suis à la section A.5 première section il me faut 48 mailles et j'en ai que 45 comment j'intègre le A.4 car il me faut 45 mailles pour le A.5A.6 et j'aurai le même problème à la fin pour A.7 merci
19.08.2017 - 04:14Odpowiedź DROPS Design :
Bonjour Lorraine. Avant de commencer le diagramme A.5, vous avez 277 m. Vous tricotez le rang suivant ainsi: 3 m point mousse, A.4 1 fois (=3 m), vous répétez A.5 (=40m) + A.6 (=5 m) 5 fois en total, puis A.5 (40 m), A.7 (3m) et enfin 3 m point mousse. En total : 3+3+(40+5)*5+40+3+3= 277 m. Bon tricot.
20.08.2017 - 17:14
![]() Lorraine napisała::
Lorraine napisała::
Je fais le modèle 170-12 présentement et je voulais savoir si je comprends bien je suis à la séquence A.5 je pense que l'on exécute A.4 A.5A.6 A.5A.6 A.5A.6 A.5A.6 A.5A.6 A.5 A.7 alors ma question que si je calcule le nombre de mailles je n'arrive pas au même nombre qu'indiqué à la fin ceci doit me donner 361 et j'ai 301 je voudrais savoir ce qui me manque merci.
19.08.2017 - 02:06Odpowiedź DROPS Design :
Bonjour Lorraine. Après avoir tricoté le diagramme A.5 1 fois en verticale, vous avez 54 m dans le diagramme A.5. Vous avez pourtant: 3 m point mousse, A.4 (=3 m), A.5 (= 54 m) + A.6 (=5 m) 5 fois en total, A.5 (54 m), A.7 (3m) et enfin 3 m point mousse. En total : 3+3+(54+ 5)*5+54+3+3= 361 m. Bon tricot.
20.08.2017 - 17:21
![]() Bonita napisała::
Bonita napisała::
I am having trouble starting A10 and A11
11.06.2017 - 00:45Odpowiedź DROPS Design :
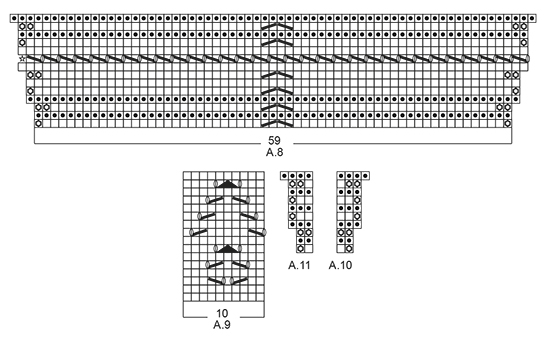
Hi Bonita, A.10 and A.11 are only 2 stitches in width on the first row, knit from right side and purl from wrong side (in A.10 you start with knit from the right side and in A.11 you start with purl from wrong side. To start A.10, work 3 stitches in garter stitch, then A.10, then garter stitch until 2 stitches are left before the marker, decrease as before, garter stitch until 2 stitches before marker, the A.11 (2 stitches) followed by A.10 as you have started on your repeat and so on....Continue like this upwards according to A.10 and A.11. I hope this helps, Kind regards, Deirdre
12.06.2017 - 12:58Eleni Sideri napisała::
Where we use A5 in this pattern?
23.11.2016 - 10:16Odpowiedź DROPS Design :
Hi Eleni, the English version should be corrected. Please see the US language version. When the piece measures approx. 38 cm, you will start A.5. Happy knitting!
24.11.2016 - 18:48
![]() Kathy Griffin napisała::
Kathy Griffin napisała::
Thank you for your answers to my questions. They were most helpful. My misunderstanding was to do with the explanation at the beginning of the pattern which states: INCREASE TIP: Inc 1 St by making 1 YO, on next row work YO twisted to avoid holes. I assumed that I should follow this, even when following the charts. I guess that it simply applied to the start of the chart as you increased from 6 St to 18 St.
04.10.2016 - 18:55Kathy Griffin napisała::
When working 2 stitches in one stitch, do you knit and then purl the same stitch? Thanks, Kathy from Canada
03.10.2016 - 19:43Odpowiedź DROPS Design :
Dear Mrs Griffin, if you click on the video tab, on the top under the pattern title, next to the materials, you can find all the video related to this pattern. In particular, you can work 2 sts in 1 st knitting the same st in the front and in the back loop. Happy knitting!
04.10.2016 - 08:37Vicki napisała::
There is an error late in this pattern when starting the section with A.9. It says " Inc made in A.4/A.6/A.7 are drawn as extra sts in **A.5** so that the patterns align.". There is no A.5 is this section. Can you please confirm that directions should read : inc made in A.4/A.6/A.7 are drawn in as extra sts on each side of the 60 stitch blocks of A.9 as stocking stitch. Thanks.
19.09.2016 - 17:27Odpowiedź DROPS Design :
Dear Vicki, you are correct, the extra sts not included in A.4/A.6 and A.7 should be worked in stocking st. Happy knitting!
06.10.2016 - 13:06
![]() Gardien napisała::
Gardien napisała::
Bonjour Comme Christine, je suis bloquée dans la même section. Si je comprends bien, je ne m'occupe pas des augmentations faites dans A4,A6 et A7. Elles sont tricotées en jersey le rang suivant. Merci de m'eclairer. Ça fait 3 fois que je detricote le 3ème rang de A9
15.06.2016 - 18:28Odpowiedź DROPS Design :
Bonjour Mme Gardien, les augmentations faites dans A.4/A.6 et dans A.6/A.7 (= de chaque côté d'un motif de A.5) sont dans le diagramme A.5, vous pouvez placer un marqueur entre chaque diagramme pour bien vous repérer et ainsi continuer les diagrammes comme indiqués. Bon tricot!
16.06.2016 - 08:42
![]() Christine napisała::
Christine napisała::
Bonjour, ce modèle de châle est magnifique, j'ai quasiment fini de le tricoter, le résultat est splendide mais je ne comprends pas l'explications de l'avant dernière section, celle qui utilise les diagrammes A4, A9, A6 et A7. Pouvez-vous me donner leur succession de manière claire ? Je vous remercie d'avance pour votre réponse et vos superbes modèles :-)
16.02.2016 - 11:20Odpowiedź DROPS Design :
Bonjour Christine et merci. Tricotez les diagrammes dans l'ordre indiqué, en alignant bien tous les diagrammes les uns au-dessus des autres au fur et à mesure, c'est-à-dire que les augmentations faites dans A.4/A.6 et A.7 vont s'intercaler entre les diagrammes (tricotez les en jersey). Placez un marqueur entre chaque diagramme pour bien repérer ces augm. et bien aligner les motifs les uns au-dessus des autres sans les décaler. Bon tricot!
16.02.2016 - 12:58
|
|||||||||||||||||||||||||
Spring Splendor#springsplendorscarf |
|||||||||||||||||||||||||
|
|
|||||||||||||||||||||||||
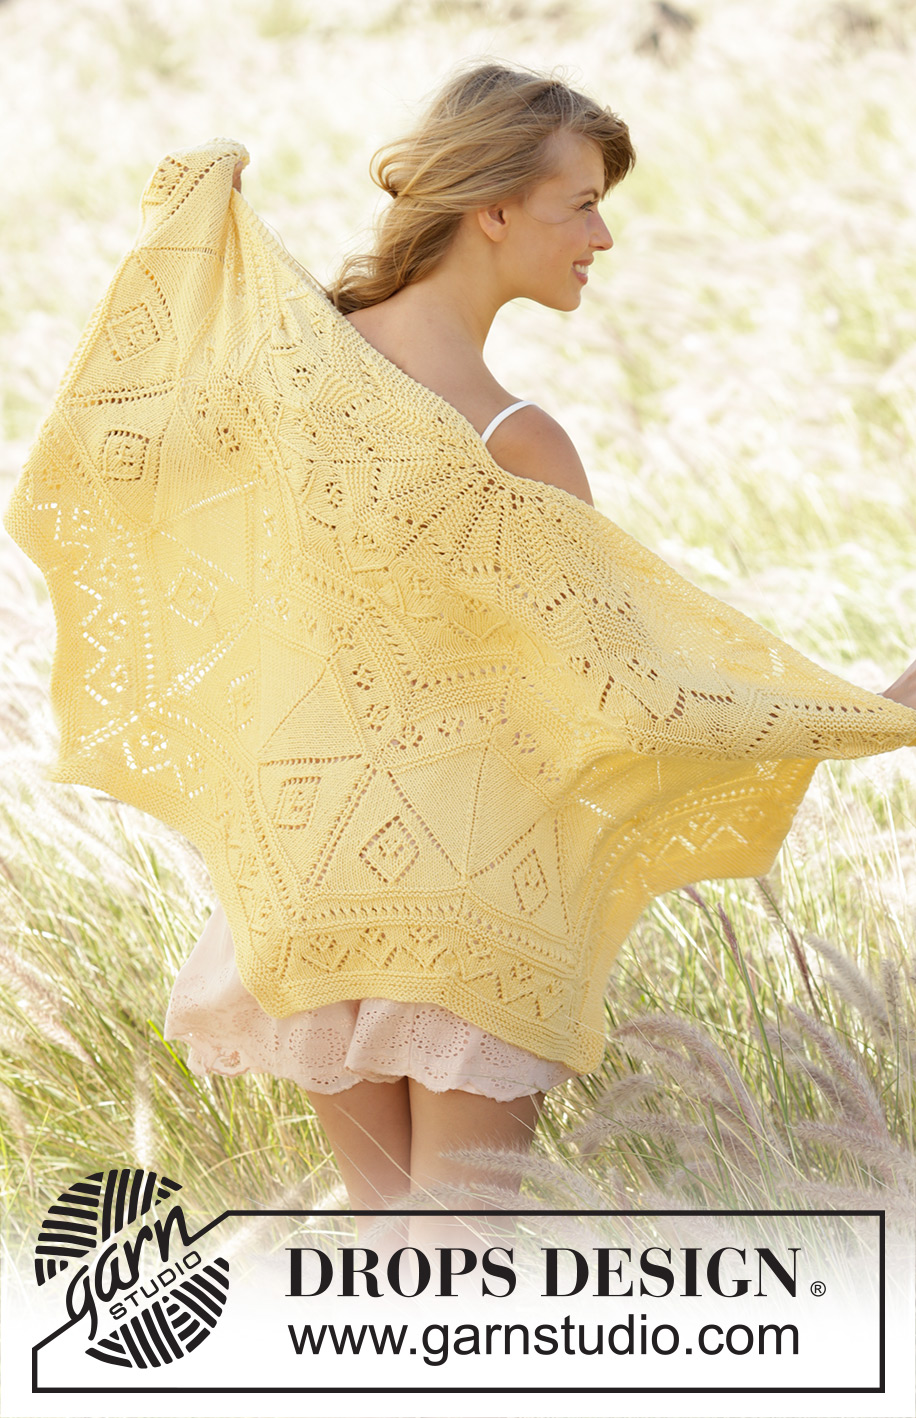
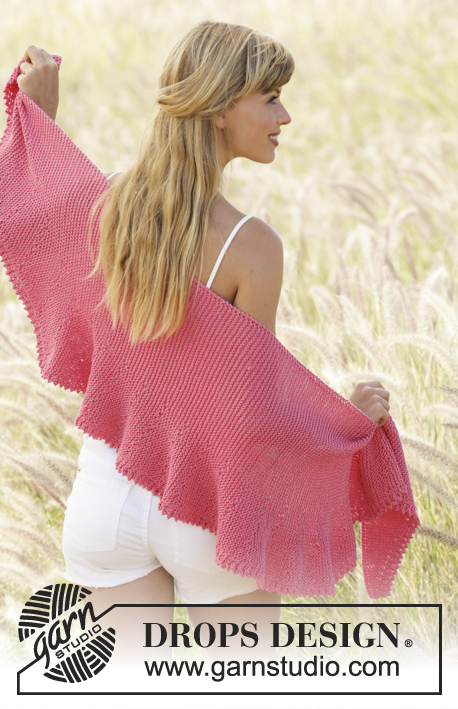
Szal DROPS ściegiem francuskim, ściegiem ażurowym i zygzakiem, z włóczki „Cotton Merino”
DROPS 170-12 |
|||||||||||||||||||||||||
|
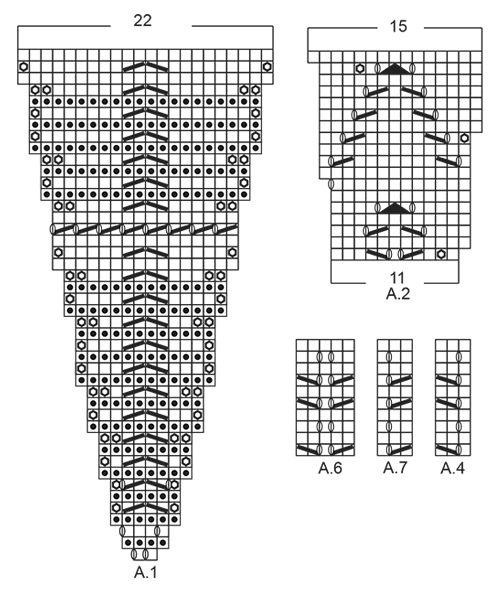
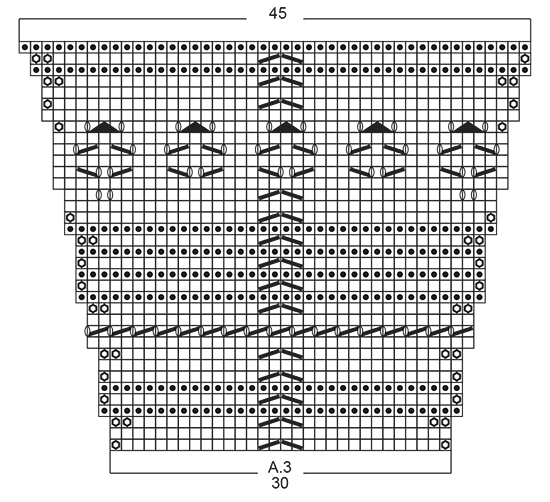
ŚCIEG FANTAZYJNY: Patrz schematy A.1-A.11. Schematy przedstawiają wszystkie rzędy ściegu fantazyjnego, widok na prawej stronie robótki. ŚCIEG FRANCUSKI (w tę i z powrotem): Przer. wszystkie rzędy na prawo. 1 „ściągacz” francuski = 2 rz. na prawo. DODAWANIE OCZEK: Aby dodać 1 o. należy wykonać 1 narzut, w nast. rzędzie przer. oczko przekręcone w miejscu narzutu, aby uniknąć dziur. ---------------------------------------------------------- SZAL: Przerabiany w tę i z powrotem, z góry na dół. Na drutach z żyłką nr 4,5 nabrać 6 o. włóczką Cotton Merino. Przer. 3 ściągacze ściegiem francuskim - patrz powyżej - i równomiernie dodawać 4 o. w każdym rzędzie na prawej stronie robótki - PATRZ DODAWANIE OCZEK = 18 o. Dalej przer. kolejny rząd na prawej stronie robótki następująco: 3 o. ŚCIEGIEM FRANCUSKIM – patrz powyżej, umieścić 1 marker, *A.1 (= 2 o.), umieścić 1 marker*, powt. od *-* jeszcze 5 razy, zakończyć przerabiając 3 o. ściegiem francuskim = 7 markerów. Przesuwać markery w miarę postępu robótki. Dalej przer. schemat A.1 z 3 o. ściegiem francuskim z każdej strony. ZACHOWAĆ TAKIE SAME NAPRĘŻENIE NICI JAK W PRZYPADKU PRÓBKI! Gdy schemat A.1 zostanie przerobiony 1 raz na wysokość jest 138 o. Przer. kolejny rząd na prawej stronie robótki następująco: 3 o. ściegiem francuskim, A.2 (= 11 o.) aż zostaje 3 o. (= 12 razy na szerokość), zakończyć przerabiając 3 o. ściegiem francuskim. Gdy schemat A.2 zostanie przerobiony 1 raz na wysokość jest 186 o. Przer. kolejny rząd na prawej stronie robótki następująco: 3 o. ściegiem francuskim, A.3 (= 30 o.) aż zostaje 3 o. (= 6 razy na szerokość), zakończyć przerabiając 3 o. ściegiem francuskim. W ost. rzędzie na prawej stronie robótki w schemacie A.3, dodawać wykonując 1 narzut za 3 o. ściegiem francuskim na początku rzędu. Gdy schemat A.3 zostanie przerobiony 1 raz na wysokość jest 277 o. Dł. robótki wynosi ok. 38 cm w najdłuższym miejscu (mierzyć po środku). Przer. kolejny rząd na prawej stronie robótki następująco: 3 o. ściegiem francuskim, A.4 (= 3 o.), *A.5 (= 40 o.), A.6 (= 5 o.) *, powt. od *-* jeszcze 4 razy, przer. A.5, A.7 (= 3 o.), zakończyć przerabiając 3 o. ściegiem francuskim. Dodawanie o. w A.4/A.6/A.7 występują w motywie A.5, aby motyw wypadał w odpowiednim miejscu. Powt. schematy A.4/A.6/A.7 na wysokość, aż schemat A.5 zostanie przerobiony 1 raz na wysokość. Gdy schemat A.5 zostanie przerobiony 1 raz na wysokość jest 361 o. Dł. robótki wynosi ok. 53 cm w najdłuższym miejscu (mierzyć wzdłuż środka). Przer. na prawej stronie robótki następująco: 3 o. ściegiem francuskim, 1 o. ściegiem francuskim (to oczko jest przerabiane ściegiem francuskim, gdy przerabiamy ściegiem francuskim w schemacie A.8 i dżersejem, gdy przerabiamy dżersejem w schemacie A.8), powt. schemat A.8 (= 59 o.) aż zostaje 3 o. (= 6 razy na szerokość), zakończyć przerabiając 3 o. ściegiem francuskim. UWAGA: rząd ażurowy schematu A.8 nie wypada równo w schemacie, ale odpowiada ogólnej liczbie o. w rzędzie, pierwsze oczko za 3 o. ściegiem francuskim na prawej stronie robótki jest przerabiane dżersejem. W ost. rzędzie na prawej stronie robótki umieścić 1 nitkę marker na środku każdego motywu A.8, tzn. między: zdjąć 1 o. jak do przerobienia na prawo, 1 o.p., przełożyć oczko zdjęte nad przerobionym oczkiem, umieścić 1 marker i przer. 2 o. razem na prawo. Przesuwać nitki markery w miarę postępu robótki. Gdy schemat A.8 zostanie przerobiony 1 raz na wysokość jest 397 o. Dł. robótki wynosi ok. 58 cm w najdłuższym miejscu (mierzyć wzdłuż środka). W nast. rzędzie na prawej stronie robótki przer. następująco: 3 o. ściegiem francuskim, A.4 ponad 3 nast. o., *powt. w sumie 6 razy schemat A.9 (= 10 o.) na szerokość, A.6 ponad 5 nast. o.*, powt. od *-* jeszcze 4 razy, powt. w sumie 6 razy schemat A.9 (= 10 o.), A.7 ponad 3 nast. o., zakończyć przerabiając 3 o. ściegiem francuskim. Oczka dodawane w schematach A.4/A.6/A.7 są przerabiane dżersejem. Powt. A.4/A.6/A.7 na wysokość (pamiętać, aby schematy A.4/A.6/A.7 występowały jedne nad drugimi) aż schemat A.9 zostanie przerobiony 1 raz na wysokość. Gdy schemat A.9 zostanie przerobiony 1 raz na wysokość jest 433 o. Dł. robótki wynosi ok. 65 cm w najdłuższym miejscu (mierzyć wzdłuż środka). Dalej przer. ściegiem francuskim na prawej stronie robótki następująco: 3 o. ściegiem francuskim, *A.10 (= 2 o.), przer. ściegiem francuskim aż zostaje 2 o. przed nitką markerem, zamykać o. jak wcześniej (tj. zdjąć 1 o. jak do przerobienia na prawo, 1 o.p., przełożyć oczko zdjęte nad przerobionym oczkiem, przer. 2 nast. o. razem na prawo), przer. ściegiem francuskim aż zostaje 2 o. przed markerem, przer. A.11 ponad 2 nast. o.*, powt. od *-* aż zostaje 3 o., zakończyć przerabiając 3 o. ściegiem francuskim. Dalej przer. tak samo, aż dł. robótki wynosi 70 cm w najdłuższym miejscu. Luźno zakończyć. |
|||||||||||||||||||||||||
Objaśnienia do schematu |
|||||||||||||||||||||||||
|
|||||||||||||||||||||||||
 |
|||||||||||||||||||||||||
 |
|||||||||||||||||||||||||
 |
|||||||||||||||||||||||||
 |
|||||||||||||||||||||||||
Skończyłaś ten wzór?Otaguj swoje zdjęcia #dropspattern #springsplendorscarf lub prześlij je do #dropsfan gallery. Potrzebujesz pomocy w związku z tym wzorem?Zobacz 18 instrukcje video, sekcję Komentarze/Pytania i jeszcze więcej, wchodząc na stronę wzoru na garnstudio.com © 1982-2026 DROPS Design A/S. Wszelkie prawa zastrzeżone. Ten dokument, w całości, jest chroniony prawem. Zobacz co możesz robić z naszymi wzorami na dole każdego wzoru na naszej stronie. |
|||||||||||||||||||||||||


Posiadając 40 lat doświadczenia w projektowaniu wzorów na druty i szydełko, DROPS Design oferuje jedną z największych kolekcji bezpłatnych wzorów w internecie – przetłumaczonych na 17 języków. Obecnie jest dostępnych 324 katalogów i 12290 wzorów w języku polskim.
Dokładamy wszelkich starań, aby oferować Wam druty i szydełka, inspiracje, fachowe porady oraz doskonałej jakości włóczki w najlepszych cenach! Zamierzasz wykorzystać nasze wzory inaczej niż tylko do osobistego użytku? Przeczytaj jakie masz prawa w Copyright, który znajdziesz na końcu każdego wzoru. Miłej pracy!
Dodaj komentarz do modelu DROPS 170-12
Chcielibyśmy się dowiedzieć co masz do powiedzenia o tym wzorze!
Jeśli chcesz zadać pytanie i szybko uzyskać odpowiedź, upewnij się, że została wybrana właściwa kategoria w formularzu poniżej. Pola obowiązkowe są oznaczone *.