
Popularne kategorie
Szukasz włóczki?


Komentarze / Pytania (66)
![]() Linda Langlois napisała::
Linda Langlois napisała::
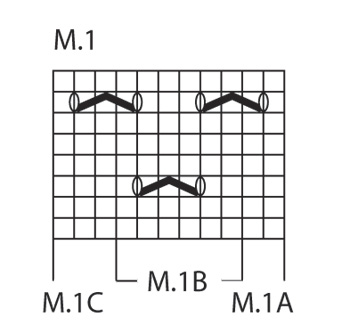
Bonjour, mon questionnement se situe au début du rang 7 c'est-à-dire: est-ce que je commence par une maille endroit selon le graphique ou si je dois faire le M.1A (2 mailles) avant le commencer le M.1B. Le nombre de répétition du motif est-il 4 fois comme le rang 3? J'ai essayé de le faire en commençant par 1 m. end., 1 jeté et en continuant avec le M.1B et en terminant le rang par 1 m. end. mais j'arrive à 5 répétitions au lieu de 4. Est-ce correct?
07.11.2019 - 15:10Odpowiedź DROPS Design :
Bonjour Mme Langlois, vous devez toujours tricoter: 1 x M.1A, puis vous répétez M.1B et terminez par M.1C, au 7ème rang de M.1, tricotez les 2 premières m de A, puis vous répétez les mailles de B et terminez par les mailes de C - cf réponse ci-dessous pour le détail des mailles du 7ème rang. Bon tricot!
07.11.2019 - 15:23
![]() Linda Langlois napisała::
Linda Langlois napisała::
: M.1A (= 2 sts), then repeat M.1B a total of 4 times in width (= 24 sts) and finish with M.1C (= 3 sts) = 2+24+3= 29 stitches. Happy knitting! mais pour le rang 7???
05.11.2019 - 19:10
![]() Linda Langlois napisała::
Linda Langlois napisała::
Pouvez-vous m'explique le rang 7 du diagramme par rapport au rang 3? J'essaie de comprendre le M.1B Merci
05.11.2019 - 18:22Odpowiedź DROPS Design :
Bonjour Mme Langlois, au rang 7 de M.1, vous tricotez: 1 m end, 1 jeté (= 2 m pour A), glissez la m suivante (=la dernière m de A, 2 m ens à l'end, m glissée par-dessus m tricotée), 1 jeté, 3 m end, 1 jeté (= M.1B), tricotez maintenant la dernière m de M.1B avec les 2 premières m du M.1B suivant (puis de M.1C la dernière fois). Bon tricot!
06.11.2019 - 08:43
![]() Christine napisała::
Christine napisała::
I am almost ready to decrease for the toe shaping...once again, I do not understand...I have 52 stitches, but the pattern says separate 25 stitches , for the underfoot and 25 stitches for the upper foot...what happens to the other 2 sts?, sigh...sorry to be such a pain...
03.10.2019 - 02:34Odpowiedź DROPS Design :
Dear Christine, there should be 25 stitches for both upper and under foot + 1 stitch with marker on each side = 52 sts in total. Happy knitting!
03.10.2019 - 09:29
![]() Kendall napisała::
Kendall napisała::
Christine,thanks for your help I appreciated it😊I figured out to put the 35 stitches to the side by talking it over with my sister,she knits too,and the comment just confirmed it which is great and if you still need help on when to start the lace pattern,you start the lace pattern the row after you pick up the 14 side stitches go across the top of the sock and pick up the other 14 stitches once you get back to the 29 stitches that’s when you do the lace pattern I hope I helped😊
01.10.2019 - 15:40
![]() Christine napisała::
Christine napisała::
Kendall, clearly I was wrong. This is not a typo error. As you can see from the answers. I was wrong and hope I have not confused you. now I understand. if you need help, don’t be shy, I can now help 😊
01.10.2019 - 02:06
![]() Christine napisała::
Christine napisała::
Thank you for your answer. Does that mean that I should put 3 stitches from the 35 to the 14 stitches picked up on both sides, and work the decrease including those 3 stitches? Thank you.
30.09.2019 - 14:11Odpowiedź DROPS Design :
Dear Christine, you will decrease before the 29 stitches (first 3 from the 35 sts are worked with the picked up stitches in stocking stitch) and after the 29 stitches in pattern (= the last 3 from the 35 sts are worked with the picked up sts in stocking st), ie these 3 sts on either side of the 29 middle sts will be worked in stocking stitch and decreased for instep. Happy knitting!
30.09.2019 - 16:04
![]() Christine napisała::
Christine napisała::
At what point do you start working with the Diagram please? I am totally confused. I am at the point where I have picked up 14 stitches on both sides as well as the 35 stitches that were on the stitch holder. I now have 76 stitches on the needles, but I am unsure how to proceed at this point. With big thanks in advance.
28.09.2019 - 20:03Odpowiedź DROPS Design :
Dear Christine, once you get the 76 sts on the needle (= heel is now worked),k you now work the stitches from under foot in stocking stitch (= over the first 3 sts from the 35 sts slipped on a thread + the last 3 sts from these 35 sts (=29 sts remain for upper foot) + the stitches from heel while decreasing for instep and work the 29 stitches (upper foot, the stitches slipped on a thread) in pattern: : M.1A (= 2 sts), then repeat M.1B a total of 4 times in width (= 24 sts) and finish with M.1C (= 3 sts) = 2+24+3= 29 stitches. Happy knitting!
30.09.2019 - 10:26
![]() Christine napisała::
Christine napisała::
Kendall, I just started this yesterday and came across the same problem. I figured it out to be simply a typo, and followed the pattern with 35 (for the medium sock). It is working out perfectly like that. I hope this helps.
28.09.2019 - 18:49
![]() Kendall napisała::
Kendall napisała::
How come you go from 35 stitches on top of the foot to 29?wheres the rest of the stitches?and then at the end when you work the toe where’s the missing two stitches?
28.09.2019 - 16:28
|
|||||||
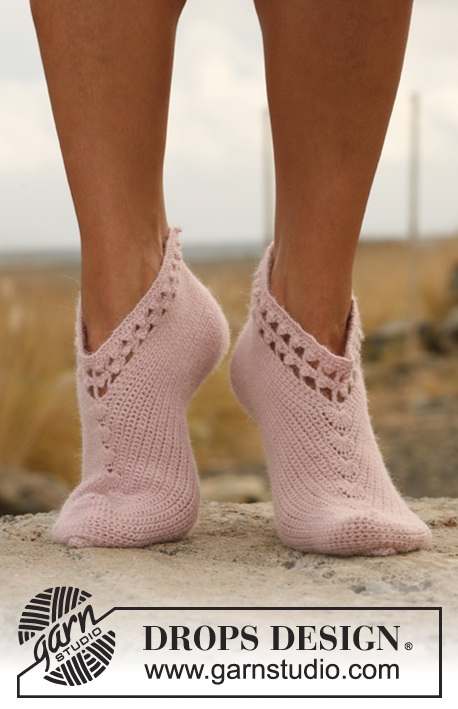
Neptunia Socks#neptuniasocks |
|||||||
|
|
|||||||
Krótkie ażurowe skarpetki z włóczki DROPS Fabel.
DROPS 129-18 |
|||||||
|
ŚCIEG FANTAZYJNY: Patrz schemat M.1. ZAMYKANIE OCZEK NA PIĘTĘ: Rząd 1 (= na prawej stronie robótki): przerabiać aż zostaje 5-5-6 o., zdjąć 1 o. jak do przerobienia na prawo, 1 o.p., przełożyć oczko zdjęte nad przerobionym oczkiem, obrócić. Rząd 2 (= na lewej stronie robótki): przerabiać aż zostaje 5-5-6 o., zdjąć 1 o. jak do przerobienia na lewo, 1 o.l., przełożyć oczko zdjęte nad przerobionym oczkiem, obrócić. Rząd 3 (= na prawej stronie robótki): przerabiać aż zostaje 4-4-5 o., zdjąć 1 o. jak do przerobienia na prawo, 1 o.p., przełożyć oczko zdjęte nad przerobionym oczkiem, obrócić. Rząd 4 (= na lewej stronie robótki): przerabiać aż zostaje 4-4-5 o., zdjąć 1 o. jak do przerobienia na lewo, 1 o.l., przełożyć oczko zdjęte nad przerobionym oczkiem, obrócić. Dalej zamykać oczka tak samo, aby było o 1 o. mniej przed każdym zamykanym oczkiem, aż na drucie będzie 13-13-15 o. -------------------------------------------------------- SKARPETKI: Przerabiane na okrągło na drutach pończoszniczych. Na drutach pończoszniczych nr 2,5 nabrać 50-56-60 o. włóczką Fabel. Przerobić 1 okrążenie na prawo, dalej przerabiać ściągaczem = 1 o.p./1 o.l. przez 2-2-3 cm. Następnie zostawić na drucie 21-21-25 pierwszych o. i zdjąć na drut pomocniczy 29-35-35 pozostałych o. (= wierzch stopy). Przerabiać dżersejem w tę i z powrotem ponad oczkami pięty przez 5-5,5-6 cm. Umieścić 1 marker na środku pięty - od teraz mierzyć od tego markera. Następnie formować piętę - patrz ZAMYKANIE OCZEK NA PIĘTĘ! Po zamknięciu o. na piętę nabrać 13-14-15 o. wzdłuż każdej strony pięty i wziąć powrotem 29-35-35 o. z drutu pomocniczego = 68-76-80 o. Umieścić po 1 markerze z każdej strony 29-29-35 o. środkowych wierzchu stopy. Dalej przerabiać dżersejem ponad oczkami spodu stopy i przerabiać 29-29-35 o. wierzchu stopy następująco: M.1A (= 2 o.), powtarzać schemat M.1B ponad 24-24-30 nast. o. (= 4-4-5 razy) i zakończyć przerabiając M.1C (= 3 o.). W TYM SAMYM CZASIE zamykać z każdej strony następująco: przerabiać razem przekręcone na prawo (wkłuwając drut z tyłu, zamiast z przodu oczka) 2 ostatnie o. przed 29-29-35 o. wierzchu stopy i przerabiać razem na prawo 2 pierwsze o. za 29-29-35 o. środkowymi wierzchu stopy. Powtarzać zamykanie oczek w sumie 10-12-12 razy co 2 okrążenia = 48-52-56 o. Dalej przerabiać do wys. 18-19-22 cm od markera na pięcie (= zostaje ok. 4-5-5 cm). Umieścić po 1 markerze w 1-sze o. z każdej strony, aby było 23-25-27 o. na wierzch stopy i 23-25-27 o. na spód stopy. Dalej przerabiać dżersejem ponad wszystkimi oczkami, W TYM SAMYM CZASIE zamykać na palce z każdej strony markerów następująco - zacząć 2 o. przed markerem: 2 o. razem na prawo, 1 o.p. (marker znajduje się w tym oczku), 2 o. razem przekręcone na prawo. Dalej zamykać o. tak samo z każdej strony w sumie 4-7-6 razy co 2 okrążenia, dalej w sumie 6-4-6 razy w każdym okrążeniu = zostaje 8 o. Odciąć nitkę i przeciągnąć ją przez pozostałe oczka, zacisnąć, zakończyć. |
|||||||
Objaśnienia do schematu |
|||||||
|
|||||||
 |
|||||||
Skończyłaś ten wzór?Otaguj swoje zdjęcia #dropspattern #neptuniasocks lub prześlij je do #dropsfan gallery. Potrzebujesz pomocy w związku z tym wzorem?Zobacz 18 instrukcje video, sekcję Komentarze/Pytania i jeszcze więcej, wchodząc na stronę wzoru na garnstudio.com © 1982-2026 DROPS Design A/S. Wszelkie prawa zastrzeżone. Ten dokument, w całości, jest chroniony prawem. Zobacz co możesz robić z naszymi wzorami na dole każdego wzoru na naszej stronie. |
|||||||


Posiadając 40 lat doświadczenia w projektowaniu wzorów na druty i szydełko, DROPS Design oferuje jedną z największych kolekcji bezpłatnych wzorów w internecie – przetłumaczonych na 17 języków. Obecnie jest dostępnych 324 katalogów i 12290 wzorów w języku polskim.
Dokładamy wszelkich starań, aby oferować Wam druty i szydełka, inspiracje, fachowe porady oraz doskonałej jakości włóczki w najlepszych cenach! Zamierzasz wykorzystać nasze wzory inaczej niż tylko do osobistego użytku? Przeczytaj jakie masz prawa w Copyright, który znajdziesz na końcu każdego wzoru. Miłej pracy!
Dodaj komentarz do modelu DROPS 129-18
Chcielibyśmy się dowiedzieć co masz do powiedzenia o tym wzorze!
Jeśli chcesz zadać pytanie i szybko uzyskać odpowiedź, upewnij się, że została wybrana właściwa kategoria w formularzu poniżej. Pola obowiązkowe są oznaczone *.