
Categorie popolari
State cercando un filato?


Commenti / Domande (47)
![]() Suzie Rose ha scritto:
Suzie Rose ha scritto:
Can I use Paintbox Simply Aran DK yarn for this garment?
10.06.2023 - 04:57DROPS Design ha risposto:
Dear Suzie Rose, we unfortunately do not know this yarn, you can use our yarn converter to get alternative and new amount - or you are welcome to ask the store where you bought your yarn; they should be able to help you even per mail or telephone. Happy knitting!
12.06.2023 - 09:40
![]() Christine ha scritto:
Christine ha scritto:
I am knitting the 7-8yr size but when starting the daisy pattern I only have 13 repeats not the 15 stated on the pattern - I have 179 stitches on row 18. I have started this twice and stil getting the same result. It's there something I'm doing wrong ? Many thanks
02.03.2023 - 17:31DROPS Design ha risposto:
Dear Christine, in size 7/8 years there are 101 sts worked as follows, seen from RS: 5 front band sts, A.1 (= 1 st), then repeat the 6 sts in A.2 until 5 sts remain (= a total of 15 times), finish with 5 front band sts; Row 18 should be worked over 12 sts (6 sts have been increased before as shown in diagram, alternately at the end + at the beg of each A.2), so that you should have: 5 + 1 + (12x15) + 5 = 191 sts. When A.2 is done there are 16 sts in each A.2 and 251 sts in total. Adding marker between each A.2 might help you to check your number of stitches after every round. Happy knitting!
03.03.2023 - 08:52
![]() Hindle Julie ha scritto:
Hindle Julie ha scritto:
Please can you tell me how I know how many balls of wool to order for this pattern? Thank you. Julie
03.02.2023 - 08:51DROPS Design ha risposto:
Hi Julie, if you choose for example size 7/8 years that means you will need the 3rd amount of each colour, counting from the left (under MATERIALS). Each ball weighs 50 g. Please see also the lesson DROPS HERE. Happy knitting!
03.02.2023 - 09:23
![]() Varain ha scritto:
Varain ha scritto:
Bonjour, Je fais le modèle en 9/10 ans. Je ne comprends pas ce que veut dire dans l’empiècement après 5 mailles de bordure devant au point mousse : A.1 au dessus de la maille suivante. (Que veut dire cette phrase) Comment procéder ? En vous remerciant Bonne journée
12.04.2022 - 17:33DROPS Design ha risposto:
Bonjour Mme Varain, tricotez simplement la maille suivante en suivant le diagramme A.1 , autrement dit, sur l'endroit, terminez par A.1 avant la bordure devant et sur l'envers, commencez par A.1 après la bordure devant. Le motif sera ainsi symétrique. Bon tricot!
19.04.2022 - 08:54
![]() Karin Flodin ha scritto:
Karin Flodin ha scritto:
Hej, mina knapphål hamnar inte på mitten av de fem kantmaskorna. Det ser ut som att de ska vara i mitten på bilderna tycker jag. Gör jag fel?
03.02.2022 - 11:25DROPS Design ha risposto:
Hej Karin. Du ska sticka ihop 2:a och 3:e maskan och sedan göra ett omslag och då ska knapphålet hamna i mitten av kantmaskorna. Mvh DROPS Design
04.02.2022 - 12:19
![]() CJ Miller ha scritto:
CJ Miller ha scritto:
Working on the child's cardigan, on row 22 of A.2. there is no white, only the yellow centers. Do you recommend I carry the white across row 22 from row 21 so it is in place for row 23, or stop/start the white over again on row 23. I see no other way to carry it up beyond carrying it across or cutting and restarting. Thanks for the advice and wonderful patterns.
15.10.2021 - 01:56DROPS Design ha risposto:
Dear Mrs Miller, that's only 2 sts difference, you can carry the white yarn at the end of row 22 so that it's on the right place at the beg of row 23 or just carry the yarn 1 stitch before the first stitch in white at the beg of first A.2. Your yarn store might have even more tips for you, do not hesitate to ask them, even per mail or telephone. Happy knitting!
15.10.2021 - 08:07
![]() Mira Holler ha scritto:
Mira Holler ha scritto:
Die Maße stimmen leider nicht. Ich habe die Passe genau nach Anleitung gestrickt, aber statt der angegebenen cm-Maße erhalte ich fast 10 cm mehr. Nach Maschenprobe sind 28 Reihen = 10 cm; wenn aber A1 und A2 schon über 84 Reihen gehen, können bei der Größe 7/8 keine 16 cm für die Passe entstehen! Das passt meiner Enkelin niemals! Bin sehr enttäuscht, dass ich meine fast fertige Arbeit nun wieder aufribbeln muss.
13.04.2021 - 09:54DROPS Design ha risposto:
Liebe Frau Holler, Diagramme zeigen alle Reihen, dh die Hin- sowie die Rückreihen - siehe MUSTER und hier lesen Sie mehr Über Diagramme. d.h. A.1+A.2= 42 Reihen. Sollte Ihre Maschenprobe stimmen, dann sollte di Passe auch in der Höhe stimmen. Viel Spaß beim stricken!
13.04.2021 - 11:43
![]() Kitty ha scritto:
Kitty ha scritto:
Just to check is each line on the chart one row of knitting, or is it 2 rows. As in knit from right side then purl from the wrong side. For example the first 6 stitches on A2 , is that knit one row right side then purl one row on the wrong side?
09.04.2021 - 17:23DROPS Design ha risposto:
Dear Kitty, on the charts each row is represented by one row of small squares, thus each row is shown, however, they are showing the pattern as you would see them from the RS. So if it shows a knit stitch, that stitch should be knitted from the rs and purled from the WS. Happy Knitting!
09.04.2021 - 19:08
![]() Ingrid ha scritto:
Ingrid ha scritto:
I’m having trouble understanding the pattern. I love your cardigans and sweaters, but avoid them because the instructions are, in my opinion, poorly written (or translated?) My question here is: Does A 1 mean “increase”? I only got as far as “Work according to diagrams A1 and A2.” Refuse to give up because I normally never have a problem following other patterns. Thanks!
08.04.2021 - 21:04DROPS Design ha risposto:
Dear Ingrid, the patterns are not "poorly written", but written in a different style than most Enlish/American knitters are used to, but most European knitters are familiar with. It is well worth to take your time, study some patterns (maybe start with a simpler one), and we are here to help, if you get stuck. A.1 in that sentence you mention means the pattern diagrams that are below the instructions, which show visually how the patterns should be knitted. Happy Knitting!
08.04.2021 - 21:48
![]() Marian Green ha scritto:
Marian Green ha scritto:
I have nearly completed the main piece of this jacket size 5/6 years and am delighted with the pattern so far. However I do have a query regarding the start row of the bottom rib. It states it's worked from the right side , but the previous increase row states to work from the right side. Presumably the first rib row should read work from the left side? Thank you in anticipation.😊
03.03.2021 - 16:30DROPS Design ha risposto:
Dear Mrs Green, work the increase row from the right side, then turn and work the next row from the wrong side as before (= purl with the 5 front bands sts in garter stitch), then start the rib on next row from the right side. Happy knitting!
04.03.2021 - 07:35
|
|||||||||||||||||||
Daisy Delight Cardigan#daisydelightcardigan |
|||||||||||||||||||
 |
 |
||||||||||||||||||
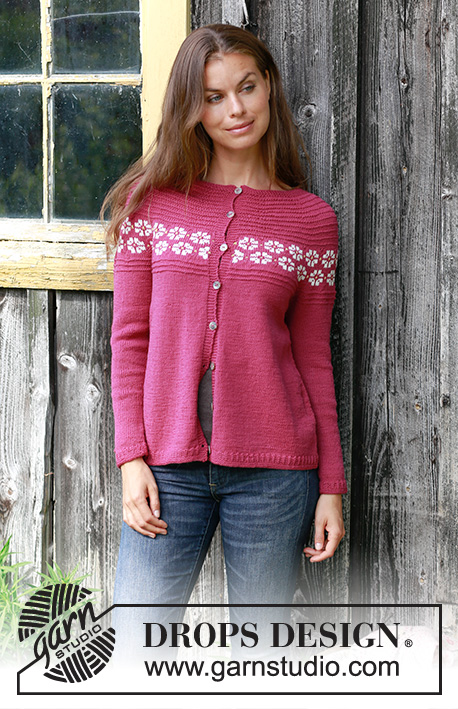
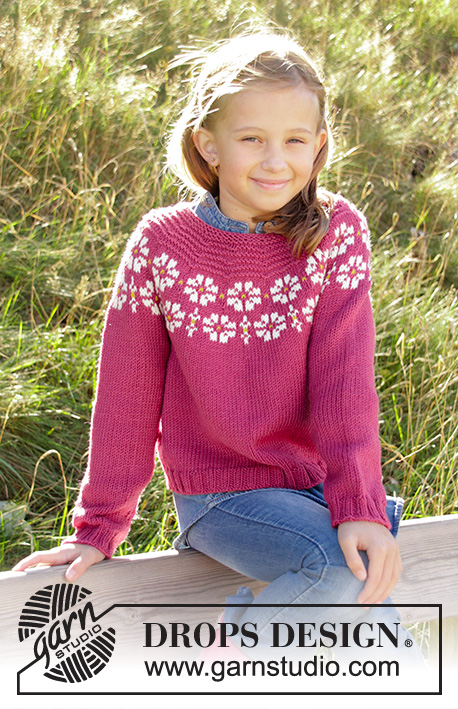
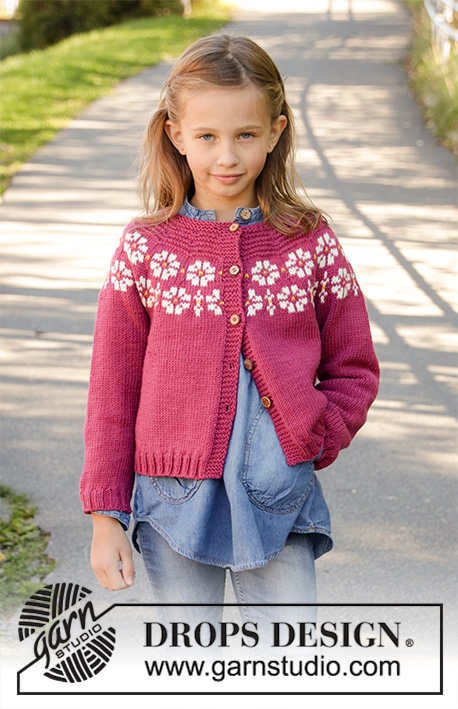
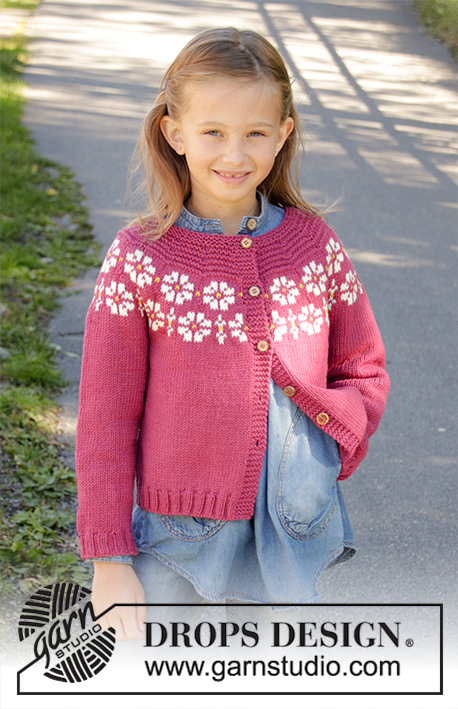
Cardigan per bambini lavorato ai ferri in DROPS Merino Extra Fine o DROPS Lima. Lavorato dall’alto in basso con fiori, motivo a colori, maglia legaccio e maglia rasata. Taglie 3-12 anni
DROPS Children 34-5 |
|||||||||||||||||||
|
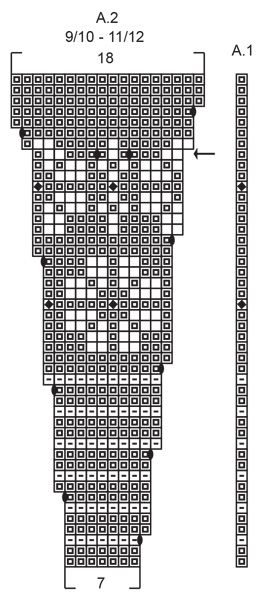
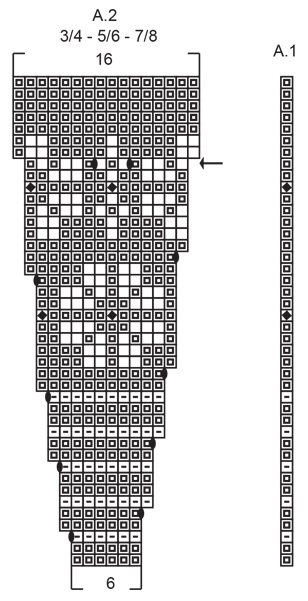
---------------------------------------------------------- SPIEGAZIONI DEL MODELLO: ---------------------------------------------------------- COSTA/MAGLIA LEGACCIO (avanti e indietro): 1 costa = 2 ferri diritto. MOTIVO: Vedere i diagrammi A.1 e A.2. Scegliere il diagramma per la vostra taglia. I diagrammi mostrano tutti i ferri del motivo visti dal diritto del lavoro. SUGGERIMENTO PER GLI AUMENTI (distribuiti in modo uniforme): Per stabilire ogni quanto aumentare in modo uniforme, prendere il n° totale di maglie sul ferro (ad esempio 72 maglie) e dividerlo per il n° di aumenti da fare (ad esempio 17) = 4,2. In questo esempio aumentare facendo 1 gettato circa dopo ogni 4° maglia. Sul ferro successivo lavorare i gettati a ritorto per evitare buchi SUGGERIMENTO PER GLI AUMENTI-2 (applicato ai lati del corpo): Lavorare fino a quando rimane 1 maglia prima del segnapunti, 1 gettato, 2 maglie diritto (= il segnapunti è al centro di queste 2 maglie), 1 gettato = 2 aumenti. Sul ferro successivo lavorare i gettato a ritorto per evitare buchi. Poi lavorare le nuove maglie a maglia rasata. SUGGERIMENTO PER LE DIMINUZIONI (applicato alle maniche): Diminuire 1 maglia a ogni lato del segnapunti come segue: Lavorare fino a quando rimangono 3 maglie prima del segnapunti, 2 maglie insieme a diritto, 2 maglie diritto (= il segnapunti è al centro di queste 2 maglie), passare 1 maglia a diritto senza lavorarla, 1 maglia diritto, accavallare la maglia passata sopra quella appena lavorata = 2 diminuzioni. ASOLE: Lavorare le asole sul bordo destro (quando il capo è indossato). 1 asola = iniziare dal rovescio del lavoro e lavorare insieme a diritto la 2° e la 3° maglia dal bordo, fare 1 gettato. Sul ferro successivo lavorare i gettati a diritto per creare buchi. Lavorare la 1° asola dopo 1 cm sul collo, poi lavorare le altre 4-4-5-5-5 asole successive ogni 6-6-6-7-7 cm. ---------------------------------------------------------- INIZIO DEL LAVORO: ---------------------------------------------------------- CARDIGAN – BREVE RIASSUNTO DEL LAVORO: Lavorato avanti e indietro con i ferri circolari, dall’alto in basso, poi lavorare il davanti e il dietro avanti e indietro sui ferri. Lavorare le maniche in tondo con i ferri a doppia punta/ferri circolari corti. SPRONE: Avviare 72-76-80-86-92 maglie con i ferri circolari n° 4 mm con erika. Lavorare 2 COSTE – leggere la descrizione sopra- ricordarsi delle ASOLE sul bordo destro – leggere la descrizione sopra. Lavorare 1 ferro diritto in cui aumentare 17-19-21-23-24 maglie in modo uniforme sul ferro – LEGGERE IL SUGGERIMENTO PER GLI AUMENTI-1! = 89-95-101-109-116 maglie sul ferro. Lavorare 1 ferro diritto dal rovescio del lavoro. Inserire un segnapunti in questo ferro e misurare da qui d’ora in poi. Lavorare seguendo i diagrammia A.1 e A.2 dal diritto del lavoro come segue: 5 maglie per il bordo a MAGLIA LEGACCIO, A.1 su 1 maglia, A.2 per un totale di 13-14-15-14-15 volte sul ferro e 5 maglie per il bordo a maglia legaccio. FARE ATTENZIONE ALLA TENSIONE DEL LAVORO Alla fine di A.1 e A.2, ci sono 219-235-251-263-281 maglie sul ferro. Sul ferro successivo dal diritto del lavoro aumentare 3-3-5-1-5 maglie in modo uniforme sul ferro = 222-238-256-264-286 maglie. Continuare con maglia rasata e 5 maglia per il bordo a maglia legaccio a ogni lato fino a quando il lavoro misura circa 15-15-16-17-18 cm dal segnapunti. Lavorare il ferro successivo dal diritto del lavoro come segue: lavorare 5 maglie per il bordo a maglia legaccio, lavorare 31-33-36-37-38 maglie a maglia rasata (= davanti), trasferire le 44-48-51-53-62 maglie successive su un fermamaglie (= manica), avviare 6 nuove maglie sotto la manica, lavorare 62-66-72-74-76 maglie a maglia rasata (= dietro), trasferire le 44-48-51-53-62 maglie successive su un fermamaglie (= manica), avviare 6 nuove maglie sotto la manica, lavorare 31-33-36-37-38 maglie (= davanti) e lavorare 5 maglie per il bordo a maglia legaccio. CORPO: Ora ci sono 146-154-166-170-174 maglie sul ferro. ORA MISURARE IL LAVORO DA QUI! Inserire un segnapunti al centro delle 6 nuove maglie avviate sotto ogni manica. Lavorare a maglia rasata avanti e indietro con 5 maglie per il bordo a maglia legaccio a ogni lato. Quando il lavoro misura 3 cm, aumentare 1 maglia a ogni lato di tutti i segnapunti (= 4 aumenti) – leggere il SUGGERIMENTO PER GLI AUMENTI-2! Ripetere gli aumenti ogni 3-4-5-6-7 cm 3 volte in totale = 158-166-178-182-186 maglie sul ferro. Poi lavorare come prima fino a quando il lavoro misura circa 12-16-19-22-25 cm. Lavorare 1 ferro a maglia rasata dal diritto del lavoro in cui aumentare 10-10-10-10-10 maglie in modo uniforme (non aumentare sulle maglie del bordo) = 168-176-188-192-196 maglie. Lavorare il ferro successivo come segue dal diritto del lavoro: 5 maglie per il bordo a maglia legaccio, 2 maglie rovescio, * 2 maglie diritto, 2 maglie rovescio *. Lavorare *-* fino a quando rimangono 5 maglie e lavorare 5 maglie per il bordo a maglia legaccio. Continuare a coste in questo modo fino a quando misurano 3 cm. Sul ferro successivo dal diritto del lavoro intrecciare senza stringere con maglia legaccio su maglia legaccio, diritto su diritto e rovescio su rovescio. Tagliare e affrancare il filo. MANICA: Traferire le maglie dal fermamaglie sui ferri circolari corti/ferri a doppia punta n° 4 mm (= 44-48-51-54-62 maglie), riprendere 1 maglia in ognuna delle 6 maglie avviate sul corpo (= 50-54-57-60-68 maglie). Inserire 1 segnapunti al centro di queste 6 maglie. Lavorare a maglia rasata in tondo fino a quando la manica misura 2 cm. Ora diminuire 1 maglia a ogni lato del segnapunti – leggere il SUGGERIMENTO PER LE DIMINUZIONI! Continuare a maglia rasata e ripetere le diminuzioni ogni 4-3½-4-4-3½ cm fino a quando le diminuzioni sono state lavorate 5-7-7-8-10 volte in totale = 40-40-43-44-48 maglie sul ferro. Lavorare a maglia rasata fino a quando la manica misura 22-27-30-34-37 cm. Lavorare 1 giro diritto e aumentare 4-4-5-5-4 maglie sul giro = 44-44-48-48-52 maglie. Lavorare a coste con 2 maglie diritto/2 maglie rovescio per 3 cm. Intrecciare senza stringere con diritto su diritto e rovescio su rovescio. Tagliare e affrancare il filo. Lavorare l’altra manica nello stesso modo. CONFEZIONE: Cucire le aperture sotto le maniche. Attaccare i bottoni sul bordo sinistro. |
|||||||||||||||||||
Spiegazioni del diagramma |
|||||||||||||||||||
|
|||||||||||||||||||
 |
|||||||||||||||||||
 |
|||||||||||||||||||
 |
|||||||||||||||||||
Avete terminato questo modello?Allora taggate le vostre foto con #dropspattern #daisydelightcardigan o inviatele alla #dropsfan gallery. Avete bisogno di aiuto con questo modello?Troverete 29 video tutorial, una sezione per i commenti/domande e molto altro guardando il modello su www.garnstudio.com © 1982-2026 DROPS Design A/S. Ci riserviamo tutti i diritti. Questo documento, compreso tutte le sue sotto-sezioni, è protetto dalle leggi sul copyright. Potete leggere quello che potete fare con i nostri modelli alla fine di ogni modello sul nostro sito. |
|||||||||||||||||||


Con oltre 40 anni di esperienza nel design di modelli di maglia e uncinetto, DROPS Design offre la più estesa collezione di modelli gratuiti su internet - tradotti in 17 lingue. Ad oggi vi possiamo fornire 324 cataloghi e 12285 modelli - 9556 dei quali sono tradotti in Italiano.
Ci stiamo impegnando molto per darvi il meglio che vi possiamo offrire in termini di maglia e uncinetto, ispirazioni e consigli così come filati di grande qualità ad un prezzo incredibile! Volete utilizzare i nostri modelli per qualcosa d'altro oltre al vostro uso personale? Potete leggere tutto ciò che è consentito nel testo sul Copyright in basso su tutte le pagine dei nostri modelli. Buon lavoro!
Lasciare un commento sul modello DROPS Children 34-5
Noi saremmo felici di ricevere i tuoi commenti e opinioni su questo modello!
Se vuoi fare una domanda, fai per favore attenzione a selezionare la categoria corretta nella casella qui sotto per velocizzare il processo di risposta. I campi richiesti sono indicati da *.