
Categorie popolari
State cercando un filato?


Commenti / Domande (55)
![]() Linda ha scritto:
Linda ha scritto:
You have shown two symbols for knit? The first blank box symbol in first 5 rows then the symbol shown in the 6th row?
17.08.2018 - 16:38DROPS Design ha risposto:
Hello, Yes, we are showing 2 symbols for a knit stitch but it is not the same knit stitch. The blacnk box symbol is the usual knit stitch. However, the 6th symbol was created to let you know that after you insert the right needle in the middle of the stitch marked with a circle 4 rounds before this round, pick up the strand and pull the loop 3 cm long, you will knit 1 stitch. This way, it will make the chart easier to follow. Happy Knitting!
30.08.2018 - 11:48
![]() Yvonne ha scritto:
Yvonne ha scritto:
Ik wil deze trui met garen acryl maken en naalden 4 en 5 hoeveel wol heb ik nodig bol is 100 gram
14.08.2018 - 08:51
![]() Haesaert Bernard ha scritto:
Haesaert Bernard ha scritto:
Erreur diagramme au lieu de 3 mailles ensembles je pense 2 mailles merci
18.07.2018 - 19:58DROPS Design ha risposto:
Bonjour Mme Haesaert, on tricote bien 3 m ens à l'end (= les 3 m du symbole avec une croix au tour précédent), puis 1 m end (= la m end au milieu du motif), puis 3 m ens torse à l'end (= les 3 m du symbole avec une croix au tour précédent). Bon tricot!
19.07.2018 - 09:17Ginny ha scritto:
Excellent pattern!! However, FYI in the body section you mention "read PURLING TIP" when there's no tip to be found.
17.07.2018 - 13:38DROPS Design ha risposto:
Dear Ginny, thanks for your feedback, the Purling tip as well as other explanations for the pattern have been now added. Happy knitting!
17.07.2018 - 15:08
![]() ULiaL73 ha scritto:
ULiaL73 ha scritto:
Der Pulli ist, gerade in dieser Farbe, wunderschön! Er sollte Kürbis heißen. :)
07.06.2018 - 14:19
|
||||||||||||||||||||||
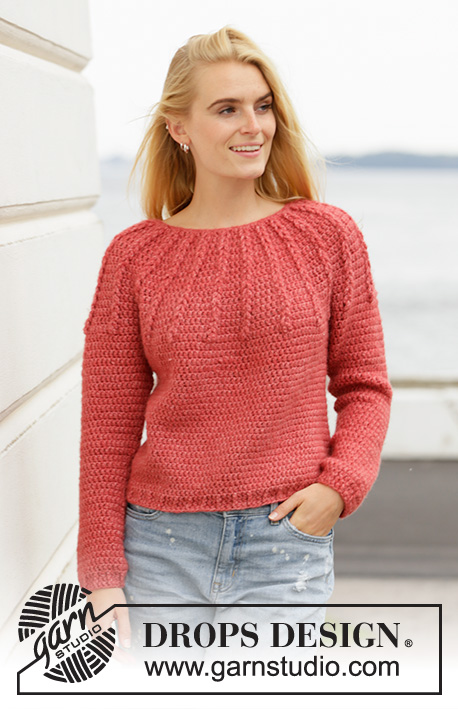
Clemence#clemencesweater |
||||||||||||||||||||||
 |
 |
|||||||||||||||||||||
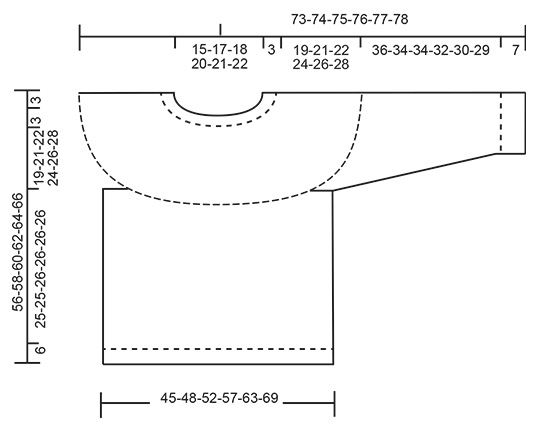
Maglione lavorato ai ferri con sprone rotondo in DROPS Air. Lavorato dall’alto in basso con bordi a punto fantasia. Taglie: S - XXXL.
DROPS 197-8 |
||||||||||||||||||||||
|
----------------------------------------------------- SPIEGAZIONI DEL MODELLO: ------------------------------------------------------- MODELLO: Vedere il diagramma A.1. Scegliere il diagramma per la vostra taglia. SUGGERIMENTO PER GLI AUMENTI/DIMINUZIONI (distribuiti in modo uniforme): Per stabilire ogni quanto diminuire/aumentare in modo uniforme, prendere il n° totale di maglie sul ferro (ad esempio 180 maglie) e dividerlo per il n° di diminuzioni/aumenti da fare (ad esempio 4) = 45. In questo esempio, diminuire lavorando insieme a diritto ogni 44esima e 45 esima maglia. Aumentare facendo 1 gettato dopo ogni 45esima maglia. Sul giro successivo lavorare i gettati a ritorto per evitare buchi. SUGGERIMENTO PER LA PARTE A ROVESCIO (per le maniche e il corpo): Quando si lavora a rovescio dal diritto del lavoro, è possibile risvoltare il lavoro e lavorare a diritto dal rovescio del lavoro. Ricordarsi di risvoltare il maglione dal diritto del lavoro quando si lavora la parte a coste. SUGGERIMENTO PER LE DIMINUZIONI (per le maniche): Diminuire 1 maglia a ogni lato del segnapunti come segue: lavorare fino a quando rimangono 3 maglie prima del segnapunti, 2 maglie insieme a rovescio, 2 maglie rovescio (= il segnapunti è al centro di queste maglie), lavorare insieme a rovescio le 2 maglie successive (NOTA! Lavorare a diritto se avete risvoltato il maglione). ------------------------------------------------------- INIZIO DEL LAVORO: ------------------------------------------------------- MAGLIONE: Il maglione è lavorato in tondo con i ferri circolari, dall’alto in basso. Alla fine dello sprone, il corpo è lavorato in tondo con i ferri circolari. Le maniche sono lavorate in tondo con i ferri circolari corti/ferri a doppia punta. SPRONE: Avviare 54-60-63-66-69-72 maglie con i ferri circolari n° 7 mm e Air. Inserire 1 segnapunti all’inizio del giro (= centro dietro). Lavorare A.1a su tutte le maglie – vedere il diagramma per la vostra taglia (= 18-20-21-22-23-24 ripetizioni di 3 maglie). Continuare fino alla fine di A.1a. Passare ai ferri circolari n° 8 mm e lavorare A.1b su A.1a. FARE ATTENZIONE ALLA TENSIONE DEL LAVORO! Alla fine di A.1b ci sono 180-200-210-242-253-264 maglie sul ferro. Poi lavorare A.1c su A.1b. Ripetere A.1c in altezza fino a quando il lavoro misura 22-24-25-27-29-31 cm dal bordo di avvio – aggiustarlo in modo da finire dopo un giro lavorato come il 1° giro di A.1c. Lavorare 1 giro rovescio in cui diminuire 4-4-0-12-11-0 maglie in modo uniforme sul giro – leggere il SUGGERIMENTO PER LE DIMINUZIONI/AUMENTI = 176-196-210-230-242-264 maglie. Lavorare il giro successivo a rovescio come segue: lavorare le prime 26-28-30-33-36-40 maglie (= metà dietro), mettere le 36-42-45-49-49-52 maglie successive in sospeso per la manica, avviare 6-6-8-8-10-10 nuove maglie sotto la manica, lavorare le 52-56-60-66-72-80 maglie successive (= davanti), mettere le 36-42-45-49-49-52 maglie successive in sospeso per la manica, avviare 6-6-8-8-10-10 nuove maglie sotto la manica e lavorare le ultime 26-28-30-33-36-40 maglie (= metà dietro). ORA MISURARE IL LAVORO DA QUI! CORPO: = 116-124-136-148-164-180 maglie. Inserire 1 segnapunti al centro delle 6-6-8-8-10-10 maglie avviate sotto una manica e iniziare il giro all’altezza di questo segnapunti. Continuare a rovescio – leggere il SUGGERIMENTO PER LA PARTE A ROVESCIO, fino a quando il lavoro misura 25-25-26-26-26-26 cm dalla divisione. Passare ai ferri circolari n° 7 mm e lavorare a coste (= 2 maglie diritto / 2 maglie rovescio) per 6 cm. Intrecciare senza stringere con diritto su diritto e rovescio su rovescio – per evitare che il bordo di chiusura sia tirato, potete intrecciare con un ferro n° 8 mm. Il maglione misura circa 56-58-60-62-64-66 cm dalla spalla. MANICA: Riportare le 36-42-45-49-49-52 maglie in sospeso a un lato del lavoro sui ferri circolari corti/ferri a doppia punta n° 8 mm e riprendere 1 maglia in ognuna delle 6-6-8-8-10-10 maglie avviate sotto le maniche = 42-48-53-57-59-62 maglie. Inserire 1 segnapunti al centro delle 6-6-8-8-10-10 maglie sotto la manica e iniziare qui il giro. Continuare a rovescio – ricordarsi del SUGGERIMENTO PER LA PARTE A ROVESCIO. Quando il lavoro misura 3 cm dalla divisione, diminuire 2 maglie al centro sotto la manica – leggere il SUGGERIMENTO PER LE DIMINUZIONI. Diminuire in questo modo ogni 5-3-2½-2-2-1½ cm per un totale di 7-10-12-13-13-14 volte = 28-28-29-31-33-34 maglie. Continuare fino a quando la manica misura 36-34-34-32-30-29 cm dalla divisione (misure più piccolo per le taglie più grandi a causa dello sprone più lungo). Lavorare 1 giro diritto in cui aumentare 0-0-3-1-3-2 maglie in modo uniforme sul giro = 28-28-32-32-36-36 maglie. Passare ai ferri a doppia punta n° 7 mm e lavorare a coste (= 2 maglie diritto / 2 maglie rovescio) per 6 cm. La manica misura circa 43-41-41-39-37-36 cm dalla divisione. Intrecciare senza stringere con diritto su diritto e rovescio su rovescio – per evitare che il bordo di chiusura sia tirato, potete intrecciare con un ferro n° 8 mm. Lavorare l’altra manica nello stesso modo. |
||||||||||||||||||||||
Spiegazioni del diagramma |
||||||||||||||||||||||
|
||||||||||||||||||||||
 |
||||||||||||||||||||||
 |
||||||||||||||||||||||
Avete terminato questo modello?Allora taggate le vostre foto con #dropspattern #clemencesweater o inviatele alla #dropsfan gallery. Avete bisogno di aiuto con questo modello?Troverete 26 video tutorial, una sezione per i commenti/domande e molto altro guardando il modello su www.garnstudio.com © 1982-2026 DROPS Design A/S. Ci riserviamo tutti i diritti. Questo documento, compreso tutte le sue sotto-sezioni, è protetto dalle leggi sul copyright. Potete leggere quello che potete fare con i nostri modelli alla fine di ogni modello sul nostro sito. |
||||||||||||||||||||||


Con oltre 40 anni di esperienza nel design di modelli di maglia e uncinetto, DROPS Design offre la più estesa collezione di modelli gratuiti su internet - tradotti in 17 lingue. Ad oggi vi possiamo fornire 324 cataloghi e 12290 modelli - 9561 dei quali sono tradotti in Italiano.
Ci stiamo impegnando molto per darvi il meglio che vi possiamo offrire in termini di maglia e uncinetto, ispirazioni e consigli così come filati di grande qualità ad un prezzo incredibile! Volete utilizzare i nostri modelli per qualcosa d'altro oltre al vostro uso personale? Potete leggere tutto ciò che è consentito nel testo sul Copyright in basso su tutte le pagine dei nostri modelli. Buon lavoro!
Lasciare un commento sul modello DROPS 197-8
Noi saremmo felici di ricevere i tuoi commenti e opinioni su questo modello!
Se vuoi fare una domanda, fai per favore attenzione a selezionare la categoria corretta nella casella qui sotto per velocizzare il processo di risposta. I campi richiesti sono indicati da *.